|
|
Home | Switchboard | Unix Administration | Red Hat | TCP/IP Networks | Neoliberalism | Toxic Managers |
| (slightly skeptical) Educational society promoting "Back to basics" movement against IT overcomplexity and bastardization of classic Unix | |||||||
| News | Snapshots | Recommended Links | LVM | Linux Disk Partitioning | Recovery of LVM partitions |
| AIX snapshots | Solaris Snapshots | /etc/fstab/ | Horror Stories | Humor | Etc |
|
|
Snapshots are ``frozen'' images of a logical volume which can be used to back up the file system of some files on it (for example a database). A user command is used to initiate a snapshot at which point the current state of the LV is preserved and can be accessed through a special, additional, device node. It can be mounted and used iether read-only or read-write. For example, to take backup on a "live" volume you need to create a snapshot of it, mount it as read-only on some mount point, for example /snap_lv6 and use this mounting point to take backup of all your data. They will not change during the backup as they are frozen. The file system or a database on it can continue running and making changes to actual file system while the backup takes place. Those changes will not be reflected in the backup you take.
|
|
Availability of snapshots now is what distinguish good filesystem from a bad one. In some form they are now available on all major OSes:
An LVM snapshot of logical volume generally requires only a fraction of the space of the original LV because only changed data needs new space. The actual size should be tuned according to the frequency of writes to the live volume and the life span of the snapshot volume. If write activity changes to the original volume after the snapshot has been taken, the snapshot size can be changed at run time. This is especially useful if too little space was allocated for the snapshot volume. For patching you generally need 2-3GB of additional space.
A snapshot is created as a new LV in the same volume group as the target LV. The volume group must have free space available to allocate the snapshot LV. The name of the snapshot LV can be assigned by the user just as the name of any new LV. One snapshot LV corresponds to one "real" LV.
Snapshots are read/write by default. Read/write snapshots work like read-only snapshots, with the additional feature that if data is written to the snapshot, that block is marked in the exception table as used, and never gets copied from the original volume. This opens up many new possibilities that were not possible with LVM1's read-only snapshots.
As in Linux you can remount partition to a new mount point and this feature can be used for swapping snapshot partition with the original
mount --move olddir newdir
- The move operation.
- Since Linux 2.5.1 it is possible to atomically move a mounted tree to another place.
- The shared subtrees operations.
- Since Linux 2.6.15 it is possible to mark a mount and its submounts as shared, private, slave or unbindable. A shared mount provides ability to create mirrors of that mount such that mounts and umounts within any of the mirrors propagate to the other mirror. A slave mount receives propagation from its master, but any not vice-versa. A private mount carries no propagation abilities. A unbindable mount is a private mount which cannot cloned through a bind operation. Detailed semantics is documented in Documentation/sharedsubtree.txt file in the kernel source tree.
To ensure that patches do not ruin your system you can:
From this point of view it makes sense to have on LVM root LV (in a single partition) all three key directories that are involved in patching: /(root), /usr, and /var
One example is to snapshot a volume, mount the snapshot, and try an experimental program that change files on that volume. If you don't like what it did, you can unmount the snapshot, remove it, and mount the original filesystem in its place.
It is also useful for creating volumes for use with Xen. You can create a disk image, then snapshot it and modify the snapshot for a particular domU instance. You can then create another snapshot of the original volume, and modify that one for a different domU instance. Since the only storage used by a snapshot is blocks that were changed on the origin or the snapshot, the majority of the volume is shared by the domU's.
A consistent backup is achieved when no data is changed between the start and the end of the backup process. This can be hard to guarantee without stopping the system for the time required by the copy process.
Linux LVM implements a feature called Snapshots which is similar to taking a picture of a logical volume at a given moment in time. With a Snapshot, you are provided with two copies of the same LV—one can be used for backup purposes while the other continues in operation.
The two great advantages of Snapshots are:
This functionality is accomplished by having an exception list that is updated every time something changes between the LVs (formally known as CoW, Copy-on-Write).
In order to create a new Snapshot LV, use the same lvcreate command, specifying the -s parameter and an origin LV. The -L size in this case specifies the exception table size, which is how much difference the Snapshot will support before losing consistency.
#create a Snapshot LV called 'snap' from origin LV 'test'
lvcreate -s -L 2G -n snap /dev/vg0/snap
Use lvdisplay to query special information like CoW-size and CoW-usage:
How big and much space is now usedlvdisplay /dev/vg0/snap
  --- Logical volume ---
  LV Name                /dev/vg0/snap
  VG Name                vg00
  LV UUID                QHVJYh-PR3s-A4SG-s4Aa-MyWN-Ra7a-HL47KL
  LV Write Access        read/write
  LV snapshot status     active destination for /dev/vg0/test
  LV Status              available
  # open                 0
  LV Size                4.00 GB
  Current LE             1024
  COW-table size         2.00 GB
  COW-table LE           512
  Allocated to snapshot  54.16%
  Snapshot chunk size    8.00 KB
  Segments               1
  Allocation             inherit
  Read ahead sectors     0
  Block device           254:5
In this case snapshot volume is 2GB large, 54.16 % of which is already used.
For all intents and purposes, the Snapshot volume represents a copy of the original LV at the moment it was created. It can be mounted on a separate mounting point and used for backup or other purposes:
# mount snapshot volume
mount -o ro /dev/vg0/snap /mnt/snap
In this snippet code, the ro flag to mount it is read-only. You can make it read-only at the LVM level by appending a -p r to the lvcreate command.
Once the filesystem has been mounted, you can proceed with backup using tar, rsync, or whatever backup tool is desired. If the LV doesn't contain a filesystem, or if a raw backup is desired, it's also possible to use dd directly on the device node.
Once the copy process finishes and the Snapshot is no longer needed, simply unmount and scrap it using lvremove:
umount /mnt/snap
lvremove /dev/vg0/snap
For consistency, in case a database is on top of an LV and a consistent backup is desired, remember to flush tables and make the Snapshot volume while acquiring a read-lock (sample pseudo-code):
SQL> flush tables read lock
{create Snapshot}
SQL> release read lock
{start copy process from the snapshot LV}
This is not intended for enterprise use—an incremental backup with history would make more sense there. The concept remains the same, though.
#!/bin/sh

# we need the dm-snapshot module
modprobe dm-snapshot
if [ -e /dev/vg00/home-snap ]
then
  # remove left-overs, if any
  umount -f /mnt/home-snap && true
  lvremove -f /dev/vg00/home-snap
fi
# create snapshot, 1GB CoW space
# that should be sufficient for accommodating changes during copy
lvcreate -vs -p r -n home-snap -L 1G /dev/vg00/home
mkdir -p /mnt/home-snap
# mount recently-created snapshot as read-only
mount -o ro /dev/vg00/home-snap /mnt/home-snap
# magical rsync command__rsync -avhzPCi --delete -e "ssh -i /home/klausk/.ssh/id_rsa" \
      --filter '- .Trash/' --filter '- *~' \
      --filter '- .local/share/Trash/' \
      --filter '- *.mp3' --filter '- *Cache*' --filter '- *cache*' \
      /mnt/home-snap/klausk [email protected] e-mail address is being protected
      from spam bots, you need JavaScript enabled to view it :bkp/
# unmount and scrap snapshot LV
umount /mnt/home-snap
lvremove -f /dev/vg00/home-snap
In special cases where the cycle can't be estimated or copy process times are long, a script could query the Snapshot CoW usage with lvdisplay and extend the LV on demand. In extreme cases, you could opt for a Snapshot the same size as the original LV—that way, changes can never be larger than the whole volume!
Recent LVM2 developments allow a logical volume to sport high-availability features by having two or more mirrors each which can be placed under different physical volumes (or different devices). dmeventd can bring a PV offline without service prejudice when an I/O error is detected in the device. Refer to lvcreate(8), lvconvert(8), and lvchange(8) man pages for more info.
For hardware that supports it, it's possible to use dm_multipath for using different channels to access a single device, having a fail-over possibility in case a channel goes down. Refer to the dm_multipath and multipathd documentation for more details.
|
|
Switchboard | ||||
| Latest | |||||
| Past week | |||||
| Past month | |||||
Dec 1, 2012 | tutonics.com
In this LVM Guide, we'll show you how to use lvm snapshots for backups and how to revert a logical volume to a previous state e.g. fix your root filesystem if some "experiment" has broken your system.
If you're not familiar with logical volume manager (lvm) software in Ubuntu/Linux, you may want to take a look at LVM Guide -Part 1.All the steps in the sections below have been tested on Ubuntu 12.10 (quantal quetzal) - the same principles should apply to any linux distribution which uses lvm2.
LVM SnapshotsThe logical volume manager software allows you to take a snapshot of any logical volume.
This can be used to bring your logical volume back to a known good state or to merge changes from a modified snapshot back to the original logical volume. The latter is possible because lvm snapshots are also writeable (as of lvm2, this is not the case for the older lvm1).
You can use snapshots as a form of backup which allows you to recover lost data or recover from a dodgy system following some experiment.
For example before you try some experiment such as tweaking important system configuration files or installing new software, you could take a snapshot of your good system before trying something out. If things don't work as you planned, you can revert to a good working system by using the snapshot.Note: its important to mention that if a snapshot runs out of space, the whole snapshot is dropped and cannot be used. However if you notice the snapshot is running out of space (check this using the lvdisplay or lvs commands), you can increase its size just like any other logical volume.
Taking A SnapshotWhen you take a snapshot, use the lvcreate command along with the "-s" or --snapshot option as shown below and remember not to use any "-" (i.e. dash/hyphen) in the name as software like grub2 will have trouble using it:
sudo lvcreate --size 1G -s -n snapshot_lv /dev/vgroup/original_lvSo the above would create a logical volume called snapshot_lv which is a snapshot of original_lv (in the volume group called vgroup).
Note that the size you need to use will depend on what you're doing. Bear in mind that snapshots use "copy on write", so data is only copied to the snapshot when it deviates from the original data. So when you access data in the snapshot volume, you effectively access the original logical volume's data unless: (a) the original volume's data has changed, in which case you access a copy of the original which is stored in the snapshot volume, (b) you have written to the snapshot, in which case the modified data resides in the snapshot volume.
Thus, you can create a snapshot of say, 100GiB using only a few GiB, because most of the "snapshot" data still resides on the original volume.Mounting A Snapshot
You can mount a snapshot which allows a limited form of experimentation, e.g. you can run software on files there without damaging the original files. If you're happy with the outcome, then you can run the software using your original files. Or you could just merge that snapshot if you'd like to change your originals to the state of those in the snapshot (instructions to merge are shown in next section).
To mount a snapshot, create a directory for the snapshot in /mnt for example:
sudo mkdir /mnt/snapThen for a snapshot called "mysnap", you could mount it using:sudo mount /dev/ubuntu/mysnap /mnt/snapThen cd to the directory to access the snapshot's files:cd /mnt/snapReverting/Merging To The Snapshot's StateOnce you have a snapshot available, you can change the original logical volume to the state of that snapshot should the need arise.
Before changing the state of the logical volume to that of it's snapshot, you need to have unmounted that logical volume if you want the change to happen immediately. Alternatively, if you can't unmount, you can carry out the command but the changes will not take effect until you do a reboot.
In order to revert to the snapshot, you would simply use the lvconvert command along with the --merge option, as shown below:
lvconvert --merge /dev/vgroup/snapshot-lvNow the original logical volume has been reverted/merged to the state of the snapshot (remember this will probably require a reboot if one of the volumes is mounted).
Note that once you've used a snapshot to revert/merge, the snapshot disappears from your system.Removing A Snapshot
If you no longer have use for a snapshot, you can remove it using the lvremove command:
sudo lvremove /dev/vgroup/snapshot_lv_nameWhere vgroup is the volume group in which the snapshot resides, and snapshot_lv_name is the name of your snapshot logical volume.A Simple Example
As an example, lets create a snapshot of the logical volume (music_lv) which we created for our music in LVM Guide - Part 1 (you could do this before trying out some new media player software, just in case your music files get corrupted or deleted somehow by the new software due to a bug). In this case, lets say we have 10GiB of music:
sudo lvcreate --size 2G -s -n music_lv_snapshot /dev/vgroup/music_lvThe 2GiB of data means you're covered if a few of your files get deleted.
If instead you used 10GiB as the snapshot size, you can rest assured that even if every file was accidently deleted, the snapshot can hold enough data to recover it all.If the new software did actually mess up your music files, you can revert your files to their original state when you took the snapshot by using the command:
lvconvert --merge /dev/ubuntu/music_lv_snapshotSo using snapshots can give you more flexibility for your backups and snapshot size is based on the risk assessment of how your data may change.Creating A "Complete Backup" From A Snapshot
Snapshots only grow if data on the original logical volume changes or if you write to the snapshot yourself (more about the write aspect later).
So if we forget about us manually writing to snapshots for the moment, the only data in the snapshot are chunks of original volume data which have changed on the original volume since the snapshot was taken.
Have you noticed that a snapshot still relies on the unchanged original data being OK?
In other words, you can only use a snapshot to revert an original logical volume if the original still exists. So snapshots are a fantastic feature as you'll see below, but they are not backups in the conventional sense of having a complete copy of all the original data.
If you want a completely independent separate copy of your data at the time of a snapshot, you can take a copy in the same way you would for any other device, e.g. using the cp or dd commands.
Note that this way of backing up data ensures a consistent view of the data is quickly taken at a specific point in time. This is important when backing up databases for example. Obviously creation of a consistent view requires tables to be locked, but the beauty of lvm is that they need only be locked for a very small amount of time (which makes it viable when compared to locking tables and waiting hours for data to be physically copied).
Preparing For Recovery Before Experimenting/Tweaking/Trying Something NewHave you ever wrecked your system by tweaking things, or adding software that didn't quite do what you expected, or by removing something important by mistake? Wouldn't it be nice to be able to undo the mess and return your system to its former working state?
Well using a snapshot you can return to that good state - that is, only if you took a snapshot before you started your experimentation!
There are two ways to do this.Using either approach, you'll need take a snapshot of the system in a known good state before you start any tweaks or try out new stuff (and if you're changing the kernel, the very first thing you should do is back up /boot if your install has /boot on a normal /dev/sda1 partition which is not part of lvm, more about this below).
- Method 1: The first method is to change your current system and revert to the snapshot if something goes wrong.
- Method 2: Alternatively you can boot using the snapshot as your root logical volume, make the changes to the snapshot, then if something goes wrong just reboot and remove the snapshot, or if you would like to keep the changes just merge the snapshot.
Recovery Method 1: Trying Out New Stuff On Your Root Logical Volume (Your Normal System)
Using this approach, you take a snapshot of the root file system's logical volume then carry out your tweaks on the root logical volume. If there is a mistake or problem you revert to the snapshot which has the root volume's (thus the root filesystem's) original state.
Now is the time to back up /boot if you are going to change the kernel (see if this applies to you by reading the "Backing Up /boot" section, below).
Ok, having backed up /boot (only if you needed to), now we can get on with taking the snapshot.
In Ubuntu 12.10, the root file system resides on the logical volume /dev/ubuntu/root (also /dev/mapper/ubuntu-root).
So, based on this you could create a snapshot of this logical volume, using:sudo lvcreate --size 2G -s -n rootsnap /dev/ubuntu/rootYou should base the size on whatever job you are doing, unfortunately there is no rule-of-thumb for calculating this size. Think about how much data will change, e.g. if it's only for a few config file changes or for trying out a new graphics driver, 2GiB is overkill. But if you plan on changing a lot of software, take the size of the software into account. If you have the space, its recommended to be generous with the size of your snapshot - in any case, once you've finished the snapshot will be removed anyway thus relinquishing the space to your system.Once you have taken your snapshot, crack on with trying out some experimentation or new software config etc ...
If you are happy with the changes, you just need to remove the snapshot (see "Removing A Snapshot" section above) and you're done.
Otherwise, if this new stuff messes up your system, the steps required to fix things will depend on how badly things went...
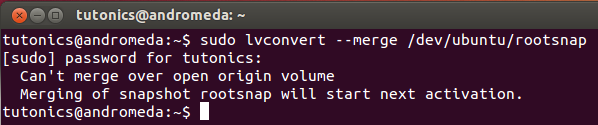
If the system boots up OK, you can run the lvconvert command below while the root filesystem is mounted, a reboot will then be required before the logical volume is actually reverted to the snapshot.
sudo lvconvert --merge /dev/ubuntu/rootsnapIf you can't boot you should start up a live cd or live usb then run the above lvconvert command.When you run the lvconvert command you should see something like this:
Then reboot.
If you still can't boot, (this may happen if /boot has been changed somehow!) for example if you've changed to a different kernel as part of what you tried since taking the snapshot (In which case you'll see something like "An error occurred while mounting /boot"), then you'll need to fix /boot.
To fix /boot: follow the "Restoring /boot" section below. When you've restored /boot, you just need to reboot normally - now things will be right back as they were before you started your experiments!Quick Summary:
Recovery Method 2: Trying Out New Stuff On The Snapshot Instead
- (1) Backup /boot if required. (Follow steps in "Backing up /boot" section below) .
- (2) Take a snapshot of your current root logical volume
- (3) Carry out your tweaks
- (4) If you're not happy with the changes, revert to snapshot using lvconvert. Otherwise if you are happy with the changes, remove the snapshot as you will not need it.
- (5) If still can't boot because /boot got messed up, follow steps in "Restoring /boot" section below.
By default lvm2 snapshots are read/write, meaning that if you mount the snapshot and change things, when a merge is done, the original will be changed to the snapshot's modified state.
For some people, using the snapshot's write functionality in this way may conceptually seem more suitable for trying out tweaks or they may feel more comfortable doing things this way (although both approaches work equally well).OK, lets start by saying that now is the time to back up /boot if you are going to change the kernel (see if this applies to you by reading the "Backing Up /boot" section, below).
Next, create a snapshot of the root logical volume as before:sudo lvcreate --size 2G -s -n rootsnap /dev/ubuntu/rootNow boot using the snapshot as your root filesystem. The easiest way to do this is to hold Shift while your system starts up.
This will bring up the grub menu, when you can see the menu you should hit e to edit.
This will bring up some grub script text which you can edit on the fly.
Move to the line starting with linux (Navigate using the cursor arrows) and change:root=/dev/mapper/ubuntu-rootto use your snapshot name, e.g:root=/dev/mapper/ubuntu-rootsnapWhen you've typed that, simply hit F10 to boot.
You should now boot into your snapshot.
(Note that this is only a temporary change that you'll need to carry out each time you want to boot into your snapshot. If you want something more permanent, you could add an entry to grub2 menu - but snapshots are usually temporary entities, so a menu entry would normally be overkill, let us know if you'd like us to include instructions about how to add a permanent entry!).
You can verify that you're using the snapshot as your root filesystem by running:df .If you used "rootsnap" for your snapshot name, you'll see something like this:You should see your snapshot name in the result.
Now you can proceed with your tweaks and experimentation.
When you're finished your tweaks, if you decide you like what you've done, just run:sudo lvconvert --merge /dev/ubuntu/rootsnapYou can run the above command from either the snapshot system or your normal system. If you run it from the snapshot, you'll see something like this:Now when you reboot, you'll have the changes on your root logical volume (i.e. your normal system will have the tweaks).
Otherwise, if your changes messed up the snapshot, you just need to boot normally (don't run lvconvert command) then remove the snapshot using:
sudo lvremove /dev/ubuntu/rootsnapIf things got messed up, and your changes involved changing the kernel, you'll probably need to follow the "Restoring /boot" section below.Quick Summary:
- (1) Backup /boot if required. (Follow steps in "Backing up /boot" section below) .
- (2) Take a snapshot of your current root logical volume
- (3) Boot using your snapshot as the root filesystem (see above).
- (4) Carry out your tweaks
- (5) If you are happy with the changes, merge to snapshot using lvconvert
- (6) If still can't boot because /boot got messed up, follow steps in "Restoring /boot" section below.
Renaming Logical Volumes (and thus Snapshots)
If you want to rename a snapshot, simply use the lvrename command.
This may be required for example if you used a logical volume name with a "-" in it when creating your snapshot.
If you ever wanted to boot up via grub2 into a root file system snapshot who's named like that, such as "root-snap", you could change the name to something useable like "rootsnap" by using this command:sudo lvrename /dev/ubuntu/root-snap ubuntu/rootsnapWhere ubuntu is the name of the volume group.Backing Up /boot
If your /boot is on its own partition, e.g. /dev/sda1 (as is the case for a default Ubuntu 12.10 lvm install), you'll want to back that up also - only if what you want to try out involves a kernel change, or any other change to /boot, otherwise there is no need to back up /boot.
To take a backup of /boot, run the following command before taking the snapshot of your root filesystem (so you'll have a copy on snapshot also):dd if=/dev/sda1 of=boot_backup.imgDo take note of where abouts in your root filesystem you've put boot_backup.img because if you have to resort to using it later you'll need to know where to find it!
Restoring /boot
To fix /boot using boot_backup.img (created earlier): start up a live cd, or live usb, then mount your root filesystem, e.g.:
sudo mkdir /mnt/rtfssudo mount /dev/ubuntu/root /mnt/rtfsLocate your boot_backup.img, then revert to the original /boot by running the below command (use your path to boot_backup.img, and take care to use the correct device!):sudo dd if=/mnt/rtfs/boot_backup.img of=/dev/sda1When this command has finished, your /boot partition has been restored.Still Can't Boot?
If you still cannot recover your system (e.g. you changed the kernel, but forgot to back up /boot), you can try holding Shift while your system restarts. This will throw up your grub menu from which you should be able to boot to an older kernel. Once up and running, you can use the software updater (or similar) to update your kernel to its former self.
This document is offered as an alternative solution to Rollback SLES Online Updates with Software RAID1. If you have your system disk configured with Logical Volume Management (LVM), you can implement this solution as a way to rollback a failed online update. You simply backup your boot directory, create an LVM snapshot of your system disk, and then update as usual. If you don't like the update and want to rollback to your previous state, then you boot up the server using the snapshot images, and restore the older data from the snapshot back to the original LVM volumes. The purpose of this article is to detail this rollback procedure using LVM. The concept should be valid for EVMS as well, but an EVMS solution is outside the scope of this article.
A word of caution. The one thing this procedure does not rollback are application meta data changes. If an application updates it's meta data format as a result of the update process and you decide to rollback the updates, the older application will most likely not do well with a new meta data format. Novell Storage Services (NSS) on Open Enterprise Server (OES) for Linux could experience something like this. I have not seen this happen with NSS, but it has the potential.
Q: I'd like to make a snapshot of a live filesystem in Linux, preferably using LVM. I'd like not to unmount it because I've got lots of files opened (my most common scenario is that I've got a busy desktop with lots of programs).
I understand that because of kernel buffers and general filesystem activity, data on disk might be in some more-or-less undefined state.
Is there any way to "atomically" unmount an FS, make an LVM snapshot and mount it back? It will be ok if the OS will block all activity for few seconds to do this task. Or maybe some kind of atomic "sync+snapshot"? Kernel call?
A: You shouldn't have to do anything for most Linux filesystems. It should just work without any effort at all on your part. The snapshot command itself hunts down mounted filesystems using the volume being snapshotted and calls a special hook that checkpoints them in a consisten, mountable state and does the snapshot atomically.
Older versions of LVM came with a set of VFS lock patches that would patch various filesystems so that they could be checkpointed for a snapshot. But with new kernels that should already be built into most Linux filesystems.
This intro on snapshopts claims as much.
And a little more research reveals that for kernels in the 2.6 series the ext series of filesystems should all support this. ReiserFS probably also. And if I know the btrfs people, that one probably does as well.
===I know that ext3 and ext4 in RedHat Enterprise, Fedora and CentOS automatically checkpoint when a LVM snapshot is created. That means there is never any problem mounting the snapshot because it is always clean.
I believe XFS has the same support. I am not sure about other filesystems.
"RedHat Enterprise, Fedora and CentOS automatically checkpoint when a LVM snapshot is created" : any documentation to prove this ? Is that specific to RH ? – Benoît Dec 4 '11 at 16:44
@Benoît: "many of the filesystems in the 2.6 kernel do this automatically when a snapshot is created" -- tldp.org/HOWTO/LVM-HOWTO/snapshotintro.html – Zan Lynx Dec 5 '11 at 16:47
Adapted from the LVM How-to page
from The Linux Documentation Project website.Snapshots:
A wonderful facility provided by LVM is a snapshot. This allows an administrator to create a new logical volume which is an exact copy of an existing logical volume (called the original), frozen at some point in time. This copy is read-only. Typically this would be used when (for instance) a backup needs to be performed on the logical volume but you don't want to halt a live system that is changing the data. When done with the snapshot the system administrator can just unmount it and then remove it. This facility does require that the snapshot be made at a time when the data on the logical volume is in a consistent state, but the time the original LV must be off-line is much less than a normal backup would take to complete.
In addition the copy typically only needs about 20% or less of the disk space of the original. Essentially, when the snapshot is made nothing is copied. However as the original changes, the updated disk blocks are first copied to the snapshot disk area before being written with the changes. The more changes are made to the original, the more disk space the snapshot will need.
When creating logical volumes to be used for snapshots, you must specify the chunk size. This is the size of the data block copied from the original to the snapshot volume. For good performance this should be set to the size of the data blocks written by the applications using the original volume. While this chunk size is independent of both the extent size and the stripe size (if striping is used), it is likely that the disk block (or cluster or page) size, the stripe size, and the chunk size should all be the same. Note the chunk size must be a power of 2 (like the stripe size), between 4K and 1M. (The extent size should be a multiple of this size.)
You should remove snapshot volumes as soon as you are finished with them, because they take a copy of all data written to the original volume and this can hurt performance. In addition, if the snapshot volume fills up errors will occur.
LVM Administration - Commands and Procedures:
The
lvmcommand permits the administrator to perform all LVM operations using this one interactive command, which includes built-in help and will remember command line arguments used from previous commands for the current command. However each LVM command is also available as a stand-alone command (that can be scripted). These are discussed briefly below, organized by task. See the man page for the commands (or use the built-in help oflvm) for complete details.... ... ...
Format Physical Volumes (PVs)
To initialize a disk or disk partition as a physical volume you just run the "
pvcreate" command on the whole disk. For example:pvcreate /dev/hdbThis creates a volume group descriptor at the start of the second IDE disk. You can initialize several disks and/or partitions at once. Just list all the disks and partitions on the command line you wish to format as PVs.
Sometimes this procedure may not work correctly, depending on how the disk (or partition) was previously formatted. If you get an error that LVM can't initialize a disk with a partition table on it, first make sure that the disk you are operating on is the correct one! Once you have confirmed that
/dev/hdbis the disk you really want to reformat, run the followingddcommand to erase the old partition table:# Warning DANGEROUS! # The following commands will destroy the partition table on the # disk being operated on. Be very sure it is the correct disk! dd if=/dev/zero of=/dev/hdb bs=1k count=1 blockdev \ --rereadpt /dev/hdbFor partitions run "
pvcreate" on the partition:pvcreate /dev/hdb1This creates a volume group descriptor at the start of the
/dev/hdb1partition. (Note that if using LVM version 1 on PCs with DOS partitions, you must first set the partition type to "0x8e" usingfdiskor some other similar program.)Create Volume Groups (VGs)
Use the "
vgcreate" program to group selected PVs into VGs, and to optionally set the extent size (the default is 4MB). The following command creates a volume group named "VG1" from two disk partitions from different disks:vgcreate VG1 /dev/hda1 /dev/hdb1Modern systems may use "
devfs" or some similar system, which creates symlinks in/devfor detected disks. With such systems names like "/dev/hda1" are actually the symlinks to the real names. You can use either the symlink or the real name in the LVM commands, however the older version of LVM demanded you use the real device names, such as/dev/ide/host0/bus0/target0/lun0/part1and/dev/ide/host0/bus0/target1/lun0/part1.You can also specify the extent size with this command using the "
-s size" option, if the 4Mb default not what you want. Thesizeis a value followed by one of k (for kilobytes), m (megabytes), g (gigabytes), or t (tetrabytes). In addition you can put some limits on the number of physical or logical volumes the volume can have. You may want to change the extent size for performance, administrative convenience, or to support very large logical volumes. (Note there may be kernel limits and/or application limits on the size of LVs and files on your system. For example Linux 2.4 kernel has a max size of 2TB.)The "
vgcreate" command adds some information to the headers of the included PVs. However the kernel modules needed to use the VGs as disks aren't loaded yet, and thus the kernel doesn't "see" the VGs you created. To make the VGs visible you must activate them. Only active volume groups are subject to changes and allow access to their logical volumes.To activate a single volume group
VG1, use the command:vgchange -a y /dev/VG1("
-a" is the same as "--available".) To active all volume groups on the system use:vgchange -a y... ... ...
Create and Use a SnapshotTo create a snapshot of some existing LV, a form of the
lvcreatecommand is used:root# lvcreate size option -s -n name existing_LVwhere size is as discussed previously, "
-s" (or "--snapshot") indicates a snapshot LV, "-n name" (or "--name name") says to call the snapshot LV name. The only option allowed is "-c chunk_size" (or "--chunksize chunk_size"), where chunk_size is specified as a power of 2 in this formula:(2^chunk_size) × 1024 bytes, where 2 ≤chunk_size≤ 10.)Suppose you have a volume group VG1 with a logical volume LV1 you wish to backup using a snapshot. you can estimate the time the backup will take, and the amount of disk writes that will take place during that time (plus a generous fudge factor), say 300MB. Then you would run the command:
root# lvcreate -l 300m -s -n backup LV1to create a snapshot logical volume named
/dev/VG1/backupwhich has read-only access to the contents of the original logical volume named/dev/VG1/LV1at point in time the snapshot was created. Assuming the original logical volume contains a file system you nowmountthe snapshot logical volume on some (empty) directory, then backup the mounted snapshot while the original filesystem continues to get updated. When finished, unmount the snapshot and delete it (or it will continue to grow as LV1 changes, and eventually run out of space).Note: If the snapshot is of an XFS filesystem, the
xfs_freezecommand should be used to quiesce the filesystem before creating the snapshot (if the filesystem is mounted):/root# xfs_freeze -f /mnt/point; /root# lvcreate -L 300M -s -n backup /dev/VG1/LV1 /root# xfs_freeze -u /mnt/point Warning Full snapshot are automatically disabledNow create a mount-point (an empty directory) and mount the volume:
/root# mkdir /mnt/dbbackup
/root# mount /dev/VG1/backup /mnt/dbbackup
mount: block device /dev/ops/dbbackup is write-protected, mounting read-only
If you are using XFS as the filesystem you will need to add the "nouuid" option to the mount command as follows:
/root# mount /dev/VG1/backup /mnt/dbbackup -o nouuid,roDo the backup, say by using
tarto some "DDS4" or "DAT" tape backup device:/root# tar -cf /dev/rmt0 /mnt/dbbackup tar: Removing leading `/' from member namesWhen the backup has finished you unmount the volume and remove it from the system:
root# umount /mnt/dbbackup
root# lvremove /dev/VG1/backup
lvremove -- do you really want to remove "/dev/VG1/backup"? [y/n]: y
lvremove -- doing automatic backup of volume group "VG1"
lvremove -- logical volume "/dev/VG1/backup" successfully removed
/root# vi ~/system-journal
Send comments and questions to [email protected]
Last updated by Wayne Pollock on 02/19/2015 06:01:18.
Create New Snapshot
To create a snapshot of lvstuff use the lvcreate command like before but use the -s flag.
lvcreate -L512M -s -n lvstuffbackup /dev/vgpool/lvstuffHere we created a logical volume with only 512 MB because the drive isn't being actively used. The 512 MB will store any new writes while we make our backup.
Mount New Snapshot
Just like before we need to create a mount point and mount the new snapshot so we can copy files from it.
mkdir /mnt/lvstuffbackup
mount /dev/vgpool/lvstuffbackup /mnt/lvstuffbackupCopy Snapshot and Delete Logical Volume
All you have left to do is copy all of the files from /mnt/lvstuffbackup/ to an external hard drive or tar it up so it is all in one file.
Note: tar -c will create an archive and -f will say the location and file name of the archive. For help with the tar command use
man tarin the terminal.
tar -cf /home/rothgar/Backup/lvstuff-ss /mnt/lvstuffbackup/Remember that while the backup is taking place all of the files that would be written to lvstuff are being tracked in the temporary logical volume we created earlier. Make sure you have enough free space while the backup is happening.
Once the backup finishes, unmount the volume and remove the temporary snapshot.
umount /mnt/lvstuffbackup

  lvremove /dev/vgpool/lvstuffbackup/
Deleting a Logical Volume
To delete a logical volume you need to first make sure the volume is unmounted, and then you can use lvremove to delete it. You can also remove a volume group once the logical volumes have been deleted and a physical volume after the volume group is deleted.
Here are all the commands using the volumes and groups we've created.
umount /mnt/lvstuff

  lvremove /dev/vgpool/lvstuff

  vgremove vgpool

  pvremove /dev/sdb1 /dev/sdc1
That should cover most of what you need to know to use LVM. If you've got some experience on the topic, be sure to share your wisdom in the comments.
Following on from the previous example we now want to use the extra space in the "ops" volume group to make a database backup every evening. To ensure that the data that goes onto the tape is consistent we use an LVM snapshot logical volume.
A snapshot volume is a special type of volume that presents all the data that was in the volume at the time the snapshot was created. For a more detailed description, see Section 3.8, Snapshots. This means we can back up that volume without having to worry about data being changed while the backup is going on, and we don't have to take the database volume offline while the backup is taking place.
13.4.1. Create the snapshot volume
In LVM1, this type of volume was read-only, but LVM2 creates read/write snapshots by default. There is a little over 500 Megabytes of free space in the "ops" volume group, so we will use all of it to allocate space for the snapshot logical volume. A snapshot volume can be as large or a small as you like but it must be large enough to hold all the changes that are likely to happen to the original volume during the lifetime of the snapshot. So here, allowing 500 megabytes of changes to the database volume which should be plenty.
# lvcreate -L 592M -s -n dbbackup /dev/ops/databases lvcreate -- WARNING: the snapshot must be disabled if it gets full lvcreate -- INFO: using default snapshot chunk size of 64 KB for "/dev/ops/dbbackup" lvcreate -- doing automatic backup of "ops" lvcreate -- logical volume "/dev/ops/dbbackup" successfully created13.4.2. Mount the snapshot volume
Full snapshot are automatically disabled If the snapshot logical volume becomes full it will be dropped (become unusable) so it is vitally important to allocate enough space. The amount of space necessary is dependent on the usage of the snapshot, so there is no set recipe to follow for this. If the snapshot size equals the origin size, it will never overflow. We can now create a mount-point and mount the volume
# mkdir /mnt/ops/dbbackup
# mount /dev/ops/dbbackup /mnt/ops/dbbackup
mount: block device /dev/ops/dbbackup is write-protected, mounting read-only
If you are using XFS as the filesystem you will need to add the nouuid option to the mount command:
13.4.3. Do the backup
# mount /dev/ops/dbbackup /mnt/ops/dbbackup -onouuid,roI assume you will have a more sophisticated backup strategy than this!
13.4.4. Remove the snapshot
# tar -cf /dev/rmt0 /mnt/ops/dbbackup tar: Removing leading `/' from member namesWhen the backup has finished you can now unmount the volume and remove it from the system. You should remove snapshot volume when you have finished with them because they take a copy of all data written to the original volume and this can hurt performance.
# umount /mnt/ops/dbbackup
# lvremove /dev/ops/dbbackup
lvremove -- do you really want to remove "/dev/ops/dbbackup"? [y/n]: y
lvremove -- doing automatic backup of volume group "ops"
              lvremove -- logical volume "/dev/ops/dbbackup" successfully removed
Nov 26, 2012 | HowtoForge - Linux Howtos and Tutorials
This tutorial explains how you can revert failed apt operations (like apt-get upgrade) and roll back to the previous system state with apt-btrfs-snapshot on an Ubuntu 12.10 system that uses the btrfs file system. apt-btrfs-snapshot creates a snapshot of the system before the apt operation. Being able to easily restore the previous system state after a failed apt operation takes away much of the pain system administrators have to deal with normally and is one of the greatest features of the btrfs file system.
August 4, 2009 | Linux Magazine
LVM Snapshots
It's impossible to go over all or many of the usage cases for LVM, but one that stands out is the snapshotting capability of LVM. If you have used LVM to create LV's and then built file systems on those LV's it's very simple to create a snapshot of the file system using LVM. The key factor in the process is that you need to make sure that you have enough space on a VG that hasn't been allocated that can be used by an LV (the snapshot LV). You should not create an LV (Logical Volume) prior to the snapshot because during the snapshot process you will be creating the LV using the lvcreate command.
In preparation for the snapshot you need to examine the file system to determine it's size ("du -sh"). This will tell you the approximate size of the snapshot. For example, if the file system says it has 29G used (29 GB), then you should snapshot a little larger - perhaps 30-32 GB (always good to have a cushion). This cushion isn't strictly necessary, but a little safety never hurts.
You can check how much space is used for the snapshot by using the command lvdisplay. This link discusses this. In addition as recommended in this link it's a good practice to plan for the worse and allocate the same amount of space as the original file system - just to be sure. You can always move the snapshot or erase it if you need the space back.
Each file system, ext2, ext3, xfs, reiserfs, jfs, etc. has it's own unique behavior when a snapshot is taken using LVM. It is recommended that you experiment with your file system of choice on a small scale before committing it to production. For example, when taking a snapshot of an xfs file system, you should run a command, "xfs_freeze" just prior to taking the snapshot. Also, ext3 file systems like to be mounted as read-write after a snapshot so the journal can be replayed (most of the time, a snapshot is mounted read-only so that backups of the snapshot don't have to worry about inadvertent writing).
To help understand snapshots a little better Figure 2 below is a variation of Figure 1 but the /data file system is not there and instead that space is left open on the VG for snapshots. There is also a single VG to make things a little easier.
Figure 2 - LVM Concepts for SnapshotsThe snapshot will be taken using the remaining space in the VG. In this case, the remaining space available is the same as that allocated to /home. Also, as noted in the figure, the file system for /home is ext3.
For a simple test case, the 2.6.30 kernel has been copied to /home/user5. The space used in /home is,
# du -sh /home
463M    /home
So there is 463 MB of space used in the file system built on top of LVM. So the snapshot should be slightly larger than this.
Now, let's take the snapshot using "lvcreate".
# lvcreate -L500M -s -n home_backup_080309 /dev/primary_vg/home_lv
  Logical volume "home_backup_080309" created
The option "-s" tells lvcreate to take a snapshot. The command creates a new LV, home_backup_080309, on the VG, primary_vg. The snapshot is of the LV /dev/primary_vg/home_lv. To see if the LV was created successfully, just use "lvscan".
# lvscan
  ACTIVE   Original '/dev/primary_vg/home_lv' [450.00 GB] inherit
  ACTIVE   Snapshot '/dev/primary_vg/home_backup_080309' [500.00 MB] inherit
You can see the snapshot (it's even labeled "Snapshot") and the full path to the snapshot.
If you want to make a backup of the snapshot (one of the primary reasons for making a snapshot) then you need to mount it.
# mkdir /mnt/backup/home_backup_080309
# mount /dev/primary_vg/home_lv/home_backup_080309 /mnt/backup/home_backup_080309
# mount
/dev/hda3 on / type ext3 (rw)
proc on /proc type proc (rw)
sysfs on /sys type sysfs (rw)
devpts on /dev/pts type devpts (rw,gid=5,mode=620)
/dev/hda1 on /boot type ext2 (rw)
tmpfs on /dev/shm type tmpfs (rw)
none on /proc/sys/fs/binfmt_misc type binfmt_misc (rw)
sunrpc on /var/lib/nfs/rpc_pipefs type rpc_pipefs (rw)
/dev/mapper/primary_vg-home_lv on /home type ext3 (rw,data=ordered)
/dev/mapper/primary_vg-home_backup_080309 on /mnt/backup/home_backup_080309 type ext3 (rw)
It's always a good idea to check the mounted snapshot to make sure it's there.
# ls -s /mnt/backup/home_backup_080309/
total 20
16 lost+found   4 user5
# ls -s /mnt/backup/home_backup_080309/user5
total 74080
    4 linux-2.6.30  74076 linux-2.6.30.tar.gz
Everything is there and is ready to be backed up. If you like, you could change the file system to ext2 and mount it read-only (the ext2 type will eliminate the need to read the journal so it will be easier to mount the snapshot read-only).
GUI Tools
The command line tools for LVM are not too complicated but for novices it can be a bit daunting. So to help here are 3 GUI tools for LVM.
It is beyond the scope of this article to review these GUI's but if you are so inclined, give them a try. EVMS, in particular, is a very powerful tool with it's own volume management capability but it can be used with LVM as well. It was developed from an IBM tool of the same name. It has some very powerful methods that make your life much easier. However, with all GUI tools it is recommended you keep detailed notes on the LVM configuration.
Summary
This is a quick review of LVM. For people new to LVM it presents some of the basic concepts and how they can be used. It's not intended to be an encompassing tutorial for LVM, but rather a quick overview. Further details are left to better more lengthy tutorials on the web. There are some GUI tools that can help gradually introduce LVM as previously pointed out.
In addition, this article reviews how to use LVM for creating snapshots. This is a very powerful tool that should be in the arsenal of all users and admins. It is straightforward to use but you need to make sure you understand the interactions with the specific file system(s). Just be sure you have enough space on your VG to store the snapshot (and don't forget to erase it when you are done).
LVM is one of the tools that people forget about and sometimes even ignore. Many installers for various distributions will use LVM as default (RHEL, CentOS, and Fedora are three that immediately come to mind but there are definitely more), and make things much easier for the novice. However, you still need to understand how the installer built the VG's and the LV's. Hopefully this article gave you a refresher on LVM (a quick one) or introduced you to a great tool for Linux.
Jeff Layton is an Enterprise Technologist for HPC at Dell. He can be found lounging around at a nearby Frys enjoying the coffee and waiting for sales (but never during working hours).
Following on from the previous example we now want to use the extra space in the "ops" volume group to make a database backup every evening. To ensure that the data that goes onto the tape is consistent we use an LVM snapshot logical volume.
A snapshot volume is a special type of volume that presents all the data that was in the volume at the time the snapshot was created. For a more detailed description, see Section 3.8, Snapshots. This means we can back up that volume without having to worry about data being changed while the backup is going on, and we don't have to take the database volume offline while the backup is taking place.
In LVM1, this type of volume was read-only, but LVM2 creates read/write snapshots by default.
13.4.1. Create the snapshot volume
There is a little over 500 Megabytes of free space in the "ops" volume group, so we will use all of it to allocate space for the snapshot logical volume. A snapshot volume can be as large or a small as you like but it must be large enough to hold all the changes that are likely to happen to the original volume during the lifetime of the snapshot. So here, allowing 500 megabytes of changes to the database volume which should be plenty.
Full snapshot are automatically disabled If the snapshot logical volume becomes full it will be dropped (become unusable) so it is vitally important to allocate enough space. The amount of space necessary is dependent on the usage of the snapshot, so there is no set recipe to follow for this. If the snapshot size equals the origin size, it will never overflow.
13.4.2. Mount the snapshot volume
We can now create a mount-point and mount the volume
# mkdir /mnt/ops/dbbackup
# mount /dev/ops/dbbackup /mnt/ops/dbbackup
mount: block device /dev/ops/dbbackup is write-protected, mounting read-only
If you are using XFS as the filesystem you will need to add the nouuid option to the mount command:
# mount /dev/ops/dbbackup /mnt/ops/dbbackup -onouuid,ro13.4.3. Do the backup
I assume you will have a more sophisticated backup strategy than this!
# tar -cf /dev/rmt0 /mnt/ops/dbbackup
tar: Removing leading `/' from member names
13.4.4. Remove the snapshot
When the backup has finished you can now unmount the volume and remove it from the system. You should remove snapshot volume when you have finished with them because they take a copy of all data written to the original volume and this can hurt performance.
# umount /mnt/ops/dbbackup
# lvremove /dev/ops/dbbackup
lvremove -- do you really want to remove "/dev/ops/dbbackup"? [y/n]: y
lvremove -- doing automatic backup of volume group "ops"
              lvremove -- logical volume "/dev/ops/dbbackup" successfully removed
LVM is an implementation of a logical volume manager for the Linux kernel. The biggest advantage is that LVM provides the ability to make a snapshot of any logical volume.
In a production environment many users access the same file (file is open) or database. Suppose you start backup process when a file is open, you will not get correct or updated copy of file i.e. inconsistent backup (see accurate definition of inconsistent backup).
Read-only partition - to avoid inconsistent backup
You need to mount partition as read only, so that no one can make changes to file and make a backup:
# umount /home
# mount -o ro /home
# tar -cvf /dev/st0 /home
# umount /home
# mount -o rw /homeAs you see, the draw back is service remains unavailable during backup time to end users as partition mounted as read-only. If you are using database then shutdown database server and make a backup.
This solution will only work if you have created the partition with LVM. A snapshot volume is a special type of volume that presents all the data that was in the volume at the time the snapshot was created. This means you can back up that volume without having to worry about data being changed while the backup is going on, and you don't have to take the database volume offline while the backup is taking place.
# lvcreate -L1000M -s -n dbbackup /dev/ops/databases
Output:
lvcreate -- WARNING: the snapshot must be disabled if it gets full
lvcreate -- INFO: using default snapshot chunk size of 64 KB for "/dev/ops/dbbackup"
lvcreate -- doing automatic backup of "ops"
lvcreate -- logical volume "/dev/ops/dbbackup" successfully created
Create a mount-point and mount the volume:
# mkdir /mnt/ops/dbbackup
# mount /dev/ops/dbbackup /mnt/ops/dbbackupOutput:
mount: block device /dev/ops/dbbackup is write-protected, mounting read-onlyDo the backup
# tar -cf /dev/st0 /mnt/ops/dbbackup
Now remove it:
# umount /mnt/ops/dbbackup
# lvremove /dev/ops/databasesPlease note that LVM snapshots cannot be used with non-LVM filesystems i.e. you need LVM partitions. You can also use third party
commercialproprietary (see below for discussion) or GPL backup solutions/software.
Logical Volume Manager (LVM) provides the ability to take a snapshot of any logical volume for the purpose of obtaining a backup of a partition in a consistent state. As applications may access files or databases on a partition during a backup some files may be backed up in one state, while later files are backed up after an update has been made, leading to an inconsistent backup.Traditionally the solution has been to mount the partition read-only, apply table-level write locks to databases or shut down the database engine etc.; all measures which adversely impact availability (but not as much as data loss without a backup will). With LVM snapshots it is possible to obtain a consistent backup without compromising availability.
Please note that this information is only valid for partitions that have been created using LVM. LVM snapshots cannot be used with non-LVM filesystems.
The LVM snapshot works by logging the changes to the filesystem to the snapshot partition, rather than mirroring the partition. Thus when you create a snapshot partition you do not need to use space equal to the size of the partition that you are taking a snapshot of, but rather the amount of changes that it will undergo during the lifetime of the snapshot. This is a function of both how much data is being written to the partition and also how long you intend keeping the LVM snapshot. The longer you leave it, the more changes there are likely to be on the file system and the more the snapshot partition will fill up with change information. The higher the rate of change on the partition the shorter the lifespan of the snapshot. If the amount of changes on the LVM partition exceed the size of the snapshot then the snapshot is released.
Now we will show an example of how to make an LVM snapshot. Here we create a logical volume of 500MB to use to take a snapshot. This will allow 500MB of changes on the volume we are taking a snapshot of during the lifetime of the snapshot.
The following command will create /dev/ops/dbbackup as a snapshot of /dev/ops/databases.
# lvcreate -L500M -s -n dbbackup /dev/ops/databases
lvcreate -- WARNING: the snapshot must be disabled if it gets full
lvcreate -- INFO: using default snapshot chunk size of 64 KB for "/dev/ops/dbbackup"
lvcreate -- doing automatic backup of "ops"
lvcreate -- logical volume "/dev/ops/dbbackup" successfully created
Now we create the mount point and mount the snapshot.
# mkdir /mnt/ops/dbbackup
# mount /dev/ops/dbbackup /mnt/ops/dbbackup
mount: block device /dev/ops/dbbackup is write-protected, mounting read-only
After performing the backup of the snapshot partition we release the snapshot. The snapshot will be automatically released when it fills up, but maintaining incurs a system overhead in the meantime.
# umount /mnt/ops/dbbackup
# lvremove /dev/ops/dbbackup
lvremove -- do you really want to remove "/dev/ops/dbbackup"? [y/n]: y
lvremove -- doing automatic backup of volume group "ops"
lvremove -- logical volume "/dev/ops/dbbackup" successfully removed
For more information about using LVM you can consult the Linux Documentation Project's HOW-TO on the subject at http://tldp.org/HOWTO/LVM-HOWTO/.
Society
Groupthink : Two Party System as Polyarchy : Corruption of Regulators : Bureaucracies : Understanding Micromanagers and Control Freaks : Toxic Managers : Harvard Mafia : Diplomatic Communication : Surviving a Bad Performance Review : Insufficient Retirement Funds as Immanent Problem of Neoliberal Regime : PseudoScience : Who Rules America : Neoliberalism : The Iron Law of Oligarchy : Libertarian Philosophy
Quotes
War and Peace : Skeptical Finance : John Kenneth Galbraith :Talleyrand : Oscar Wilde : Otto Von Bismarck : Keynes : George Carlin : Skeptics : Propaganda : SE quotes : Language Design and Programming Quotes : Random IT-related quotes : Somerset Maugham : Marcus Aurelius : Kurt Vonnegut : Eric Hoffer : Winston Churchill : Napoleon Bonaparte : Ambrose Bierce : Bernard Shaw : Mark Twain Quotes
Bulletin:
Vol 25, No.12 (December, 2013) Rational Fools vs. Efficient Crooks The efficient markets hypothesis : Political Skeptic Bulletin, 2013 : Unemployment Bulletin, 2010 : Vol 23, No.10 (October, 2011) An observation about corporate security departments : Slightly Skeptical Euromaydan Chronicles, June 2014 : Greenspan legacy bulletin, 2008 : Vol 25, No.10 (October, 2013) Cryptolocker Trojan (Win32/Crilock.A) : Vol 25, No.08 (August, 2013) Cloud providers as intelligence collection hubs : Financial Humor Bulletin, 2010 : Inequality Bulletin, 2009 : Financial Humor Bulletin, 2008 : Copyleft Problems Bulletin, 2004 : Financial Humor Bulletin, 2011 : Energy Bulletin, 2010 : Malware Protection Bulletin, 2010 : Vol 26, No.1 (January, 2013) Object-Oriented Cult : Political Skeptic Bulletin, 2011 : Vol 23, No.11 (November, 2011) Softpanorama classification of sysadmin horror stories : Vol 25, No.05 (May, 2013) Corporate bullshit as a communication method : Vol 25, No.06 (June, 2013) A Note on the Relationship of Brooks Law and Conway Law
History:
Fifty glorious years (1950-2000): the triumph of the US computer engineering : Donald Knuth : TAoCP and its Influence of Computer Science : Richard Stallman : Linus Torvalds : Larry Wall : John K. Ousterhout : CTSS : Multix OS Unix History : Unix shell history : VI editor : History of pipes concept : Solaris : MS DOS : Programming Languages History : PL/1 : Simula 67 : C : History of GCC development : Scripting Languages : Perl history : OS History : Mail : DNS : SSH : CPU Instruction Sets : SPARC systems 1987-2006 : Norton Commander : Norton Utilities : Norton Ghost : Frontpage history : Malware Defense History : GNU Screen : OSS early history
Classic books:
The Peter Principle : Parkinson Law : 1984 : The Mythical Man-Month : How to Solve It by George Polya : The Art of Computer Programming : The Elements of Programming Style : The Unix Hater’s Handbook : The Jargon file : The True Believer : Programming Pearls : The Good Soldier Svejk : The Power Elite
Most popular humor pages:
Manifest of the Softpanorama IT Slacker Society : Ten Commandments of the IT Slackers Society : Computer Humor Collection : BSD Logo Story : The Cuckoo's Egg : IT Slang : C++ Humor : ARE YOU A BBS ADDICT? : The Perl Purity Test : Object oriented programmers of all nations : Financial Humor : Financial Humor Bulletin, 2008 : Financial Humor Bulletin, 2010 : The Most Comprehensive Collection of Editor-related Humor : Programming Language Humor : Goldman Sachs related humor : Greenspan humor : C Humor : Scripting Humor : Real Programmers Humor : Web Humor : GPL-related Humor : OFM Humor : Politically Incorrect Humor : IDS Humor : "Linux Sucks" Humor : Russian Musical Humor : Best Russian Programmer Humor : Microsoft plans to buy Catholic Church : Richard Stallman Related Humor : Admin Humor : Perl-related Humor : Linus Torvalds Related humor : PseudoScience Related Humor : Networking Humor : Shell Humor : Financial Humor Bulletin, 2011 : Financial Humor Bulletin, 2012 : Financial Humor Bulletin, 2013 : Java Humor : Software Engineering Humor : Sun Solaris Related Humor : Education Humor : IBM Humor : Assembler-related Humor : VIM Humor : Computer Viruses Humor : Bright tomorrow is rescheduled to a day after tomorrow : Classic Computer Humor
The Last but not Least Technology is dominated by two types of people: those who understand what they do not manage and those who manage what they do not understand ~Archibald Putt. Ph.D
Copyright © 1996-2021 by Softpanorama Society. www.softpanorama.org was initially created as a service to the (now defunct) UN Sustainable Development Networking Programme (SDNP) without any remuneration. This document is an industrial compilation designed and created exclusively for educational use and is distributed under the Softpanorama Content License. Original materials copyright belong to respective owners. Quotes are made for educational purposes only in compliance with the fair use doctrine.
FAIR USE NOTICE This site contains copyrighted material the use of which has not always been specifically authorized by the copyright owner. We are making such material available to advance understanding of computer science, IT technology, economic, scientific, and social issues. We believe this constitutes a 'fair use' of any such copyrighted material as provided by section 107 of the US Copyright Law according to which such material can be distributed without profit exclusively for research and educational purposes.
This is a Spartan WHYFF (We Help You For Free) site written by people for whom English is not a native language. Grammar and spelling errors should be expected. The site contain some broken links as it develops like a living tree...
|
|
You can use PayPal to to buy a cup of coffee for authors of this site |
Disclaimer:
The statements, views and opinions presented on this web page are those of the author (or referenced source) and are not endorsed by, nor do they necessarily reflect, the opinions of the Softpanorama society. We do not warrant the correctness of the information provided or its fitness for any purpose. The site uses AdSense so you need to be aware of Google privacy policy. You you do not want to be tracked by Google please disable Javascript for this site. This site is perfectly usable without Javascript.
Last modified: March 12, 2019