which pipes the file to the program lpr on the remote side of things. Essentially, anything after the destination host
on the SSH command is passed as a command to the remote server.
If disk space is tight, you can also use that trick to tar files to a storage place on a different system: tar
cvf - source_directory | ssh user@remote_host 'cat > my-tar-file.tar'.
The quotes are necessary to ensure that the remote system, not the local system, redirects output.
One trap associated with executing commands via SSH is that interactive programs tend to die reluctantly. That is generally
because they expect a terminal to be available, and SSH does not allocate a terminal for commands that it does not believe
to be interactive. For example, I keep nethack on one system and I execute it via a script that calls ssh jon@remote-system
nethack. For a long time I did not understand why nethack failed to run properly, but then I discovered SSH's -t
option, which forces allocation of a pseudo-TTY. Using ssh -t jon@remote-system nethack does the trick just
fine.
The SSH client drop back to the rsh program if the remote system does not have SSH installed. Your SSH client should
print out an error message under those circumstances, and you would be ill-advised to ignore it. You can disable that behavior
with a line reading FallBackToRsh No in your ssh_config configuration file or equvalent in Putty or Teraterm.
I've recently freed myself from the annoyance of typing passwords frequently. As a system administrator, I find that
using SSH to run commands on remote systems helps me manage them efficiently, both in executing the same command on multiple
systems (such as package upgrades) and in collecting remote data (such as running uptime and sending the output to a file).
As a user, I find that, once ssh-agent is configured properly, my workday proceeds more smoothly.
Total Commander, Nautilus, MC and several other file managers allow you to create pseudo-filesystem based on scp. Extremely
convenient for file operations on the remote server. With the Nautilus file manager, launch the file manager, click the
File menu and select Connect to Server.
Connecting and transferring files to remote systems is something system administrators do
all the time. One essential tool used by many system administrators on Linux platforms is SSH.
SSH supports two forms of authentication:
Password authentication
Public-key Authentication
Public-key authentication is considered the most secure form of these two methods, though
password authentication is the most popular and easiest. However, with password authentication,
the user is always asked to enter the password. This repetition is tedious. Furthermore, SSH
also requires manual intervention when used in a shell script. If automation is needed when
using SSH password authentication, then a simple tool called sshpass is
indispensable.
What is sshpass?
The sshpass utility is designed to run SSH using the
keyboard-interactive password authentication mode, but in a non-interactive way.
SSH uses direct TTY access to ensure that the password is indeed issued by an interactive
keyboard user. sshpass runs SSH in a dedicated TTY, fooling SSH into thinking it
is getting the password from an interactive user.
Install sshpass
You can install sshpass with this simple command:
# yum install sshpass
Use sshpass
Specify the command you want to run after the sshpass options. Typically, the
command is ssh with arguments, but it can also be any other command. The SSH
password prompt is, however, currently hardcoded into sshpass .
The synopsis for the sshpass command is described below:
-ppassword
    The password is given on the command line.
-ffilename
    The password is the first line of the file filename.
-dnumber
    number is a file descriptor inherited by sshpass from the runner. The password is read from the open file descriptor.
-e
    The password is taken from the environment variable "SSHPASS".
Examples
To better understand the value and use of sshpass , let's look at some examples
with several different utilities, including SSH, Rsync, Scp, and GPG.
Example 1: SSH
Use sshpass to log into a remote server by using SSH. Let's assume the password
is !4u2tryhack . Below are several ways to use the sshpass options.
A. Use the -p (this is considered the least secure choice and shouldn't be
used):
You can also use sshpass with a GPG-encrypted file. When the -f
switch is used, the reference file is in plaintext. Let's see how we can encrypt a file with
GPG and use it.
sshpass is a simple tool that can be of great help to sysadmins. This doesn't,
by any means, override the most secure form of SSH authentication, which is public-key
authentication. However, sshpass can also be added to the sysadmin toolbox.
"... For us, fail2ban uses iptables to ban the IP address of the offending system for a "bantime" of 600 seconds (10 minutes). ..."
"... You can, of course, change any of these settings to meet your needs. Ten minutes seems to be long enough to cause a bot or script to "move on" to less secure hosts. However, ten minutes isn't so long as to alienate users who mistype their passwords more than three times. ..."
Security, for system administrators, is an ongoing struggle because you must secure your systems enough to
protect them from unwanted attacks but not so much that user productivity is hindered. It's a difficult balance to
maintain. There are always complaints of "too much" security, but when a system is compromised, the complaints
range from, "There wasn't enough security" to "Why didn't you use better security controls?" The struggle is real.
There are controls you can put into place that are both effective against intruder attack and yet stealthy enough
to allow users to operate in a generally unfettered manner.
Fail2ban
is the
answer to protect services from brute force and other automated attacks.
Note:
Fail2ban can only be used to protect services that require username/password authentication.
For example, you can't protect ping with fail2ban.
In this article, I demonstrate how to protect the SSH daemon (SSHD) from a brute force attack. You can set up
filters, as
fail2ban
calls them, to protect almost every listening service on your system.
Installation and initial setup
Fortunately, there is a ready-to-install package for
fail2ban
that includes all dependencies, if
any, for your system.
Unless you have some sort of syntax problem in your
fail2ban
configuration, you won't see any
standard output messages.
Now to configure a few basic things in
fail2ban
to protect the system without it interfering with
itself. Copy the
/etc/fail2ban/jail.conf
file to
/etc/fail2ban/jail.local
.
The
jail.local
file is the configuration file of interest for us.
Open
/etc/fail2van/jail.local
in your favorite editor and make the following changes or check to
be sure these few parameters are set. Look for the setting
ignoreip
and add all IP addresses to this
line that must have access without the possibility of a lockout. By default, you should add the loopback address,
and all IP addresses local to the protected system.
ignoreip = 127.0.0.1/8 192.168.1.10 192.168.1.20
You can also add entire networks of IP addresses, but this takes away much of the protection that you wish to
engage
fail2ban
for. Keep it simple and local for now. Save the
jail.local
file and
restart the
fail2ban
service.
$ sudo systemctl restart fail2ban
You must restart
fail2ban
every time you make a configuration change.
Setting up a filtered service
A fresh install of
fail2ban
doesn't really do much for you. You have to set up so-called filters
for any service that you want to protect. Almost every Linux system must be accessible by SSH. There are some
circumstances where you would most certainly stop and disable SSHD to better secure your system, but I assume that
every Linux system allows SSH connections.
Passwords, as everyone knows, are not a good security solution. However, it is often the standard by which we
live. So, if user or administrative access is limited to SSH, then you should take steps to protect it. Using
fail2ban
to "watch" SSHD for failed access attempts with subsequent banning is a good start.
Note:
Before implementing any security control that might hinder a user's access to a system, inform
the users that this new control might lock them out of a system for ten minutes (or however long you decide) if
their failed login attempts exceed your threshold setting.
To set up filtered services, you must create a corresponding "jail" file under the
/etc/fail2ban/jail.d
directory. For SSHD, create a new file named
sshd.local
and enter service filtering instructions into
it.
Create the
[sshd]
heading and enter the setting you see above as a starting place. Most of the
settings are self-explanatory. For the two that might not be intuitively obvious, the "action" setting describes
the action you want
fail2ban
to take in the case of a violation. For us,
fail2ban
uses
iptables
to ban the IP address of the offending system for a "bantime" of 600 seconds (10 minutes).
You can, of course, change any of these settings to meet your needs. Ten minutes seems to be long enough to
cause a bot or script to "move on" to less secure hosts. However, ten minutes isn't so long as to alienate users
who mistype their passwords more than three times.
Once you're satisfied with the settings, restart the
fail2ban
service.
What banning looks like
On the protected system (192.168.1.83),
tail
the
/var/log/fail2ban.log
to see any
current ban actions.
2020-05-15 09:12:06,722 fail2ban.filter         [25417]: INFO    [sshd] Found 192.168.1.69 - 2020-05-15 09:12:06
2020-05-15 09:12:07,018 fail2ban.filter         [25417]: INFO    [sshd] Found 192.168.1.69 - 2020-05-15 09:12:07
2020-05-15 09:12:07,286 fail2ban.actions        [25417]: NOTICE  [sshd] Ban 192.168.1.69
2020-05-15 09:22:08,931 fail2ban.actions        [25417]: NOTICE  [sshd] Unban 192.168.1.69
You can see that the IP address 192.168.1.69 was banned at 09:12 and unbanned ten minutes later at 09:22.
On the remote system, 192.168.1.69, a ban action looks like the following:
You can see that I entered my password incorrectly three times before being banned. The banned user, unless
explicitly informed, won't know why they can no longer reach the target system. The
fail2ban
filter
performs a silent ban action. It gives no explanation to the remote user, nor is the user notified when the ban is
lifted.
Unbanning a system
It will inevitably happen that a system gets banned that needs to be quickly unbanned. In other words, you
can't or don't want to wait for the ban period to expire. The following command will immediately unban a system.
$ sudo fail2ban-client set sshd unbanip 192.168.1.69
You don't need to restart the fail2ban daemon after issuing this command.
Wrap up
That's basically how
fail2ban
works. You set up a filter, and when conditions are met, then the
remote system is banned. You can ban for longer periods of time, and you can set up multiple filters to protect
your system. Remember that
fail2ban
is a single solution and does not secure your system from other
vulnerabilities. A layered, multi-faceted approach to security is the strategy you want to pursue. No single
solution provides enough security.
You can find examples of other filters and some advanced
fail2ban
implementations described at
fail2ban.org
.
By default, the SSH client verifies the identity of the host to which it connects.
If the remote host key is unknown to your SSH client, you would be asked to accept it by
typing "yes" or "no".
This could cause a trouble when running from script that automatically connects to a remote
host over SSH protocol.
Cool Tip: Slow SSH login? Password prompt takes too long? You can easily remove the delay!
Read more
→
This article explains how to bypass this verification step by disabling host key checking
.
The Authenticity Of Host Can't Be Established
When you log into a remote host that you have never connected before, the remote host key is
most likely unknown to your SSH client, and you would be asked to confirm its fingerprint :
The authenticity of host ***** can't be established.
RSA key fingerprint is *****.
Are you sure you want to continue connecting (yes/no)?
If your answer
is 'yes', the SSH client continues login, and stores the host key locally in the file
~/.ssh/known_hosts .
If your answer is 'no', the connection will be terminated.
If you would like to bypass this verification step , you can set the "
StrictHostKeyChecking " option to " no " on the command line:
$ ssh -o "StrictHostKeyChecking=no" user@host
This option disables the prompt and automatically adds the host key to the
~/.ssh/known_hosts file.
Remote Host Identification Has Changed
However, even with " StrictHostKeyChecking=no ", you may be refused to connect with
the following warning message:
@@@@@@@@@@@@@@@@@@@@@@@@@@@@@@@@@@@@@@@@@@@@@@@@@@@@@@@@@@@
@    WARNING: REMOTE HOST IDENTIFICATION HAS CHANGED!     @
@@@@@@@@@@@@@@@@@@@@@@@@@@@@@@@@@@@@@@@@@@@@@@@@@@@@@@@@@@@
IT IS POSSIBLE THAT SOMEONE IS DOING SOMETHING NASTY!
Someone could be eavesdropping on you right now (man-in-the-middle attack)!
It is also possible that the RSA host key has just been changed.
The fingerprint for the RSA key sent by the remote host is
*****
Please contact your system administrator.
Add correct host key in /home/user/.ssh/known_hosts to get rid of this message.
Offending key in /home/user/.ssh/known_hosts:1
RSA host key for ***** has changed and you have requested strict checking.
Host key verification failed.
If you are sure that it is harmless and the remote host key has been changed in a
legitimate way, you can skip the host key checking by sending the key to a null
known_hosts file:
Note: It is one thing to do this to allow a local IP address such as above 192.168.x.x
but it risky to do with a remote host etc.. I would probably just edit ~/.ssh/known_hosts
or wipe the file and start over if I am seeing the messages above.
I need to copy all the *.c files from local laptop named hostA to hostB including all directories. I am using the following scp
command but do not know how to exclude specific files (such as *.out): $ scp -r ~/projects/ user@hostB:/home/delta/projects/
How do I tell scp command to exclude particular file or directory at the Linux/Unix command line? One can use scp command to securely
copy files between hosts on a network. It uses ssh for data transfer and authentication purpose. Typical scp command syntax is as
follows: scp file1 user@host:/path/to/dest/ scp -r /path/to/source/ user@host:/path/to/dest/ scp [options] /dir/to/source/
user@host:/dir/to/dest/
Scp exclude files
I don't think so you can filter or exclude files when using scp command. However, there is a great workaround to exclude files
and copy it securely using ssh. This page explains how to filter or excludes files when using scp to copy a directory recursively.
-a : Recurse into directories i.e. copy all files and subdirectories. Also, turn on archive mode and all other
options (-rlptgoD)
-v : Verbose output
-e ssh : Use ssh for remote shell so everything gets encrypted
--exclude='*.out' : exclude files matching PATTERN e.g. *.out or *.c and so on.
Example of rsync command
In this example copy all file recursively from ~/virt/ directory but exclude all *.new files: $ rsync -av -e ssh --exclude='*.new' ~/virt/ root@centos7:/tmp
SSH tunneling or SSH port forwarding is a method of creating an encrypted SSH connection between a client
and a server machine through which services ports can be relayed.
SSH forwarding is useful for
transporting network data of services that uses an unencrypted protocol, such as VNC or
FTP
, accessing
geo-restricted content or bypassing intermediate firewalls. Basically, you can forward any TCP port and
tunnel the traffic over a secure SSH connection.
There are three types of SSH port forwarding:
Local Port Forwarding. - Forwards a connection from the client host to the SSH server host and
then to the destination host port.
Remote Port Forwarding. - Forwards a port from the server host to the client host and then to the
destination host port.
Dynamic Port Forwarding. - Creates SOCKS proxy server which allows communication across a range of
ports.
In this article, we will talk about how to set up local, remote, and dynamic encrypted SSH tunnels.
Local Port Forwarding
Local port forwarding allows you to forward a port on the local (ssh client) machine to a port on the
remote (ssh server) machine, which is then forwarded to a port on the destination machine.
In this type of forwarding the SSH client listens on a given port and tunnels any connection to that
port to the specified port on the remote SSH server, which then connects to a port on the destination
machine. The destination machine can be the remote SSH server or any other machine.
Local port forwarding is mostly used to connect to a remote service on an internal network such as a
database or VNC server.
In Linux, macOS and other Unix systems to create a local port forwarding pass the
-L
option to the
ssh
client:
[LOCAL_IP:]LOCAL_PORT
- The local machine ip and port number. When
LOCAL_IP
is omitted the ssh client binds on localhost.
DESTINATION:DESTINATION_PORT
- The IP or hostname and the port of the destination
machine.
[USER@]SERVER_IP
- The remote SSH user and server IP address.
You can use any port number greater than
1024
as a
LOCAL_PORT
. Ports numbers
less than
1024
are privileged ports and can be used only by root. If your SSH server is
listening on a
port other than 22
(the default) use the
-p [PORT_NUMBER]
option.
The destination hostname must be resolvable from the SSH server.
Let's say you have a MySQL database server running on machine
db001.host
on an internal
(private) network, on port 3306 which is accessible from the machine
pub001.host
and you
want to connect using your local machine
mysql
client to the database server. To do so you
can forward the connection like so:
Once you run the command, you'll be prompted to enter the remote SSH user password. After entering it,
you will be logged in to the remote server and the SSH tunnel will be established. It is a good idea to
set up an SSH key-based
authentication
and connect to the server without entering a password.
Now if you point your local machine database client to
127.0.0.1:3336
, the connection
will be forwarded to the
db001.host:3306
MySQL server through the
pub001.host
machine which will act as an intermediate server.
You can forward multiple ports to multiple destinations in a single ssh command. For example, you have
another MySQL database server running on machine
db002.host
and you want to connect to both
servers from your local client you would run:
To connect to the second server you would use
127.0.0.1:3337
.
When the destination host is the same as the SSH server instead of specifying the destination host IP
or hostname you can use
localhost
.
Say you need to connect to a remote machine through VNC which runs on the same server and it is not
accessible from the outside. The command you would use is:
The
-f
option tells the
ssh
command to run in the background and
-N
not to execute a remote command. We are using
localhost
because the VNC and the SSH server
are running on the same host.
If you are having trouble setting up tunneling check your remote SSH server configuration and make
sure
AllowTcpForwarding
is not set to
no
. By default, forwarding is allowed.
Remote Port Forwarding
Remote port forwarding is the opposite of local port forwarding. It allows you to forward a port on
the remote (ssh server) machine to a port on the local (ssh client) machine, which is then forwarded to a
port on the destination machine.
In this type of forwarding the SSH server listens on a given port and tunnels any connection to that
port to the specified port on the local SSH client, which then connects to a port on the destination
machine. The destination machine can be the local or any other machine.
In Linux, macOS and other Unix systems to create a remote port forwarding pass the
-R
option to the
ssh
client:
[REMOTE:]REMOTE_PORT
- The IP and the port number on the remote SSH server. An empty
REMOTE
means that the remote SSH server will bind on all interfaces.
DESTINATION:DESTINATION_PORT
- The IP or hostname and the port of the destination
machine.
[USER@]SERVER_IP
- The remote SSH user and server IP address.
Local port forwarding is mostly used to give access to an internal service to someone from the
outside.
Let's say you are developing a web application on your local machine and you want to show a preview to
your fellow developer. You do not have a public IP so the other developer can't access the application
via the Internet.
If you have access to a remote SSH server you can set up a remote port forwarding as follows:
The command above will make ssh server to listen on port
8080
and tunnel all traffic from
this port to your local machine on port
3000
.
Now your fellow developer can type
the_ssh_server_ip:8080
in his/her browser and preview
your awesome application.
If you are having trouble setting up remote port forwarding make sure
GatewayPorts
is set
to
yes
in the remote SSH server configuration.
Dynamic Port Forwarding
Dynamic port forwarding allows you to create a socket on the local (ssh client) machine which acts as
a SOCKS proxy server. When a client connects to this port the connection is forwarded to the remote (ssh
server) machine, which is then forwarded to a dynamic port on the destination machine.
This way, all the applications using the SOCKS proxy will connect to the SSH server and the server
will forward all the traffic to its actual destination.
In Linux, macOS and other Unix systems to create a dynamic port forwarding (SOCKS) pass the
-D
option to the
ssh
client:
ssh -R [LOCAL_IP:]LOCAL_PORT [USER@]SSH_SERVER
The options used are as follows:
[LOCAL_IP:]LOCAL_PORT
- The local machine ip and port number. When
LOCAL_IP
is omitted the ssh client binds on localhost.
[USER@]SERVER_IP
- The remote SSH user and server IP address.
A typical example of a dynamic port forwarding is to tunnel the web browser traffic through an SSH
server.
The following command will create a SOCKS tunnel on port
9090
:
Once the tunneling is established you can configure your application to use it.
This article
explains how to configure Firefox and Google Chrome browser to use the SOCKS proxy.
The port forwarding has to be separately configured for each application that you want to tunnel the
traffic thought it.
Set up SSH Tunneling in Windows
Windows users can create SSH tunnels using the PuTTY SSH client. You can download PuTTY
here
.
Launch Putty and enter the SSH server IP Address in the
Host name (or IP address)
field.
<img alt="" src=/post/how-to-setup-ssh-tunneling/launch-putty.jpg>
Under the
Connection
menu, expand
SSH
and select
Tunnels
.
Check the
Local
radio button to setup local,
Remote
for remote, and
Dynamic
for dynamic port forwarding.
If setting up local forwarding enter the local forwarding port in the
Source Port
field and in
Destination
enter the destination host and IP, for example,
localhost:5901
.
For remote port forwarding enter the remote SSH server forwarding port in the
Source Port
field and in
Destination
enter the destination host and IP, for example,
localhost:3000
.
If setting up dynamic forwarding enter only the local SOCKS port in the
Source Port
field.
Click on the
Add
button as shown in the image below.
<img alt="" src=/post/how-to-setup-ssh-tunneling/add-tunnel-putty.jpg>
Go back to the
Session
page to save the settings so that you do not need to enter
them each time. Enter the session name in the
Saved Session
field and click on the
Save
button.
<img alt="" src=/post/how-to-setup-ssh-tunneling/save-session-putty.jpg>
Select the saved session and log in to the remote server by clicking on the
Open
button.
<img alt="" src=/post/how-to-setup-ssh-tunneling/open-session-putty.jpg>
A new window asking for your username and password will show up. Once you enter your username and
password you will be logged in to your server and the SSH tunnel will be started.
Setting up
public
key authentication
will allow you to connect to your server without entering a password.
Conclusion
We have shown you how to set up SSH tunnels and forward the traffic through a secure SSH connection.
For ease of use, you can define the SSH tunnel in your
SSH config file
or create a
Bash alias
that will set up the SSH
tunnel.
If you hit a problem or have feedback, leave a comment below.
"... A classic scenario is connecting from your desktop or laptop from inside your company's internal network, which is highly secured with firewalls to a DMZ. In order to easily manage a server in a DMZ, you may access it via a jump host . ..."
A jump host (also known as a jump server ) is an intermediary host or an SSH gateway
to a remote network, through which a connection can be made to another host in a dissimilar
security zone, for example a demilitarized zone ( DMZ ). It bridges two dissimilar security
zones and offers controlled access between them.
A jump host should be highly secured and monitored especially when it spans a private
network and a DMZ with servers providing services to users on the internet.
A classic scenario is connecting from your desktop or laptop from inside your company's
internal network, which is highly secured with firewalls to a DMZ. In order to easily manage a
server in a DMZ, you may access it via a jump host .
In this article, we will demonstrate how to access a remote Linux server via a jump host and
also we will configure necessary settings in your per-user SSH client configurations.
Consider the following scenario.
SSH Jump Host
In above scenario, you want to connect to HOST 2 , but you have to go through HOST 1 ,
because of firewalling, routing and access privileges. There is a number of valid reasons why
jumphosts are needed..
Dynamic Jumphost List
The simplest way to connect to a target server via a jump host is using the -J
flag from the command line. This tells ssh to make a connection to the jump host and then
establish a TCP forwarding to the target server, from there (make sure you've Passwordless
SSH Login between machines).
$ ssh -J host1 host2
If usernames or ports on machines differ, specify them on the terminal as shown.
$ ssh -J username@host1:port username@host2:port
Multiple Jumphosts List
The same syntax can be used to make jumps over multiple servers.
Static jumphost list means, that you know the jumphost or jumphosts that you need to connect
a machine. Therefore you need to add the following static jumphost 'routing' in
~/.ssh/config file and specify the host aliases as shown.
### First jumphost. Directly reachable
Host vps1
  HostName vps1.example.org

### Host to jump to via jumphost1.example.org
Host contabo
  HostName contabo.example.org
  ProxyJump contabo
Now try to connect to a target server via a jump host as shown.
$ ssh -J vps1 contabo
Login to Target Host via Jumphost
The second method is to use the ProxyCommand option to add the jumphost configuration in
your ~.ssh/config or $HOME/.ssh/config file as shown.
In this example, the target host is contabo and the jumphost is vps1 .
Host vps1
        HostName vps1.example.org
        IdentityFile ~/.ssh/vps1.pem
        User ec2-user

Host contabo
        HostName contabo.example.org
        IdentityFile ~/.ssh/contabovps
        Port 22
        User admin
        Proxy Command ssh -q -W %h:%p vps1
Where the command Proxy Command ssh -q -W %h:%p vps1 , means run ssh in quiet
mode (using -q ) and in stdio forwarding (using -W ) mode, redirect
the connection through an intermediate host ( vps1 ).
Then try to access your target host as shown.
$ ssh contabo
The above command will first open an ssh connection to vps1 in the background effected by
the ProxyCommand , and there after, start the ssh session to the target server contabo .
That's all for now! In this article, we have demonstrated how to access a remote server via
a jump host. Use the feedback form below to ask any questions or share your thoughts with
us.
Normally, you would forward a remote computer's X11 graphical display to your local computer
with the -X option, but the OpenSSH application places additional security limits on such
connections as a precaution. As long as you're starting a shell on a trusted machine, you can
use the -Y option to opt out of the excess security:
$ ssh -Y 93.184.216.34
Now you can launch an instance of any one of the remote computer's applications, but have it
appear on your screen. For instance, try launching the Nautilus file manager:
remote$ nautilus &
The result is a Nautilus file manager window on your screen, displaying files on the remote
computer. Your user can't see the window you're seeing, but at least you have graphical access
to what they are using. Through this, you can debug, modify settings, or perform actions that
are otherwise unavailable through a normal text-based SSH session.
Keep in mind, though, that a forwarded X11 session does not bring the whole remote session
to you. You don't have access to the target computer's audio playback, for example, though you
can make the remote system play audio through its speakers. You also can't access any custom
application themes on the target computer, and so on (at least, not without some skillful
redirection of environment variables).
However, if you only need to view files or use an application that you don't have access to
locally, forwarding X can be invaluable.
Learn to configure SSH port forwarding on your Linux system. Remote forwarding is also explained.
Regular Linux users know about
SSH
, as it is basically what allows them to connect to any server remotely to be able to manage it via command
line. However, this is not the only thing SSH can provide you for, it can also act as a great security tool to
encrypt your connections even when there is no encryption by default.
For example, let's say you have a remote Linux desktop that you wish to connect via
SMTP
or email but the firewall on that network currently blocks the SMTP port (25) which is very common. Through
a SSH tunnel you would simply connect to that particular SMTP service using another port by simply using SSH without
having to reconfigure SMTP configuration to a different port and on top of that, gaining the encryption capabilities
of SSH.
Configure OpenSSH for port forwarding
In order for
OpenSSH
Server to allow forwarding, you have to make sure it is active in the configuration. To do this, you must
edit your
/etc/ssh/ssh_config
file.
For Ubuntu 18.04 this file has changed a little bit so, you must un-comment one line in it:
By
default this line comes commented, you need to un-comment to allow forwarding
Once un-commented, you need to restart the SSH service to apply the changes:
restart
SSH Daemon to apply changes recently done in its configuration
Now that we have our target configured to allow SSH forwarding, we simply need to re-route things through a port
we know is not blocked. Let's use a very uncommonly blocked port like 3300:
So now we have done this, all traffic that comes to port 25 will automatically sent over to port 3300. From
another computer or client we simply will connect to this server to its port 3300 and we will then be able to
interact with it as it was SMTP server without any firewall restrictions to its 25 port, basically we simply
re-routed its port 25 traffic to another (non blocked) one to be able to access it.
We talked about forwarding a local port to another port, but let's say you want to do it exactly opposite: you
want to route a remote port or something you currently can access from the server to a local port.
To explain it easily, let's use an example similar to the previous one: from this server you access a particular
server through port 25 (SMTP) and you want to "share" that through a local port 3302 so anyone else can connect to
your server to the 3302 port and see whatever that server sees on port 25:
Summing up and some tips on SSH port forwarding
As you can see, this SSH forwarding acts like a very small VPN, because it routes things to given ports. Whenever
you execute these commands, they will open SSH shells, as it understands you need to interact to the server via SSH.
If you don't need this, it will be enough to simply add the "-N" option in them, so they will simply not open any
shell.
Liked the article? Please share it and help us grow :)
About
Helder
Systems Engineer, technology evangelist, Ubuntu user, Linux enthusiast, father and husband.
I have a Ubuntu 12.04 server I bought, if I connect with putty using ssh and a sudoer user
putty gets disconnected by the server after some time if I am idle How do I configure Ubuntu to keep this connection alive indefinitely?
No, it's the time between keepalives. If you set it to 0, no keepalives are sent but you want
putty to send keepalives to keep the connection alive. – das Keks
Feb 19 at 11:46
In addition to the answer from "das Keks" there is at least one other aspect that can affect
this behavior. Bash (usually the default shell on Ubuntu) has a value TMOUT
which governs (decimal value in seconds) after which time an idle shell session will time out
and the user will be logged out, leading to a disconnect in an SSH session.
In addition I would strongly recommend that you do something else entirely. Set up
byobu (or even just tmux alone as it's superior to GNU
screen ) and always log in and attach to a preexisting session (that's GNU
screen and tmux terminology). This way even if you get forcibly
disconnected - let's face it, a power outage or network interruption can always happen - you
can always resume your work where you left. And that works across different machines. So you
can connect to the same session from another machine (e.g. from home). The possibilities are
manifold and it's a true productivity booster. And not to forget, terminal multiplexers
overcome one of the big disadvantages of PuTTY: no tabbed interface. Now you get "tabs" in
the form of windows and panes inside GNU screen and tmux .
apt-get install tmux
apt-get install byobu
Byobu is a nice frontend to both terminal multiplexers, but tmux is so
comfortable that in my opinion it obsoletes byobu to a large extent. So my
recommendation would be tmux .
Also search for "dotfiles", in particular tmux.conf and
.tmux.conf on the web for many good customizations to get you started.
Change the default value for "Seconds between keepalives(0 to turn off)" : from 0 to
600 (10 minutes) --This varies...reduce if 10 minutes doesn't help
Check the "Enable TCP_keepalives (SO_KEEPALIVE option)" check box.
Finally save setting for session
,
I keep my PuTTY sessions alive by monitoring the cron logs
tail -f /var/log/cron
I want the PuTTY session alive because I'm proxying through socks.
The simpler alternative is to route your local network traffic with an encrypted SOCKS proxy tunnel. This
way, all your applications using the proxy will connect to the SSH server and the server will forward all
the traffic to its actual destination. Your ISP (internet service provider) and other third parties will not
be able to inspect your traffic and block your access to websites.
This tutorial will walk you through the process of creating an encrypted SSH tunnel and configuring
Firefox and
Google Chrome
web browsers to use SOCKS proxy.
Prerequisites
Server running any flavor of Linux, with SSH access to route your traffic through it.
Web browser.
SSH client.
Set up the SSH tunnel
We'll create an SSH tunnel that will securely forwards traffic from your local machine on port
9090
to the SSH server on port
22
. You can use any port number greater than
1024
.
Linux and macOS
If you run Linux, macOS or any other Unix-based operating system on your local machine, you can easily
start an SSH tunnel with the following command:
ssh -N -D 9090 [USER]@[SERVER_IP]
The options used are as follows:
-N
- Tells SSH not to execute a remote command.
-D 9090
- Opens a SOCKS tunnel on the specified port number.
[USER]@[SERVER_IP]
- Your remote SSH user and server IP address.
To run the command in the background use the
-f
option.
If your SSH server is listening on a port other than port 22 (the default) use the
-p
                           [PORT_NUMBER]
option.
Once you run the command, you'll be prompted to enter your user password. After entering it, you will be
logged in to your server and the SSH tunnel will be established.
Windows users can create an SSH tunnel using the PuTTY SSH client. You can download PuTTY
here
.
Launch Putty and enter your server IP Address in the
Host name (or IP address)
field.
Under the
Connection
menu, expand
SSH
and select
Tunnels
.
Enter the port
9090
in the
Source Port
field , and check the
Dynamic
radio button.
Click on the
Add
button as shown in the image bellow.
Go back to the
Session
page to save the settings so that you do not need to enter them
each time. Enter the session name in the
Saved Session
field and click on the
Save
button.
Select the saved session and login to the remote server by clicking on the
Open
button.
A new window asking for your username and password will show up. Once you enter your username and
password you will be logged in to your server and the SSH tunnel will be started.
Configuring Your Browser to Use Proxy
Now that you have open the SSH SOCKS tunnel the last step is to configure your preferred browser to use
it.
Firefox
The steps bellow are the same for Windows, macOS, and Linux.
In the upper right hand corner, click on the hamburger icon
☰
to open Firefox's menu:
Click on the
⚙ Preferences
link.
Scroll down to the
Network Settings
section and click on the
Settings...
button.
A new window will open.
Select the
Manual proxy configuration
radio button.
Enter
127.0.0.1
in the
SOCKS Host
field and
9090
in the
Port
field.
Check the
Proxy DNS when using SOCKS v5
checkbox.
Click on the
OK
button to save the settings.
At this point your Firefox is configured and you can browse the Internet thought your SSH tunnel. To
verify it you can open
google.com
, type "what is my ip" and you should see your server IP
address.
To revert back to the default settings go to
Network Settings
, select the
Use system
                        proxy settings
radio button and save the settings.
There are also several plugins that can help you to configure Firefox's proxy settings such as
FoxyProxy
.
Google Chrome
Google Chrome uses the default system proxy settings. Instead of changing your operating system proxy
settings you can either use an addon such as
SwitchyOmega
or start Chrome web browser from the command line.
To launch Chrome using a new profile and your SSH tunnel use the following command:
The above command kicks off the SSH Key installation process for users. The -o option
instructs ssh-keygen to store the private key in the new OpenSSH format instead of the old (and
more compatible PEM format). It is highly recommended to use the -o option as the new OpenSSH
format has an increased resistance to brute-force password cracking. In case the -o option does
not work on your server (it has been introduced in 2014) or you need a private key in the old
PEM format, then use the command ' ssh-keygen -b 4096 -t rsa '.
The -b option of the ssh-keygen command is used to set the key length to 4096 bit instead of
the default 1024 bit for security reasons.
Upon entering the primary Gen Key command, users need to go through the following drill by
answering the following prompts:
Enter the file where you wish to save the key (/home/demo/.ssh/id_rsa)
Users need to press ENTER in order to save the file to the user home
The next prompt would read as follows:
Enter passphrase
If, as an administrator, you wish to assign the passphrase, you may do so when prompted (as
per the question above), though this is optional, and you may leave the field vacant in case
you do not wish to assign a passphrase.
However, it is pertinent to note there that keying in a unique passphrase does offer a bevy
of benefits listed below:
1. The security of a key, even when highly encrypted, depends largely on its invisibility to
any other party. I 2. In the likely instance of a passphrase-secure private key falling into
the custody of an unauthorized user, they will be rendered unable to log in to its allied
accounts until they can crack the passphrase. This invariably gives the victim (the hacked
user) precious extra time to avert the hacking bid On the downside, assigning a passphrase to
the key requires you to key it in every time you make use of the Key Pair, which makes the
process a tad tedious, nonetheless absolutely failsafe.
Here is a broad outline of the end-to-end key generation process:
root@server1:~# ssh-keygen -b 4096 -o -t rsa
Generating public/private rsa key pair.
Enter file in which to save the key (/root/.ssh/id_rsa):
Created directory '/root/.ssh'.
Enter passphrase (empty for no passphrase):
Enter same passphrase again:
Your identification has been saved in /root/.ssh/id_rsa.
Your public key has been saved in /root/.ssh/id_rsa.pub.
The key fingerprint is:
SHA256:KBZP/guc7lND8I239zKv8PRziF/5jnA6N0nEocCDlLA root@server1
The key's randomart image is:
+---[RSA 2048]----+
| .o.+ |
| ..o + . |
| . Eo o o o . |
| = .+ o . o |
| o +.S. . . |
| . o oo . . . .|
| +.....o+.+.|
| ... . +==Boo|
| .o.. +O==o|
+----[SHA256]-----+
The public key can now be traced to the link ~/.ssh/id_rsa.pub
The private key (identification) can now be traced to the link-/home/demo/.ssh/id_rsa
3
Step Two: Copying the Public Key
Once the distinct key pair has been generated, the next step remains to place the public key
on the virtual server that we intend to use. Users would be able to copy the public key into
the authorized_keys file of the new machine using the ssh-copy-id command. Given below is the
prescribed format (strictly an example) for keying in the username and IP address, and must be
replaced with actual system values:
Either of the above commands, when used, shall toss the following message on your
system:
The authenticity of host '192.168.0.100 ' can't be established. RSA key fingerprint is
b1:2d:32:67:ce:35:4d:5f:13:a8:cd:c0:c4:48:86:12. Are you sure you want to continue connecting
(yes/no)? yes Warning: Permanently added '192.168.0.100' (RSA) to the list of known hosts.
[email protected]'s password: Now try logging into the machine, with "ssh
'[email protected]'", and check in: ~/.ssh/authorized_keys to make sure we haven't added extra
keys that you weren't expecting.
After the above drill, users are ready to go ahead and log into [email protected] without
being prompted for a password. However, if you have earlier assigned a passphrase to the key
(as per Step 2 above), you will be prompted to enter the passphrase at this point (and each
time for subsequent log-ins.).
Step Three (This Step is Optional): Disabling the Password
to Facilitate Root Login
After users have copied their SSH keys unto your server and ensured seamless log-in with the
SSH keys only, they have the option to restrict the root login, and permit the same only
through SSH keys. To accomplish this, users need to access the SSH configuration file using the
following command:
sudo nano /etc/ssh/sshd_config
Once the file is accessed, users need to find the line within the file that includes
PermitRootLogin , and modify the same to ensure a foolproof connection using the SSH key. The
following command shall help you do that:
PermitRootLogin without-password
The last step in the process remains to implement the changes by using the following
command:
reload ssh
The above completes the process of installing SSH keys on the Linux server.
Converting
OpenSSH private key to new format
Most older OpenSSH keys are stored in the PEM format. While this format is compatible with
many older applications, it has the drawback that the password of a password-protected private
key can be attacked with brute-force attacks. This chapter explains how to convert a private
key in PEM format to one in the new OpenSSH format.
ssh-keygen -p -o -f /root/.ssh/id_rsa
The path /root/.ssh/id_rsa is the path of the old private key
file.
Conclusion
The above steps shall help you install SSH keys on any virtual private server in a
completely safe, secure and hassle-free manner.
If you're a Linux system administrator, chances are you've got more than one machine that
you're responsible for on a daily basis. You may even have a bank of machines that you maintain
that are similar -- a farm of Web servers, for example. If you have a need to type the same
command into several machines at once, you can login to each one with SSH and do it serially,
or you can save yourself a lot of time and effort and use a tool like ClusterSSH.
ClusterSSH is a Tk/Perl wrapper around standard Linux tools like XTerm and SSH. As such,
it'll run on just about any POSIX-compliant OS where the libraries exist -- I've run it on
Linux, Solaris, and Mac OS X. It requires the Perl libraries Tk ( perl-tk on
Debian or Ubuntu) and X11::Protocol ( libx11-protocol-perl on Debian or Ubuntu),
in addition to xterm and OpenSSH.
Installation
Installing ClusterSSH on a Debian or Ubuntu system is trivial -- a simple sudo apt-get
install clusterssh will install it and its dependencies. It is also packaged for use
with Fedora, and it is installable via the ports system on FreeBSD. There's also a MacPorts
version for use with Mac OS X, if you use an Apple machine. Of course, it can also be compiled
from source.
Configuration
ClusterSSH can be configured either via its global configuration file --
/etc/clusters , or via a file in the user's home directory called
.csshrc . I tend to favor the user-level configuration as that lets multiple
people on the same system to setup their ClusterSSH client as they choose. Configuration is
straightforward in either case, as the file format is the same. ClusterSSH defines a "cluster"
as a group of machines that you'd like to control via one interface. With that in mind, you
enumerate your clusters at the top of the file in a "clusters" block, and then you describe
each cluster in a separate section below.
For example, let's say I've got two clusters, each consisting of two machines. "Cluster1"
has the machines "Test1" and "Test2" in it, and "Cluster2" has the machines "Test3" and "Test4"
in it. The ~.csshrc (or /etc/clusters ) control file would look like
this:
clusters = cluster1 cluster2
cluster1 = test1 test2
cluster2 = test3 test4
You can also make meta-clusters -- clusters that refer to clusters. If you wanted to make a
cluster called "all" that encompassed all the machines, you could define it two ways. First,
you could simply create a cluster that held all the machines, like the following:
By calling out the "all" cluster as containing cluster1 and cluster2, if either of those
clusters ever change, the change is automatically captured so you don't have to update the
"all" definition. This will save you time and headache if your .csshrc file ever grows in
size.
Using ClusterSSH
Using ClusterSSH is similar to launching SSH by itself. Simply running cssh -l
<username> <clustername> will launch ClusterSSH and log you in as the
desired user on that cluster. In the figure below, you can see I've logged into "cluster1" as
myself. The small window labeled "CSSH [2]" is the Cluster SSH console window. Anything I type
into that small window gets echoed to all the machines in the cluster -- in this case, machines
"test1" and "test2". In a pinch, you can also login to machines that aren't in your .csshrc
file, simply by running cssh -l <username> <machinename1>
<machinename2> <machinename3> .
If I want to send something to one of the terminals, I can simply switch focus by clicking
in the desired XTerm, and just type in that window like I usually would. ClusterSSH has a few
menu items that really help when dealing with a mix of machines. As per the figure below, in
the "Hosts" menu of the ClusterSSH console there's are several options that come in handy.
"Retile Windows" does just that if you've manually resized or moved something. "Add host(s)
or Cluster(s)" is great if you want to add another set of machines or another cluster to the
running ClusterSSH session. Finally, you'll see each host listed at the bottom of the "Hosts"
menu. By checking or unchecking the boxes next to each hostname, you can select which hosts the
ClusterSSH console will echo commands to. This is handy if you want to exclude a host or two
for a one-off or particular reason. The final menu option that's nice to have is under the
"Send" menu, called "Hostname". This simply echoes each machine's hostname to the command line,
which can be handy if you're constructing something host-specific across your cluster.
Caveats with ClusterSSH
Like many UNIX tools, ClusterSSH has the potential to go horribly awry if you aren't
very careful with its use. I've seen ClusterSSH mistakes take out an entire tier of
Web servers simply by propagating a typo in an Apache configuration. Having access to multiple
machines at once, possibly as a privileged user, means mistakes come at a great cost. Take
care, and double-check what you're doing before you punch that Enter key.
Conclusion
ClusterSSH isn't a replacement for having a configuration management system or any of the
other best practices when managing a number of machines. However, if you need to do something
in a pinch outside of your usual toolset or process, or if you're doing prototype work,
ClusterSSH is indispensable. It can save a lot of time when doing tasks that need to be done on
more than one machine, but like any power tool, it can cause a lot of damage if used
haphazardly.
SSH is one of the most widely used protocols for connecting to remote shells. While there are numerous SSH clients the most-used
still remains OpenSSH's ssh . OpenSSH has been the default ssh client for every major Linux operation, and is trusted by
cloud computing providers such as
Amazon's EC2 services and web hosting companies like
MediaTemple . There is a plethora of tips and tricks that can be used to make
your experience even better than it already is. Read on to discover some of the best tweaks to your favorite SSH client.
Adding
A Keep-Alive
A keep-alive is a small piece of data transmitted between a client and a server to ensure that the connection is still open or
to keep the connection open. Many protocols implement this as a way of cleaning up dead connections to the server. If a client does
not respond, the connection is closed.
SSH does not enable this by default. There are pros and cons to this. A major pro is that under a lot of conditions if you disconnect
from the Internet, your connection will be usable when you reconnect. For those who drop out of WiFi a lot, this is a major plus
when you discover you don't need to login again.
For those who get the following message from their SSH client when they stop typing for a few minutes it's not as convenient:
symkat@symkat:~$ Read from remote host symkat.com: Connection reset by peer
Connection to symkat.com closed.
This happens because your router or firewall is trying to clean up dead connections. It's seeing that no data has been transmitted
in N seconds and falsely assumes that the connection is no longer in use.
To rectify this you can add a Keep-Alive. This will ensure that your connection stays open to the server and the firewall doesn't
close it.
To make all connections from your shell send a keepalive add the following to your ~/.ssh/config file:
KeepAlive yes
ServerAliveInterval 60
The con is that if your connection drops and a KeepAlive packet is sent SSH will disconnect you. If that becomes a problem, you
can always actually fix the Internet connection.
Multiplexing Your Connection
Do you make a lot of connections to the same servers? You may not have noticed how slow an initial connection to a shell is. If
you multiplex your connection you will definitely notice it though. Let's test the difference between a multiplexed connection using
SSH keys and a non-multiplexed connection using SSH keys:
# Without multiplexing enabled:
$ time ssh [email protected] uptime
 20:47:42 up 16 days,  1:13,  3 users,  load average: 0.00, 0.01, 0.00

real    0m1.215s
user    0m0.031s
sys 0m0.008s

# With multiplexing enabled:
$ time ssh [email protected] uptime
 20:48:43 up 16 days,  1:14,  4 users,  load average: 0.00, 0.00, 0.00

real    0m0.174s
user    0m0.003s
sys 0m0.004s
We can see that multiplexing the connection is much faster, in this instance on an order of 7 times faster than not multiplexing
the connection. Multiplexing allows us to have a â??controlâ? connection, which is your initial connection to a server, this is then
turned into a UNIX socket file on your computer. All subsequent connections will use that socket to connect to the remote host. This
allows us to save time by not requiring all the initial encryption, key exchanges, and negotiations for subsequent connections to
the server.
Host *
ControlMaster auto
ControlPath ~/.ssh/connections/%r_%h_%p
A negative to this is that some uses of ssh may fail to work with your multiplexed connection. Most notably commands which use
tunneling like git, svn or rsync, or forwarding a port. For these you can add the option -oControlMaster=no . To prevent
a specific host from using a multiplexed connection add the following to your ~/.ssh/config file:
Host YOUR_SERVER_OR_IP
MasterControl no
There are security precautions that one should take with this approach. Let's take a look at what actually happens when we connect
a second connection:
$ ssh -v -i /dev/null [email protected]
OpenSSH_4.7p1, OpenSSL 0.9.7l 28 Sep 2006
debug1: Reading configuration data /Users/symkat/.ssh/config
debug1: Reading configuration data /etc/ssh_config
debug1: Applying options for *
debug1: auto-mux: Trying existing master
Last login:
symkat@symkat:~$ exit
As we see no actual authentication took place. This poses a significant security risk if running it from a host that is not trusted,
as a user who can read and write to the socket can easily make the connection without having to supply a password. Take the same
care to secure the sockets as you take in protecting a private key.
Using SSH As A Proxy
Even Starbucks now has free WiFi in its stores. It seems the world has caught on to giving free Internet at most retail locations.
The downside is that more teenagers with "Got Root?" stickers are camping out at these locations running the latest version of wireshark.
SSH's encryption can stand up to most any hostile network, but what about web traffic?
Most web browsers, and certainly all the popular ones, support using a proxy to tunnel your traffic. SSH can provide a SOCKS proxy
on localhost that tunnels to your remote server with the -D option. You get all the encryption of SSH for your web traffic,
and can rest assured no one will be capturing your login credentials to all those non-ssl websites you're using.
Now there is a proxy running on 127.0.0.1:1080 that can be used in a web browser or email client. Any application that supports
SOCKS 4 or 5 proxies can use 127.0.0.1:1080 to tunnel its traffic.
$ nc -vvv 127.0.0.1 1080
Connection to 127.0.0.1 1080 port [tcp/socks] succeeded!
Using One-Off Commands
Often times you may want only a single piece of information from a remote host. "Is the file system full?" "What's the uptime
on the server?" "Who is logged in?"
Normally you would need to login, type the command, see the output and then type exit (or Control-D for those in the know.) There
is a better way: combine the ssh with the command you want to execute and get your result:
This executed the ssh symkat.com, logged in as symkat, and ran the command uptime on symkat. If you're not using
SSH keys then you'll be presented with a password prompt before the command is executed.
$ ssh [email protected] ps aux | echo $HOSTNAME
symkats-macbook-pro.local
This executed the command ps aux on symkat.com, sent the output to STDOUT, a pipe on my local laptop picked it up
to execute echo $HOSTNAME locally. Although in most situations using auxiliary data processing like grep
or awk will work flawlessly, there are many situations where you need your pipes and file IO redirects to work on the
remote system instead of the local system. In that case you would want to wrap the command in single quotes:
As a basic rule if you're using >>><- or | you're going to
want to wrap in single quotes.
It is also worth noting that in using this method of executing a command some programs will not work. Notably anything that requires
a terminal, such as screen, irssi, less, or a plethora of other interactive or curses based applications. To force a terminal to
be allocated you can use the -t option:
Pipes are useful. The concept is simple: take the output from one program's STDOUT and feed it to another program's STDIN. OpenSSH
can be used as a pipe into a remote system. Let's say that we would like to transfer a directory structure from one machine to another.
The directory structure has a lot of files and sub directories.
We could make a tarball of the directory on our own server and scp it over. If the file system this directory is on lacks the
space though we may be better off piping the tarballed content to the remote system.
What we did in this example was to create a new archive ( -c ) and to compress the archive with gzip ( -z
). Because we did not use -f to tell it to output to a file, the compressed archive was send to STDOUT. We then piped
STDOUT with | to ssh . We used a one-off command in ssh to invoke tar with the extract ( -x
) and gzip compressed ( -z ) arguments. This read the compressed archive from the originating server and unpacked it
into our server. We then logged in to see the listing of files.
Additionally, we can pipe in the other direction as well. Take for example a situation where you with to make a copy of a remote
database, into a local database:
symkat@chard:~$ echo "create database backup" | mysql -uroot -ppassword
symkat@chard:~$ ssh [email protected] 'mysqldump -udbuser -ppassword symkat' | \
> mysql -uroot -ppassword backup
symkat@chard:~$ echo "use backup;select count(*) from wp_links;" | mysql -uroot -ppassword
count(*)
12
symkat@chard:~$
What we did here is to create the database backup on our local machine. Once we had the database created we used a one-off
command to get a dump of the database from symkat.com. The SQL Dump came through STDOUT and was piped to another command. We used
mysql to access the database, and read STDIN (which is where the data now is after piping it) to create the database on our local
machine. We then ran a MySQL command to ensure that there is data in the backup table. As we can see, SSH can provide a true pipe
in either direction.
Using a Non Standard Port
Many people run SSH on an alternate port for one reason or another. For instance, if outgoing port 22 is blocked at your college
or place of employment you may have ssh listen on port 443.
Instead of saying ssh -p443 [email protected] you can add a configuration option to your
~/.ssh/config file that is specific to yourserver.com:
Host yourserver.com
Port 443
You can extrapolate from this information further that you can make ssh configurations specific to a host. There is little reason
to use all those -oOptions when you have a well-written ~/.ssh/config file.
Good Article ! I would like to try to implement Two Factor authentication with Google Authenticator , steps can be followed
here
http://www.digitaljournal.sg
Yes, user@hostname is common in SSH lines. Although, you could say, "-l symkat
symkat.com
" (-l is username), [email protected] works just the same. Anything preceding the @ is the username to submit, and anything following
the @ is the hostname or IP address to connect to.
I'm quite surprised you didn't cover key based authentication.
My favorite trick for key-based authentication is having per-host keys, which gives you an extra layer of theoretical security
in the event your key is leaked.
1. If your public key is leaked, nasty people could ( in theory, but its unlikely ) give you permission to log into their machines
with said key, and then log your actions, which, are you not observant, could be an information leak. ( This is insane paranoia
really ).
2. If your *private* key is leaked, every machine you gave a copy of your public key to is now vulnerable. ( This is a much
more valid concern ).
Having per-host keys makes this much weaker in some respects, because if you have a per-host key, then stealing *a* key will
only give them access to *one* machine instead of several. However, in saying that, chances are, if they get in and steal *one*
key, if you have multiple, they can probably steal *every* key, meaning blocking all those accesses via key deletion becomes much
harder. I'm not sure which is the most sane option really, I still just like per-host keys =P.
Doing this is very similar to setting up per-host auto-master connections.
and then send a copy of [email protected] to the admin of
bar.com to
put in the 'foo' users "authorized keys" file.
It will then JustWork(TM).
And if you can't be arsed having to set up a seperate key for a given host, it tries the per-host one before using the general
key, so you can just send them your common .pub file instead =).
Another option that I like when signing on to remote hosts who's ip changes - like AWS - is to prevent ssh from doing strict
host key checking via
-o StrictHostKeyChecking=no
Here's mine: remote to local mysql backup in one line
ssh user@server "/usr/bin/mysqldump -u user -p password database" | dd of=/where/you/want/the/dump.sql
Here's another one I found useful... Redirect local STDOUT to a file on a remote server.
If in the example above I wanted to create a tar.gz file of contents on the remote machine:
tar -cz contents | ssh [email protected] "cat > contents.tar.gz"
Wow. You must have looked in the wrong place all that time, because it is right there in the manpage:
# man ssh_config
Specifies whether the system should send TCP keepalive messages to the other side. If they are sent, death of the connection
or crash of one of the machines will be properly noticed. This option only uses TCP keepalives (as opposed to using ssh level
keepalives), so takes a long time to notice when the connection dies. As such, you probably want the ServerAliveInterval option
as well. However, this means
that connections will die if the route is down temporarily, and some people find it annoying.
The default is "yes" (to send TCP keepalive messages), and the client will notice if the network goes down or the remote host
dies. This is important in scripts, and many users want it too.
To disable TCP keepalive messages, the value should be set to "no".
...Here's a list of 10 things that I think are
particularly awesome and perhaps a bit off the beaten path.
Update: ( 2011-09-19 ) There are some user-submitted ssh-tricks on the wiki now!
Please feel free to add your favorites. Also the hacker news thread might be helpful for
some.
SSH Config
I used SSH regularly for years before I learned about the config file, that you can create
at ~/.ssh/config to tell how you want ssh to behave.
Consider the following configuration example:
Host example.com *.example.net
User root
Host dev.example.net dev.example.net
User shared
Port 220
Host test.example.com
User root
UserKnownHostsFile /dev/null
StrictHostKeyChecking no
Host t
HostName test.example.org
Host *
Compression yes
CompressionLevel 7
Cipher blowfish
ServerAliveInterval 600
ControlMaster auto
ControlPath /tmp/ssh-%r@%h:%p
I'll cover some of the settings in the " Host * " block, which apply to all
outgoing ssh connections, in other items in this post, but basically you can use this to create
shortcuts with the ssh command, to control what username is used to connect to a given host,
what port number, if you need to connect to an ssh daemon running on a non-standard port. See "
man ssh_config " for more information. Control Master/Control Path
This is probably the coolest thing that I know about in SSH. Set the "
ControlMaster " and " ControlPath " as above in the ssh configuration.
Anytime you try to connect to a host that matches that configuration a "master session" is
created. Then, subsequent connections to the same host will reuse the same master connection
rather than attempt to renegotiate and create a separate connection. The result is greater
speed less overhead.
This can cause problems if you' want to do port forwarding, as this must be configured on
the original connection , otherwise it won't work. SSH Keys
While ControlMaster/ControlPath is the coolest thing you can do with SSH, key-based
authentication is probably my favorite. Basically, rather than force users to authenticate with
passwords, you can use a secure cryptographic method to gain (and grant) access to a system.
Deposit a public key on servers far
and wide, while keeping a "private" key secure on your local machine. And it just
works .
You can generate multiple keys, to make it more difficult for an intruder to gain access to
multiple machines by breaching a specific key, or machine. You can specify specific keys and
key files to be used when connected to specific hosts in the ssh config file (see above.) Keys
can also be (optionally) encrypted locally with a pass-code, for additional security. Once I
understood how secure the system is (or can be), I found my self thinking "I wish you could use
this for more than just SSH." SSH Agent
Most people start using SSH keys because they're easier and it means that you don't have to
enter a password every time that you want to connect to a host. But the truth is that in most
cases you want to have unencrypted private keys that have meaningful access to systems because
once someone has access to a copy of the private key the have full access to the system. That's
not good.
But the truth is that typing in passwords is a pain, so there's a solution: the
ssh-agent . Basically one authenticates to the ssh-agent locally, which
decrypts the key and does some magic, so that then whenever the key is needed for the
connecting to a host you don't have to enter your password. ssh-agent manages the
local encryption on your key for the current session.
SSH Reagent
I'm not sure where I found this amazing little function but it's great. Typically,
ssh-agents are attached to the current session, like the window manager, so that when
the window manager dies, the ssh-agent loses the decrypted bits from your ssh key.
That's nice, but it also means that if you have some processes that exist outside of your
window manager's session (e.g. Screen sessions) they loose the ssh-agent and get
trapped without access to an ssh-agent so you end up having to restart
would-be-persistent processes, or you have to run a large number of ssh-agents which
is not ideal.
Enter "ssh-reagent." stick this in your shell configuration (e.g. ~/.bashrc or
~/.zshrc ) and run ssh-reagent whenever you have an agent session running and
a terminal that can't see it.
ssh-reagent () {
  for agent in /tmp/ssh-*/agent.*; do
      export SSH_AUTH_SOCK=$agent
      if ssh-add -l 2>&1 > /dev/null; then
         echo Found working SSH Agent:
         ssh-add -l
         return
      fi
  done
  echo Cannot find ssh agent - maybe you should reconnect and forward it?
}
It's magic.
SSHFS and SFTP
Typically we think of ssh as a way to run a command or get a prompt on a remote machine. But
SSH can do a lot more than that, and the OpenSSH package that probably the most
popular implementation of SSH these days has a lot of features that go beyond just "shell"
access. Here are two cool ones:
SSHFS creates a
mountable file system using FUSE of
the files located on a remote system over SSH. It's not always very fast, but it's
simple and works great for quick operations on local systems, where the speed issue is
much less relevant.
SFTP, replaces FTP (which is plagued by security problems,) with a similar tool for
transferring files between two systems that's secure (because it works over SSH) and is just as
easy to use. In fact most recent OpenSSH daemons provide SFTP access by default.
There's more, like a full VPN solution in recent versions, secure remote file copy, port
forwarding, and the list could go on. SSH Tunnels
SSH includes the ability to connect a port on your local system to a port on a remote
system, so that to applications on your local system the local port looks like a normal local
port, but when accessed the service running on the remote machine responds. All traffic is
really sent over ssh.
I set up an SSH tunnel for my local system to the outgoing mail server on my server. I tell
my mail client to send mail to localhost server (without mail server authentication!), and it
magically goes to my personal mail relay encrypted over ssh. The applications of this
are nearly endless.
Keep Alive Packets
The problem: unless you're doing something with SSH it doesn't send any packets, and as a
result the connections can be pretty resilient to network disturbances. That's not a problem,
but it does mean that unless you're actively using an SSH session, it can go silent causing
your local area network's NAT to eat a connection that it thinks has died, but hasn't. The
solution is to set the " ServerAliveInterval [seconds] " configuration in the SSH
configuration so that your ssh client sends a "dummy packet" on a regular interval so that the
router thinks that the connection is active even if it's particularly quiet. It's good stuff.
/dev/null .known_hosts
A lot of what I do in my day job involves deploying new systems, testing something out and
then destroying that installation and starting over in the same virtual machine. So my "test
rigs" have a few IP addresses, I can't readily deploy keys on these hosts, and every time I
redeploy SSH's host-key checking tells me that a different system is responding for the host,
which in most cases is the symptom of some sort of security error, and in most cases knowing
this is a good thing, but in some cases it can be very annoying.
These configuration values tell your SSH session to save keys to ` /dev/null (i.e.
drop them on the floor) and to not ask you to verify an unknown host:
UserKnownHostsFile /dev/null
StrictHostKeyChecking no
This probably saves me a little annoyance and minute or two every day or more, but it's
totally worth it. Don't set these values for hosts that you actually care about.
I'm sure there are other awesome things you can do with ssh, and I'd live to hear more . Onward and Upward!
Do you make a lot of connections to the same servers? You may not have noticed how slow an initial connection to a shell is. If
you multiplex your connection you will definitely notice it though. Let's test the difference between a multiplexed connection using
SSH keys and a non-multiplexed connection using SSH keys:
# Without multiplexing enabled:
$ time ssh [email protected] uptime
 20:47:42 up 16 days,  1:13,  3 users,  load average: 0.00, 0.01, 0.00

real	0m1.215s
user	0m0.031s
sys	0m0.008s

# With multiplexing enabled:
$ time ssh [email protected] uptime
 20:48:43 up 16 days,  1:14,  4 users,  load average: 0.00, 0.00, 0.00

real	0m0.174s
user	0m0.003s
sys	0m0.004s
We can see that multiplexing the connection is much faster, in this instance on an order of 7 times faster than not multiplexing
the connection. Multiplexing allows us to have a "control" connection, which is your initial connection to a server, this is then
turned into a UNIX socket file on your computer. All subsequent connections will use that socket to connect to the remote host. This
allows us to save time by not requiring all the initial encryption, key exchanges, and negotiations for subsequent connections to
the server.
Host *
ControlMaster auto
ControlPath ~/.ssh/connections/%r_%h_%p
A negative to this is that some uses of ssh may fail to work with your multiplexed connection. Most notably commands which use
tunneling like git, svn or rsync, or forwarding a port. For these you can add the option -oControlMaster=no. To prevent a specific
host from using a multiplexed connection add the following to your ~/.ssh/config file:
Host YOUR_SERVER_OR_IP
MasterControl no
There are security precautions that one should take with this approach. Let's take a look at what actually happens when we connect
a second connection:
$ ssh -v -i /dev/null [email protected]
OpenSSH_4.7p1, OpenSSL 0.9.7l 28 Sep 2006
debug1: Reading configuration data /Users/symkat/.ssh/config
debug1: Reading configuration data /etc/ssh_config
debug1: Applying options for *
debug1: auto-mux: Trying existing master
Last login:
symkat@symkat:~$ exit
As we see no actual authentication took place. This poses a significant security risk if running it from a host that is not trusted,
as a user who can read and write to the socket can easily make the connection without having to supply a password. Take the same
care to secure the sockets as you take in protecting a private key.
Using SSH As A Proxy
Even Starbucks now has free WiFi in its stores. It seems the world has caught on to giving free Internet at most retail locations.
The downside is that more teenagers with "Got Root?" stickers are camping out at these locations running the latest version of wireshark.
SSH's encryption can stand up to most any hostile network, but what about web traffic?
Most web browsers, and certainly all the popular ones, support using a proxy to tunnel your traffic. SSH can provide a SOCKS proxy
on localhost that tunnels to your remote server with the -D option. You get all the encryption of SSH for your web traffic, and can
rest assured no one will be capturing your login credentials to all those non-ssl websites you're using.
Now there is a proxy running on 127.0.0.1:1080 that can be used in a web browser or email client. Any application that supports
SOCKS 4 or 5 proxies can use 127.0.0.1:1080 to tunnel its traffic.
$ nc -vvv 127.0.0.1 1080
Connection to 127.0.0.1 1080 port [tcp/socks] succeeded!
Using One-Off Commands
Often times you may want only a single piece of information from a remote host. "Is the file system full?" "What's the uptime
on the server?" "Who is logged in?"
Normally you would need to login, type the command, see the output and then type exit (or Control-D for those in the know.) There
is a better way: combine the ssh with the command you want to execute and get your result:
This executed the ssh symkat.com, logged in as symkat, and ran the command "uptime" on symkat. If you're not using SSH keys then
you'll be presented with a password prompt before the command is executed.
$ ssh [email protected] ps aux | echo $HOSTNAME
symkats-macbook-pro.local
This executed the command ps aux on symkat.com, sent the output to STDOUT, a pipe on my local laptop picked it up to execute "echo
$HOSTNAME" locally. Although in most situations using auxiliary data processing like grep or awk will work flawlessly, there are
many situations where you need your pipes and file IO redirects to work on the remote system instead of the local system. In that
case you would want to wrap the command in single quotes:
As a basic rule if you're using > >> < - or | you're going to want to wrap in single quotes.
It is also worth noting that in using this method of executing a command some programs will not work. Notably anything that requires
a terminal, such as screen, irssi, less, or a plethora of other interactive or curses based applications. To force a terminal to
be allocated you can use the -t option:
Pipes are useful. The concept is simple: take the output from one program's STDOUT and feed it to another program's STDIN. OpenSSH
can be used as a pipe into a remote system. Let's say that we would like to transfer a directory structure from one machine to another.
The directory structure has a lot of files and sub directories.
We could make a tarball of the directory on our own server and scp it over. If the file system this directory is on lacks the
space though we may be better off piping the tarballed content to the remote system.
What we did in this example was to create a new archive (-c) and to compress the archive with gzip (-z). Because we did not use
-f to tell it to output to a file, the compressed archive was send to STDOUT. We then piped STDOUT with | to ssh. We used a one-off
command in ssh to invoke tar with the extract (-x) and gzip compressed (-z) arguments. This read the compressed archive from the
originating server and unpacked it into our server. We then logged in to see the listing of files.
Additionally, we can pipe in the other direction as well. Take for example a situation where you with to make a copy of a remote
database, into a local database:
symkat@chard:~$ echo "create database backup" | mysql -uroot -ppassword
symkat@chard:~$ ssh [email protected] 'mysqldump -udbuser -ppassword symkat' | mysql -uroot -ppassword backup
symkat@chard:~$ echo use backup;select count(*) from wp_links;" | mysql -uroot -ppassword
count(*)
12
symkat@chard:~$
What we did here is to create the database "backup" on our local machine. Once we had the database created we used a one-off command
to get a dump of the database from symkat.com. The SQL Dump came through STDOUT and was piped to another command. We used mysql to
access the database, and read STDIN (which is where the data now is after piping it) to create the database on our local machine.
We then ran a MySQL command to ensure that there is data in the backup table. As we can see, SSH can provide a true pipe in either
direction.
"... Now, you need to supply this file and path to sshd daemon so that it can fetch this banner for each user login request. For that open /etc/sshd/sshd_config file and search for line #Banner none Here you have to edit file and write your filename and remove hash mark. It should look like : Banner /etc/login.warn ..."
"... Save file and restart sshd daemon. To avoid disconnecting existing connected users, use HUP signal to restart sshd. ..."
How to display message when user connects to system before login
This message will be displayed to user when he connects to server and before he logged in. Means
when he enter the username, this message will be displayed before password prompt.
You can use any filename and enter your message within. Here we used /etc/login.warn
file and put our messages inside.
Shell
# cat /etc/login.warn !!!! Welcome to KernelTalks test server !!!! This server is meant for testing
Linux commands and tools. If you are not associated with kerneltalks.com and not authorized please
dis-connect immediately.
Now, you need to supply this file and path to sshd daemon so that it can fetch this
banner for each user login request. For that open /etc/sshd/sshd_config file and search
for line #Banner none Here you have to edit file and write your filename and remove hash mark. It should look like :
Banner /etc/login.warn
Save file and restart sshd daemon. To avoid disconnecting existing connected users,
use HUP signal to restart sshd.
Port forwarding
using SSH
tunnels is a convenient way to circumvent well-intentioned firewall rules, or to access
resources on otherwise unaddressable networks, particularly those behind NAT (with addresses
such as 192.168.0.1 ).
However, it has a shortcoming in that it only allows us to address a specific host and port
on the remote end of the connection; if we forward a local port to machine A on the remote
subnet, we can't also reach machine B unless we forward another port. Fetching documents from a
single server therefore works just fine, but browsing multiple resources over the endpoint is a
hassle.
The proper way to do this, if possible, is to have a VPN connection into the appropriate
network, whether via a virtual interface or a network route through an IPsec tunnel. In cases
where this isn't possible or practicable, we can use a SOCKS proxy set up via an SSH connection to delegate
all kinds of network connections through a remote machine, using its exact network stack,
provided our client application supports it.
Being command-line junkies, we'll show how to set the tunnel up with ssh and to
retrieve resources on it via curl , but of course graphical browsers are
able to use SOCKS proxies as well.
As an added benefit, using this for browsing implicitly encrypts all of the traffic up to
the remote endpoint of the SSH connection, including the addresses of the machines you're
contacting; it's thus a useful way to protect unencrypted traffic from snoopers on your local
network, or to circumvent firewall policies.
Establishing the tunnel
First of all we'll make an SSH connection to the machine we'd like to act as a SOCKS proxy,
which has access to the network services that we don't. Perhaps it's the only publically
addressable machine in the network.
$ ssh -fN -D localhost:8001 remote.example.com
In this example, we're backgrounding the connection immediately with -f , and
explicitly saying we don't intend to run a command or shell with -N . We're only
interested in establishing the tunnel.
Of course, if you do want a shell as well, you can leave these options out:
$ ssh -D localhost:8001 remote.example.com
If the tunnel setup fails, check that AllowTcpForwarding is set to
yes in /etc/ssh/sshd_config on the remote machine:
AllowTcpForwarding yes
Note that in both cases we use localhost rather than 127.0.0.1 ,
in order to establish both IPv4 and IPv6 sockets if appropriate.
We can then check that the tunnel is established with ss on GNU/Linux:
# ss dst :8001
State      Recv-Q Send-Q   Local Address:Port       Peer Address:Port
ESTAB      0      0            127.0.0.1:45666         127.0.0.1:8001
ESTAB      0      0            127.0.0.1:45656         127.0.0.1:8001
ESTAB      0      0            127.0.0.1:45654         127.0.0.1:8001
Requesting documents
Now that we have a SOCKS proxy running on the far end of the tunnel, we can use it to
retrieve documents from some of the servers that are otherwise inaccessible. For example, when
we were trying to run this from the client side, we found it wouldn't work:
This is because the example subnet is on a remote and unroutable LAN. If its
name comes from a private DNS server, we may not even be able to resolve its address, let alone
retrieve the document.
We can fix both problems with our local SOCKS proxy, by pointing curl to it
with its --proxy option:
$ curl --proxy socks5h://localhost:8001 http://private.example/contacts.html
<!DOCTYPE HTML PUBLIC "-//W3C//DTD HTML 3.2 Final//EN">
<html>
    <head>
        <title>Contacts</title>
...
Older versions of curl may need to use the --socks5-hostname
option:
This not only tunnels our HTTP request through to remote.example.com and
returns any response, it does the DNS lookup on the other end too. This means we can not only
retrieve documents from remote servers, we can resolve their hostnames too, even if our client
side can't contact the appropriate DNS server on its own. This is what the h
suffix does in the socks5h:// URI syntax above.
We can configure graphical web browsers to use the SOCKS proxy in the same way, optionally
including DNS resolution:
Browsers are not the only application that can use SOCKS proxies; many IM clients such as
Pidgin and Bitlbee can use them too, for example.
Making things more
permanent
If this all works for you and you'd like to set up the SOCKS proxy on the far end each time
you connect, you can add it to your ssh_config file in
$HOME/.ssh/config :
If you've
dabbled with SSH much, for example by following the excellent suso.org tutorial a few years ago,
you'll know about adding keys to allow passwordless login (or, if you prefer, a passphrase)
using public key authentication. Specifically, you copy the public key
~/.ssh/id_rsa.pub or ~/.ssh/id_dsa.pub off the machine from which you
wish to connect into the /.ssh/authorized_keys file on the target machine. That
will allow you to open an SSH session with the machine from the user account on the local
machine to the one on the remote machine, without having to type in a password.
However, there's a nice shortcut that I didn't know about when I first learned how to do
this, which has since been added to that tutorial too -- specifically, the
ssh-copy-id tool, which is available in most modern OpenSSH distributions and
combines this all into one less error-prone step. If you have it available to you, it's
definitely a much better way to add authorized keys onto a remote machine.
tom@conan:~$ ssh-copy-id crom
Incidentally, this isn't just good for convenience or for automated processes; strong
security policies for publically accessible servers might disallow logging in via passwords
completely, as usernames and passwords can be guessed. It's a lot harder to guess an entire SSH
key, so forcing this login method will reduce your risk of script kiddies or automated attacks
brute-forcing your OpenSSH server to zero. You can arrange this by setting
ChallengeResponseAuthentication to no in your
sshd_config , but if that's a remote server, be careful not to lock yourself
out!
Quite apart from
replacing Telnet and other insecure protocols as the primary means of choice for contacting and
administrating services, the OpenSSH implementation of the SSH protocol has developed into a
general-purpose toolbox for all kinds of well-secured communication, whether using both simple
challenge-response authentication in the form of user and password logins, or for more complex
public key authentication.
SSH is useful in a general sense for tunneling pretty much any kind of TCP traffic, and
doing so securely and with appropriate authentication. This can be used both for ad-hoc
purposes such as talking to a process on a remote host that's only listening locally or within
a secured network, or for bypassing restrictive firewall rules, to more stable implementations
such as setting up a persistent SSH tunnel between two machines to ensure sensitive traffic
that might otherwise be sent in cleartext is not only encrypted but authenticated. I'll discuss
a couple of simple examples here, in addition to talking about the SSH escape sequences, about
which I don't seem to have seen very much information online.
SSH tunnelling for port
forwarding
Suppose you're at work or on a client site and you need some information off a webserver on
your network at home, perhaps a private wiki you run, or a bug tracker or version control
repository. This being private information, and your HTTP daemon perhaps not the most secure in
the world, the server only listens on its local address of 192.168.1.1 , and HTTP
traffic is not allowed through your firewall anyway. However, SSH traffic is, so all you need
to do is set up a tunnel to port forward a local port on your client machine to a local port on
the remote machine. Assuming your SSH-accessible firewall was listening on
firewall.yourdomain.com , one possible syntax would be:
If you then pointed your browser to localhost:5080 , your traffic would be
transparently tunnelled to your webserver by your firewall, and you could act more or less as
if you were actually at home on your office network with the webserver happily trusting all of
your requests. This will work as long as the SSH session is open, and there are means to
background it instead if you prefer -- see man ssh and look for the -f and
-N options. As you can see by the use of the 192.168.1.1 address
here, this also works through NAT.
This can work in reverse, too; if you need to be able to access a service on your local
network that might be behind a restrictive firewall from a remote machine, a perhaps
less typical but still useful case, you could set up a tunnel to listen for SSH connections on
the network you're on from your remote firewall:
As long as this TCP session stays active on the machine, you'll be able to point an SSH
client on your firewall to localhost on port 5022, and it will open an SSH session
as normal:
$ ssh localhost -p 5022
I have used this as an ad-hoc VPN back into a remote site when the established VPN system
was being replaced, and it worked very well. With appropriate settings for sshd ,
you can even allow other machines on that network to use the forward through the firewall, by
allowing GatewayPorts and providing a bind_address to the SSH
invocation. This is also in the manual.
SSH's practicality and transparency in this regard has meant it's quite typical for advanced
or particularly cautious administrators to make the SSH daemon the only process on appropriate
servers that listens on a network interface other than localhost , or as the
only port left open on a private network firewall, since an available SSH service proffers full
connectivity for any legitimate user with a basic knowledge of SSH tunnelling anyway. This has
the added bonus of transparent encryption when working on any sort of insecure network. This
would be a necessity, for example, if you needed to pass sensitive information to another
network while on a public WiFi network at a café or library; it's the same rationale for
using HTTPS rather than HTTP wherever possible on public networks.
Escape sequences
If you use these often, however, you'll probably find it's a bit inconvenient to be working
on a remote machine through an SSH session, and then have to start a new SSH session or restart
your current one just to forward a local port to some resource that you discovered you need on
the remote machine. Fortunately, the OpenSSH client provides a shortcut in the form of its
escape sequence, ~C .
Typed on its own at a fresh Bash prompt in an ssh session, before any other
character has been inserted or deleted, this will drop you to an ssh> prompt.
You can type ? and press Enter here to get a list of the commands available:
The syntax for the -L and -R commands is the same as when used as
a parameter for SSH. So to return to our earlier example, if you had an established SSH session
to the firewall of your local network, to forward a port you could drop to the
ssh> prompt and type -L5080:localhost:80 to get the same port
forward rule working.
Posted on For system and
network administrators or other users who frequently deal with sessions on multiple machines,
SSH ends up being one of the most oft-used Unix tools. SSH usually works so well that until you
use it for something slightly more complex than
starting a terminal session on a remote machine, you tend to use it fairly automatically.
However, the ~/.ssh/config file bears mentioning for a few ways it can make using
the ssh a client a little easier. Abbreviating hostnames
If you often have to SSH into a machine with a long host and/or network name, it can get
irritating to type it every time. For example, consider the following command:
$ ssh web0911.colo.sta.solutionnetworkgroup.com
If you interact with the web0911 machine a lot, you could include a stanza like
this in your ~/.ssh/config :
This would allow you to just type the following for the same result:
$ ssh web0911
Of course, if you have root access on the system, you could also do this by adding the
hostname to your /etc/hosts file, or by adding the domain to your
/etc/resolv.conf to search it, but I prefer the above solution as it's cleaner and
doesn't apply system-wide.
Fixing alternative ports
If any of the hosts with which you interact have SSH processes listening on alternative
ports, it can be a pain to both remember the port number and to type it in every time:
$ ssh webserver.example.com -p 5331
You can affix this port permanently into your .ssh/config file instead:
Host webserver.example.com
    Port 5331
This will allow you to leave out the port definition when you call ssh on that
host:
$ ssh webserver.example.com
Custom identity files
If you have a private/public key setup working between your client machine and the server,
but for whatever reason you need to use a different key from your normal one, you'll be using
the -i flag to specify the key pair that should be used for the connection:
I need to do this for Mikrotik's RouterOS connections, as my own private key structure is
2048-bit RSA which RouterOS doesn't support, so I keep a DSA key as well just for that
purpose.
Logging in as a different user
By default, if you omit a username, SSH assumes the username on the remote machine is the
same as the local one, so for servers on which I'm called tom , I can just
type:
tom@conan:$ ssh server.network
However, on some machines I might be known as a different username, and hence need to
remember to connect with one of the following:
If I always connect as the same user, it makes sense to put that into my
.ssh/config instead, so I can leave it out of the command entirely:
Host server.anothernetwork
    User tomryder
SSH proxies
If you have an SSH server that's only accessible to you via an SSH session on an
intermediate machine, which is a very common situation when dealing with remote networks using
private RFC1918 addresses through network address translation, you can automate that in
.ssh/config too. Say you can't reach the host nathost directly, but
you can reach some other SSH server on the same private subnet that is publically accessible,
publichost.example.com :
"... The ssh-agent program is designed as a wrapper for a shell. If you have a private and public key setup ready, and you have remote machines for which your key is authorised, you can get an idea of how the agent works by typing: ..."
Public key authentication has a lot of advantages for connecting to servers,
particularly if it's the only allowed means of authentication, reducing the chances of a brute
force password attack to zero. However, it doesn't solve the problem of having to type in a
password or passphrase on each connection, unless you're using a private key with no
passphrase, which is quite risky if the private key is compromised.
Thankfully, there's a nice supplement to a well-secured SSH key setup in the use of
agents on trusted boxes to securely store decrypted keys per-session, per-user.
Judicious use of an SSH agent program on a trusted machine allows you to connect to any server
for which your public key is authorised by typing your passphrase to decrypt your private key
only once.
SSH agent setup
The ssh-agent program is designed as a wrapper for a shell. If you have a
private and public key setup ready, and you have remote machines for which your key is
authorised, you can get an idea of how the agent works by typing:
$ ssh-agent bash
This will prompt you for your passphrase, and once entered, within the context of that
subshell, you will be able to connect to authorised remote servers without typing in the
passphrase again. Once loaded, you can examine the identities you have by using ssh-add
-l to see the fingerprints, and ssh-add -L for the public keys:
You can set up your .bashrc file to automatically search for accessible SSH
agents to use for the credentials for new connections, and to prompt you for a passphrase to
open a new one if it need be. There are very workable instructions on GitHub for
setting this up.
If you want to shut down the agent at any time, you can use ssh-agent -k .
Where the configuration of the remote machine allows it, you can forward
authentication requests made from the remote machine back to the agent on your workstation.
This is handy for working with semi-trusted gateway machines that you trust to forward your
authentication requests correctly, but on which you'd prefer not to put your private key.
This means that if you connect to a remote machine from your workstation running an SSH
agent with the following, using the -A parameter:
user@workstation:~$ ssh -A remote.example.com
You can then connect to another machine from remote.example.com using your
private key on workstation :
user@remote:~$ ssh another.example.com
SSH agent authentication via PAM
It's also possible to use SSH agent authentication as a PAM method for general
authentication, such as for sudo , using pam_ssh_agent_auth .
It may be the case
that while you're happy to allow a user or process to have public key authentication access to
your server via the ~/.ssh/authorized_keys file, you don't necessarily want to
give them a full shell, or you may want to restrict them from doing things like SSH port
forwarding or X11 forwarding.
One method that's supposed to prevent users from accessing a shell is by defining their
shell in /etc/passwd as /bin/false , which does indeed prevent them
from logging in with the usual ssh or ssh command syntax. This isn't
a good approach because it still allows port forwarding and other
SSH-enabled services.
If you want to restrict the use of logins with a public key, you can prepend option pairs to
its line in the authorized_keys file. Some of the most useful options here
include:
from="<hostname/ip>" -- Prepending from="*.example.com"
to the key line would only allow public-key authenticated login if the connection was coming
from some host with a reverse DNS of example.com . You can also put IP addresses
in here. This is particularly useful for setting up automated processes through keys with
null passphrases.
command="<command>" -- Means that once authenticated, the command
specified is run, and the connection is closed. Again, this is useful in automated setups for
running only a certain script on successful authentication, and nothing else.
no-agent-forwarding -- Prevents the key user from forwarding authentication
requests to an SSH agent on their client, using the -A or
ForwardAgent option to ssh .
no-port-forwarding -- Prevents the key user from forwarding ports using
-L and -R .
no-X11-forwarding -- Prevents the key user from forwarding X11
processes.
no-pty -- Prevents the key user from being allocated a tty
device at all.
So, for example, a public key that is only used to run a script called
runscript on the server by the client [email protected] :
A public key for a user whom you were happy to allow to log in from anywhere with a full
shell, but did not want to allow agent, port, or X11 forwarding:
Use of these options goes a long way to making your public key authentication setup harder
to exploit, and is very consistent with the principle of least privilege .
To see a complete list of the options available, check out the man page for sshd .
Occasionally you
may find yourself using a network behind a firewall that doesn't allow outgoing TCP connections
with a destination port of 22, meaning you're unable to connect to your OpenSSH server, perhaps
to take advantage of a SOCKS proxy for encrypted and
unfiltered web browsing.
Since these restricted networks almost always allow port 443 out, since it's the destination
port for outgoing HTTPS requests, an easy workaround is to have your OpenSSH server listen on
port 443 if it isn't already using the port.
This is sometimes given as a rationale for changing the sshd port completely,
but you don't need to do that; you can simply add another Port directive to
sshd_config(5) :
Port 22
Port 443
After restarting the OpenSSH server with this new line in place, you can verify that it's
listening with ss(8)
or netstat(8)
# ss -lnp src :22
State      Recv-Q Send-Q    Local Address:Port      Peer Address:Port
LISTEN     0      128                  :::22                  :::*
users:(("sshd",3039,6))
LISTEN     0      128                   *:22                   *:*
users:(("sshd",3039,5))
# ss -lnp src :443
State      Recv-Q Send-Q    Local Address:Port      Peer Address:Port
LISTEN     0      128                  :::443                 :::*
users:(("sshd",3039,4))
LISTEN     0      128                   *:443                  *:*
users:(("sshd",3039,3))
You'll then be able to connect to the server on port 443, the same way you would on port 22.
If you intend this setup to be permanent, it would be a good idea to save the configuration in your
ssh_config(5)
file, or whichever SSH client you happen to use. Posted in SSH Tagged additional ports , multiple ports ,
workaround
SSHGuard is an intrusion prevention
utility that parses logs and automatically blocks misbehaving IP addresses (or their subnets)
with the system firewall. SSHGuard version 2.1 was just released with new blocking services,
the ability to block a configurable-sized subnet, and better log reading capabilities.
For system and network administrators or other users who frequently deal with sessions on
multiple machines, SSH ends up being one of the most oft-used Unix tools. SSH usually works so
well that until you use it for something slightly more complex than
starting a terminal session on a remote machine, you tend to use it fairly automatically.
However, the ~/.ssh/config file bears mentioning for a few ways it can make using
the ssh a client a little easier. Abbreviating hostnames
If you often have to SSH into a machine with a long host and/or network name, it can get
irritating to type it every time. For example, consider the following command:
$ ssh web0911.colo.sta.solutionnetworkgroup.com
If you interact with the web0911 machine a lot, you could include a stanza like
this in your ~/.ssh/config :
This would allow you to just type the following for the same result:
$ ssh web0911
Of course, if you have root access on the system, you could also do this by adding the
hostname to your /etc/hosts file, or by adding the domain to your
/etc/resolv.conf to search it, but I prefer the above solution as it's cleaner and
doesn't apply system-wide.
Fixing alternative ports
If any of the hosts with which you interact have SSH processes listening on alternative
ports, it can be a pain to both remember the port number and to type it in every time:
$ ssh webserver.example.com -p 5331
You can affix this port permanently into your .ssh/config file instead:
Host webserver.example.com
    Port 5331
This will allow you to leave out the port definition when you call ssh on that
host:
$ ssh webserver.example.com
Custom identity files
If you have a private/public key setup working between your client machine and the server,
but for whatever reason you need to use a different key from your normal one, you'll be using
the -i flag to specify the key pair that should be used for the connection:
I need to do this for Mikrotik's RouterOS connections, as my own private key structure is
2048-bit RSA which RouterOS doesn't support, so I keep a DSA key as well just for that
purpose.
Logging in as a different user
By default, if you omit a username, SSH assumes the username on the remote machine is the
same as the local one, so for servers on which I'm called tom , I can just
type:
tom@conan:$ ssh server.network
However, on some machines I might be known as a different username, and hence need to
remember to connect with one of the following:
If I always connect as the same user, it makes sense to put that into my
.ssh/config instead, so I can leave it out of the command entirely:
Host server.anothernetwork
    User tomryder
SSH proxies
If you have an SSH server that's only accessible to you via an SSH session on an
intermediate machine, which is a very common situation when dealing with remote networks using
private RFC1918 addresses through network address translation, you can automate that in
.ssh/config too. Say you can't reach the host nathost directly, but
you can reach some other SSH server on the same private subnet that is publically accessible,
publichost.example.com :
As a Linux user, we use
ssh command
to log in to remote machines. The more you use ssh command, the more time you are wasting in typing
some significant commands. We can use either
alias
defined in your .bashrc file or functions to minimize the time you spend on CLI. But this is
not a better solution. The better solution is to use SSH-alias in ssh config file.
A couple of examples where we can better the ssh commands we use.
Connecting to ssh to AWS instance is a pain. Just to type below command, every time is complete
waste your time as well.
In this post, we will see how to achieve shorting of your ssh commands without using bash alias
or functions. The main advantage of ssh alias is that all your ssh command shortcuts are stored in
a single file and easy to maintain. The other advantage is we can use same alias for both SSH and
SCP commands alike
Before we jump into actual configurations, we should know difference between /etc/ssh/ssh_config,
/etc/ssh/sshd_config, and ~/.ssh/config files. Below is the explanation for these files.
System-level SSH configurations are stored in /etc/ssh/ssh_config. Whereas user-level ssh configurations
are stored in ~/.ssh/config file.
System-level SSH configurations are stored in /etc/ssh/ssh_config. Whereas system level SSH server
configurations are stored in /etc/ssh/sshd_config file.
... ... ...
Example1: Create SSH alias for a host(www.linuxnix.com)
Edit file ~/.ssh/config with following content
Host tlj
  User root
  HostName 18.197.176.13
  port 22
... ... ...
Examaple5: Resolve SSH timeout issues in Linux. By default, your ssh logins are timed out if you
don't activily use the terminial.
SSH timeouts are one
more pain where you have to re-login to a remote machine after a certain time. We can set SSH time
out right in side your ~/.ssh/config file to make your session active for whatever time you want.
To achieve this we will use two SSH options for keeping the session alive. One ServerAliveInterval
keeps your session live for number of seconds and ServerAliveCountMax will initial session after
session for a given number.
ServerAliveInterval A
ServerAliveCountMax B
Example:
Host tlj linuxnix linuxnix.com
  User root
  HostName 18.197.176.13
  port 22
  ServerAliveInterval 60
  ServerAliveCountMax 30
We will see some other exiting howto in our next post. Keep visiting linuxnix.com.
UPDATE: This was a good exercise but I decided to replace the script with denyhosts:
http://denyhosts.sourceforge.net/
. In CentOS, just
install the
EPEL
repo first,
then you can install it via yum.
This is one of the problems that my team encountered when we opened up a firewall for SSH
connections. Brute force SSH attacks using botnets are just everywhere! And if you're not
careful, it's quite a headache if one of your servers was compromised.
Lot of tips can be found in the Internet and this is the approach that I came up with based
on numerous sites that I've read.
strong passwords
DUH! This is obvious but most people ignore it. Don't be lazy.
disable root access through SSH
Most of the time, direct root access is not needed. Disabling it is highly recommended.
open
/etc/ssh/sshd_config
enable and set this SSH config to no:
PermitRootLogin no
restart SSH:
service sshd restart
limit users who can log-in through SSH
Users who can use the SSH service can be specified. Botnets often use user names that were
added by an application, so listing the users can lessen the vulnerability.
open
/etc/ssh/sshd_config
enable and list the users with this SSH config:
AllowUsers user1 user2
          user3
restart SSH:
service sshd restart
use a script to automatically block malicious IPs
Utilizing SSH daemon's log file (in CentOS/RHEL, it's in /var/log/secure ), a simple script
can be written that can automatically block malicious IPs using tcp_wrapper's host.deny
If AllowUsers is enabled, the SSH daemon will log invalid attempts in this format:
sshd[8207]: User apache from 125.5.112.165 not allowed because not listed in AllowUsers
sshd[15398]: User ftp from 222.169.11.13 not allowed because not listed in AllowUsers
SSH also logs invalid attempts in this format: sshd[6419]: Failed password for invalid
user zabbix from 69.10.143.168 port 50962 ssh2 Based on the information above, I came up
with this script:
#!/bin/bash

# always exclude these IPs
exclude_ips='192.168.60.1|192.168.60.10'

file_log='/var/log/secure'
file_host_deny='/etc/hosts.deny'

tmp_list='/tmp/ips.for.restriction'

if [[ -e $tmp_list ]]
then
    rm $tmp_list
fi

# set the separator to new lines only
IFS=$'\n'

# REGEX filter
filter="^$(date +%b\\s*%e).+(not listed in AllowUsers|\
Failed password.+invalid user)"

for ip in $( pcregrep  $filter $file_log \
  | perl -ne 'if (m/from\s+([^\s]+)\s+(not|port)/) { print $1,"\n"; }' )
do
    if [[ $ip ]]
    then
        echo "ALL: $ip" >> $tmp_list
    fi
done

# reset
unset IFS

cat $file_host_deny >> $tmp_list
sort -u $tmp_list  | pcregrep -v $exclude_ips > $file_host_deny
I deployed the script in root's crontab and set it to run every minute
This page shows common problems experienced with SSH in general, and when establishing an
SSH tunnel
, and
solutions for each problem.
Tip: Most port-forwarding problems are caused by a basic misunderstanding of how an SSH
tunnel actually works, so it is highly recommended that you read the
SSH Tunnel
page before continuing.
Table of Contents
Connection Problems
Unable to open connection:
Host does not exist
Connection fails with the following error:
Unable to open connection:
Host does not exist
This error occurs when:
The server name cannot be resolved to an IP address. If it could be, a different error
would be displayed (such as Connection refused). Check the server exists and is reachable
using PING.
ping servername
Unable to open connection: gethostbyname: unknown error Connection fails with the
    following error:
Unable to open connection:
gethostbyname: unknown error
Connection refused
Connection fails with the following error:
Failed to connect to 100.101.102.103: Network error: Connection refused
Network error: Connection refused
FATAL ERROR: Network error: Connection refused
This error occurs when:
The server name is incorrect. Verify the server exists and is running SSHD.
The port specified with the -P (PLINK/PuTTY) or -p (ssh) argument is incorrect. Verify
that the port is correct.
There is a firewall or other connection problem between the two servers. Try using telnet
to telnet to the server/port.
Failed to add the host to the list of known hosts (/home/USERNAME/.ssh/known_hosts)
Connection works, but the following warning is issued
Failed to add the host to the list of known hosts (/home/USERNAME/.ssh/known_hosts)
This error occurs when:
The user's HOME folder has incorrect permissions
The user's HOME/.ssh folder or HOME/.ssh/known_hosts file has incorrect permissions (such
as when the folder has been copied into location by root, or permissions have been manually
set incorrectly)
To fix, execute these commands (as root) to reset the permissions to their correct values
(replace USERNAME with the appropriate username)
Authentication Problems
When using a key, you are prompted for a password (instead of
automatically authenticating)
This can be caused be:
Providing a passphrase on the key. Verify that you have created the SSH key-pair with no
passphrase
Incorrect setup on the SSH server (key file or security not correctly configured). In
some cases, no error will appear in the SSHD logs on the server.
Incorrect key specified on the client. For example, specifying the public key in the
command line arguments instead of the private key.
Incorrect username specified for the key. For example, the key has been installed for
user "neale" but you are connecting as username "cassie".
Unable to use key file "keys\KEYNAME.ppk" (unable to open file)
This is caused by an inability to open the specified SSH key file.
Verify that the key file exists, and is really at the location you have specified with
the -i argument
Verify that the local user executing the PLINK/ssh command has permissions to read the
key file
Tunnel Problems / Port Forwarding Problems
Note that some of these errors will only appear if verbose-output (-v) is switched on for
the PLINK command or SSH commands. PuTTY hides them, but PLINK can be used with exactly the
same command line arguments, so test with PLINK and the -v command line option.
Forwarded
connection refused by server: Administratively prohibited [open failed], or channel N: open
failed: administratively prohibited: open failed
This error appears in the PLINK/PuTTY/ssh window when:
the port forwarding address does not exist (most common reason, normally a typo)
port-forwarding has been disabled server-wide in /etc/ssh/sshd_config using
AllowTcpForwarding no (default setting is yes)
port-forwarding is limited to specific hosts only (and the one you are connecting to is
not in the list), in the server-wide setting file /etc/ssh/sshd_config under the PermitOpen
option. Note that even if the host is allowed in permitopen in authorized_keys2 (see below),
it still needs to be allowed in sshd_config as well.
you are using a certificate-based connection and port-forwarding has been disabled in
/home/username/.ssh/authorized_keys2 with the option no-port-forwarding
you are using a certificate-based connection and port-forwarding is limited to specific
hosts only (and the one you are connecting to is not in the list), in the
/home/username/.ssh/authorized_keys2 file using the permitopen= option
a DNS problem on the server is preventing the host name from being resolved to an IP
address (error in DNS, or manual entry in /etc/hosts)
For example, you have tried to connect to servername.example.com using an SSH command line
argument such as:
-L 127.0.0.1:3500:servername.example.com:3506
However, servername.example.com does not exist, is not permitted, or cannot be resolved
correctly by the remote server. Unfortunately, the error message is quite vague, and always makes
it look like a security issue. Verify the server name is correct and try again, then check with
your administrator.
When this is the problem the following will appear in the SSH server logs (eg:
/var/log/auth.log in Linux):
Nov 28 17:00:57 server sshd[27850]: error: connect_to servername.example.com: unknown host (Name or service not known)

or

Aug 26 17:48:10 server sshd[24180]: Received request to connect to host servername.example.com port NNNN, but the request was denied.
Forwarded connection refused by server: Connect failed [Connection refused]
This error appears in the PLINK/PuTTY/ssh window, when you try to establish a connection to
the tunnel, and the server cannot connect to the remote port specified.
For example, you have specified that the tunnel goes to servername.example.com:3506 using an
SSH command line argument such as:
-L 127.0.0.1:3500:servername.example.com:3506
When you then try to telnet to 127.0.0.1:3500 on the client machine, this is tunnelled
through to the server, which then attempts to connect to servername.example.com:3506. However, that
that connection between the server and servername.example.com:3506 is refused.
Check the tunnel server:port is correct, or ensure that the server is able to connect to the
specified server:port.
Service lookup failed for destination port ""
This error appears in the PLINK/PuTTY/ssh window, if your tunnel definition is incomplete or
incorrect.
For example, the additional space after "3500:" in the following line will cause this
error:
line which causes error:
-L 127.0.0.1:3500: mysql5.metawerx.net:3506
correct line:
-L 127.0.0.1:3500:mysql5.metawerx.net:3506
Local port 127.0.0.1:nnnnn forwarding to nnn.nnn.nnn.nnn:nnnnn failed: Network error:
Permission denied
This error appears in the PLINK/PuTTY/ssh window, if your PuTTY client cannot listen on the
local port you have specified.
This normally occurs because of another service already running on that port.
For example, the tunnel below will fail if you have a local version of SQL/Server already
listening on port 1433:
-L 127.0.0.1:1433:sql2005-1.metawerx.net:1433
To fix, close the program that is listening on that port (ie: SQL/Server in the example
above).
Advanced: You can also adjust to tunnel from another port, such as 127.0.0.2:1433 or
127.0.0.1:1434. However, with SQL/Server, the Management Console application will only allow
connections to 1433. Additionally, it listens on 0.0.0.0:1433, preventing use of port 1433 on
any other IP address. Therefore, unless you first adjust the SQL/Server registry settings to
listen on a specific IP first, it is not possible to have SQL/Server running at the same time
as a local tunnel.
<some program>: not found
If you have connected successfully, but get errors when you try to enter commands at the
tunnel prompt, this is because you have access to the tunnel itself, but not to an SSH prompt
or any tools on the server. You should not be running these commands at the SSH prompt
itself.
Example errors:
createuser: not found
mysql: not found
If you were trying to establish an SSH tunnel, you have already accomplished this part. Your
tunnel should be listening on 127.0.0.1:<some port>. The commands you are trying to
execute should be performed in a new Command Prompt or Shell.
Remember - the tunnel is providing access to a remote service, on your local machine, as if
the server is your own computer.
You can therefore use any command line or GUI tools at your disposal, and connect directly
to 127.0.0.1:<whatever port>.
If you are confused about how this works, see the
SSH Tunnel
page for diagrams and a full
explanation.
Support Topics
page for examples of setting up remote database connections over SSH
Problem not found / not solved? Something to add?
If your problem is not solved by the above guide, please click Add Comment and specify
the error message or problem you are having. This will allow us improve this guide.
If you have helpful information to add, please feel free to add a comment or register so
that you can edit this page yourself.
Contributors:
Christopher Hollowell, John DeStefano There are a number of problems that can cause failures
when connecting to the RACF. Here are some things to look at and try in order to resolve your
problem.
Have you uploaded your public key to the RACF via the key file upload form
(requires your Kerberos user name and password)?
Are you connecting to our SSH gateway from the same system on which you generated
your key pair? If not, you will have to copy the private key to this additional system. If
this system is using a different SSH client, you may need to convert or import the private
key. See: https://www.racf.bnl.gov/docs/authentication/ssh/sshkeys
and click on "Using SSH keys" to help you out. Do not generate and upload another public key
from this additional system; uploading another public key will overwrite your existing public
key and create more problems. Even using different SSH clients on the same system may require
this conversion/import of the private key.
Are you asked for a passphrase when you connect? If not, then your client is not
using the private key for some reason. It could be the private key doesn't exist, is not in
the default filename, access rights of the file are incorrect, the file is not in a directory
the client is searching, or some other reason.
If you have uploaded another public key , then that key pair is the only usable
pair that will work, and all other pairs are now obsolete. Also, the private key from this
pair must be copied and possibly converted or imported to any other SSH clients you are
using.
Username Issues
If your username on your local system is different from your username at the RACF,
then you must specify your RACF username when you connect to the RACF, using the -l option to
the ssh commmand:
ssh -l [username] [RACF-hostname]
or prepending username@ to the SSH gateway system name (no space between the @ and the SSH
gateway system name):
ssh [username]@[RACF-hostname]
In Windows SSH clients, there is typically a text box in which you type in your
username.
Ownership/Access Rights Issues
If you are using a Linux/UNIX based SSH client, please check the ownership and access
rights of your ~/.ssh/ directory and
the private key file in that directory. Both must be owned by your local user account (not
necessarily the same as your
RACF user account). The rights on your ~/.ssh/ directory should be 700 , and the rights
on the private key file (possibly,
but not definitely, named ~/.ssh/id_rsa ), should be 600 . The important thing here is
that "group" and "other" access rights
must be 00 .
PuTTY Issues
If you are using PuTTY in
Windows , then you have to either import your private key , or somehow tell PuTTY
where the key file is.
In the main PuTTY Configuration, click on SSH and then Auth . The window will have a text
box where you can put the path
of the key or browse for it. See Windows SSH Key Generation
for more information on generating SSH keys for use with PuTTY.
You may also need to forward your private key through a remote gateway machine to another
server. See SSH Agent for more information
on storing and forwarding your private key.
Viewing Your Public Key
You can view the contents of the public key you uploaded to the RACF by directing
your Web client to: https://www.racf.bnl.gov/docs/authentication/ssh/sshkeys
and clicking on SSH Public Key File Viewing
Utility . You can check this against the public key that may be on your local
system (the public key is not required to be on your local system; the private key is required
to be there). If they
are not the same, then the private key on your local system may not paired with the public key
you uploaded to the RACF.
If you have both private and public keys on your local system, check the date/time stamps on
them, as they should be the same. If they are not the same, then the private key on your local
system may not be paired with the public key that you uploaded to the RACF. If you are using
the openssh client, then you
can also check to see if your local private key is paired to the public key that you uploaded
to the RACF. Run the command:
ssh-keygen -y
on your local system. It will ask for the filename of your private key and its passphrase
and will display the public
key (without the trailing comment field) that is paired with it. Check this against the results
of viewing the public key
you uploaded to the RACF as described above.
Frozen Sessions and Terminals
If your connection or session intermittently freezes, try adding a server keep-alive option
to your usual SSH command:
ssh ... -o ServerAliveInterval=120
This ensures that a set of request and acknowledgment packets will be sent between the
connection every two minutes, even when no other data has been requested. You can also add this
option to your SSH configuration file ( ~/.ssh/config ) instead of specifying it
with each SSH command:
ServerAliveInterval 120
Host Key Issues
Sometimes host key problems can close the ssh connection before login completes. If you see
an error like this:
ssh_exchange_identification: Connection closed by remote host
Then you might try removing the offending host key from your ~/.ssh/known_hosts
file and try again.
Error: Agent admitted failure to sign using the key
This error might occur if you accidentally load the wrong SSH identity for a specific key,
if you've uploaded a new public key that hasn't yet been synced with your account (or uploaded
multiple or invalid keys), or if you're trying to load too many SSH identities at one time.
Your best recourse is usually to:
I've helped a few people recently who have had trouble getting
OpenSSH
working properly; I've also had my share of issues over the
years. Generally problems with SSH connections fall into two groups - network related and
server related. Most of these problems can be fixed fairly quickly if you know what to look
for.
Network Related Problems
These will typically be caused by improper routing or firewall configurations. Here are some
things to check.
1. If your SSH server sits behind a firewall or router, make sure the default route of your
internal SSH server points back to that firewall or router. Seems obvious, but it's common to
forget about the return trip packets need to make. This will display your default
gateway:
netstat -rn | grep UG
Sometimes the default gateway is just one of your server interfaces, this is OK as long as
that interface is directly connected to something that knows how to get back to your
client.
2. While you're at it, make sure the incoming SSH packets are actually getting to your SSH
server.
Tcpdump
works
very nicely for this, you'll need to be root to run it on the server:
tcpdump -n -i
    eth0 tcp port 22 and host [IP address of client]
Just replace eth0 by your client-facing interface name. If you don't see incoming SSH
packets during connection attempts, it's probably due to a firewall or router access
list.
SSH Server Problems
All of these issues revolve around SSH server configuration settings - not misconfigurations
necessarily, just settings you may not be aware of.
1. Permissions can be a problem - in its default configuration, OpenSSH sets StrictModes to
yes and won't allow any connections if the account you're trying to SSH into has group- or
world-writable permissions on its home directory, ~/.ssh directory, or ~/.ssh/authorized_keys
file. I typically just make the two directories mode 700 and the authorized_keys file mode 600.
The sshd man page suggests this one-liner:
chmod go-w ~/ ~/.ssh
    ~/.ssh/authorized_keys
2. On Debian or Ubuntu systems, it is possible the keys you are using to connect are
blacklisted. This is only an issue on Debian or Debian-based clients, and stems from this
now-famous vulnerability
in May of 2008
. To detect any such blacklisted keys, run ssh-vulnkey on the client, while
logged into the account you are connecting from. Debian and Ubuntu SSH servers will reject any
such keys unless the PermitBlacklistedKeys directive in the /etc/ssh/sshd_config file is set to
no . I don't recommend you actually leave this security check disabled, but it can be useful to
temporarily disable it during testing.
3. Finally, if all else fails, you can see exactly what the SSH server is doing by running
it in debug mode on a non-standard port:
/usr/sbin/sshd -d -p 2222
Then, on the client, connect and watch the server output:
ssh -vv -p 2222 [Server
    IP]
Note the -vv option to provide verbose client output. This alone can sometimes help debug
connection issues (and try -vvv for even more output).
I have user
$USER
which is a system user account with an authorized users file.
When I have SELinux enabled I am unable to ssh into the server using the public key. If I
setenabled 0
,
$USER
can now log in.
What SELinux bool/policy should I change to correct this behaviour without disabling
SELinux entirely?
It's worth noting that
$USER
can login with a password under this default
SELinux configuration, I'd appreciate some insight as to what is happening here, and why
SELinux isn't blocking that. (I will be disabling
A:
Assuming the filesystem permissions are correct on ~/.ssh/*, then check the output of
sealert -a /var/log/audit/audit.log
There should be a clue in an AVC entry there. Most likely the solution will boil down to
running:
restorecon -R -v ~/.ssh
could successfully SSH into my machine yesterday with the exact same credentials I am
using today. The machine is running Centos 6.3 . But now for some reason it is giving me
permission denied. Here is my
-v
print out, sshd_config, and ssh_config
files.
$ ssh -vg -L 3333:localhost:6666 misfitred@devilsmilk
OpenSSH_6.1p1, OpenSSL 1.0.1c 10 May 2012
debug1: Reading configuration data /etc/ssh_config
debug1: Connecting to devilsmilk [10.0.10.113] port 22.
debug1: Connection established.
debug1: identity file /home/kgraves/.ssh/id_rsa type -1
debug1: identity file /home/kgraves/.ssh/id_rsa-cert type -1
debug1: identity file /home/kgraves/.ssh/id_dsa type -1
debug1: identity file /home/kgraves/.ssh/id_dsa-cert type -1
debug1: identity file /home/kgraves/.ssh/id_ecdsa type -1
debug1: identity file /home/kgraves/.ssh/id_ecdsa-cert type -1
debug1: Remote protocol version 2.0, remote software version OpenSSH_6.1
debug1: match: OpenSSH_6.1 pat OpenSSH*
debug1: Enabling compatibility mode for protocol 2.0
debug1: Local version string SSH-2.0-OpenSSH_6.1
debug1: SSH2_MSG_KEXINIT sent
debug1: SSH2_MSG_KEXINIT received
debug1: kex: server->client aes128-ctr hmac-md5 none
debug1: kex: client->server aes128-ctr hmac-md5 none
debug1: sending SSH2_MSG_KEX_ECDH_INIT
debug1: expecting SSH2_MSG_KEX_ECDH_REPLY
debug1: Server host key: ECDSA de:1c:37:d7:84:0b:f8:f9:5e:da:11:49:57:4f:b8:f1
debug1: Host 'devilsmilk' is known and matches the ECDSA host key.
debug1: Found key in /home/kgraves/.ssh/known_hosts:1
debug1: ssh_ecdsa_verify: signature correct
debug1: SSH2_MSG_NEWKEYS sent
debug1: expecting SSH2_MSG_NEWKEYS
debug1: SSH2_MSG_NEWKEYS received
debug1: Roaming not allowed by server
debug1: SSH2_MSG_SERVICE_REQUEST sent
debug1: SSH2_MSG_SERVICE_ACCEPT received
debug1: Authentications that can continue: publickey,password,keyboard-interacti                                ve
debug1: Next authentication method: publickey
debug1: Trying private key: /home/kgraves/.ssh/id_rsa
debug1: Trying private key: /home/kgraves/.ssh/id_dsa
debug1: Trying private key: /home/kgraves/.ssh/id_ecdsa
debug1: Next authentication method: keyboard-interactive
debug1: Authentications that can continue: publickey,password,keyboard-interacti                                ve
debug1: Next authentication method: password
misfitred@devilsmilk's password:
debug1: Authentications that can continue: publickey,password,keyboard-interacti                                ve
Permission denied, please try again.
misfitred@devilsmilk's password:
debug1: Authentications that can continue: publickey,password,keyboard-interacti                                ve
Permission denied, please try again.
misfitred@devilsmilk's password:
debug1: Authentications that can continue: publickey,password,keyboard-interactive
debug1: No more authentication methods to try.
Permission denied (publickey,password,keyboard-interactive).
Here is my sshd_config file on devilsmilk:
#   $OpenBSD: sshd_config,v 1.80 2008/07/02 02:24:18 djm Exp $

# This is the sshd server system-wide configuration file.  See
# sshd_config(5) for more information.

# This sshd was compiled with PATH=/usr/local/bin:/bin:/usr/bin

# The strategy used for options in the default sshd_config shipped with
# OpenSSH is to specify options with their default value where
# possible, but leave them commented.  Uncommented options change a
# default value.

Port 22
#AddressFamily any
#ListenAddress 0.0.0.0
#ListenAddress ::

# Disable legacy (protocol version 1) support in the server for new
# installations. In future the default will change to require explicit
# activation of protocol 1
#Protocol 2

# HostKey for protocol version 1
# HostKey /etc/ssh/ssh_host_key
# HostKeys for protocol version 2
# HostKey /etc/ssh/ssh_host_rsa_key
# HostKey /etc/ssh/ssh_host_dsa_key

# Lifetime and size of ephemeral version 1 server key
#KeyRegenerationInterval 1h
#ServerKeyBits 1024

# Logging
# obsoletes QuietMode and FascistLogging
#SyslogFacility AUTH
#LogLevel INFO

# Authentication:

#LoginGraceTime 2m
#PermitRootLogin yes
StrictModes no
#MaxAuthTries 6
#MaxSessions 10

#RSAAuthentication yes
#PubkeyAuthentication yes
#AuthorizedKeysFile .ssh/authorized_keys
#AuthorizedKeysCommand none
#AuthorizedKeysCommandRunAs nobody

# For this to work you will also need host keys in /etc/ssh/ssh_known_hosts
#RhostsRSAAuthentication no
# similar for protocol version 2
#HostbasedAuthentication yes
# Change to yes if you don't trust ~/.ssh/known_hosts for
# RhostsRSAAuthentication and HostbasedAuthentication
#IgnoreUserKnownHosts no
# Don't read the user's ~/.rhosts and ~/.shosts files
#IgnoreRhosts yes

# To disable tunneled clear text passwords, change to no here!
#PasswordAuthentication yes
#PermitEmptyPasswords no

# Change to no to disable s/key passwords
#ChallengeResponseAuthentication yes

# Kerberos options
#KerberosAuthentication no
#KerberosOrLocalPasswd yes
#KerberosTicketCleanup yes
#KerberosGetAFSToken no
#KerberosUseKuserok yes

# GSSAPI options
#GSSAPIAuthentication no
#GSSAPIAuthentication yes
#GSSAPICleanupCredentials yes
#GSSAPICleanupCredentials yes
#GSSAPIStrictAcceptorCheck yes
#GSSAPIKeyExchange no

# Set this to 'yes' to enable PAM authentication, account processing,
# and session processing. If this is enabled, PAM authentication will
# be allowed through the ChallengeResponseAuthentication and
# PasswordAuthentication.  Depending on your PAM configuration,
# PAM authentication via ChallengeResponseAuthentication may bypass
# the setting of "PermitRootLogin without-password".
# If you just want the PAM account and session checks to run without
# PAM authentication, then enable this but set PasswordAuthentication
# and ChallengeResponseAuthentication to 'no'.
#UsePAM no

# Accept locale-related environment variables
#AcceptEnv LANG LC_CTYPE LC_NUMERIC LC_TIME LC_COLLATE LC_MONETARY LC_MESSAGES
#AcceptEnv LC_PAPER LC_NAME LC_ADDRESS LC_TELEPHONE LC_MEASUREMENT
#AcceptEnv LC_IDENTIFICATION LC_ALL LANGUAGE
#AcceptEnv XMODIFIERS

#AllowAgentForwarding yes
AllowTcpForwarding yes
GatewayPorts yes
#X11Forwarding no
X11Forwarding yes
#X11DisplayOffset 10
#X11UseLocalhost yes
#PrintMotd yes
#PrintLastLog yes
TCPKeepAlive yes
#UseLogin no
#UsePrivilegeSeparation yes
#PermitUserEnvironment no
#Compression delayed
#ClientAliveInterval 0
#ClientAliveCountMax 3
#ShowPatchLevel no
#UseDNS yes
#PidFile /var/run/sshd.pid
#MaxStartups 10
#PermitTunnel no
#ChrootDirectory none

# no default banner path
#Banner none

# override default of no subsystems
Subsystem   sftp    /usr/libexec/openssh/sftp-server

# Example of overriding settings on a per-user basis
#Match User anoncvs
#   X11Forwarding no
#   AllowTcpForwarding no
#   ForceCommand cvs server
And here is my ssh_config file:
#   $OpenBSD: ssh_config,v 1.25 2009/02/17 01:28:32 djm Exp $

# This is the ssh client system-wide configuration file.  See
# ssh_config(5) for more information.  This file provides defaults for
# users, and the values can be changed in per-user configuration files
# or on the command line.

# Configuration data is parsed as follows:
#  1. command line options
#  2. user-specific file
#  3. system-wide file
# Any configuration value is only changed the first time it is set.
# Thus, host-specific definitions should be at the beginning of the
# configuration file, and defaults at the end.

# Site-wide defaults for some commonly used options.  For a comprehensive
# list of available options, their meanings and defaults, please see the
# ssh_config(5) man page.

# Host *
#   ForwardAgent no
#   ForwardX11 no
#   RhostsRSAAuthentication no
#   RSAAuthentication yes
#   PasswordAuthentication yes
#   HostbasedAuthentication no
#   GSSAPIAuthentication no
#   GSSAPIDelegateCredentials no
#   GSSAPIKeyExchange no
#   GSSAPITrustDNS no
#   BatchMode no
#   CheckHostIP yes
#   AddressFamily any
#   ConnectTimeout 0
#   StrictHostKeyChecking ask
#   IdentityFile ~/.ssh/identity
#   IdentityFile ~/.ssh/id_rsa
#   IdentityFile ~/.ssh/id_dsa
#   Port 22
#   Protocol 2,1
#   Cipher 3des
#   Ciphers aes128-ctr,aes192-ctr,aes256-ctr,arcfour256,arcfour128,aes128-cbc,3des-cbc
#   MACs hmac-md5,hmac-sha1,[email protected],hmac-ripemd160
#   EscapeChar ~
#   Tunnel no
#   TunnelDevice any:any
#   PermitLocalCommand no
#   VisualHostKey no
#Host *
# GSSAPIAuthentication yes
# If this option is set to yes then remote X11 clients will have full access
# to the original X11 display. As virtually no X11 client supports the untrusted
# mode correctly we set this to yes.
    ForwardX11Trusted yes
# Send locale-related environment variables
    SendEnv LANG LC_CTYPE LC_NUMERIC LC_TIME LC_COLLATE LC_MONETARY LC_MESSAGES
    SendEnv LC_PAPER LC_NAME LC_ADDRESS LC_TELEPHONE LC_MEASUREMENT
    SendEnv LC_IDENTIFICATION LC_ALL LANGUAGE
    SendEnv XMODIFIERS
UPDATE REQUEST 1: /var/log/secure
Jan 29 12:26:26 localhost sshd[2317]: Server listening on 0.0.0.0 port 22.
Jan 29 12:26:26 localhost sshd[2317]: Server listening on :: port 22.
Jan 29 12:26:34 localhost polkitd(authority=local): Registered Authentication Agent for session /org/freedesktop/ConsoleKit/Session1 (system bus name :1.29 [/usr/libexec/polkit-gnome-authentication-agent-1], object path /org/gnome/PolicyKit1/AuthenticationAgent, locale en_US.UTF-8)
Jan 29 12:36:09 localhost pam: gdm-password[3029]: pam_unix(gdm-password:session): session opened for user misfitred by (uid=0)
Jan 29 12:36:09 localhost polkitd(authority=local): Unregistered Authentication Agent for session /org/freedesktop/ConsoleKit/Session1 (system bus name :1.29, object path /org/gnome/PolicyKit1/AuthenticationAgent, locale en_US.UTF-8) (disconnected from bus)
Jan 29 12:36:11 localhost polkitd(authority=local): Registered Authentication Agent for session /org/freedesktop/ConsoleKit/Session2 (system bus name :1.45 [/usr/libexec/polkit-gnome-authentication-agent-1], object path /org/gnome/PolicyKit1/AuthenticationAgent, locale en_US.UTF-8)
Jan 29 12:53:39 localhost polkitd(authority=local): Operator of unix-session:/org/freedesktop/ConsoleKit/Session2 successfully authenticated as unix-user:root to gain TEMPORARY authorization for action org.freedesktop.packagekit.system-update for system-bus-name::1.64 [gpk-update-viewer] (owned by unix-user:misfitred)
Jan 29 12:54:02 localhost su: pam_unix(su:session): session opened for user root by misfitred(uid=501)
Jan 29 12:54:06 localhost sshd[2317]: Received signal 15; terminating.
Jan 29 12:54:06 localhost sshd[3948]: Server listening on 0.0.0.0 port 22.
Jan 29 12:54:06 localhost sshd[3948]: Server listening on :: port 22.
Jan 29 12:55:46 localhost su: pam_unix(su:session): session closed for user root
Jan 29 12:55:56 localhost pam: gdm-password[3029]: pam_unix(gdm-password:session): session closed for user misfitred
Jan 29 12:55:56 localhost polkitd(authority=local): Unregistered Authentication Agent for session /org/freedesktop/ConsoleKit/Session2 (system bus name :1.45, object path /org/gnome/PolicyKit1/AuthenticationAgent, locale en_US.UTF-8) (disconnected from bus)
Jan 29 12:55:58 localhost polkitd(authority=local): Registered Authentication Agent for session /org/freedesktop/ConsoleKit/Session3 (system bus name :1.78 [/usr/libexec/polkit-gnome-authentication-agent-1], object path /org/gnome/PolicyKit1/AuthenticationAgent, locale en_US.UTF-8)
Jan 29 12:56:29 localhost pam: gdm-password[4044]: pam_unix(gdm-password:auth): conversation failed
Jan 29 12:56:29 localhost pam: gdm-password[4044]: pam_unix(gdm-password:auth): auth could not identify password for [misfitred]
Jan 29 12:56:29 localhost pam: gdm-password[4044]: gkr-pam: no password is available for user
Jan 29 12:57:11 localhost pam: gdm-password[4051]: pam_selinux_permit(gdm-password:auth): Cannot determine the user's name
Jan 29 12:57:11 localhost pam: gdm-password[4051]: pam_succeed_if(gdm-password:auth): error retrieving user name: Conversation error
Jan 29 12:57:11 localhost pam: gdm-password[4051]: gkr-pam: couldn't get the user name: Conversation error
Jan 29 12:57:17 localhost pam: gdm-password[4053]: pam_unix(gdm-password:session): session opened for user misfitred by (uid=0)
Jan 29 12:57:17 localhost polkitd(authority=local): Unregistered Authentication Agent for session /org/freedesktop/ConsoleKit/Session3 (system bus name :1.78, object path /org/gnome/PolicyKit1/AuthenticationAgent, locale en_US.UTF-8) (disconnected from bus)
Jan 29 12:57:17 localhost polkitd(authority=local): Registered Authentication Agent for session /org/freedesktop/ConsoleKit/Session4 (system bus name :1.93 [/usr/libexec/polkit-gnome-authentication-agent-1], object path /org/gnome/PolicyKit1/AuthenticationAgent, locale en_US.UTF-8)
Jan 29 12:57:49 localhost unix_chkpwd[4495]: password check failed for user (root)
Jan 29 12:57:49 localhost su: pam_unix(su:auth): authentication failure; logname=misfitred uid=501 euid=0 tty=pts/0 ruser=misfitred rhost=  user=root
Jan 29 12:58:04 localhost su: pam_unix(su:session): session opened for user root by misfitred(uid=501)
Jan 29 13:16:16 localhost su: pam_unix(su:session): session closed for user root
Jan 29 13:18:05 localhost su: pam_unix(su:session): session opened for user root by misfitred(uid=501)
Jan 29 13:21:14 localhost su: pam_unix(su:session): session closed for user root
Jan 29 13:21:40 localhost su: pam_unix(su:session): session opened for user root by misfitred(uid=501)
Jan 29 13:24:17 localhost su: pam_unix(su:session): session opened for user misfitred by misfitred(uid=0)
Jan 29 13:27:10 localhost su: pam_unix(su:session): session opened for user root by misfitred(uid=501)
Jan 29 13:28:55 localhost su: pam_unix(su:session): session closed for user root
Jan 29 13:28:55 localhost su: pam_unix(su:session): session closed for user misfitred
Jan 29 13:28:55 localhost su: pam_unix(su:session): session closed for user root
Jan 29 13:29:00 localhost su: pam_unix(su:session): session opened for user root by misfitred(uid=501)
Jan 29 13:31:48 localhost sshd[3948]: Received signal 15; terminating.
Jan 29 13:31:48 localhost sshd[5498]: Server listening on 0.0.0.0 port 22.
Jan 29 13:31:48 localhost sshd[5498]: Server listening on :: port 22.
Jan 29 13:44:58 localhost sshd[5498]: Received signal 15; terminating.
Jan 29 13:44:58 localhost sshd[5711]: Server listening on 0.0.0.0 port 22.
Jan 29 13:44:58 localhost sshd[5711]: Server listening on :: port 22.
Jan 29 14:00:19 localhost sshd[5711]: Received signal 15; terminating.
Jan 29 14:00:19 localhost sshd[5956]: Server listening on 0.0.0.0 port 22.
Jan 29 14:00:19 localhost sshd[5956]: Server listening on :: port 22.
Jan 29 15:03:00 localhost sshd[5956]: Received signal 15; terminating.
Jan 29 15:10:23 localhost su: pam_unix(su:session): session closed for user root
Jan 29 15:10:38 localhost pam: gdm-password[4053]: pam_unix(gdm-password:session): session closed for user misfitred
Jan 29 15:10:38 localhost polkitd(authority=local): Unregistered Authentication Agent for session /org/freedesktop/ConsoleKit/Session4 (system bus name :1.93, object path /org/gnome/PolicyKit1/AuthenticationAgent, locale en_US.UTF-8) (disconnected from bus)
Jan 29 15:11:21 localhost polkitd(authority=local): Registered Authentication Agent for session /org/freedesktop/ConsoleKit/Session1 (system bus name :1.29 [/usr/libexec/polkit-gnome-authentication-agent-1], object path /org/gnome/PolicyKit1/AuthenticationAgent, locale en_US.UTF-8)
Jan 29 15:11:32 localhost pam: gdm-password[2919]: pam_unix(gdm-password:session): session opened for user misfitred by (uid=0)
Jan 29 15:11:32 localhost polkitd(authority=local): Unregistered Authentication Agent for session /org/freedesktop/ConsoleKit/Session1 (system bus name :1.29, object path /org/gnome/PolicyKit1/AuthenticationAgent, locale en_US.UTF-8) (disconnected from bus)
Jan 29 15:11:33 localhost polkitd(authority=local): Registered Authentication Agent for session /org/freedesktop/ConsoleKit/Session2 (system bus name :1.45 [/usr/libexec/polkit-gnome-authentication-agent-1], object path /org/gnome/PolicyKit1/AuthenticationAgent, locale en_US.UTF-8)
Jan 29 15:15:10 localhost su: pam_unix(su:session): session opened for user root by misfitred(uid=501)
Jan 29 15:30:24 localhost userhelper[3700]: running '/usr/share/system-config-users/system-config-users ' with root privileges on behalf of 'root'
Jan 29 15:32:00 localhost su: pam_unix(su:session): session opened for user misfitred by misfitred(uid=0)
Jan 29 15:32:23 localhost passwd: gkr-pam: changed password for 'login' keyring
Jan 29 15:32:39 localhost passwd: pam_unix(passwd:chauthtok): password changed for misfitred
Jan 29 15:32:39 localhost passwd: gkr-pam: couldn't change password for 'login' keyring: 1
Jan 29 15:33:06 localhost passwd: pam_unix(passwd:chauthtok): password changed for misfitred
Jan 29 15:33:06 localhost passwd: gkr-pam: changed password for 'login' keyring
Jan 29 15:37:08 localhost su: pam_unix(su:session): session opened for user root by misfitred(uid=501)
Jan 29 15:38:16 localhost su: pam_unix(su:session): session closed for user root
Jan 29 15:38:16 localhost su: pam_unix(su:session): session closed for user misfitred
Jan 29 15:38:16 localhost su: pam_unix(su:session): session closed for user root
Jan 29 15:38:25 localhost su: pam_unix(su:session): session opened for user root by misfitred(uid=501)
Jan 29 15:42:47 localhost su: pam_unix(su:session): session closed for user root
Jan 29 15:47:13 localhost sshd[4111]: pam_unix(sshd:session): session opened for user misfitred by (uid=0)
Jan 29 16:49:40 localhost su: pam_unix(su:session): session opened for user root by misfitred(uid=501)
Jan 29 16:55:19 localhost su: pam_unix(su:session): session opened for user root by misfitred(uid=501)
Jan 30 08:34:57 localhost sshd[4111]: pam_unix(sshd:session): session closed for user misfitred
Jan 30 08:34:57 localhost su: pam_unix(su:session): session closed for user root
Jan 30 08:35:24 localhost su: pam_unix(su:session): session opened for user root by misfitred(uid=501)
I agree with fboaventura; The configs look fine; try changing the password for
your user to what you think it should be, also check that it isn't expired/account
locked. And try another user just in case. Also, are you able to log in locally as
that user? i.e. is the error specific to SSH or is it having an error via other
auth mechs. –
Justin
Jan 29 '13 at 22:56
@ fboaventura & Justin I did try another user and I also changed the
password and tried it again with no success. I can login locally just fine and I
can also SSH to localhost just fine. –
Kentgrav
Jan 30 '13 at 13:33
@ John Siu I added the /var/log/secure and I attempted the SSH right before I
copied it. And nothing was added to it. Hope it helps. –
Kentgrav
Jan 30 '13 at 13:41
Yeah I did this already I actually figured out what the problem was. And as I
thought...it was the one thing that should have been blatantly obvious. –
Kentgrav
Jan 30 '13 at 16:08
The problem with this answer is that the defaults are commented out by default
as the comments in the file explain. It doesn't matter if (1) is commented or not
because the default is "yes". The correct answer is below. It's probably a DNS
problem and can easily test by using the IP address instead of the domain name.
–
Colin Keenan
Sep 18 '15 at 4:41
Make sure the permissions on the
~/.ssh
directory and its contents are proper.
When I first set up my ssh key auth, I didn't have the
~/.ssh
folder properly
set up, and it yelled at me.
Your home directory
~
, your
~/.ssh
directory and the
~/.ssh/authorized_keys
file on the remote machine must be writable only by
you:
rwx------
and
rwxr-xr-x
are fine, but
rwxrwx---
is no good¹, even if you are the only user in your group (if you prefer numeric modes:
700
or
755
, not
775
).
If
~/.ssh
or
authorized_keys
is a symbolic link,
the canonical path (with symbolic links expanded) is checked
.
Your
~/.ssh/authorized_keys
file (on the remote machine) must be readable
(at least 400), but you'll need it to be also writable (600) if you will add any more keys
to it.
Your private key file (on the local machine) must be readable and writable only by you:
rw-------
, i.e.
600
.
If you have root access to the server, the easy way to solve such problems is to run sshd in
debug mode, e.g.:
service ssh stop      # will not kill existing ssh connections
/usr/sbin/sshd -d     # full path to sshd executable needed, 'which sshd' can help
...debug output...
service ssh start
(If you can access the server through any port, you can just use
/usr/sbin/sshd -d
      -p <port number>
to avoid having to stop the SSH server. You still need to be
root though.)
In the debug output, look for something like
debug1: trying public key file /path/to/home/.ssh/authorized_keys
...
Authentication refused: bad ownership or modes for directory /path/to/home/
Is your home dir encrypted? If so, for your first ssh session you will have to provide a
password. The second ssh session to the same server is working with auth key. If this is the
case, you could move your
authorized_keys
to an unencrypted dir and change the
path in
~/.ssh/config
.
What I ended up doing was create a
/etc/ssh/username
folder, owned by
username, with the correct permissions, and placed the
authorized_keys
file in
there. Then changed the AuthorizedKeysFile directive in
/etc/ssh/config
to :
AuthorizedKeysFile /etc/ssh/%u/authorized_keys
This allows multiple users to have this ssh access without compromising permissions.
I faced challenges when the home directory on the remote does not have correct privileges. In
my case the user changed the home dir to 777 for some local access with in the team. The
machine could not connect with ssh keys any longer. I changed the permission to 744 and it
started to work again.
We ran into the same problem and we followed the steps in the answer. But it still did not
work for us. Our problem was that login worked from one client but not from another (the .ssh
directory was NFS mounted and both clients were using the same keys).
So we had to go one step further. By running the ssh command in verbose mode you get a lot
of information.
ssh -vv user@host
What we discovered was that the default key (id_rsa) was not accepted and instead the ssh
client offered a key matching the client hostname:
debug1: Offering public key: /home/user/.ssh/id_rsa
debug2: we sent a publickey packet, wait for reply
debug1: Authentications that can continue: publickey,gssapi-keyex,gssapi-with-mic,password
debug1: Offering public key: /home/user/.ssh/id_dsa
debug2: we sent a publickey packet, wait for reply
debug1: Authentications that can continue: publickey,gssapi-keyex,gssapi-with-mic,password
debug1: Offering public key: user@myclient
debug2: we sent a publickey packet, wait for reply
debug1: Server accepts key: pkalg ssh-rsa blen 277
Obviously this will not work from any other client.
So the solution in our case was to switch the default rsa key to the one that contained
user@myclient. When a key is default, there is no checking for client name.
Then we ran into another problem, after the switch. Apparently the keys are cached in the
local ssh agent and we got the following error on the debug log:
'Agent admitted failure to sign using the key'
This was solved by reloading the keys to the ssh agent:
ssh-add
,
It would be SSH miss configuration at server end. Server side sshd_config file has to be
edited. Located in
/etc/ssh/sshd_config
. In that file, change variables
'yes' to 'no' for ChallengeResponseAuthentication, PasswordAuthentication, UsePAM
I am not sure whether it is possible to scp a folder from remote to local, but
still I am left with no other options. I use ssh to log into my server and from there I would
like to copy the folder foo to home/user/Desktop (my local). Is there
any command so that I can do this?
To use full power of scp you need to go through next steps:
Then, for example if you'll have this ~/.ssh/config :
Host
 test

User
 testuser

HostName
 test
-
site
.
com

Port
22022
Host
 prod

User
 produser

HostName
 production
-
site
.
com

Port
22022
you'll save yourself from password entry and simplify scp syntax like this:
scp
-
r prod
:/
path
/
foo
/
home
/
user
/
Desktop
# copy to local

scp
-
r prod
:/
path
/
foo test
:/
tmp
# copy from remote prod to remote test
More over, you will be able to use remote path-completion:
scp test
:/
var
/
log
/
# press tab twice
Display
 all
151
 possibilities
?
(
y or n
)
Update:
For enabling remote bash-completion you need to have bash-shell on both <source>
and <target> hosts, and properly working bash-completion. For more information see related
questions:
"... scp will overwrite the files only if you have write permissions to them. In other words: You can make scp effectively skip said files by temporarily removing the write permissions on them (if you are the files' owner, that is). ..."
"... before running scp (it will complain and skip the existing files). And change them back afterward ( chmod +w to get umask based value). If the files do not all have write permission according to your umask, you would somehow have to store the permissions so that you can restore them. (Gilles' answer overwrites existing files if locally they are newer, I lost valuable data that way. Do not understand why that wrong and harmful answer has so many up votes). I don't get it: how did rsync --ignore-existing cause you to lose data? – ..."
"... Unable to create temporary file Clock skew detected ..."
"... In my case - I could not do this and the solution was: lftp . lftp 's usage for syncronization is below: ..."
"... To copy a whole bunch of files, it's faster to tar them. By using -k you also prevent tar from overwriting files when unpacking it on the target system. ..."
How do I copy an entire directory into a directory of the same name without replacing the content
in the destination directory? (instead, I would like to add to the contents of the destination folder)
ssh rsync scp synchronization
Use rsync , and pass -u if you want to only update files that are newer
in the original directory, or --ignore-existing to skip all files that already exist
in the destination.
rsync -au /local/directory/ host:/remote/directory/
rsync -a --ignore-existing /local/directory/ host:/remote/directory/
(Note the / on the source side: without it rsync would create
/remote/directory/directory .)
@Anthon I don't understand your comment and I don't see an answer or comment by chandra.
--ignore-existing does add without replacing, what data loss do you see? –
Gilles
Nov 27 '13 at 9:59
Sorry, I only looked at your first example that is where you can have data loss (and is IMHO not
what the OP asked for), if you include --ignore-existing data-loss should not happen. –
Anthon
Nov 27 '13 at 10:08
@Gilles: True, but all of the options seems to involve Cygwin DLLs... (The current state of the
MS port of OpenSSH is such that enabling compression on scp is enough to break SCP...) (Getting rsync
functional over Win32-OpenSSH also seems non-trivial - hopefully that improves over time) (Solaris
10 is the other example, where a third party package and --rsync-path is needed) –
Gert van den
Berg
Oct 25 '16 at 13:01
scp will overwrite
the files only if you have write permissions to them. In other words: You can make scp
effectively skip said files by temporarily removing the write permissions on them (if you
are the files' owner, that is).
If you can make the destination file contents read-only:
find . -type f -exec chmod a-wbefore running scp (it will complain and skip the existing files). And change
them back afterward ( chmod +w to get umask based value). If the files do not all
have write permission according to your umask, you would somehow have to store the permissions
so that you can restore them.
(Gilles' answer overwrites existing files if locally they are newer, I lost valuable data
that way. Do not understand why that wrong and harmful answer has so many up votes).
I had a similar task, in my case I could not use rsync , csync , or
FUSE because my storage has only SFTP. rsync could not change the date and time for
the file, some other utilities (like csync ) showed me other errors: " Unable to
create temporary file Clock skew detected ".
If you have access to the storage-server - just install openssh-server or launch
rsync as a daemon here.
In my case - I could not do this and the solution was: lftp . lftp 's usage for
syncronization is below:
scp does overwrite files and there's no switch to stop it doing that, but you can
copy things out the way, do the scp and then copy the existing files back. Examples:
Copy all existing files out the way
mkdir original_files ; cp -r * original_files/
Copy everything using scp
scp -r user@server:dir/* ./
Copy the original files over anything scp has written over:
cp -r original_files/* ./
This method doesn't help when you're trying to pull files over from a remote and pick up where
you left off. I.e. if the whole purpose is to save time. –
Oliver Williams
Dec 1 '16 at 17:58
>To copy a whole bunch of files, it's faster to tar them. By using -k you also prevent tar
from overwriting files when unpacking it on the target system.
It does make a remote connection. First it tar's the source, pipes it into the ssh connection
and unpacks it on the remote system. –
huembi
Aug 22 '16 at 21:17
Then, for example if you'll have this ~/.ssh/config:
Host test
    User testuser
    HostName test-site.com
    Port 22022

Host prod
    User produser
    HostName production-site.com
    Port 22022
you'll save yourself from password entry and simplify scp syntax like this:
scp -r prod:/path/foo /home/user/Desktop   # copy to local
scp -r prod:/path/foo test:/tmp            # copy from remote prod to remote test
More over, you will be able to use remote path-completion:
scp test:/var/log/  # press tab twice
Display all 151 possibilities? (y or n)
Update:
For enabling remote bash-completion you need to have bash-shell on both <source>
and <target> hosts, and properly working bash-completion. For more information see related
questions:
The following steps needs to be performed in your SSH client, not in the remote server.
To configure the current user, edit SSH config file:
sudo nano ~/.ssh/config
Add the following lines:
Host *
 ServerAliveInterval 60
Please ensure you indent the second line with a space . Let me explain what these lines do. Once you added these lines in your
SSH client system, it will send a packet called no-op (No Operation) to your Remote system. The no-op packet will inform
the remote system "Nothing to do". Also it tells the SSH client is still connected with the remote system, hence do not close the
TCP connection and log you out.
Here "Host *" indicates this configuration is applicable for all remote hosts. "ServerAliveInterval 60" indicates the number of
seconds to wait to send a no-op packet.
... ... ...
To apply this settings for all users (globally) in your system, add or modify the following line in /etc/ssh/ssh_config file.
There are times when you will want a single purpose user account – an account that cannot get
a shell, not can it do anything but run a single command. This can come in useful for a few reasons
– for me, I use it to force an svn update on machines that can't use user generated crontabs. Others
have used this setup to allow multiple users run some arbitrary command, without giving them shell
access.
Add the user
Add the user as you'd add any user. You'll need a home directory, as I want to use ssh keys so
I don't need a password and it can be scripted from the master server.
root@slave1# adduser restricteduser
Set the users password
Select a nice strong password. I like using $pwgen 32
root@slave1# passwd restricteduser
Copy your ssh-key to the server
Some Linux distros don't have the following command, in this case, contact your distro mailing
list or Google.
root@master# ssh-copy-id restricteduser@slave1
Lock out the user
Password lock out the user. This contradicts the above step, but it ensures that restricteduser
can't update their password.
root@slave1# passwd -l restricteduser
Edit the sshd config
Depending on your system, this can be in a number of places. On Debian, it's in /etc/ssh/sshd_config.
Put it down the bottom.
 Match User restricteduser
    AllowTCPForwarding no
    X11Forwarding no
    ForceCommand /bin/foobar_command
Restart ssh
root@slave1# service ssh restart
Add more ssh keys
Add any additional ssh key to /home/restricteduser/.ssh/authorized_keys
I guess many of us rely heavily on ssh/scp to
access/maintain remote hosts. In this short article I
would like to share some experiences I find useful for
ssh/scp usage.
First let's have a look how things started:
In the beginning: ssh 192.168.0.1
Then we get another host, this time with a
different user id: ssh [email protected]
Since we use those commands quite often and it's
not fun to type the ip address over and over, let's
simplify this a bit by putting those IP's to
/etc/hosts and using hostnames instead of IP's:
ssh host1, resp. ssh root@host2
Then we got another host to maintain, this time
with a non-standard port for ssh: ssh -p 222
admin@host3
Hm it's getting a bit messy, let's simplify
this: for each host let's have a simple script so we
don't need to remember the user id and port to
connect. Let's put the above commands to
ssh-host1, ssh-host2 and ssh-host3.
Great, now we can enjoy the auto-completion feature
of shells to access those hosts, and forget all
those parameters...
Then we need to scp something to these hosts: hm
it's getting messy again, let's create another set
of scripts for scp...
Then we get another host...
It's not hard to imagine how this would
continue.
I use a simple trick to get out of this mess: I have
a simple script named ssh-generic that looks as
follows:
Then I make ssh-host1, scp-to-host1 and
scp-from-host1 as symlink to the above script (ie
ssh-generic). Usage is trivial:
To ssh to host1: ssh-host1
To copy a file to host1: scp-to-host1
<filename>
To copy a file from host1: scp-from-host1
<filename>
Similar for host2 and host3. When we get another
host, it's easy to edit ssh-generic, add the
relevant entry and make needed symlinks. For example,
let's add another host with ip 192.168.0.4, port for ssh
2222 and user id admin2. We want to access this host by
simply saying ssh-host4. This turns out to be
easy:
Edit ssh-generic and add the following
lines to the right place (left as exercise
for readers):
Make ssh-host4, scp-to-host4 and
scp-from-host4 as symlink to ssh-generic
A bonus is that we can say in the command line eg
ssh-host<Tab> to free ourselves from remembering the
hostnames, connection details and hence from making
mistakes. There are some cosmetic details that I left
out from the script for clarity, like automatically
setting the title of current xshell before running ssh/scp,
or a dryrun option for the script.
I also have a companion script that can be used to
ease uploading ssh keys. I named it "enable-ssh" (a bit
poor chosen name, should be renamed to something better)
and it looks as follows:
if test -z "$1"; then
        echo Usage: $0 '[-p <port>] <host>'
        exit 1
fi

if ! test -s $HOME/.ssh/id_rsa.pub; then
    ssh-keygen -t rsa
fi

cd
cat $HOME/.ssh/id_rsa.pub | \
    ssh "$@" "mkdir -p .ssh; touch .ssh/authorized_keys; cat >> .ssh/authorized_keys"
Usage:
To upload ssh key to a host with the standard
port and the same user id: enable-ssh host1
To upload ssh key to a host with non-standard
port and different user id:
First try to ssh to that host to find out
the needed parameters (we don't want to remember
anything that we have written down, don't we?):
ssh-host4
The above comment will write the command
used to connect to host4: running ssh -p 2222
[email protected]
the command is obvious, I know, but maybe not everyone knows that using the
parameter "-l" you can limit the use of bandwidth command scp.
In this example fetch all files from the directory zutaniddu and I copy them
locally using only 10 Kbs
Compare a remote file with a local file
vimdiff scp://[@]/
Easily scp a file back to the host you're connecting from
mecp () { scp "$@" ${SSH_CLIENT%% *}:Desktop/; }
Place in .bashrc and invoke like this: "mecp /path/to/file", and it will copy
the specified file(s) back to the desktop of the host you're ssh'ing in from. To
easily upload a file from the host you're ssh'ing in from use this:
scp file from hostb to hostc while logged into hosta
scp user@hostb:file user@hostc:
While at the command line of of hosta, scp a file from remote hostb to remote
hostc. This saves the step of logging into hostb and then issuing the scp
command to hostc.
Copy something to multiple SSH hosts with a Bash loop
for h in host1 host2 host3 host4 ; { scp file user@$h:/destination_path/ ; }
Just a quick and simple one to demonstrate Bash For loop. Copies 'file' to
multiple ssh hosts.
This will output the sound from your microphone port to the ssh target computer's speaker port. The
sound quality is very bad, so you will hear a lot of hissing.
Install SSHFS from http://fuse.sourceforge.net/sshfs.html Will allow you to mount a folder security over a network.
6) SSH connection through host in the middle
ssh -t reachable_host ssh unreachable_host
Unreachable_host is unavailable from local network, but it's available from reachable_host's network.
This command creates a connection to unreachable_host through "hidden" connection to reachable_host.
7) Copy from host1 to host2, through your host
ssh root@host1 "cd /somedir/tocopy/ && tar -cf - ." | ssh root@host2 "cd /samedir/tocopyto/ && tar
-xf -"
Good if only you have access to host1 and host2, but they have no access to your host (so ncat won't
work) and they have no direct access to each other.
8) Run any GUI program remotely
ssh -fX <user>@<host> <program>
The SSH server configuration requires:
X11Forwarding yes # this is default in Debian
And it's convenient too:
Compression delayed
9) Create a persistent connection to a machine
ssh -MNf <user>@<host>
Create a persistent SSH connection to the host in the background. Combine this with settings in your
~/.ssh/config: Host host ControlPath ~/.ssh/master-%r@%h:%p ControlMaster no All the SSH connections to the machine will then go through the persisten SSH socket. This is very useful
if you are using SSH to synchronize files (using rsync/sftp/cvs/svn) on a regular basis because it won't
create a new socket each time to open an ssh connection.
10) Attach screen over ssh
ssh -t remote_host screen -r
Directly attach a remote screen session (saves a useless parent bash process)
Dumps a MySQL database over a compressed SSH tunnel and uses it as input to mysql - i think that
is the fastest and best way to migrate a DB to a new server!
15) Remove a line in a text file. Useful to fix "ssh host key change" warnings
sed -i 8d ~/.ssh/known_hosts
16) Copy your ssh public key to a server from a machine that doesn't have ssh-copy-id
If you use Mac OS X or some other *nix variant that doesn't come with ssh-copy-id, this one-liner
will allow you to add your public key to a remote machine so you can subsequently ssh to that machine
without a password.
17) Live ssh network throughput test
yes | pv | ssh $host "cat > /dev/null"
connects to host via ssh and displays the live transfer speed, directing all transferred data to
/dev/null needs pv installed
Debian: 'apt-get install pv' Fedora: 'yum install pv' (may need the 'extras' repository enabled)
18) How to establish a remote Gnu screen session that you can re-connect to
Long before tabbed terminals existed, people have been using Gnu screen to open many shells in a
single text terminal. Combined with ssh, it gives you the ability to have many open shells with a single
remote connection using the above options. If you detach with "Ctrl-a d" or if the ssh session is accidentally
terminated, all processes running in your remote shells remain undisturbed, ready for you to reconnect.
Other useful screen commands are "Ctrl-a c" (open new shell) and "Ctrl-a a" (alternate between shells).
Read this quick reference for more screen commands: http://aperiodic.net/screen/quick_reference
It can resume a failed secure copy ( usefull when you transfer big files like db dumps through vpn
) using rsync. It requires rsync installed in both hosts. rsync -partial -progress -rsh=ssh $file_source $user@$host:$destination_file local -> remote or rsync -partial -progress -rsh=ssh $user@$host:$remote_file $destination_file remote -> local
20) Analyze traffic remotely over ssh w/ wireshark
This captures traffic on a remote machine with tshark, sends the raw pcap data over the ssh link,
and displays it in wireshark. Hitting ctrl+C will stop the capture and unfortunately close your wireshark
window. This can be worked-around by passing -c # to tshark to only capture a certain # of packets,
or redirecting the data through a named pipe rather than piping directly from ssh to wireshark. I recommend
filtering as much as you can in the tshark command to conserve bandwidth. tshark can be replaced with
tcpdump thusly: ssh [email protected] tcpdump -w - 'port !22′ | wireshark -k -i -
Open a ssh session opened forever, great on laptops losing Internet connectivity when switching WIFI
spots.
22) Harder, Faster, Stronger SSH clients
ssh -4 -C -c blowfish-cbc
We force IPv4, compress the stream, specify the cypher stream to be Blowfish. I suppose you could
use aes256-ctr as well for cypher spec. I'm of course leaving out things like master control sessions
and such as that may not be available on your shell although that would speed things up as well.
this bzips a folder and transfers it over the network to "host" at 777k bit/s. cstream can do a lot more, have a look http://www.cons.org/cracauer/cstream.html#usage for example:
echo w00t, i'm 733+ | cstream -b1 -t2
24) Transfer SSH public key to another machine in one step
ssh-keygen; ssh-copy-id user@host; ssh user@host
This command sequence allows simple setup of (gasp!) password-less SSH logins. Be careful, as if
you already have an SSH keypair in your ~/.ssh directory on the local machine, there is a possibility
ssh-keygen may overwrite them. ssh-copy-id copies the public key to the remote host and appends it to
the remote account's ~/.ssh/authorized_keys file. When trying ssh, if you used no passphrase for your
key, the remote shell appears soon after invoking ssh user@host.
25) Copy stdin to your X11 buffer
ssh user@host cat /path/to/some/file | xclip
Have you ever had to scp a file to your work machine in order to copy its contents to a mail? xclip
can help you with that. It copies its stdin to the X11 buffer, so all you have to do is middle-click
to paste the content of that looong file :)
Have Fun
Please comment if you have any other good SSH Commands OR Tricks.
Related to your 19. I've got a nice alias in my bashRc, called rescp.
alias rescp='rsync -size-only -partial -progress -stats -inplace'
I just use it in place of scp, and it work great!
Doug says:
Good list overall.
I'm not sure I see a the difference between #1 and #7. Are they dups?
Same goes for #10, #18, and somewhat #21 - While slightly different invocations, they ultimately
do the same thing, right? My preference is using the #21 syntax to always ensure connection back
to the same screen session.
@Doug you are absolutely right! # 1 and #8 are exactly the same, I didn't even notice, thank
you for pointing that out, I'm going to have to add a replacement command for that one as far #18
the -x switch allows you to connect to a non-datached screen and #21 has the -m switch which ignore
$STY variable, do create a new screen session. #6 and #8 are exactly the same and once again sorry for that. but #12 is good
eliasp says:
#15 makes more sense like this:
sed -i '/^name-of-offending-host/d' ~/.ssh/known_hosts
If firewalledhost can't reach the public internet or the machine someSquidProxy, but your machine
can, this opens a tunnel via SSH. I use it a lot to download patches to machines that normally can't
get them directly.
Many times I'll be at a site where I need remote support from someone who is blocked on the outside by a company
firewall. Few people realize that if you can get out to the world through a firewall, then it is relatively easy
to open a hole so that the world can come into you.
In its crudest form, this is called "poking a hole in the firewall." I'll call it an SSH back door. To
use it, you'll need a machine on the Internet that you can use as an intermediary.
In our example, we'll call our machine blackbox.example.com. The machine behind the company firewall is called
ginger. Finally, the machine that technical support is on will be called tech. Figure 4 explains how this is set
up.
Check that what you're doing is allowed, but make sure you ask the right people. Most people will cringe
that you're opening the firewall, but what they don't understand is that it is completely encrypted. Furthermore,
someone would need to hack your outside machine before getting into your company. Instead, you may belong to
the school of "ask-for-forgiveness-instead-of-permission." Either way, use your judgment and don't blame me
if this doesn't go your way.
SSH from ginger to blackbox.example.com with the -R flag. I'll assume that you're the root
user on ginger and that tech will need the root user ID to help you with the system. With the -R
flag, you'll forward instructions of port 2222 on blackbox to port 22 on ginger. This is how you set up an SSH
tunnel. Note that only SSH traffic can come into ginger: You're not putting ginger out on the Internet naked.
VNC or virtual network computing has been around a long time. I typically find myself needing to use it when
the remote server has some type of graphical program that is only available on that server.
For example, suppose in Trick 5, ginger is a storage server. Many storage
devices come with a GUI program to manage the storage controllers. Often these GUI management tools need a direct
connection to the storage through a network that is at times kept in a private subnet. Therefore, the only way to
access this GUI is to do it from ginger.
You can try SSH'ing to ginger with the -X option and launch it that way, but many times the bandwidth
required is too much and you'll get frustrated waiting. VNC is a much more network-friendly tool and is readily
available for nearly all operating systems.
Let's assume that the setup is the same as in Trick 5, but you want tech to be able to get VNC access instead
of SSH. In this case, you'll do something similar but forward VNC ports instead. Here's what you do:
Start a VNC server session on ginger. This is done by running something like:
The options tell the VNC server to start up with a resolution of 1024x768 and a pixel depth of 24 bits per
pixel. If you are using a really slow connection setting, 8 may be a better option. Using :99 specifies
the port the VNC server will be accessible from. The VNC protocol starts at 5900 so specifying :99
means the server is accessible from port 5999.
When you start the session, you'll be asked to specify a password. The user ID will be the same user that
you launched the VNC server from. (In our case, this is root.)
SSH from ginger to blackbox.example.com forwarding the port 5999 on blackbox to ginger. This is done from
ginger by running the command:
Once you run this command, you'll need to keep this SSH session open in order to keep the port forwarded
to ginger. At this point if you were on blackbox, you could now access the VNC session on ginger by just running:
thedude@blackbox:~$ vncviewer localhost:99
That would forward the port through SSH to ginger. But we're interested in letting tech get VNC access to
ginger. To accomplish this, you'll need another tunnel.
From tech, you open a tunnel via SSH to forward your port 5999 to port 5999 on blackbox. This would be done
by running:
This time the SSH flag we used was -L, which instead of pushing 5999 to blackbox, pulled from
it. Once you are in on blackbox, you'll need to leave this session open. Now you're ready to VNC from tech!
From tech, VNC to ginger by running the command:
root@tech:~# vncviewer localhost:99 .
Tech will now have a VNC session directly to ginger.
While the effort might seem like a bit much to set up, it beats flying across the country to fix the storage
arrays. Also, if you practice this a few times, it becomes quite easy.
Let me add a trick to this trick: If tech was running the Windows® operating system and didn't have a command-line
SSH client, then tech can run Putty. Putty can be set to forward SSH ports by looking in the options in the sidebar.
If the port were 5902 instead of our example of 5999, then you would enter something like in Figure 5.
Secure Shell (SSH) is a rich subsystem used to log in to remote systems, copy files, and tunnel through firewalls-securely.
Since SSH is a subsystem, it offers plenty of options to customize and streamline its operation. In fact, SSH provides
an entire "dot directory", named $HOME/.ssh, to contain all its data. (Your .ssh directory must be mode 600 to preclude
access by others. A mode other than 600 interferes with proper operation.) Specifically, the file $HOME/.ssh/config
can define lots of shortcuts, including aliases for machine names, per-host access controls, and more.
Here is a typical block found in $HOME/.ssh/config to customize SSH for a specific host:
Host worker
HostName worker.example.com
IdentityFile ~/.ssh/id_rsa_worker
User joeuser
Each block in ~/.ssh/config configures one or more hosts. Separate individual blocks with a blank line. This block uses
four options: Host, HostName, IdentityFile, and User. Host
establishes a nickname for the machine specified by HostName. A nickname allows you to type ssh worker
instead of ssh worker.example.com. Moreover, the IdentityFile and User options
dictate how to log in to worker. The former option points to a private key to use with the host; the latter
option provides the login ID. Thus, this block is the equivalent of the command:
A powerful but little-known option is ControlMaster. If set, multiple SSH sessions
to the same host share a single connection. Once the first connection is established, credentials are
not required for subsequent connections, eliminating the drudgery of typing a password each and every time you connect
to the same machine. ControlMaster is so handy, you'll likely want to enable it for every machine. That's
accomplished easily enough with the host wildcard, *:
Host *
ControlMaster auto
ControlPath ~/.ssh/master-%r@%h:%p
As you might guess, a block tagged Host * applies to every host, even those not explicitly named in the
config file. ControlMaster auto tries to reuse an existing connection but will create a new connection
if a shared connection cannot be found. ControlPath points to a file to persist a control socket for sharing.
%r is replaced by the remote login user name, %h is replaced by the target host name, and
%p stands in for the port used for the connection. (You can also use %l; it is replaced with
the local host name.) The specification above creates control sockets with file names akin to:
Each control socket is removed when all connections to the remote host are severed. If you want to know which machines
you are connected to at any time, simply type ls ~/.ssh and look at the host name portion of the control
socket (%h).
The SSH configuration file is so expansive, it too has its own man page. Type man ssh_config to see
all possible options. And here's a clever SSH trick: You can tunnel from a local system to a remote one via SSH. The
command line to use looks something like this:
$ ssh example.com -L 5000:localhost:3306
This command says, "Connect via example.com and establish a tunnel between port 5000 on the local machine and port 3306
[the MySQL server port] on the machine named 'localhost.'" Because localhost is interpreted on example.com
as the tunnel is established, localhost is example.com. With the outbound tunnel-formally called a local
forward-established, local clients can connect to port 5000 and talk to the MySQL server running on example.com.
This is the general form of tunneling:
$ ssh proxyhostlocalport:targethost:targetport
Here, proxyhost is a machine you can access via SSH and one that has a network connection (not via
SSH) to targethost. localport is a non-privileged port (any unused port above
1024) on your local system, and targetport is the port of the service you want to connect to.
The previous command tunnels out from your machine to the outside world. You can also use SSH to tunnel
in, or connect to your local system from the outside world. This is the general form of an inbound tunnel:
When establishing an inbound tunnel-formally called a remote forward-the roles of proxyhost
and targethost are reversed: The target is your local machine, and the proxy is the remote machine.
user is your login on the proxy. This command provides a concrete example:
The command reads, "Connect to example.com as joe, and connect the remote port 8080 to local port 80." This command
gives users on example.com a tunnel to Joe's machine. A remote user can connect to 8080 to hit the Web server on Joe's
machine.
In addition to -L and -R for local and remote forwards, respectively, SSH offers
-D to create an HTTP proxy on a remote machine. See the SSH man page for the proper syntax.
Martin Streicher is a freelance Ruby on Rails developer and the former Editor-in-Chief of
Linux Magazine. Martin holds a Masters of Science degree in computer science
from Purdue University and has programmed UNIX-like systems since 1986. He collects art and toys. You can reach Martin
at [email protected].
When you connect to your SSH server from another system, you'll see a warning message if the system doesn't already
know its key. This message helps you ensure the remote system isn't being impersonated by another system.
However, you may have trouble remembering the long string that identifies the remote system's public key. To make
the key's fingerprint easier to remember, enable the "visual host key" feature.
You can enable this in your SSH config file or just specify it as an option while running the SSH command. For example,
run the following command to connect to an SSH server with VisualHostKey enabled:
ssh -o VisualHostKey=yes user@host
Now you'll only have to remember the picture, not a long string.
Do you have any other tips to share? Leave a comment and let us know.
[Nov 26, 2011] User Access Control Lists
Sshd user access control lists (ACLs) can be specified in the server configuration file. No other part of the operating
system honors this ACL. You can either specifically allow or deny individual users or groups. The default is to allow
access to anyone with a valid account. You can use ACLs to limit access to particular users in NIS environments, without
resorting to custom pluggable authentication modules. Use only one of the following
four ACL keywords in the server configuration file:AllowGroups, AllowUsers, DenyGroups
or DenyUsers.
When you have the password-less login enabled, you may be either using SSH to execute command in the batch mode on
a remote machine or using SCP to copy files from/to the remote machine.
If there are some issues with the password less login, your batch program may end up in a loop or timeout.
In this article, let us review how instruct ssh/scp to do the operation only if you can do without waiting for password.
Before you try this out, make sure
password less login is setup between your local host and remote host.
1. ssh -o "BatchMode yes" Usage Example
If you have the password less login enabled, following example will login to the remote host and execute the who
command without asking for the password.
local-host# ssh ramesh@remote-host whoIf the password less login is not enabled, it will prompt for the password
	on the remote host as shown below.
local-host# ssh ramesh@remote-host who
ramesh@remote-host's password:
If you use ssh -o "BatchMode yes", then it will do ssh only if the password-less login is enabled, else it will return
error and continues.
Batch mode command execution using SSH - success case
local-host# ssh -o "BatchMode yes" ramesh@remote-host who
..
[Note: This will display the output of remote-host's who command]
Batch mode command execution using SSH - Failure case
local-host# ssh -o "BatchMode yes" ramesh@remote-host who
Permission denied (publickey,password).
Note: If you didn't use -o "BatchMode yes", the above command would've asked for the password for
my account on the remote host. This is the key difference in using the BatchMode yes option.
2. scp -B option Usage Example
If you use scp -B option, it will execute scp only if the passwordless login is enabled, else it will exit immediately
without waiting for password.
Do you make a lot of connections to the same servers? You may not have noticed how slow an initial connection to
a shell is. If you multiplex your connection you will definitely notice it though. Let's test the difference between
a multiplexed connection using SSH keys and a non-multiplexed connection using SSH keys:
# Without multiplexing enabled:
$ time ssh [email protected] uptime
 20:47:42 up 16 days,  1:13,  3 users,  load average: 0.00, 0.01, 0.00

real	0m1.215s
user	0m0.031s
sys	0m0.008s

# With multiplexing enabled:
$ time ssh [email protected] uptime
 20:48:43 up 16 days,  1:14,  4 users,  load average: 0.00, 0.00, 0.00

real	0m0.174s
user	0m0.003s
sys	0m0.004s
We can see that multiplexing the connection is much faster, in this instance on an order of 7 times faster than not
multiplexing the connection. Multiplexing allows us to have a "control" connection, which is your initial connection
to a server, this is then turned into a UNIX socket file on your computer. All subsequent connections will use that
socket to connect to the remote host. This allows us to save time by not requiring all the initial encryption, key exchanges,
and negotiations for subsequent connections to the server.
Host *
ControlMaster auto
ControlPath ~/.ssh/connections/%r_%h_%p
A negative to this is that some uses of ssh may fail to work with your multiplexed connection. Most notably commands
which use tunneling like git, svn or rsync, or forwarding a port. For these you can add the option -o ControlMaster=no.
To prevent a specific host from using a multiplexed connection add the following to your ~/.ssh/config file:
Host YOUR_SERVER_OR_IP
MasterControl no
There are security precautions that one should take with this approach. Let's take a look at what actually happens
when we connect a second connection:
$ ssh -v -i /dev/null [email protected]
OpenSSH_4.7p1, OpenSSL 0.9.7l 28 Sep 2006
debug1: Reading configuration data /Users/symkat/.ssh/config
debug1: Reading configuration data /etc/ssh_config
debug1: Applying options for *
debug1: auto-mux: Trying existing master
Last login:
symkat@symkat:~$ exit
As we see no actual authentication took place. This poses a significant security risk if running it from a host that
is not trusted, as a user who can read and write to the socket can easily make the connection without having to supply
a password. Take the same care to secure the sockets as you take in protecting a private key.
Using SSH As A Proxy
Even Starbucks now has free WiFi in its stores. It seems the world has caught on to giving free Internet at most
retail locations. The downside is that more teenagers with "Got Root?" stickers are camping out at these locations running
the latest version of wireshark.
SSH's encryption can stand up to most any hostile network, but what about web traffic?
Most web browsers, and certainly all the popular ones, support using a proxy to tunnel your traffic. SSH can provide
a SOCKS proxy on localhost that tunnels to your remote server with the -D option. You get all the encryption of SSH
for your web traffic, and can rest assured no one will be capturing your login credentials to all those non-ssl websites
you're using.
Now there is a proxy running on 127.0.0.1:1080 that can be used in a web browser or email client. Any application
that supports SOCKS 4 or 5 proxies can use 127.0.0.1:1080 to tunnel its traffic.
$ nc -vvv 127.0.0.1 1080
Connection to 127.0.0.1 1080 port [tcp/socks] succeeded!
Using One-Off Commands
Often times you may want only a single piece of information from a remote host. "Is the file system full?" "What's
the uptime on the server?" "Who is logged in?"
Normally you would need to login, type the command, see the output and then type exit (or Control-D for those in
the know.) There is a better way: combine the ssh with the command you want to execute and get your result:
This executed the ssh symkat.com, logged in as symkat, and ran the command "uptime" on symkat. If you're not using
SSH keys then you'll be presented with a password prompt before the command is executed.
$ ssh [email protected] ps aux | echo $HOSTNAME
symkats-macbook-pro.local
This executed the command ps aux on symkat.com, sent the output to STDOUT, a pipe on my local laptop picked it up
to execute "echo $HOSTNAME" locally. Although in most situations using auxiliary data processing like grep or awk will
work flawlessly, there are many situations where you need your pipes and file IO redirects to work on the remote system
instead of the local system. In that case you would want to wrap the command in single quotes:
As a basic rule if you're using > >> < - or | you're going to want to wrap in single quotes.
It is also worth noting that in using this method of executing a command some programs will not work. Notably anything
that requires a terminal, such as screen, irssi, less, or a plethora of other interactive or curses based applications.
To force a terminal to be allocated you can use the -t option:
Pipes are useful. The concept is simple: take the output from one program's STDOUT and feed it to another program's
STDIN. OpenSSH can be used as a pipe into a remote system. Let's say that we would like to transfer a directory structure
from one machine to another. The directory structure has a lot of files and sub directories.
We could make a tarball of the directory on our own server and scp it over. If the file system this directory is
on lacks the space though we may be better off piping the tarballed content to the remote system.
What we did in this example was to create a new archive (-c) and to compress the archive with gzip (-z). Because
we did not use -f to tell it to output to a file, the compressed archive was send to STDOUT. We then piped STDOUT with
| to ssh. We used a one-off command in ssh to invoke tar with the extract (-x) and gzip compressed (-z) arguments. This
read the compressed archive from the originating server and unpacked it into our server. We then logged in to see the
listing of files.
Additionally, we can pipe in the other direction as well. Take for example a situation where you with to make a copy
of a remote database, into a local database:
symkat@chard:~$ echo "create database backup" | mysql -uroot -ppassword
symkat@chard:~$ ssh [email protected] 'mysqldump -udbuser -ppassword symkat' | mysql -uroot -ppassword backup
symkat@chard:~$ echo use backup;select count(*) from wp_links;" | mysql -uroot -ppassword
count(*)
12
symkat@chard:~$
What we did here is to create the database "backup" on our local machine. Once we had the database created we used
a one-off command to get a dump of the database from symkat.com. The SQL Dump came through STDOUT and was piped to another
command. We used mysql to access the database, and read STDIN (which is where the data now is after piping it) to create
the database on our local machine. We then ran a MySQL command to ensure that there is data in the backup table. As
we can see, SSH can provide a true pipe in either direction.
To transfer a (large, complicated) file tree from one machine to another
Tuesday March 23, 2004 (04:52 PM GMT)
By: Graeme Winter
To transfer a (large, complicated) file tree from one machine to another, using stuff which is usually supported:
(tar cf - stuff) - tar stuff to the standard output
(| ssh [email protected]) - pipe this to an ssh connection to wendy - where
(tar xf - -C/home/brian) - is run - which will untar the standard input and place the result in/home/brian....
Neat. This is better than using scp -r or tar then scp, because you can send > 4 gig files, and also retain softlinks
etc which get broken by scp...
Issue 112:
Eleven SSH Tricks
Posted on Friday, August 01, 2003 by Daniel Allen
Run remote GUI applications and tunnel any Net connection securely using a free utility that's probably already installed
on your system.
SSH is the descendant of rsh and rlogin, which are non-encrypted programs for remote shell logins. Rsh and rlogin, like
telnet, have a long lineage but now are outdated and insecure. However, these programs evolved a surprising number of
nifty features over two decades of UNIX development, and the best of them made their way into SSH. Following are the
11 tricks I have found useful for squeezing the most power out of SSH.
Installation and Versions
OpenSSH is the most common free version of SSH and is available for virtually all UNIX-like operating systems. It
is included by default with Debian, SuSE, Red Hat, Mandrake, Slackware, Caldera and Gentoo Linux, as well as OpenBSD,
Cygwin for Windows and Mac OS X. This article is based on OpenSSH, so if you are using some other version, check your
documentation before trying these tricks.
X11 Forwarding
You can encrypt X sessions over SSH. Not only is the traffic encrypted, but the DISPLAY environment variable on the
remote system is set properly. So, if you are running X on your local computer, your remote X applications magically
appear on your local screen.
Turn on X11 forwarding with ssh -X host. You should use X11 forwarding only for remote computers where you
trust the administrators. Otherwise, you open yourself up to X11-based attacks.
A nifty trick using X11 forwarding displays images within an xterm window. Run the web browser w3m with the in-line
image extension on the remote machine; see the Debian package w3m-img or the RPM w3m-imgdisplay. It uses X11 forwarding
to open a borderless window on top of your xterm. If you read your e-mail remotely using SSH and a text-based client,
it then is possible to bring up in-line images over the same xterm window.
Config File
SSH looks for the user config file in ~/.ssh/config. A sample might look like:
ForwardX11 yes
Protocol 2,1
Using ForwardX11 yes is the same as specifying -X on the command line. The Protocol line tells SSH
to try SSH2 first and then fall back to SSH1. If you want to use only SSH2, delete the ,1.
The config file can include sections that take effect only for certain remote hosts by using the Host option. Another
useful config file option is User, which specifies the remote user name. If you often log in to a machine with ssh
-l remoteuser remotehost or ssh remoteuser@remotehost, you can shorten this by placing the following lines
in your config file:
Host remotehost
ForwardX11 yes
User remoteuser

Host *
ForwardX11 no
Now, you can type ssh remotehost to log on as user remoteuser with the ForwardX11 option turned on. Otherwise,
ForwardX11 is turned off, as recommended above. The asterisk matches all hosts, including hosts already matched in a
Host section, but only the first matching option is used. Put specific Host sections before generic sections in your
config file.
A system-wide SSH config file, /etc/ssh/ssh_config, also is available. SSH obtains configuration data in the following
order: command-line options, user's configuration file and system-wide configuration file. All of the options can be
explored by browsing man ssh_config.
Speeding Things Up: Compression and Ciphers
SSH can use gzip compression on any connection. The default compression level is equivalent to approximately 4× compression
for text. Compression is a great idea if you are forwarding X sessions on a dial-up or slow network. Turn on compression
with ssh -C or put Compression yes in your config file.
Another speed tweak involves changing your encryption cipher. The default cipher on many older systems is triple
DES (3DES), which is slower than Blowfish and AES. New versions of OpenSSH default to Blowfish. You can change the cipher
to blowfish with ssh -c blowfish.
Cipher changes to your config file depend on whether you are connecting with SSH1 or SSH2. For SSH1, use Cipher
blowfish; for SSH2, use:
Ports are the numbers representing different services on a server; such as port 80 for HTTP and port 110 for POP3.
You can find the list of standard port numbers and their services in /etc/services. SSH can translate transparently
all traffic from an arbitrary port on your computer to a remote server running SSH. The traffic then can be forwarded
by SSH to an arbitrary port on another server. Why would you want to do this? Two reasons: encryption and tunneled connections.
Encryption
Many applications use protocols where passwords and data are sent as clear text. These protocols include POP3, IMAP,
SMTP and NNTP. SSH can encrypt these connections transparently. Say your e-mail program normally connects to the POP3
port (110) on mail.example.net. Also, say you can't SSH directly to mail.example.net, but you have a shell login at
shell.example.net. You can instruct SSH to encrypt traffic from port 9110 (chosen arbitrarily) on your local computer
and send it to port 110 on mail.example.net, using the SSH server at shell.example.net:
That is, send local port 9110 to mail.example.net port 110, over an SSH connection to shell.example.net.
Then, simply tell your e-mail program to connect to port 9110 on localhost. From there, data is encrypted, transmitted
to shell.example.net over the SSH port, then decrypted and passed to mail.example.net over port 110. As a neat side
effect, as far as the POP3 dæmon on mail.example.net knows, it is accepting traffic from shell.example.net.
Tunneled Connections
SSH can act as a bridge through a firewall whether the firewall is protecting your computer, a remote server or both.
All you need is an SSH server exposed to the other side of the firewall. For example, many DSL and cable-modem companies
forbid sending e-mail from your own machine over port 25 (SMTP).
Our next example is sending mail to your company's SMTP server through your cable-modem connection. In this example,
we use a shell account on the SMTP server, which is named mail.example.net. The SSH command is:
ssh -L 9025:mail.example.net:25 mail.example.net
Then, tell your mail transport agent to connect to port 9025 on localhost to send mail. This exercise should look quite
similar to the last example; we are tunneling from local port 9025 to mail.example.net port 25 over mail.example.net.
As far as the firewall sees, it is passing normal SSH data on the normal SSH port, 22, between you and mail.example.net.
A final example is connecting through an ISP firewall to a mail or news server inside a restricted network. What
would this look like? In fact, it would be the same as the first example; mail.example.net can be walled away inside
the network, inaccessible to the outside world. All you need is an SSH connection to a server that can see it, such
as shell.example.net. Is that neat or what?
Limitations/Refinements to Port Forwarding
If a port is reassigned on a computer (the local port in the examples above), every user of that computer sees the
reassigned port. If the local system has multiple users, tunnel only from unused, high-numbered ports to avoid confusion.
If you want to forward a privileged local port (lower than 1024), you need to do so as root. Forwarding a lower-numbered
port might be useful if a program won't let you change its port, such as standard BSD FTP.
By default, a tunneled local port is accessible only to local users and not by remote connection. However, any user
can make the tunneled port available remotely by using the -g option. Again, you can do this to privileged ports only
if you are root.
Any user who can log in with SSH can expose any port inside a private network to the outside world using port forwarding.
As an administrator, if you allow incoming SSH connections, you're really allowing incoming connections of any kind.
You can configure the OpenSSH dæmon to refuse port forwarding with AllowTcpForwarding no, but a determined
user can forward anyway.
A config file option is available to forward ports; it is called LocalForward. The first port-forwarding example
given above could be written as:
This way, if you type ssh forwardpop you receive the same result as in the first example. This example uses
the Host command described above and the HostName command, which specifies a real hostname with which to connect.
Finally, a command similar to LocalForward, called RemoteForward, forwards a port from the computer to which you
are connected, to your computer. Please read the ssh_config man pages to find out how.
Piping Binary Data to a Remote Shell
Piping works transparently through SSH to remote shells. Consider:
The first example pipes myfile to lpr running on the machine named desktop. The second example creates a tar file
and writes it to the terminal (because the tar file name is specified as dash), which is then piped to the machine named
desktop and redirected to a file.
Running Remote Shell Commands
With SSH, you don't need to open an interactive shell if you simply want some output from a remote command, such
as:
ssh user@host w
This command runs the command w on host as user and displays the result. It can be used to automate commands,
such as:
Notice the back-ticks around the SSH command. This uses Perl to call SSH 12 times, each time running the command
w on a different remote host, server1 through server12. In addition, you need to enter your password each time
SSH makes a connection. However, read on for a way to eliminate the password requirement without sacrificing security.
Authentication
How does SSH authenticate that you should be allowed to connect? Here are some options:
By hostnames only: uses .rhosts file; insecure; disabled by default.
By hostnames and host-key checking.
The S/Key one-time password system.
Kerberos: private-key encryption with time-expired "tickets".
Smart card.
Password prompt.
Public key.
The most common authentication method is by password prompt, which is how most SSH installations are run out of the
box.
However, public key encryption is worth investigating; it is considerably more secure than passwords, and by using
it you can do away with all or most of your password typing.
Briefly, public key encryption relies on two keys: a public key to encrypt, which you don't keep secret, and a private
key to decrypt, which is kept private on your local computer. The general idea is to run ssh-keygen to generate
your keys. Press Return when it asks you for a passphrase. Then copy your public key to the remote computer's authorized_keys
file.
The details depend on whether the computer to which you are connecting uses SSH1 or SSH2. For SSH1 type ssh-keygen
-t rsa1, and copy ~/.ssh/identity.pub to the end of the file ~/.ssh/authorized_keys on the remote computer. For
SSH2, type ssh-keygen -t rsa, and copy ~/.ssh/id_rsa.pub to the end of the file ~/.ssh/authorized_keys on the
remote computer. This file might be called ~/.ssh/authorized_keys2, depending on your OpenSSH version. If the first
one doesn't work, try the second. The payoff is you can log in without typing a password.
You can use a passphrase that keeps the private key secret on your local computer. The passphrase encrypts the private
key using 3DES. At no time is your passphrase or any secret information sent over the network. You still have to enter
the passphrase when connecting to a remote computer.
Authentication Agent
You might wonder: if we want to use a passphrase, are we stuck back where we started, typing in a passphrase every
time we log in? No. Instead, you can use a passphrase, but type it only once instead of every time you use the private
key. To set up this passphrase, execute ssh-agent when you first start your session. Then execute ssh-add,
which prompts for your passphrase and stores it in memory, not on disk. From then on, all connections authenticating
with your private key use the version in memory, and you won't be asked for a password.
Your distribution may be set up to start ssh-agent when you start X. To see if it's already running, enter ssh-add
-L. If the agent is not running already, you need to start it, which you can do by adding it to your .bash_login,
logging out and logging back in again.
Authentication Agent Forwarding
If you connect from one server to another using public key authentication, you don't need to run an authentication
agent on both. SSH automatically can pass any authentication requests coming from other servers, back to the agent running
on your own computer. This way, it never passes your secret key to the remote computer; rather, it performs authentication
on your computer and sends the results back to the remote computer.
To set up authentication agent forwarding, simply run ssh -A or add the following line to your config file:
ForwardAgent yes
You should use authentication agent forwarding only if you trust the administrators of the remote computer; you risk
them using your keys as if they were you. Otherwise, it is quite secure.
Traveling with SSH Java Applet
Many people carry a floppy with PuTTY or another Windows SSH program, in case they need to use an unsecured computer
while traveling. This method works if you have the ability to run programs from the floppy drive. You also can download
PuTTY from the web site and run it.
Another alternative is putting an SSH Java applet on a web page that you can use from a browser. An excellent Java
SSH client is Mindterm, which is free for noncommercial use. You can find it at
www.appgate.com/mindterm.
Conclusion
An SSH configuration can go wrong in a few places if you are using these various tricks. You can catch many problems
by using ssh -v and watching the output. Of course, none of these tricks is essential to using SSH. Eventually,
though, you may encounter situations where you're glad you know them. So give a few of them a try.
Daniel R. Allen ([email protected]) discovered UNIX courtesy of a 1,200-baud modem,
a free local dial-up and a guest account at MIT, back when those things existed. He has been an enthusiastic Linux user
since 1995. He is president of Prescient Code Solutions, a software consulting company in Kitchener, Ontario and Ithaca,
New York.
Re: Eleven SSH Tricks (Score: 0)
by Anonymous on Sunday, January 25, 2004
One trick I use a lot: set up aliases based on your known_hosts file so you get proper hostname completion.
Try sticking this in ~/.bashrc:
if [ -f ~/.ssh/known_hosts ] ; then
while read host junk
do
host=${host%%,*}
alias "${host}=ssh ${host}"
done fi
-Dom
Correction re: Tunnelled Connections (Score: 0)
by Anonymous on Friday, June 04, 2004
I believe I made a mistake in the "Tunnelled Connections" example- In the fourth paragraph, "tell your mail
transport agent" should read "tell your mail user agent". In other words, change the settings in your email
program.
The other situation, where you're running your own sendmail/postfix/exim and want to send out mail to the world,
punching though an ISP firewall, is only possible if you have access to a mail relay running a ssh server to
relay all your outgoing email, which is nearly the same as the above situation with a remote SMTP server.
Since there needs to be a server receiving the SSH connection at the other end, you'd otherwise need to figure
out how to set up your mail server to establish a SSH connection to every server you emailed to, which isn't
possible with regular SMTP.
Perhaps ultimately we should be happy for that, since if a way to transparently send SMTP over SSH were available,
most ISPs would then be compelled to block all ports to prevent SSH connections, instead of only blocking SMTP
ports to block spammers, and we'd all have yet another reason to hate spammers...
-Daniel Allen
Re: Eleven SSH Tricks (Score: 0)
by Anonymous on Friday, June 04, 2004
In the section Running Remote Shell Commands, perl seems a little overkill for running those consecutive
ssh commands. You can replace the little perl code by straight bash:
Are you looking for a solution to backup your data to a remote location? While a solid backup solution such as
Arkeia or TSM from IBM are nice from an enterprise
point of view, simpler solutions are available from a home user's perspective. I will walk you through on you how you
can backup your data to a remote server, using the default tools available on all linux systems. In a nutshell, we will
use ssh capabilities to allow a cron job to transfer a tarball from you local machine to a remote machine.
For the purpose of this tutorial, the local machine will be called "localmachine" (running slackware) and the remote
server will be called "remoteserver" (slackware as well). The user will be joe (me). You will have to substitute those
3 with your own machines names and user.
Generating your private/public key pair
To be able to logon to another server without being prompted for your password, you need to generate a key that will
be trusted by the remote server, where your backups will be sent to. To accomplish this, follow the following steps
as the user you will use (joe here).
ssh-keygen -t rsa
You will then be prompted for a file name. Leave it as the default by simply pressing "Enter".
Generating public/private rsa key pair.
Enter file in which to save the key (/home/joe/.ssh/id_rsa):
The last step of the key creation is the passphrase. Since the purpose of this is to not enter a password, hence
being able to create batch jobs, just hit "Enter" twice, leaving them blank.
Enter passphrase (empty for no passphrase):
Enter same passphrase again:
Your identification has been saved in /home/joe/.ssh/id_rsa.
Your public key has been saved in /home/joe/.ssh/id_rsa.pub.
The key fingerprint is:
a6:84:5d:a6:cd:ff:31:48:21:85:ca:46:93:88:7a:50 joe@localmachine
This just created 2 files in the user's home directory. ~/.ssh/id_rsa (the private key) and ~/.ssh/id_rsa.pub.
The id_rsa.pub is your public key, which you share with the remote host. The id_rsa is your private key, and this is
only for you. Do not lose it or share it with anyone, as this is your passkey! Make sure the file is not readable by
anyone but you (chmod 600 ~/.ssh/id_rsa). Anyone having a copy of this key could usurpate your identity and login
to this server as you. It is not any more dangerous to use this method as to use a traditional password, but I will
not enter into a debate here.
Now that you have your keyring, it is time to send your public key to the remote machine, so that it can trust you.
Sharing your localmachine public key
First things first, let's make sure that the remote folder into which you will put this key exists (~/.ssh), and
will only be readable by you.
ssh remotemachine "mkdir .ssh; chmod 600 .ssh"
This time, it will prompt you for your password. Enter it. If the remote directory didn't exist, everything should
go without a hitch. If not you will receive a message like mkdir: cannot create directory `.ssh': File exists.,
which is fine. The permissions will be changed nevertheless.
Next step is to actually copy your public key in the remote directory, like this:
You should now be able to ssh remotemachine, and not being prompted for a password.
Creating the job to be run by cron
To make it easy, we will create the backup tarball first, then ssh it over to the remote host. Beforehand, let's
make sure you have a remote directory where you will put the tarball, accessible to the user running the script. In
this case, we will use 'backup' directory under joe's homedir, that you can create like this:
ssh remotemachine "mkdir backup"
Here is what a shell script (home_backup.sh) could look like. This is used to back up a whole home directory.
#!/bin/bash
# this tars up joe's home directory into myhome.tar.gz tarball.
/bin/tar -zcpf /home/joe/myhome.tar.gz /home/joe
# This sends the tarball to the remote directory
cat /home/joe/myhome.tar.gz |ssh remotemachine "cd backup; cat > backup.tar.gz"
And this is it! Your tarball is now copied on your remote host. You can go there, check and make sure that the ball
untars well, and that permissions were preserved (which they should because of the p switch.)
Cron
All that is left is to create a cron job for this user.
crontab -e
Let's say we want to backup every night at 2am.
0 2 * * * /home/joe/home_backup.sh
Save the file, and you're done!
Conclusion
I hope this will help some people to better protect their personal data.
If I can be of any help, you can email me at chapeaurouge_AT_madpenguin_DOT_org. Thanks.
Fred Blaise
Disclaimer: I cannot be held responsible for any data loss due to this HOWTO.
There are mainly two different techniques to start sshd at boot time.
Go into /etc/rc.d directory, and edit the file rc.local. At its end add the lines:
echo "Starting sshd ...." /usr/local/sbin/sshd
In such a way, at the end of your next computer reboot, sshd is invoked and the message Starting sshd ....
is printed on the screen. To start sshd without rebooting the machine type from the command line:
/usr/local/sbin/sshd
Alternatively, in systems using System V initialization, you can put the sshd2.startup script, which
came with this distribution, to /etc/rc.d/init.d, naming it sshd2. Then go to rc$number.d directory, where $number
is your default runlevel. If you don't know your runlevel search in the file /etc/inittab the line specifying it:
id:5:initdefault
or
id:3:initdefault
In the first case your runlevel is 5, in the second one it is 3.
In the directory rc$number.d issue the command:
ln -s ../init.d/sshd2 S90sshd2
Then change directory to /etc/rc.d/rc0.d and run the command:
ln -s ../init.d/sshd2 K90sshd2
Repeat the operation in the directory /etc/rc.d/rc6.d.
After doing that you can start sshd2 with out rebooting the machine, simply running the script:
/etc/rc.d/init.d/sshd2 start
Establish a SSH connection
Once sshd is running on your machine you can test your configuration trying to login into it using the ssh client.
Let's suppose that you machine is named host1 and your login name is myname. To start a ssh connection
use the command:
ssh -l myname host1
In such a way ssh2 client (default client) tries to connect to host1 port 22 (default port). sshd2 daemon,
running on host1, catches the request and asks for the myname password. If the password is correct
it allows the login and open a shell.
Generating and managing ssh keys
Ssh allows another authentication mechanism, based upon authentication keys, a public key cryptography method.
Each user wishing to use ssh with public key authentication must runs ssh-keygen command (without any option)
to create authentication keys. The command starts the generation of the keys pair (public and private) and ask for a
passphrase in order to protect them.
Two file are created in the $HOME/.ssh2/ directory: id_dsa_1024_a and id_dsa_1024_a.pub, the user
private and public key.
Let's suppose that we have two accounts, myname1 on host1 and myname2 on host2.
We want to login from host1 to host2 using ssh public key authentication. In order to do that four steps are required:
On host1 generate the key pair using ssh-keygen command, and choose a passphrase to protect it.
Login into host2, using ssh password authentication, and repeat the previous operation. Then change directory
to $HOME/.ssh2 and create a file, named identification, containing the following lines:
# identification
IdKey  id_dsa_1024_a
This file is used by sshd to identify the key pair to be used during connections.
From host2, get the ssh host1 public key and rename it in a suitable way (e.g. host1.pub):
ftp host1
[...]
cd .ssh2
get id_dsa_1024_a.pub host1.pub
At the end of ftp process a copy of host1 public key, named host1.pub, resides in host2 $HOME/.ssh2
directory.
Create the file authorization containing the following lines:
# authorization
Key     host1.pub
This file lists all trusted ssh public keys placed in $HOME/.ssh2 directory. When a ssh connection is started
from a user whom public key matches one of the entry of authorization file the public key authentication
scheme starts.
In order to test the previous configuration, you could try to connect from host1 to host2 using ssh. Sshd must reply
asking for a passphrase, otherwise, if password is requested, some mistakes occurred in the configuration process and
you must check carefully steps 1 to 4.
The passphrase required is your LOCAL passphrase (i.e. passphrase protecting host1 public key).
Tip of the Week: Automated File Synchronization Using rsync and ssh
The tip of the Week describes a procedure to automatically synchronize files using rsync over SSH.
When a user connects via SSH, he must prove his identity to the remote machine using one of several methods. A common
question usually arise: "How can I access a remote host without entering a password at each login?".
SSH provides two solutions to allow remote logins without password rompt: - the first solution uses the /etc/shosts.equiv
and .shosts method which is similar to the method using /etc/hosts.equiv and /.rhosts. This
form of authentication should not be allowed because it is not secure.
However this weak authentication method can be combined with RSA-based host authentication where the client's host
key is checked with the known_hosts file of the remote machine.
- as second solution, SSH implements the RSA authentication protocol: the user creates his RSA key pair using ssh-keygen.
The private key is stored in .ssh/identity and the public key in .ssh/identity.pub. Both files are
located in the user's home directory. The user can then copy his identity.pub to .ssh/authorized_keys in his home
directory on the remote machine he wants to login to (this could also be the home directory of another user). The authorized_keys
file corresponds to the conventional .rhosts file. Then the user is allowed to login to this remote machine without
giving any password. RSA authentication is much more secure than classical .shosts authentication method.
In our situation, let's imagine that we have a user backup on a machine called master that needs to login to his
account backup on a remote machine called mirror without providing a password for each login. This login without password
prompt is necessary to automate the synchronization of a directory.
First, both machine should run SSH (http://www.openssh.org/portable.html).
Then a personal key for master can be generated using ssh-keygen from the command line. The user will be prompted
three times during the generation of the keys: once for the name of the output file and twice for the passphrase, just
hit enter three times:
Enter file in which to save the key (/home/backup/.ssh/identity): Enter passphrase (empty for no passphrase): Enter
same passphrase again: Your identification has been saved in /home/backup/.ssh/identity Your public key has been saved
in /home/backup/.ssh/identity.pub The key fingerprint is:
backup@master:~ > During a login, SSH will look for a file named
authorized_keys in the user's .ssh/ directory. This file contains the keys of users allowed to login to this account.
Now master must copy the content of identity.pub to the file .ssh/authorized_keys in the home directory of user backup
on the machine mirror. If not present the directory .ssh should be created on the machine mirror:
The access to authorized_keys must be restricted. Now the user backup on machine master should be able to login to
the account backup on machine mirror without being prompted for a password:
rsync is a program that can be used in automated scripts to synchronize the content of a directory with the content
of another directory. Recent versions of rsync have the capability of tunneling rsync data though SSH.
Now the user can automate the synchronization of a local directory (on master) with a remote directory on mirror.
This command line could be used in a script to automate the process:
The Last but not LeastTechnology is dominated by
two types of people: those who understand what they do not manage and those who manage what they do not understand ~Archibald Putt.
Ph.D
FAIR USE NOTICEThis site contains
copyrighted material the use of which has not always been specifically
authorized by the copyright owner. We are making such material available
to advance understanding of computer science, IT technology, economic, scientific, and social
issues. We believe this constitutes a 'fair use' of any such
copyrighted material as provided by section 107 of the US Copyright Law according to which
such material can be distributed without profit exclusively for research and educational purposes.
This is a Spartan WHYFF (We Help You For Free)
site written by people for whom English is not a native language. Grammar and spelling errors should
be expected. The site contain some broken links as it develops like a living tree...
You can use PayPal to to buy a cup of coffee for authors
of this site
Disclaimer:
The statements, views and opinions presented on this web page are those of the author (or
referenced source) and are
not endorsed by, nor do they necessarily reflect, the opinions of the Softpanorama society.We do not warrant the correctness
of the information provided or its fitness for any purpose. The site uses AdSense so you need to be aware of Google privacy policy. You you do not want to be
tracked by Google please disable Javascript for this site. This site is perfectly usable without
Javascript.
<img alt="" src=/post/how-to-setup-ssh-tunneling/launch-putty.jpg>
<img alt="" src=/post/how-to-setup-ssh-tunneling/configure-tunnel-putty.jpg>
<img alt="" src=/post/how-to-setup-ssh-tunneling/add-tunnel-putty.jpg>
<img alt="" src=/post/how-to-setup-ssh-tunneling/save-session-putty.jpg>
<img alt="" src=/post/how-to-setup-ssh-tunneling/open-session-putty.jpg>
SSH Jump Host
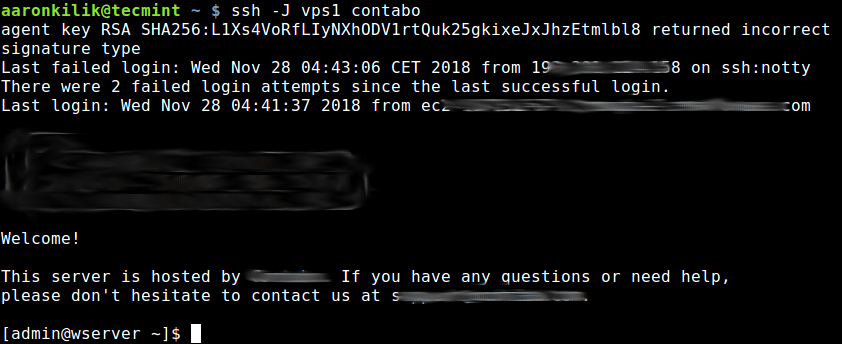
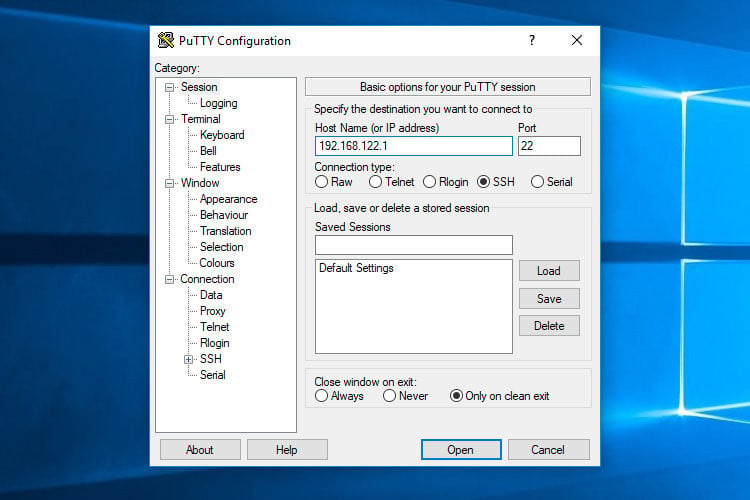
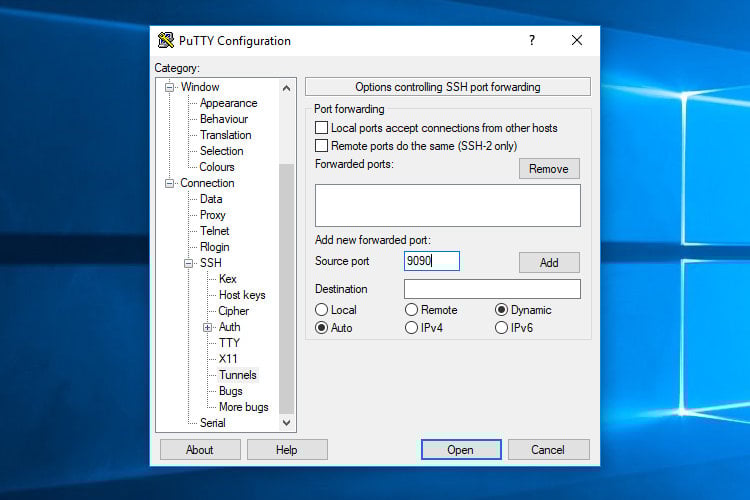

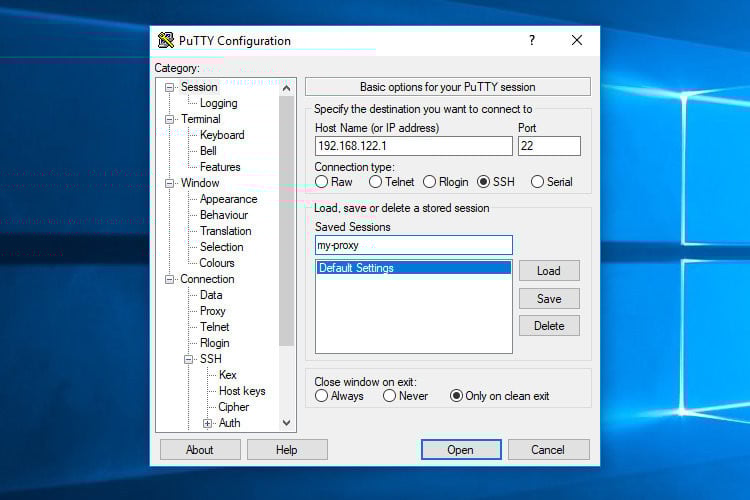
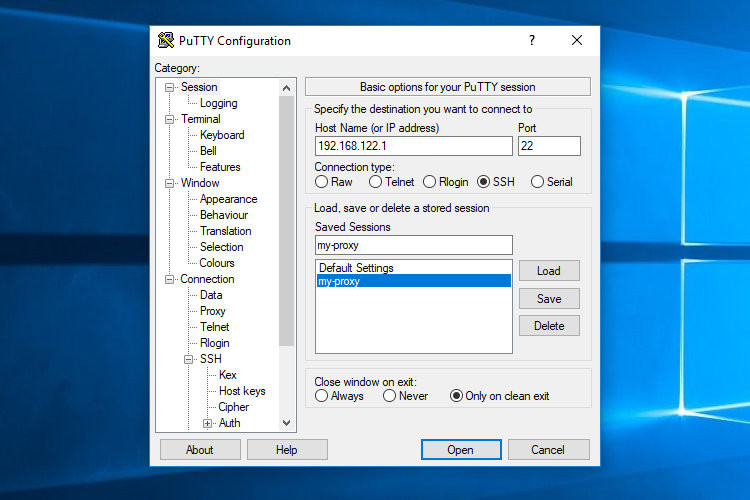
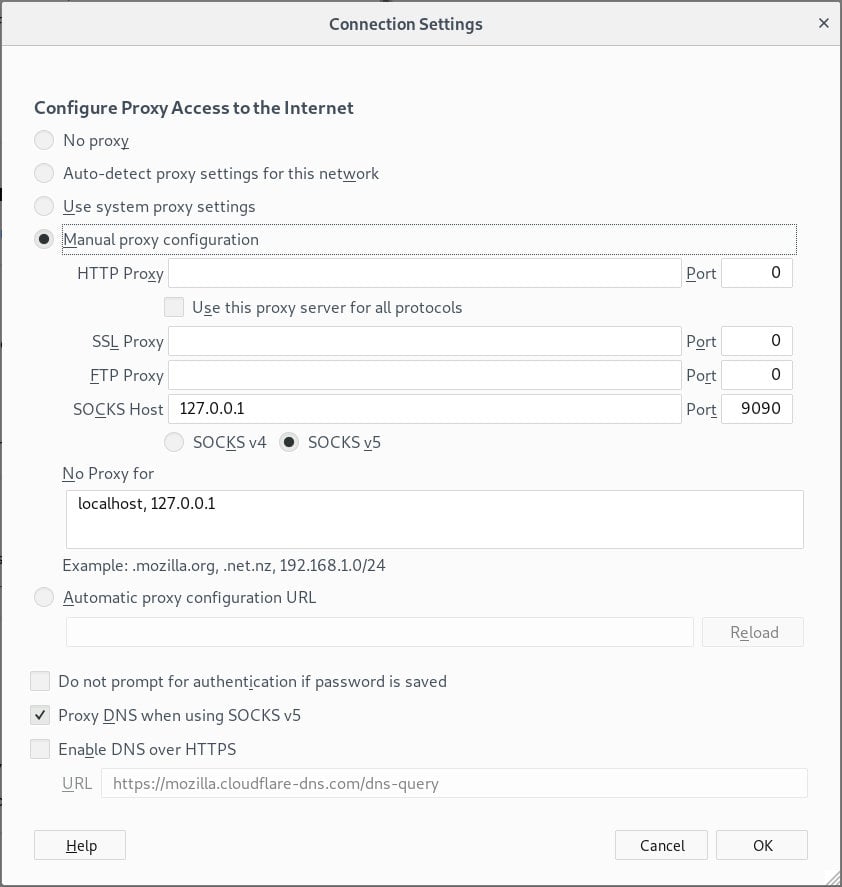

.
The Sexiest Man in Jamaica 113


 <img alt="" src=/post/how-to-setup-ssh-tunneling/launch-putty.jpg>
 <img alt="" src=/post/how-to-setup-ssh-tunneling/configure-tunnel-putty.jpg>
 <img alt="" src=/post/how-to-setup-ssh-tunneling/add-tunnel-putty.jpg>
 <img alt="" src=/post/how-to-setup-ssh-tunneling/save-session-putty.jpg>
 <img alt="" src=/post/how-to-setup-ssh-tunneling/open-session-putty.jpg>


