The first in this like is set number which
adds line numbers as the first column
To remove number column use
set nonumber
It makes sense to put some set command in your in your .exrc :
    set showmode number ai
    set shiftwidth=3
    set tabstop=3
    set showmatch Notes:
The shiftwidth options allows one to easily indent blocks of code.
At any line enter >> ; the line should be shifted 3 spaces; enter 3<< and the 3 lines
at the cursor should be shifted 4 spaces. This is useful for increasing the indentation of a block of
code.
Most programmers like tab stops of 3 or even less. the rest of the would often uses
tab stops of 8. If we wish to communicate with the rest of the world, (i.e. send code over email and
have it look reasonable) it would be a good idea to remove the tabs, replacing all tabs with spaces.
The command that does this from the shell is: pr -t -e4 file.c > file.txt
I often forget to sudo before editing a file I don't have write permissions on. When I
come to save that file and get a permission error, I just issue that vim command in order to
save the file without the need to save it to a temp file and then copy it back again.
You obviously have to be on a system with sudo installed and have sudo rights.
Something I just discovered recently that I thought was very cool:
:earlier 15m
Reverts the document back to how it was 15 minutes ago. Can take various arguments for the
amount of time you want to roll back, and is dependent on undolevels. Can be reversed with
the opposite command :later
Also very usefull is g+ and g- to go backward and forward in time. This is so much more
powerful than an undo/redo stack since you don't loose the history when you do something
after an undo. – Etienne PIERRE
Jul 21 '09 at 13:53
You don't lose the redo history if you make a change after an undo. It's just not easily
accessed. There are plugins to help you visualize this, like Gundo.vim – Ehtesh Choudhury
Nov 29 '11 at 12:09
This is quite similar to :r! The only difference as far as I can tell is that :r! opens a new
line, :.! overwrites the current line. – saffsd
May 6 '09 at 14:41
:.! is actually a special case of :{range}!, which filters a range
of lines (the current line when the range is . ) through a command and replaces
those lines with the output. I find :%! useful for filtering whole buffers.
– Nefrubyr
Mar 25 '10 at 16:24
dab "delete arounb brackets", daB for around curly brackets, t for xml type tags,
combinations with normal commands are as expected cib/yaB/dit/vat etc – sjh
Apr 8 '09 at 15:33
de Delete everything till the end of the word by pressing . at your heart's desire.
ci(xyz[Esc] -- This is a weird one. Here, the 'i' does not mean insert mode. Instead it
means inside the parenthesis. So this sequence cuts the text inside parenthesis you're
standing in and replaces it with "xyz". It also works inside square and figure brackets --
just do ci[ or ci{ correspondingly. Naturally, you can do di (if you just want to delete all
text without typing anything. You can also do a instead of i if you
want to delete the parentheses as well and not just text inside them.
ci" - cuts the text in current quotes
ciw - cuts the current word. This works just like the previous one except that
( is replaced with w .
C - cut the rest of the line and switch to insert mode.
ZZ -- save and close current file (WAY faster than Ctrl-F4 to close the current tab!)
ddp - move current line one row down
xp -- move current character one position to the right
U - uppercase, so viwU upercases the word
~ - switches case, so viw~ will reverse casing of entire word
Ctrl+u / Ctrl+d scroll the page half-a-screen up or down. This seems to be more useful
than the usual full-screen paging as it makes it easier to see how the two screens relate.
For those who still want to scroll entire screen at a time there's Ctrl+f for Forward and
Ctrl+b for Backward. Ctrl+Y and Ctrl+E scroll down or up one line at a time.
Crazy but very useful command is zz -- it scrolls the screen to make this line appear in
the middle. This is excellent for putting the piece of code you're working on in the center
of your attention. Sibling commands -- zt and zb -- make this line the top or the bottom one
on the sreen which is not quite as useful.
% finds and jumps to the matching parenthesis.
de -- delete from cursor to the end of the word (you can also do dE to delete
until the next space)
bde -- delete the current word, from left to right delimiter
df[space] -- delete up until and including the next space
dt. -- delete until next dot
dd -- delete this entire line
ye (or yE) -- yanks text from here to the end of the word
ce - cuts through the end of the word
bye -- copies current word (makes me wonder what "hi" does!)
yy -- copies the current line
cc -- cuts the current line, you can also do S instead. There's also lower
cap s which cuts current character and switches to insert mode.
viwy or viwc . Yank or change current word. Hit w multiple times to keep
selecting each subsequent word, use b to move backwards
vi{ - select all text in figure brackets. va{ - select all text including {}s
vi(p - highlight everything inside the ()s and replace with the pasted text
b and e move the cursor word-by-word, similarly to how Ctrl+Arrows normally do . The
definition of word is a little different though, as several consecutive delmiters are treated
as one word. If you start at the middle of a word, pressing b will always get you to the
beginning of the current word, and each consecutive b will jump to the beginning of the next
word. Similarly, and easy to remember, e gets the cursor to the end of the
current, and each subsequent, word.
similar to b / e, capital B and E
move the cursor word-by-word using only whitespaces as delimiters.
capital D (take a deep breath) Deletes the rest of the line to the right of the cursor,
same as Shift+End/Del in normal editors (notice 2 keypresses -- Shift+D -- instead of 3)
One that I rarely find in most Vim tutorials, but it's INCREDIBLY useful (at least to me), is
the
g; and g,
to move (forward, backward) through the changelist.
Let me show how I use it. Sometimes I need to copy and paste a piece of code or string,
say a hex color code in a CSS file, so I search, jump (not caring where the match is), copy
it and then jump back (g;) to where I was editing the code to finally paste it. No need to
create marks. Simpler.
Ctrl-O and Ctrl-I (tab) will work similarly, but not the same. They move backward and forward
in the "jump list", which you can view by doing :jumps or :ju For more information do a :help
jumplist – Kimball Robinson
Apr 16 '10 at 0:29
Not sure if this counts as dark-corner-ish at all, but I've only just learnt it...
:g/match/y A
will yank (copy) all lines containing "match" into the "a / @a
register. (The capitalization as A makes vim append yankings instead of
replacing the previous register contents.) I used it a lot recently when making Internet
Explorer stylesheets.
Sometimes it's better to do what tsukimi said and just filter out lines that don't match your
pattern. An abbreviated version of that command though: :v/PATTERN/d
Explanation: :v is an abbreviation for :g!, and the
:g command applies any ex command to lines. :y[ank] works and so
does :normal, but here the most natural thing to do is just
:d[elete] . – pandubear
Oct 12 '13 at 8:39
You can also do :g/match/normal "Ayy -- the normal keyword lets you
tell it to run normal-mode commands (which you are probably more familiar with). –
Kimball
Robinson
Feb 5 '16 at 17:58
Hitting <C-f> after : or / (or any time you're in command mode) will bring up the same
history menu. So you can remap q: if you hit it accidentally a lot and still access this
awesome mode. – idbrii
Feb 23 '11 at 19:07
Other VIM tips
Checking perl syntax in VIM on each save
au BufWritePost *.pl,*.pm !perl -cw %
Every time you save a .pl or .pm file, it executes perl -cw and shows you
the output.
When Vim creates more than one window, its default behavior is to create a status line for each window (whereas the default behavior
for a single window is not to display any status line). You can control this behavior with Vim’s laststatus option, e.g.:
:set laststatus=1
Set laststatus to 2 to always see a status line for each window, even in single window mode. (It is best to set this
in your .vimrc file.)
Because window size affects readability and usability, you may want to control Vim’s limits for window sizes. Use Vim’s winheight
and winwidth options to define reasonable limits for the current window (other windows may be resized to
accommodate it).
Split the edit window and scroll each window so that each shows the same area of the file. Make changes. Watch the other window.
Magic.
Don’t believe you’re editing the same file at the same time? Split the edit window and scroll each window so that each shows the
same area of the file. Make changes. Watch the other window. Magic.
Why or how is this useful? One common use by this author, when writing shell scripts or C programs, is to code a block of text that
describes the program’s usage. (Typically, the program will display the block when passed a --help option.) I
split the display so that one window displays the usage text, and I use this as a template to edit the code in the other window that
parses all the options and command-line arguments described in the usage text. Often (almost always) this code is complex and ends up
far enough from the usage text that I can’t display everything I want in a single window.
If you want to edit or browse another file without losing your place in your current file, provide the new file as an argument to
your :split command. For instance:
:split otherfile
If you want windows to always split equally, set the equalalways option, preferably putting it in your .vimrc
to make it persistent over sessions. By default, setting equalalways splits both horizontal and vertical windows equally.
Add the eadirection option (hor, ver, both, for horizontal, vertical, or both, respectively)
to control which direction splits equally.
The following form of the :split command opens a new horizontal window as before, but with a slight nuance:
:[n]new [++opt] [+cmd] [file]
In addition to creating the new window, the WinLeave, WinEnter, BufLeave, and BufEnter autocommands execute. (For more information on autocommands, see the section Autocommands.)
Along with the horizontal split commands, Vim offers analogous vertical ones. So, for example, to split a vertical window, instead
of :split or :new, use :vsplit and :vnew respectively. The
same optional parameters are available as for the horizontal split commands.
There are two horizontal split commands without vertical cousins:
:sviewfilename
Splits the screen horizontally to open a new window and sets the readonly for that buffer. :sview
requires the filename argument.
:sfind [++opt] [+cmd]filename
Works like :split, but looks for the filename in the path. If Vim does not find the file, it
doesn’t split the window.
Mnemonic Tips
t and b are mnemonic for top and bottom windows.
In keeping with the convention that lowercase and uppercase implement opposites, CTRL-W w moves you through the windows in the opposite
direction from CTRL-W W.
The Control characters do not distinguish between uppercase and lowercase; in other words, pressing the Shift key while pressing
a CTRL- key itself has no effect. However, an upper/lowercase distinction is recognized for the regular keyboard key you press
afterward.
One way to simplify working with multiple windows
One of the authors’ favorite ways to use the CTRL-W + and CTRL-W - commands is by mapping each to keys, both keys adjacent. The +
key is a convenient choice. Though it is already the Vim “up” command, that behavior is redundant and little used by veteran Vim users
(who use the k command instead). Therefore, this key is a good candidate to map to something else, in this case CTRL-W +. Immediately
to that key’s left (on most standard keyboards) is the -. But since it is unshifted and the + is shifted, map the shifted key, _, to
CTRL-W -. Now you have two convenient side-by-side keys to easily and quickly expand and contract your current window horizontally.
:resizen sets the horizontal size of the current window to n lines. It sets an absolute size,
in contrast to the previously described commands that make a relative change.
zn sets the current window height to n lines. Note that n is not optional!
Omitting it results in the vi/Vim command z, which moves the cursor to the top of the screen.
CTRL-W< and CTRL-W> decrease and increase the window width, respectively. Think of the mnemonic device of “shift left” (<<)
and “shift right” (>>) to associate these commands to their function.
Finally, CTRL-W | resizes the current window to the widest size possible (by default). You can also specify explicitly how to change
the window width with vertical resizen. The n defines the window’s new width.
A common sequence of events when editing files is to make a change and then need to test by executing
the file you edited in a shell. If you're using vim, you could suspend your session (ctrl-Z), and then
run the command in your shell.
That's a lot of keystrokes, though.
So, instead, you could use vim's built-in "run a shell command"!
:!{cmd} Run a shell command, shows you the output and prompts you before returning
to your current buffer.
Even sweeter, is to use the vim special character for current filename: %
Here's ':! %' is in action!
A few more helpful shortcuts related to executing things in the shell:
:! By itself, runs the last external command (from your shell history)
:!! Repeats the last command
:silent !{cmd} Eliminates the need to hit enter after the command is done
:r !{cmd} Puts the output of $cmd into the current buffer
you can also use "%!" to pass current buffer via some filtering command.
For example : %!nl - to number lines (different from :set nu), :%!wc to check word count on current
buffer, :%!tac to reverse order of lines, and so on.
Every now and then you’ll have a need to duplicate a line, either directly
below the line that needs to be duplicated or to some other place in the current buffer. When this
problem arises, I’ve found there are a few different ways you can handle it.
The first is to use the :t. command, which
is a combination of t (itself a synonym for “copy”; see
:h :t) and the . command
(you’ll remember from
Chapter 5
that this is the “repeat” command). In this instance, :t. would
paste the copied content into the following line. You could also specify a line number to copy to. For
example, :t5 would copy the current line (or selection) to line 5 of
the buffer.
We can also use yyp, which means to yank the
current line (yy) and paste (p)
it into the following line. We could even add a count to the beginning of that command, if we needed to
duplicate the same line multiple times.
Note You
can duplicate a specific line (or range of lines) to another line by using the following command
:1t10, which would copy line 1 into line 10.
Moving Lines
Similar to duplicating lines of content is the common requirement to move lines
of content. In this instance, we can use the move (:m) command in
much the same way as we use the :t command.
If we want to move the current line down by one, we would execute
:m+1, whereas if we wanted to move the current line up by one, we
would execute :m-2 . . .wait, what? Yes, you read that correctly.
Imagine we have the following content:
ABCD
If we wanted line three (C) to be one line
up (consequently making the order A, C, B, D), we would have to move the line up by two and not one.
That’s because the move command actually places the specified line one line below the destination.
So when our cursor is on line three and we run :m-2, what we’re
telling Vim is to move the line up by two (which would be line one) and then insert it (thus sticking it
on line two).
Step 1:
Open
the file using vim editor with command:
$ vim ostechnix.txt
Step 2:
Highlight
the lines that you want to comment out. To do so, go to the line you want to comment and move the cursor to the beginning of a line.
Press
SHIFT+V
to
highlight the whole line after the cursor. After highlighting the first line, press
UP
or
DOWN
arrow
keys or
k
or
j
to
highlight the other lines one by one.
Here is how the lines will look like after highlighting them.
Highlight
lines in Vim editor
Step 3:
After
highlighting the lines that you want to comment out, type the following and hit
ENTER
key:
:s/^/# /
Please mind
the
space
between
#
and
the last forward slash (
/
).
Now you will see the selected lines are commented out i.e.
#
symbol
is added at the beginning of all lines.
Comment
out multiple lines at once in Vim editor
Here,
s
stands
for
"substitution"
.
In our case, we substitute the
caret
symbol
^
(in
the beginning of the line) with
#
(hash).
As we all know, we put
#
in-front
of a line to comment it out.
Step 4:
After
commenting the lines, you can type
:w
to
save the changes or type
:wq
to
save the file and exit.
Let us move on to the next method.
Method 2:
Step 1:
Open
the file in vim editor.
$ vim ostechnix.txt
Step 2:
Set
line numbers by typing the following in vim editor and hit ENTER.
:set number
Set
line numbers in Vim
Step 3:
Then
enter the following command:
:1,4s/^/#
In this case, we are commenting out the lines from
1
to
4
.
Check the following screenshot. The lines from
1
to
4
have
been commented out.
Comment
out multiple lines at once in Vim editor
Step 4:
Finally,
unset the line numbers.
:set nonumber
Step 5:
To
save the changes type
:w
or
:wq
to
save the file and exit.
The same procedure can be used for uncommenting the lines in a file. Open the file and set the line numbers as shown in Step 2.
Finally type the following command and hit ENTER at the Step 3:
:1,3s/^#/
After uncommenting the lines, simply remove the line numbers by entering the following command:
:set nonumber
Let us go ahead and see the third method.
Method 3:
This one is similar to Method 2 but slightly different.
Step 1:
Open
the file in vim editor.
$ vim ostechnix.txt
Step 2:
Set
line numbers by typing:
:set number
Step 3:
Type
the following to comment out the lines.
:1,4s/^/# /
The above command will comment out lines from 1 to 4.
Comment
out multiple lines at once in Vim editor
Step 4:
Finally,
unset the line numbers by typing the following.
:set nonumber
Method 4:
This method is suggested by one of our reader
Mr.Anand
Nande
in the comment section below.
Step 1:
Open
file in vim editor:
$ vim ostechnix.txt
Step 2:
Go
to the line you want to comment. Press
Ctrl+V
to
enter into
'Visual
block'
mode.
Enter
into Visual block mode in Vim editor
Step 3:
Press
UP
or
DOWN
arrow
or the letter
k
or
j
in
your keyboard to select all the lines that you want to be commented in your file.
Select
the lines to comment in Vim
Step 4:
Press
Shift+i
to
enter into
INSERT
mode.
This will place your cursor on the first line.
Step 5:
And
then insert
#
(press
Shift+3
)
before your first line.
Insert
hash symbol before a line in Vim
Step 6:
Finally,
press
ESC
key.
This will insert
#
on
all other selected lines.
Comment
out multiple lines at once in Vim editor
As you see in the above screenshot, all other selected lines including the first line are commented out.
Method 5:
This method is suggested by one of our Twitter follower and friend
Mr.Tim
Chase
. We can even target lines to comment out by
regex
.
In other words, we can comment all the lines that contains a specific word.
Step 1:
Open
the file in vim editor.
$ vim ostechnix.txt
Step 2:
Type
the following and press ENTER key:
:g/\Linux/s/^/# /
The above command will comment out all lines that contains the word
"Linux"
.
Replace
"Linux"
with
a word of your choice.
Comment
out all lines that contains a specific word in Vim editor
As you see in the above output, all the lines have the word
"Linux"
,
hence all of them are commented out.
And, that's all for now. I hope this was useful. If you know any other method than the given methods here, please let me know in the
comment section below. I will check and add them in the guide.
...Now, let us edit these two files at a time using Vim editor. To do so, run:
$ vim file1.txt file2.txt
Vim will display the contents of the files in an order. The first file's contents will be
shown first and then second file and so on.
Edit Multiple Files Using Vim Editor Switch between files
To move to the next file, type:
:n
Switch between files in Vim editor
To go back to previous file, type:
:N
Here, N is capital (Type SHIFT+n).
Start editing the files as the way you do with Vim editor. Press 'i' to switch to
interactive mode and modify the contents as per your liking. Once done, press ESC to go back to
normal mode.
Vim won't allow you to move to the next file if there are any unsaved changes. To save the
changes in the current file, type:
ZZ
Please note that it is double capital letters ZZ (SHIFT+zz).
To abandon the changes and move to the previous file, type:
:N!
To view the files which are being currently edited, type:
:buffers
View files in buffer in VIm
You will see the list of loaded files at the bottom.
List of files in buffer in Vim
To switch to the next file, type :buffer followed by the buffer number. For example, to
switch to the first file, type:
:buffer 1
Or, just do:
:b 1
Switch to next file in Vim
Just remember these commands to easily switch between buffers:
:bf            # Go to first file.
:bl            # Go to last file
:bn            # Go to next file.
:bp            # Go to previous file.
:b number  # Go to n'th file (E.g :b 2)
:bw            # Close current file.
Opening additional files for editing
We are currently editing two files namely file1.txt, file2.txt. You might want to open
another file named file3.txt for editing. What will you do? It's easy! Just type :e followed by
the file name like below.
:e file3.txt
Open additional files for editing in Vim
Now you can edit file3.txt.
To view how many files are being edited currently, type:
:buffers
View all files in buffers in Vim
Please note that you can not switch between opened files with :e using either :n or :N . To
switch to another file, type :buffer followed by the file buffer number.
Copying contents
of one file into another
You know how to open and edit multiple files at the same time. Sometimes, you might want to
copy the contents of one file into another. It is possible too. Switch to a file of your
choice. For example, let us say you want to copy the contents of file1.txt into file2.txt.
To do so, first switch to file1.txt:
:buffer 1
Place the move cursor in-front of a line that wants to copy and type yy to yank(copy) the
line. Then, move to file2.txt:
:buffer 2
Place the mouse cursor where you want to paste the copied lines from file1.txt and type p .
For example, you want to paste the copied line between line2 and line3. To do so, put the mouse
cursor before line and type p .
Sample output:
line1
line2
ostechnix
line3
line4
line5
Copying contents of one file into another file using Vim
To save the changes made in the current file, type:
ZZ
Again, please note that this is double capital ZZ (SHIFT+z).
To save the changes in all files and exit vim editor. type:
:wq
Similarly, you can copy any line from any file to other files.
Copying entire file
contents into another
We know how to copy a single line. What about the entire file contents? That's also
possible. Let us say, you want to copy the entire contents of file1.txt into file2.txt.
To do so, open the file2.txt first:
$ vim file2.txt
If the files are already loaded, you can switch to file2.txt by typing:
:buffer 2
Move the cursor to the place where you wanted to copy the contents of file1.txt. I want to
copy the contents of file1.txt after line5 in file2.txt, so I moved the cursor to line 5. Then,
type the following command and hit ENTER key:
:r file1.txt
Copying entire contents of a file into another file
Here, r means read .
Now you will see the contents of file1.txt is pasted after line5 in file2.txt.
line1
line2
line3
line4
line5
ostechnix
open source
technology
linux
unix
Copying entire file contents into another file using Vim
To save the changes in the current file, type:
ZZ
To save all changes in all loaded files and exit vim editor, type:
:wq
Method 2
The another method to open multiple files at once is by using either -o or -O flags.
To open multiple files in horizontal windows, run:
$ vim -o file1.txt file2.txt
Open multiple files at once in Vim
To switch between windows, press CTRL-w w (i.e Press CTRL+w and again press w ). Or, use the
following shortcuts to move between windows.
CTRL-w k - top window
CTRL-w j - bottom window
To open multiple files in vertical windows, run:
$ vim -O file1.txt file2.txt file3.txt
Open multiple files in vertical windows in Vim
To switch between windows, press CTRL-w w (i.e Press CTRL+w and again press w ). Or, use the
following shortcuts to move between windows.
CTRL-w l - left window
CTRL-w h - right window
Everything else is same as described in method 1.
For example, to list currently loaded files, run:
:buffers
To switch between files:
:buffer 1
To open an additional file, type:
:e file3.txt
To copy entire contents of a file into another:
:r file1.txt
The only difference in method 2 is once you saved the changes in the current file using ZZ ,
the file will automatically close itself. Also, you need to close the files one by one by
typing :wq . But, had you followed the method 1, when typing :wq all changes will be saved in
all files and all files will be closed at once.
In this case, we are commenting out the lines from 1 to 3. Check the following screenshot.
The lines from 1 to 3 have been commented out.
Comment out multiple lines at once in vim
To uncomment those lines, run:
:1,3s/^#/
Once you're done, unset the line numbers.
:set nonumber
Let us go ahead and see third method.
Method 3:
This one is same as above but slightly different.
Open the file in vim editor.
$ vim ostechnix.txt
Set line numbers:
:set number
Then, type the following command to comment out the lines.
:1,4s/^/# /
The above command will comment out lines from 1 to 4.
Comment out multiple lines in vim
Finally, unset the line numbers by typing the following.
:set nonumber
Method 4:
This method is suggested by one of our reader Mr.Anand Nande in the comment section
below.
Open file in vim editor:
$ vim ostechnix.txt
Press Ctrl+V to enter into 'Visual block' mode and press DOWN arrow to select all the lines
in your file.
Select lines in Vim
Then, press Shift+i to enter INSERT mode (this will place your cursor on the first line).
Press Shift+3 which will insert '#' before your first line.
Insert '#' before the first line in Vim
Finally, press ESC key, and you can now see all lines are commented out.
Comment out multiple lines using vim Method 5:
This method is suggested by one of our Twitter follower and friend Mr.Tim Chase .
We can even target lines to comment out by regex. Open the file in vim editor.
$ vim ostechnix.txt
And type the following:
:g/\Linux/s/^/# /
The above command will comment out all lines that contains the word "Linux".
Comment out all lines that contains a specific word in Vim
And, that's all for now. I hope this helps. If you know any other easier method than the
given methods here, please let me know in the comment section below. I will check and add them
in the guide. Also, have a look at the comment section below. One of our visitor has shared a
good guide about Vim usage.
NUNY3 November 23, 2017 - 8:46 pm
If you want to be productive in Vim you need to talk with Vim with *language* Vim is using.
Every solution that gets out of "normal
mode" is most probably not the most effective.
METHOD 1
Using "normal mode". For example comment first three lines with: I#j.j.
This is strange isn't it, but:
I –> capital I jumps to the beginning of row and gets into insert mode
# –> type actual comment character
–> exit insert mode and gets back to normal mode
j –> move down a line
. –> repeat last command. Last command was: I#
j –> move down a line
. –> repeat last command. Last command was: I#
You get it: After you execute a command, you just repeat j. cobination for the lines you would
like to comment out.
METHOD 2
There is "command line mode" command to execute "normal mode" command.
Example: :%norm I#
Explanation:
% –> whole file (you can also use range if you like: 1,3 to do only for first three
lines).
norm –> (short for normal)
I –> is normal command I that is, jump to the first character in line and execute
insert
# –> insert actual character
You get it, for each range you select, for each of the line normal mode command is executed
METHOD 3
This is the method I love the most, because it uses Vim in the "I am talking to Vim" with Vim
language principle.
This is by using extension (plug-in, add-in): https://github.com/tomtom/tcomment_vim
extension.
How to use it? In NORMAL MODE of course to be efficient. Use: gc+action.
Examples:
gcap –> comment a paragraph
gcj –> comment current line and line bellow
gc3j –> comment current line and 3 lines bellow
gcgg –> comment current line and all the lines including first line in file
gcG –> comment current line and all the lines including last line in file
gcc –> shortcut for comment a current line
You name it it has all sort of combinations. Remember, you have to talk with Vim, to
properly efficially use it.
Yes sure it also works with "visual mode", so you use it like: V select the lines you would
like to mark and execute: gc
You see if I want to impress a friend I am using gc+action combination. Because I always
get: What? How did you do it? My answer it is Vim, you need to talk with the text editor, not
using dummy mouse and repeat actions.
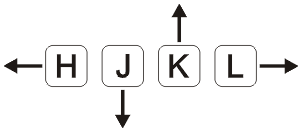
NOTE: Please stop telling people to use DOWN arrow key. Start using h, j, k and l keys to
move around. This keys are on home row of typist. DOWN, UP, LEFT and RIGHT key are bed habit
used by beginners. It is very inefficient. You have to move your hand from home row to arrow
keys.
VERY IMPORTANT: Do you want to get one million dollar tip for using Vim? Start using Vim
like it was designed for use normal mode. Use its language: verbs, nouns, adverbs and
adjectives. Interested what I am talking about? You should be, if you are serious about using
Vim. Read this one million dollar answer on forum:
https://stackoverflow.com/questions/1218390/what-is-your-most-productive-shortcut-with-vim/1220118#1220118
MDEBUSK November 26, 2019 - 7:07 am
I've tried the "boxes" utility with vim and it can be a lot of fun.
"... Apart from regular absolute line numbers, Vim supports relative and hybrid line numbers too to help navigate around text files. The 'relativenumber' vim option displays the line number relative to the line with the cursor in front of each line. Relative line numbers help you use the count you can precede some vertical motion commands with, without having to calculate it yourself. ..."
"... We can enable both absolute and relative line numbers at the same time to get "Hybrid" line numbers. ..."
How do I show
line numbers in Vim by default on Linux? Vim (Vi IMproved) is not just free text editor, but it
is the number one editor for Linux sysadmin and software development work.
By default, Vim
doesn't show line numbers on Linux and Unix-like systems, however, we can turn it on using the
following instructions.
.... Let us see how to display the line number in vim
permanently. Vim (Vi IMproved) is not just free text editor, but it is the number one editor
for Linux sysadmin and software development work.
By default, Vim doesn't show line numbers on
Linux and Unix-like systems, however, we can turn it on using the following instructions. My
experience shows that line numbers are useful for debugging shell scripts, program code, and
configuration files. Let us see how to display the line number in vim permanently.
Vim show line numbers by default
Turn on absolute line numbering by default in vim:
Open vim configuration file ~/.vimrc by typing the following command: vim ~/.vimrc
Append set number
Press the Esc key
To save the config file, type :w and hit Enter key
You can temporarily disable the absolute line numbers within vim session, type: :set nonumber
Want to enable disabled the absolute line numbers within vim session? Try: :set number
We can see vim line numbers on the left side.
Relative line numbers
Apart from regular absolute line numbers, Vim supports relative and hybrid line numbers too
to help navigate around text files. The 'relativenumber' vim option displays the line number
relative to the line with the cursor in front of each line. Relative line numbers help you use
the count you can precede some vertical motion commands with, without having to calculate it
yourself. Once again edit the ~/vimrc, run: vim ~/vimrc
Finally, turn relative line numbers on: set relativenumber Save and close the file
in vim text editor.
How to show "Hybrid" line numbers in Vim by default
What happens when you put the following two config directives in ~/.vimrc ? set number
set relativenumber
That is right. We can enable both absolute and relative line numbers at the same time to get
"Hybrid" line numbers.
Conclusion
Today we learned about permanent line number settings for the vim text editor. By adding the
"set number" config directive in Vim configuration file named ~/.vimrc, we forced vim to show
line numbers each time vim started. See vim docs here for more info and following tutorials too:
Vim
is one of the best, most popular, feature-rich and powerful text editor. There is no doubt
about that. It has lot of features. For example, the beginners can easily learn the basics of
Vim from the built-in help-section by running "vimtutor" command in Terminal. Learning Vim is
worth the effort. Today, in this guide, we will be discussing one of the most-widely used
feature called "spell check" in Vim editor. If you're a programmer who edits lots of text, then
"spell check" feature might be quite useful. It helps you to avoid embarrassing spelling
mistakes/typos while editing text files using Vim. Use Spell Check Feature In Vim Text
EditorEnable Spell Check
To enable Spell Check feature in Vim, open it and type the following from Command Mode:
:set spell
Enable Spell Check feature in Vim
Remember you need to type the above command inside Vim session, not in the Terminal
window.
Find and correct spelling mistakes, typos
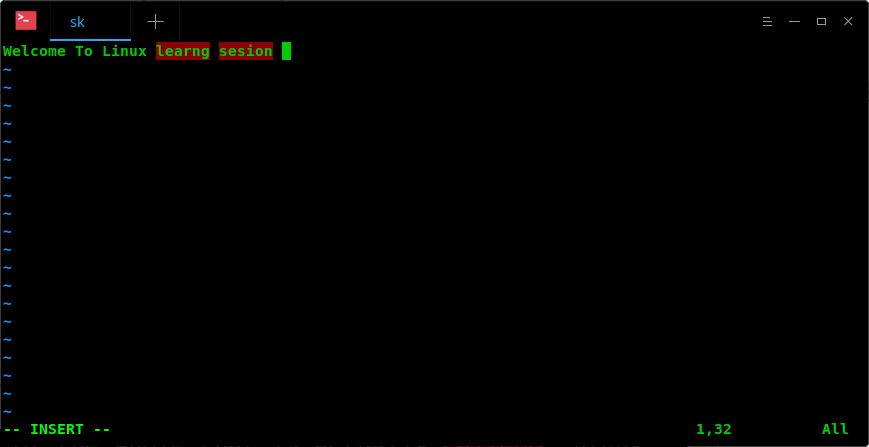
Now, go to "Insert Mode" (type "i" to switch to Insert Mode from Command mode) and type any
misspelled letters. Vim will instantly highlight the misspelled words.
As you see in the above output, I have typed "Welcome to Linux learng sesion" instead of
"Welcome to Linux learning session" and vim is highlighting the misspelled words "learng" and
"sesion" in red color.
Now, go back to Command mode by simply pressing the ESC key.
You can navigate through the misspelled words by typing any one of the following
letters:
]s – Find the misspelled word after the cursor (Forward search).
[s – Find the misspelled word before the cursor (Backward search).
]S (Note the capital "S") – Similar to "]s" but only stop at bad words, not at rare
words or words for another region.
[S – Similar to "[s" but search backwards.
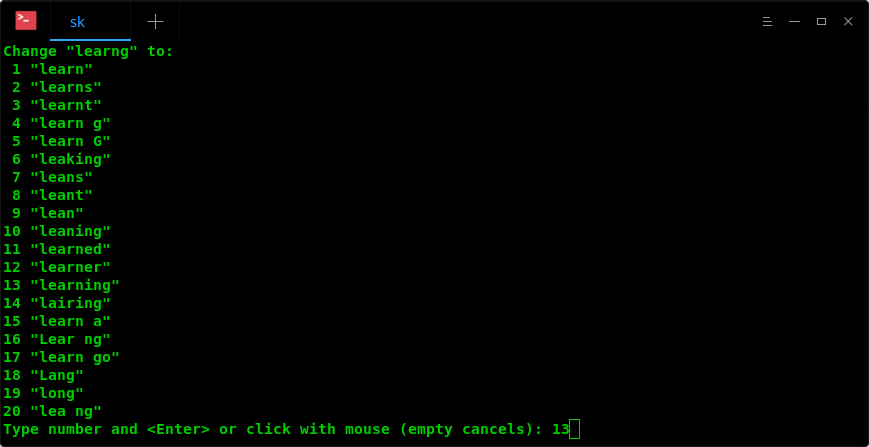
After you located the misspelled word, type z= to find suggestions for the that particular
word. Here, Vim shows me the list of suggestions for the misspelled word "learng". Pick the
correct word from the list by typing the respective number and press ENTER key to update the
misspelled word with right one.
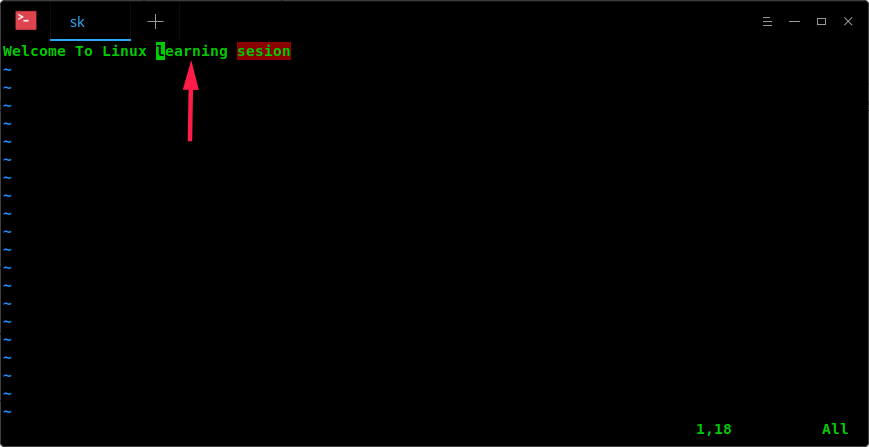
As you see in the above screenshot, I entered number 13 to replace the misspelled word
"learng" with correct word "learning. Vim immediately updated the correct word in the input
after I hit ENTER key.
Similarly, correct all spelling mistakes in your text as described above. Once you've
corrected all mistakes type :wq to save the changes and quit Vim editor.
Please remember – we can only check the spelling mistakes, not the grammar
mistakes.
Set Spell language
By default, Vim uses "en" (all regions of English) to check for spelling mistakes. We can
also choose our own spell language. For instance, to set US region English, type the following
from the Command mode in Vim editor:
:set spell spelllang=en_us
The list of all available regions for the English language is:
en – all regions
en_au – Australia
en_ca – Canada
en_gb – Great Britain
en_nz – New Zealand
en_us – USA
Add words to Spellfile
Some times you might want to add some words as exceptions, for example your name, a command,
Email etc. In such cases, you can add those specific words to the Spellefile . This file
contains all exceptions.
Make sure you have ~/.vim/spell/ directory in your system. If it is not, create one:
$ mkdir -p ~/.vim/spell/
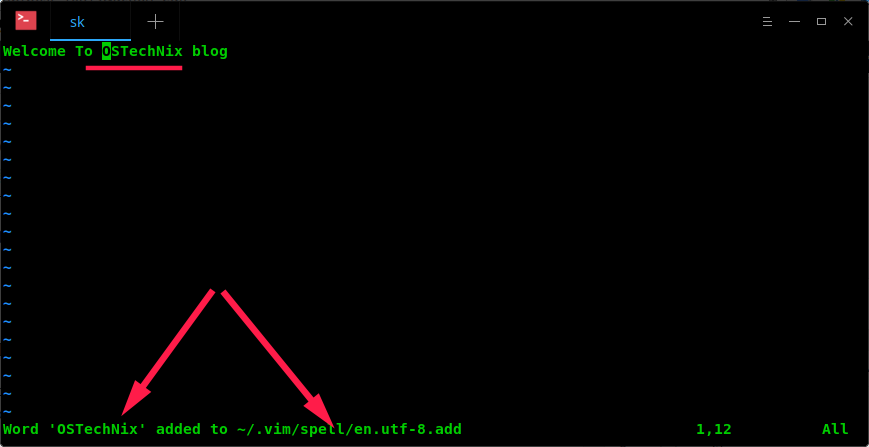
Then, set spellfile using:
:set spellfile=~/.vim/spell/en.utf-8.add
Now, any words which are not in Dictionary, locate the misspelled word (use z= ) and type zg
. It will add the word under the cursor as good word in spellfile. i.e adds the words to your
own dictionary.
To undo this add (remove the word from spellfile), just use zug . To mark the mispelled
word, type zw . To undo this action, use zuw .
Disable Spell Check in Vim
Vim will highlight all misspelled and words which are not available in the Dictionary. Some
times, you find this annoying while writing code or a README file that contains a lot of words
which are not available in the Dictionary. In such cases, you can disable the "Spell Check"
feature by simply typing the following command:
:set nospell
Disable Spell Check feature in Vim
That's it. Now, Vim will highlight nothing. You can enable the spell check feature at any
time by running ":set spell" from the Command mode in Vim.
Vim has more built-in help pages for Spell Check feature. To know more about spell check
feature, run:
:help spell
You also refer individual help section for every options, for example:
The :e# command can help you copy blocks of text from one file to another. When you call vim
with the names of several files as arguments, you can use :n to edit the next file, :e# to edit
the file you just edited, and :rew to rewind the sequence of files so that you are editing the
first file again.
As you move between files, you can copy text from one file into a buffer and
paste that text into another file. You can use :n! to force vim to close a file without writing
out changes before it opens the next file.
"... A buffer is a file loaded into memory for editing. All opened files are associated with a buffer. There are also buffers not associated with any file. ..."
You can use a Named buffer with any of the Delete, Yank, or Put commands. Each of the 26
Named buffers is named by a letter of the alphabet. Each Named buffer can store a different
block of text and you can recall each block as needed. Unlike the General-Purpose buffer, vim
does not change the contents of a Named buffer unless you issue a command that specifically
overwrites that buffer. The vim editor maintains the contents of the Named buffers throughout
an editing session.
The vim editor stores text in a Named buffer if you precede a Delete or Yank command with a
double quotation mark ( " ) and a buffer name (for example, " kyy
yanks a copy of the current line into buffer k ). You can put information from the Work buffer
into a Named buffer in two ways. First, if you give the name of the buffer as a lowercase
letter, vim overwrites the contents of the buffer when it deletes or yanks text into the
buffer. Second, if you use an uppercase letter for the buffer name, vim appends the newly
deleted or yanked text to the end of the buffer. This feature enables you to collect blocks of
text from various sections of a file and deposit them at one place in the file with a single
command. Named buffers are also useful when you are moving a section of a file and do not want
to give a Put command immediately after the corresponding Delete command, and when you want to
insert a paragraph, sentence, or phrase repeatedly in a document.
If you have one sentence you use throughout a document, you can yank that sentence into a
Named buffer and put it wherever you need it by using the following procedure: After entering
the first occurrence of the sentence and pressing ESCAPE to return to Command
mode, leave the cursor on the line containing the sentence. (The sentence must appear on a line
or lines by itself for this procedure to work.) Then yank the sentence into Named buffer a by
giving the " ayy command (or " a2yy if the sentence takes up two
lines). Now anytime you need the sentence, you can return to Command mode and give the command
" ap to put a copy of the sentence below the current line.
This technique provides a quick and easy way to insert text that you use frequently in a
document. For example, if you were editing a legal document, you might store the phrase The
Plaintiff alleges that the Defendant in a Named buffer to save yourself the trouble of typing
it every time you want to use it. Similarly, if you were creating a letter that frequently used
a long company name, such as National Standards Institute , you might put it into a Named
buffer.
Numbered Buffers
In addition to the 26 Named buffers and 1 General-Purpose buffer, 9 Numbered buffers are
available. They are, in one sense, readonly buffers. The vim editor fills them with the nine
most recently deleted chunks of text that are at least one line long. The most recently deleted
text is held in " 1 , the next most recent in " 2 , and so on. If you
delete a block of text and then give other vim commands so that you cannot reclaim the deleted
text with an Undo command, you can use " 1p to paste the most recently deleted
chunk of text below the location of the cursor. If you have deleted several blocks of text and
want to reclaim a specific one, proceed as follows: Paste the contents of the first buffer with
"1p . If the first buffer does not hold the text you are looking for, undo the paste operation
with u and then give the period ( . ) command to repeat the previous command. The Numbered
buffers work in a unique way with the period command: Instead of pasting the contents of buffer
" 1 , the period command pastes the contents of the next buffer ( " 2
). Another u and period would replace the contents of buffer " 2 with that of
buffer " 3 , and so on through the nine buffers.
What
is a Vim buffer?
A buffer is a file loaded into memory for editing. All opened files are associated with a
buffer. There are also buffers not associated with any file.
Vim buffers are identified using a name and a number. The name of the buffer is the name of
the file associated with that buffer. The buffer number is a unique sequential number assigned
by Vim. This buffer number will not change in a single Vim session.
When you open a file using any of the Vim commands, a buffer is automatically created. For
example, if you use :edit file to edit a file, a new buffer is automatically
created. An empty buffer can be created by entering :new or :vnew
.
How do I add a new buffer for a file to the buffer list without opening the file?
You can add a new buffer for a file without opening it, using the ":badd" command. For
example,
:badd f1.txt
:badd f2.txt
The above commands will add two new buffers for the files f1.txt and f2.txt to the buffer
list.
You can delete a buffer using the ":bdelete" command. You can use either the buffer name or
the buffer number to specify a buffer. For example,
:bdelete f1.txt
:bdelete 4
The above commands will delete the buffer named "f1.txt" and the fourth buffer in the buffer
list. The ":bdelete" command will remove the buffer from the buffer list.
When a buffer is deleted, the buffer becomes an unlisted-buffer and is no longer included in
the buffer list. But the buffer name and other information associated with the buffer is still
remembered. To completely delete the buffer, use the ":bwipeout" command. This command will
remove the buffer completely (i.e. the buffer will not become a unlisted buffer).
You can remove a buffer displayed in a window in several ways:
Close the window or edit another buffer/file in that window.
Use the ":bunload" command. This command will remove the buffer from the window and
unload the buffer contents from memory. The buffer will not be removed from the buffer
list.
How do I edit an existing buffer from the buffer list?
You can edit or jump to a buffer in the buffer list in several ways:
Use the ":buffer" command passing the name of an existing buffer or the buffer number.
Note that buffer name completion can be used here by pressing the <Tab> key.
You can enter the buffer number you want to jump/edit and press the Ctrl-^ key.
Use the ":sbuffer" command passing the name of the buffer or the buffer number. Vim will
split open a new window and open the specified buffer in that window.
You can enter the buffer number you want to jump/edit and press the Ctrl-W ^ or Ctrl-W
Ctrl-^ keys. This will open the specified buffer in a new window.
You can open all the loaded buffers in the buffer list using the ":unhide" or ":sunhide"
commands. Each buffer will be loaded in a separate new window.
You can open the next or a specific modified buffer using the ":bmodified" command. You can
open the next or a specific modified buffer in a new window using the ":sbmodified"
command.
Is there a simpler way for using the buffers under gvim (GUI Vim)?
Yes, use the 'Buffers' menu to list all the buffers. You can select a buffer name to edit
the buffer. You can also delete a buffer or browse the buffer list. Click the dashed line at
the top of the menu to tear it off so you can always see a list of the buffers.
Is it possible to save and restore the buffer list across Vim sessions?
Yes. To save and restore the buffer list across Vim session, include the '%' flag in the
'viminfo' option. Note that if Vim is invoked with a filename argument, then the buffer list
will not be restored from the last session. To use buffer lists across sessions, invoke Vim
without passing filename arguments.
The point is to overwrite the global setting by calling local setting after the 'viminfo'
setting, for example.
set viminfo='1025,f1,%1024
call SetLocalOptions(".")
How do I remove all the entries from the buffer list?
You can remove all the entries in the buffer list by starting Vim with a file argument. You
can also manually remove all the buffers using the ":bdelete" command.
What is a hidden buffer?
A hidden buffer is a buffer with some unsaved modifications and is not displayed in a
window. Hidden buffers are useful, if you want to edit multiple buffers without saving the
modifications made to a buffer while loading other buffers.
How do I load buffers in a window, which currently has a buffer with unsaved
modifications?
By setting the option 'hidden', you can load a buffer in a window that currently has a
modified buffer. Vim will remember your modifications to the buffer. When you quit Vim, you
will be asked to save the modified buffers. It is important to note that, if you have the
'hidden' option set, and you quit Vim forcibly, for example using ":quit!", then you will lose
all your modifications to the hidden buffers.
Is it possible to unload or delete a buffer when it becomes hidden?
By setting the 'bufhidden' option to either 'hide' or 'unload' or 'delete', you can control
what happens to a buffer when it becomes hidden. When 'bufhidden' is set to 'delete', the
buffer is deleted when it becomes hidden. When 'bufhidden' is set to 'unload', the buffer is
unloaded when it becomes hidden. When 'bufhidden' is set to 'hide', the buffer is hidden.
When I open an existing buffer from the buffer list, if the buffer is already displayed
in one of the existing windows, I want Vim to jump to that window instead of creating a new
window for this buffer. How do I do this?
When opening a buffer using one of the split open buffer commands (:sbuffer, :sbnext), Vim
will open the specified buffer in a new window. If the buffer is already opened in one of the
existing windows, then you will have two windows containing the same buffer. You can change
this behavior by setting the 'switchbuf' option to 'useopen'. With this setting, if a buffer is
already opened in one of the windows, Vim will jump to that window, instead of creating a new
window.
Every buffer in the buffer list contains information about the last cursor position, marks,
jump list, etc.
What is the difference between deleting a buffer and unloading a buffer?
When a buffer is unloaded, it is not removed from the buffer list. Only the file contents
associated with the buffer are removed from memory. When a buffer is deleted, it is unloaded
and removed from the buffer list. A deleted buffer becomes an 'unlisted' buffer.
Is it possible to configure Vim, by setting some option, to re-use the number of a
deleted buffer for a new buffer?
No. Vim will not re-use the buffer number of a deleted buffer for a new buffer. Vim will
always assign the next sequential number for a new buffer. The buffer number assignment is
implemented this way, so that you can always jump to a buffer using the same buffer number. One
method to achieve buffer number reordering is to restart Vim. If you restart Vim, it will
re-assign numbers sequentially to all the buffers in the buffer list (assuming you have
properly set 'viminfo' to save and restore the buffer list across Vim sessions).
This creates a temporary buffer which is not associated with a file, which does not have an
associated swap file, and which will be hidden when its window is closed. On exit, Vim discards
any text in a scratch buffer without warning.
Also you can use scratch.vim for creating a scratch
buffer.
How do I determine whether a buffer is modified or not?
There are several ways to find out whether a buffer is modified or not. The simplest way is
to look at the status line or the title bar. If the displayed string contains a '+' character,
then the buffer is modified. Another way is to check whether the 'modified' option is set or
not. If 'modified' is set, then the buffer is modified. To check the value of modified, use
:set modified?
You can also explicitly set the 'modified' option to mark the buffer as modified like
this:
To change two vertically split windows to horizontal split: Ctrl - WtCtrl - WK
Horizontally to vertically: Ctrl - WtCtrl - WH
Explanations:
Ctrl - W t -- makes the first (topleft) window current
Ctrl - W K -- moves the current window to full-width at the very
top
Ctrl - W H -- moves the current window to full-height at far
left
Note that the t is lowercase, and the K and H are uppercase.
Also, with only two windows, it seems like you can drop the Ctrl - Wt part because if you're already in one of only two windows, what's the point of
making it current?
Just toggle your NERDTree panel closed before 'rotating' the splits, then toggle it
back open. :NERDTreeToggle (I have it mapped to a function key for convenience).
The command ^W-o is great! I did not know it. –
Masi Aug 13 '09 at 2:20
add a comment | up vote 6
down vote The following ex commands will (re-)split
any number of windows:
To split vertically (e.g. make vertical dividers between windows), type :vertical
ball
To split horizontally, type :ball
If there are hidden buffers, issuing these commands will also make the hidden buffers
visible.
This is very ugly, but hey, it seems to do in one step exactly what I asked for (I tried). +1, and accepted. I was looking for
a native way to do this quickly but since there does not seem to be one, yours will do just fine. Thanks! –
greg0ireJan 23
'13 at 15:27
You're right, "very ugly" shoud have been "very unfamiliar". Your command is very handy, and I think I definitely going to carve
it in my .vimrc – greg0ireJan 23
'13 at 16:21
By "move a piece of text to a new file" I assume you mean cut that piece of text from the current file and create a new file containing
only that text.
Various examples:
:1,1 w new_file to create a new file containing only the text from line number 1
:5,50 w newfile to create a new file containing the text from line 5 to line 50
:'a,'b w newfile to create a new file containing the text from mark a to mark b
set your marks by using ma and mb where ever you like
The above only copies the text and creates a new file containing that text. You will then need to delete afterward.
This can be done using the same range and the d command:
:5,50 d to delete the text from line 5 to line 50
:'a,'b d to delete the text from mark a to mark b
Or by using dd for the single line case.
If you instead select the text using visual mode, and then hit : while the text is selected, you will see the
following on the command line:
:'<,'>
Which indicates the selected text. You can then expand the command to:
:'<,'>w >> old_file
Which will append the text to an existing file. Then delete as above.
One liner:
:2,3 d | new +put! "
The breakdown:
:2,3 d - delete lines 2 through 3
| - technically this redirects the output of the first command to the second command but since the first command
doesn't output anything, we're just chaining the commands together
new - opens a new buffer
+put! " - put the contents of the unnamed register ( " ) into the buffer
The bang ( ! ) is there so that the contents are put before the current line. This causes and
empty line at the end of the file. Without it, there is an empty line at the top of the file.
Your assumption is right. This looks good, I'm going to test. Could you explain 2. a bit more? I'm not very familiar with ranges.
EDIT: If I try this on the second line, it writes the first line to the other file, not the second line. –
greg0ireJan 23
'13 at 14:09
Ok, if I understand well, the trick is to use ranges to select and write in the same command. That's very similar to what I did.
+1 for the detailed explanation, but I don't think this is more efficient, since the trick with hitting ':' is what I do for the
moment. – greg0ireJan 23
'13 at 14:41
I have 4 steps for the moment: select, write, select, delete. With your method, I have 6 steps: select, delete, split, paste,
write, close. I asked for something more efficient :P – greg0ireJan 23
'13 at 13:42
That's better, but 5 still > 4 :P – greg0ireJan 23
'13 at 13:46
Based on @embedded.kyle's answer and this Q&A , I ended
up with this one liner to append a selection to a file and delete from current file. After selecting some lines with Shift+V
, hit : and run:
'<,'>w >> test | normal gvd
The first part appends selected lines. The second command enters normal mode and runs gvd to select the last selection
and then deletes.
Visual selection is a common feature in applications, but Vim's visual selection has several
benefits.
To cut-and-paste or copy-and-paste:
Position the cursor at the beginning of the text you want to cut/copy.
Press v to begin character-based visual selection, or V to select whole
lines, or Ctrl-v or Ctrl-q to select a block.
Move the cursor to the end of the text to be cut/copied. While selecting text, you can
perform searches and other advanced movement.
Press d (delete) to cut, or y (yank) to copy.
Move the cursor to the desired paste location.
Press p to paste after the cursor, or P to paste before.
Visual selection (steps 1-3) can be performed using a mouse.
If you want to change the selected text, press c instead of d or y in
step 4. In a visual selection, pressing c performs a change by deleting the selected
text and entering insert mode so you can type the new text.
Pasting over a block of text
You can copy a block of text by pressing Ctrl-v (or Ctrl-q if you use Ctrl-v for paste),
then moving the cursor to select, and pressing y to yank. Now you can move
elsewhere and press p to paste the text after the cursor (or P to
paste before). The paste inserts a block (which might, for example, be 4 rows by 3
columns of text).
Instead of inserting the block, it is also possible to replace (paste over) the
destination. To do this, move to the target location then press 1vp (
1v selects an area equal to the original, and p pastes over it).
When a count is used before v , V , or ^V (character,
line or block selection), an area equal to the previous area, multiplied by the count, is
selected. See the paragraph after :help
<LeftRelease> .
Note that this will only work if you actually did something to the previous visual
selection, such as a yank, delete, or change operation. It will not work after visually
selecting an area and leaving visual mode without taking any actions.
NOTE: after selecting the visual copy mode, you can hold the shift key while selection
the region to get a multiple line copy. For example, to copy three lines, press V, then hold
down the Shift key while pressing the down arrow key twice. Then do your action on the
buffer.
I have struck out the above new comment because I think it is talking about something
that may apply to those who have used :behave mswin . To visually select
multiple lines, you type V , then press j (or cursor down). You
hold down Shift only to type the uppercase V . Do not press Shift after that. If
I am wrong, please explain here. JohnBeckett 10:48, October 7, 2010
(UTC)
If you just want to copy (yank) the visually marked text, you do not need to 'y'ank it.
Marking it will already copy it.
Using a mouse, you can insert it at another position by clicking the middle mouse
button.
This also works in across Vim applications on Windows systems (clipboard is inserted)
This is a really useful thing in Vim. I feel lost without it in any other editor. I have
some more points I'd like to add to this tip:
While in (any of the three) Visual mode(s), pressing 'o' will move the cursor to the
opposite end of the selection. In Visual Block mode, you can also press 'O', allowing you to
position the cursor in any of the four corners.
If you have some yanked text, pressing 'p' or 'P' while in Visual mode will replace the
selected text with the already yanked text. (After this, the previously selected text will be
yanked.)
Press 'gv' in Normal mode to restore your previous selection.
It's really worth it to check out the register functionality in Vim: ':help
registers'.
If you're still eager to use the mouse-juggling middle-mouse trick of common unix
copy-n-paste, or are into bending space and time with i_CTRL-R<reg>, consider checking
out ':set paste' and ':set pastetoggle'. (Or in the latter case, try with
i_CTRL-R_CTRL-O..)
You can replace a set of text in a visual block very easily by selecting a block, press c
and then make changes to the first line. Pressing <Esc> twice replaces all the text of
the original selection. See :help v_b_c .
On Windows the <mswin.vim> script seems to be getting sourced for many users.
Result: more Windows like behavior (ctrl-v is "paste", instead of visual-block selection).
Hunt down your system vimrc and remove sourcing thereof if you don't like that behavior (or
substitute <mrswin.vim> in its place, see VimTip63 .
With VimTip588 one can
sort lines or blocks based on visual-block selection.
With reference to the earlier post asking how to paste an inner block
Select the inner block to copy usint ctrl-v and highlighting with the hjkl keys
yank the visual region (y)
Select the inner block you want to overwrite (Ctrl-v then hightlight with hjkl keys)
paste the selection P (that is shift P) , this will overwrite keeping the block
formation
The "yank" buffers in Vim are not the same as the Windows clipboard (i.e., cut-and-paste)
buffers. If you're using the yank, it only puts it in a Vim buffer - that buffer is not
accessible to the Windows paste command. You'll want to use the Edit | Copy and Edit | Paste
(or their keyboard equivalents) if you're using the Windows GUI, or select with your mouse and
use your X-Windows cut-n-paste mouse buttons if you're running UNIX.
Double-quote and star gives one access to windows clippboard or the unix equivalent. as an
example if I wanted to yank the current line into the clipboard I would type "*yy
If I wanted to paste the contents of the clippboard into Vim at my current curser location I
would type "*p
The double-qoute and start trick work well with visual mode as well. ex: visual select text
to copy to clippboard and then type "*y
I find this very useful and I use it all the time but it is a bit slow typing "* all the
time so I am thinking about creating a macro to speed it up a bit.
Copy and Paste using the System Clipboard
There are some caveats regarding how the "*y (copy into System Clipboard) command works. We
have to be sure that we are using vim-full (sudo aptitude install vim-full on debian-based
systems) or a Vim that has X11 support enabled. Only then will the "*y command work.
For our convenience as we are all familiar with using Ctrl+c to copy a block of text in most
other GUI applications, we can also map Ctrl+c to "*y so that in Vim Visual Mode, we can simply
Ctrl+c to copy the block of text we want into our system buffer. To do that, we simply add this
line in our .vimrc file:
map <C-c> "+y<CR>
Restart our shell and we are good. Now whenever we are in Visual Mode, we can Ctrl+c to grab
what we want and paste it into another application or another editor in a convenient and
intuitive manner.
You are talking about text selecting and copying, I think that you should give a look to the
Vim Visual Mode .
In the visual mode, you are able to select text using Vim commands, then you can do
whatever you want with the selection.
Consider the following common scenarios:
You need to select to the next matching parenthesis.
You could do:
v% if the cursor is on the starting/ending parenthesis
vib if the cursor is inside the parenthesis block
You want to select text between quotes:
vi" for double quotes
vi' for single quotes
You want to select a curly brace block (very common on C-style languages):
viB
vi{
You want to select the entire file:
ggVG
Visual
block selection is another really useful feature, it allows you to select a rectangular
area of text, you just have to press Ctrl - V to start it, and then
select the text block you want and perform any type of operation such as yank, delete, paste,
edit, etc. It's great to edit column oriented text.
I have two files, say a.txt and b.txt , in the same session of vim
and I split the screen so I have file a.txt in the upper window and
b.txt in the lower window.
I want to move lines here and there from a.txt to b.txt : I
select a line with Shift + v , then I move to b.txt in the
lower window with Ctrl + w↓ , paste with p
, get back to a.txt with Ctrl + w↑ and I
can repeat the operation when I get to another line I want to move.
My question: is there a quicker way to say vim "send the line I am on (or the test I
selected) to the other window" ?
I presume that you're deleting the line that you've selected in a.txt . If not,
you'd be pasting something else into b.txt . If so, there's no need to select
the line first. – Anthony Geoghegan
Nov 24 '15 at 13:00
This sounds like a good use case for a macro. Macros are commands that can be recorded and
stored in a Vim register. Each register is identified by a letter from a to z.
Recording
To start recording, press q in Normal mode followed by a letter (a to z).
That starts recording keystrokes to the specified register. Vim displays
"recording" in the status line. Type any Normal mode commands, or enter Insert
mode and type text. To stop recording, again press q while in Normal mode.
For this particular macro, I chose the m (for move) register to store it.
I pressed qm to record the following commands:
dd to delete the current line (and save it to the default register)
CtrlWj to move to the window below
p to paste the contents of the default register
and CtrlWk to return to the window above.
When I typed q to finish recording the macro, the contents of the
m register were:
dd^Wjp^Wk
Usage
To move the current line, simply type @m in Normal mode.
To repeat the macro on a different line, @@ can be used to execute the most
recently used macro.
To execute the macro 5 times (i.e., move the current line with the following four lines
below it), use 5@m or 5@@ .
I asked to see if there is a command unknown to me that does the job: it seems there is none.
In absence of such a command, this can be a good solution. – brad
Nov 24 '15 at 14:26
@brad, you can find all the commands available to you in the documentation. If it's not there
it doesn't exist no need to ask random strangers. – romainl
Nov 26 '15 at 9:54
@romainl, yes, I know this but vim documentation is really huge and, although it doesn't
scare me, there is always the possibility to miss something. Moreover, it could also be that
you can obtain the effect using the combination of 2 commands and in this case it would be
hardly documented – brad
Nov 26 '15 at 10:17
I normally work with more than 5 files at a time. I use buffers to open different files. I
use commands such as :buf file1, :buf file2 etc. Is there a faster way to move to different
files?
Below I describe some excerpts from sections of my .vimrc . It includes mapping
the leader key, setting wilds tab completion, and finally my buffer nav key choices (all
mostly inspired by folks on the interweb, including romainl). Edit: Then I ramble on about my
shortcuts for windows and tabs.
" easier default keys {{{1

let mapleader=','
nnoremap <leader>2 :@"<CR>
The leader key is a prefix key for mostly user-defined key commands (some
plugins also use it). The default is \ , but many people suggest the easier to
reach , .
The second line there is a command to @ execute from the "
clipboard, in case you'd like to quickly try out various key bindings (without relying on
:so % ). (My nmeumonic is that Shift - 2 is @
.)
" wilds {{{1

set wildmenu wildmode=list:full
set wildcharm=<C-z>
set wildignore+=*~ wildignorecase
For built-in completion, wildmenu is probably the part that shows up yellow
on your Vim when using tab completion on command-line. wildmode is set to a
comma-separated list, each coming up in turn on each tab completion (that is, my list is
simply one element, list:full ). list shows rows and columns of
candidates. full 's meaning includes maintaining existence of the
wildmenu . wildcharm is the way to include Tab presses
in your macros. The *~ is for my use in :edit and
:find commands.
The ,3 is for switching between the "two" last buffers (Easier to reach than
built-in Ctrl - 6 ). Nmeuonic is Shift - 3 is
# , and # is the register symbol for last buffer. (See
:marks .)
,bh is to select from hidden buffers ( ! ).
,bw is to bwipeout buffers by number or name. For instance, you
can wipeout several while looking at the list, with ,bw 1 3 4 8 10 <CR> .
Note that wipeout is more destructive than :bdelete . They have their pros and
cons. For instance, :bdelete leaves the buffer in the hidden list, while
:bwipeout removes global marks (see :help marks , and the
description of uppercase marks).
I haven't settled on these keybindings, I would sort of prefer that my ,bb
was simply ,b (simply defining while leaving the others defined makes Vim pause
to see if you'll enter more).
Those shortcuts for :BufExplorer are actually the defaults for that plugin,
but I have it written out so I can change them if I want to start using ,b
without a hang.
You didn't ask for this:
If you still find Vim buffers a little awkward to use, try to combine the functionality
with tabs and windows (until you get more comfortable?).
Notice how nice ,w is for a prefix. Also, I reserve Ctrl key for
resizing, because Alt ( M- ) is hard to realize in all
environments, and I don't have a better way to resize. I'm fine using ,w to
switch windows.
" tabs {{{3

nnoremap <leader>t :tab
nnoremap <M-n> :tabn<cr>
nnoremap <M-p> :tabp<cr>
nnoremap <C-Tab> :tabn<cr>
nnoremap <C-S-Tab> :tabp<cr>
nnoremap tn :tabe<CR>
nnoremap te :tabe<Space><C-z><S-Tab>
nnoremap tf :tabf<Space>
nnoremap tc :tabc<CR>
nnoremap to :tabo<CR>
nnoremap tm :tabm<CR>
nnoremap ts :tabs<CR>

nnoremap th :tabr<CR>
nnoremap tj :tabn<CR>
nnoremap tk :tabp<CR>
nnoremap tl :tabl<CR>

" or, it may make more sense to use
" nnoremap th :tabp<CR>
" nnoremap tj :tabl<CR>
" nnoremap tk :tabr<CR>
" nnoremap tl :tabn<CR>
In summary of my window and tabs keys, I can navigate both of them with Alt ,
which is actually pretty easy to reach. In other words:
" (modifier) key choice explanation {{{3
"
"       KEYS        CTRL                  ALT
"       hjkl        resize windows        switch windows
"       np          switch buffer         switch tab
"
" (resize windows is hard to do otherwise, so we use ctrl which works across
" more environments. i can use ',w' for windowcmds o.w.. alt is comfortable
" enough for fast and gui nav in tabs and windows. we use np for navs that
" are more linear, hjkl for navs that are more planar.)
"
This way, if the Alt is working, you can actually hold it down while you find
your "open" buffer pretty quickly, amongst the tabs and windows.
,
There are many ways to solve. The best is the best that WORKS for YOU. You have lots of fuzzy
match plugins that help you navigate. The 2 things that impress me most are
The NERD tree allows you to explore your filesystem and to open files and directories. It presents the filesystem to you in
the form of a tree which you manipulate with the keyboard and/or mouse. It also allows you to perform simple filesystem operations.
The tree can be toggled easily with :NERDTreeToggle which can be mapped to a more suitable key. The keyboard shortcuts in the
NERD tree are also easy and intuitive.
For those of us not wanting to follow every link to find out about each plugin, care to furnish us with a brief synopsis? –
SpoonMeiserSep 17 '08
at 19:32
Pathogen is the FIRST plugin you have to install on every Vim installation! It resolves the plugin management problems every Vim
developer has. – Patrizio RulloSep 26
'11 at 12:11
A very nice grep replacement for GVim is Ack . A search plugin written
in Perl that beats Vim's internal grep implementation and externally invoked greps, too. It also by default skips any CVS directories
in the project directory, e.g. '.svn'.
This blog shows a way to integrate Ack with vim.
A.vim is a great little plugin. It allows you
to quickly switch between header and source files with a single command. The default is :A , but I remapped it to
F2 reduce keystrokes.
I really like the SuperTab plugin, it allows
you to use the tab key to do all your insert completions.
community wiki Greg Hewgill, Aug 25, 2008
at 19:23
I have recently started using a plugin that highlights differences in your buffer from a previous version in your RCS system (Subversion,
git, whatever). You just need to press a key to toggle the diff display on/off. You can find it here:
http://github.com/ghewgill/vim-scmdiff . Patches welcome!
It doesn't explicitly support bitkeeper at the moment, but as long as bitkeeper has a "diff" command that outputs a normal patch
file, it should be easy enough to add. – Greg HewgillSep 16 '08
at 9:26
@Yogesh: No, it doesn't support ClearCase at this time. However, if you can add ClearCase support, a patch would certainly be
accepted. – Greg HewgillMar 10
'10 at 1:39
Elegant (mini) buffer explorer - This
is the multiple file/buffer manager I use. Takes very little screen space. It looks just like most IDEs where you have a top
tab-bar with the files you've opened. I've tested some other similar plugins before, and this is my pick.
TagList - Small file explorer, without
the "extra" stuff the other file explorers have. Just lets you browse directories and open files with the "enter" key. Note
that this has already been noted by
previouscommenters
to your questions.
SuperTab - Already noted by
WMR in this
post, looks very promising. It's an auto-completion replacement key for Ctrl-P.
Moria color scheme - Another good, dark
one. Note that it's gVim only.
Enahcned Python syntax - If you're using
Python, this is an enhanced syntax version. Works better than the original. I'm not sure, but this might be already included
in the newest version. Nonetheless, it's worth adding to your syntax folder if you need it.
Not a plugin, but I advise any Mac user to switch to the MacVim
distribution which is vastly superior to the official port.
As for plugins, I used VIM-LaTeX for my thesis and was very
satisfied with the usability boost. I also like the Taglist
plugin which makes use of the ctags library.
clang complete - the best c++ code completion
I have seen so far. By using an actual compiler (that would be clang) the plugin is able to complete complex expressions including
STL and smart pointers.
With version 7.3, undo branches was added to vim. A very powerful feature, but hard to use, until
Steve Losh made
Gundo which makes this feature possible to use with a ascii
representation of the tree and a diff of the change. A must for using undo branches.
My latest favourite is Command-T . Granted, to install it
you need to have Ruby support and you'll need to compile a C extension for Vim. But oy-yoy-yoy does this plugin make a difference
in opening files in Vim!
Definitely! Let not the ruby + c compiling stop you, you will be amazed on how well this plugin enhances your toolset. I have
been ignoring this plugin for too long, installed it today and already find myself using NERDTree lesser and lesser. –
Victor FarazdagiApr 19
'11 at 19:16
just my 2 cents.. being a naive user of both plugins, with a few first characters of file name i saw a much better result with
commandt plugin and a lots of false positives for ctrlp. –
FUDDec
26 '12 at 4:48
Conque Shell : Run interactive commands inside a Vim buffer
Conque is a Vim plugin which allows you to run interactive programs, such as bash on linux or powershell.exe on Windows, inside
a Vim buffer. In other words it is a terminal emulator which uses a Vim buffer to display the program output.
The vcscommand plugin provides global ex commands
for manipulating version-controlled source files and it supports CVS,SVN and some other repositories.
You can do almost all repository related tasks from with in vim:
* Taking the diff of current buffer with repository copy
* Adding new files
* Reverting the current buffer to the repository copy by nullifying the local changes....
Just gonna name a few I didn't see here, but which I still find extremely helpful:
Gist plugin - Github Gists (Kind of
Githubs answer to Pastebin, integrated with Git for awesomeness!)
Mustang color scheme (Can't link directly due to low reputation, Google it!) - Dark, and beautiful color scheme. Looks
really good in the terminal, and even better in gVim! (Due to 256 color support)
One Plugin that is missing in the answers is NERDCommenter
, which let's you do almost anything with comments. For example {add, toggle, remove} comments. And more. See
this blog entry for some examples.
This script is based on the eclipse Task List. It will search the file for FIXME, TODO, and XXX (or a custom list) and put
them in a handy list for you to browse which at the same time will update the location in the document so you can see exactly
where the tag is located. Something like an interactive 'cw'
I really love the snippetsEmu Plugin. It emulates
some of the behaviour of Snippets from the OS X editor TextMate, in particular the variable bouncing and replacement behaviour.
For vim I like a little help with completions.
Vim has tons of completion modes, but really, I just want vim to complete anything it can, whenver it can.
I hate typing ending quotes, but fortunately
this plugin obviates the need for such misery.
Those two are my heavy hitters.
This one may step up to roam my code like
an unquiet shade, but I've yet to try it.
The Txtfmt plugin gives you a sort of "rich text" highlighting capability, similar to what is provided by RTF editors and word
processors. You can use it to add colors (foreground and background) and formatting attributes (all combinations of bold, underline,
italic, etc...) to your plain text documents in Vim.
The advantage of this plugin over something like Latex is that with Txtfmt, your highlighting changes are visible "in real
time", and as with a word processor, the highlighting is WYSIWYG. Txtfmt embeds special tokens directly in the file to accomplish
the highlighting, so the highlighting is unaffected when you move the file around, even from one computer to another. The special
tokens are hidden by the syntax; each appears as a single space. For those who have applied Vince Negri's conceal/ownsyntax patch,
the tokens can even be made "zero-width".
To copy two lines, it's even faster just to go yj or yk,
especially since you don't double up on one character. Plus, yk is a backwards
version that 2yy can't do, and you can put the number of lines to reach
backwards in y9j or y2k, etc.. Only difference is that your count
has to be n-1 for a total of n lines, but your head can learn that
anyway. – zelk
Mar 9 '14 at 13:29
If you would like to duplicate a line and paste it right away below the current like, just
like in Sublime Ctrl + Shift + D, then you can add this to
your .vimrc file.
y7yp (or 7yyp) is rarely useful; the cursor remains on the first line copied so that p pastes
the copied lines between the first and second line of the source. To duplicate a block of
lines use 7yyP – Nefrubyr
Jul 29 '14 at 14:09
For someone who doesn't know vi, some answers from above might mislead him with phrases like
"paste ... after/before current line ".
It's actually "paste ... after/before cursor ".
yy or Y to copy the line
or dd to delete the line
then
p to paste the copied or deleted text after the cursor
or P to paste the copied or deleted text before the cursor
For those starting to learn vi, here is a good introduction to vi by listing side by side vi
commands to typical Windows GUI Editor cursor movement and shortcut keys. It lists all the
basic commands including yy (copy line) and p (paste after) or
P (paste before).
When you press : in visual mode, it is transformed to '<,'>
so it pre-selects the line range the visual selection spanned over. So, in visual mode,
:t0 will copy the lines at the beginning. – Benoit
Jun 30 '12 at 14:17
For the record: when you type a colon (:) you go into command line mode where you can enter
Ex commands. vimdoc.sourceforge.net/htmldoc/cmdline.html
Ex commands can be really powerful and terse. The yyp solutions are "Normal mode" commands.
If you want to copy/move/delete a far-away line or range of lines an Ex command can be a lot
faster. – Niels Bom
Jul 31 '12 at 8:21
Y is usually remapped to y$ (yank (copy) until end of line (from
current cursor position, not beginning of line)) though. With this line in
.vimrc : :nnoremap Y y$ – Aaron Thoma
Aug 22 '13 at 23:31
gives you the advantage of preserving the cursor position.
,Sep 18, 2008 at 20:32
You can also try <C-x><C-l> which will repeat the last line from insert mode and
brings you a completion window with all of the lines. It works almost like <C-p>
This is very useful, but to avoid having to press many keys I have mapped it to just CTRL-L,
this is my map: inoremap ^L ^X^L – Jorge Gajon
May 11 '09 at 6:38
1 gotcha: when you use "p" to put the line, it puts it after the line your cursor is
on, so if you want to add the line after the line you're yanking, don't move the cursor down
a line before putting the new line.
Use the > command. To indent 5 lines, 5>> . To mark a block of lines and indent it, Vjj>
to indent 3 lines (vim only). To indent a curly-braces block, put your cursor on one of the curly braces and use >%
.
If you're copying blocks of text around and need to align the indent of a block in its new location, use ]p
instead of just p . This aligns the pasted block with the surrounding text.
Also, the shiftwidth
setting allows you to control how many spaces to indent.
My problem(in gVim) is that the command > indents much more than 2 blanks (I want just two blanks but > indent something like
5 blanks) – Kamran Bigdely
Feb 28 '11 at 23:25
The problem with . in this situation is that you have to move your fingers. With @mike's solution (same one i use) you've already
got your fingers on the indent key and can just keep whacking it to keep indenting rather than switching and doing something else.
Using period takes longer because you have to move your hands and it requires more thought because it's a second, different, operation.
– masukomi
Dec 6 '13 at 21:24
I've an XML file and turned on syntax highlighting. Typing gg=G just puts every line starting from position 1. All
the white spaces have been removed. Is there anything else specific to XML? –
asgs
Jan 28 '14 at 21:57
This is cumbersome, but is the way to go if you do formatting outside of core VIM (for instance, using vim-prettier
instead of the default indenting engine). Using > will otherwise royally scew up the formatting done by Prettier.
– oligofren
Mar 27 at 15:23
I find it better than the accepted answer, as I can see what is happening, the lines I'm selecting and the action I'm doing, and
not just type some sort of vim incantation. – user4052054
Aug 17 at 17:50
Suppose | represents the position of the cursor in Vim. If the text to be indented is enclosed in a code block like:
int main() {
line1
line2|
line3
}
you can do >i{ which means " indent ( > ) inside ( i ) block ( { )
" and get:
int main() {
    line1
    line2|
    line3
}
Now suppose the lines are contiguous but outside a block, like:
do
line2|
line3
line4
done
To indent lines 2 thru 4 you can visually select the lines and type > . Or even faster you can do >2j
to get:
do
    line2|
    line3
    line4
done
Note that >Nj means indent from current line to N lines below. If the number of lines to be indented
is large, it could take some seconds for the user to count the proper value of N . To save valuable seconds you can
activate the option of relative number with set relativenumber (available since Vim version 7.3).
Not on my Solaris or AIX boxes it doesn't. The equals key has always been one of my standard ad hoc macro assignments. Are you
sure you're not looking at a vim that's been linked to as vi ? –
rojomoke
Jul 31 '14 at 10:09
In ex mode you can use :left or :le to align lines a specified amount. Specifically,
:left will Left align lines in the [range]. It sets the indent in the lines to [indent] (default 0).
:%le3 or :%le 3 or :%left3 or :%left 3 will align the entire file by padding
with three spaces.
:5,7 le 3 will align lines 5 through 7 by padding them with 3 spaces.
:le without any value or :le 0 will left align with a padding of 0.
Awesome, just what I was looking for (a way to insert a specific number of spaces -- 4 spaces for markdown code -- to override
my normal indent). In my case I wanted to indent a specific number of lines in visual mode, so shift-v to highlight the lines,
then :'<,'>le4 to insert the spaces. Thanks! –
Subfuzion
Aug 11 '17 at 22:02
There is one more way that hasn't been mentioned yet - you can use norm i command to insert given text at the beginning
of the line. To insert 10 spaces before lines 2-10:
:2,10norm 10i
Remember that there has to be space character at the end of the command - this will be the character we want to have inserted.
We can also indent line with any other text, for example to indent every line in file with 5 underscore characters:
:%norm 5i_
Or something even more fancy:
:%norm 2i[ ]
More practical example is commenting Bash/Python/etc code with # character:
:1,20norm i#
To re-indent use x instead of i . For example to remove first 5 characters from every line:
...what? 'indent by 4 spaces'? No, this jumps to line 4 and then indents everything from there to the end of the file, using the
currently selected indent mode (if any). – underscore_d
Oct 17 '15 at 19:35
There are clearly a lot of ways to solve this, but this is the easiest to implement, as line numbers show by default in vim and
it doesn't require math. – HoldOffHunger
Dec 5 '17 at 15:50
How to indent highlighted code in vi immediately by a # of spaces:
Option 1: Indent a block of code in vi to three spaces with Visual Block mode:
Select the block of code you want to indent. Do this using Ctrl+V in normal mode and arrowing down to select
text. While it is selected, enter : to give a command to the block of selected text.
The following will appear in the command line: :'<,'>
To set indent to 3 spaces, type le 3 and press enter. This is what appears: :'<,'>le 3
The selected text is immediately indented to 3 spaces.
Option 2: Indent a block of code in vi to three spaces with Visual Line mode:
Open your file in VI.
Put your cursor over some code
Be in normal mode press the following keys:
Vjjjj:le 3
Interpretation of what you did:
V means start selecting text.
jjjj arrows down 4 lines, highlighting 4 lines.
: tells vi you will enter an instruction for the highlighted text.
le 3 means indent highlighted text 3 lines.
The selected code is immediately increased or decreased to three spaces indentation.
Option 3: use Visual Block mode and special insert mode to increase indent:
Open your file in VI.
Put your cursor over some code
Be in normal mode press the following keys:
Ctrl+V
jjjj
(press spacebar 5 times)
EscShift+i
All the highlighted text is indented an additional 5 spaces.
This answer summarises the other answers and comments of this question, and adds extra information based on the
Vim documentation and the
Vim wiki . For conciseness, this answer doesn't distinguish between Vi and
Vim-specific commands.
In the commands below, "re-indent" means "indent lines according to your
indentation settings ."
shiftwidth is the
primary variable that controls indentation.
General Commands
>>   Indent line by shiftwidth spaces
<<   De-indent line by shiftwidth spaces
5>>  Indent 5 lines
5==  Re-indent 5 lines

>%   Increase indent of a braced or bracketed block (place cursor on brace first)
=%   Reindent a braced or bracketed block (cursor on brace)
<%   Decrease indent of a braced or bracketed block (cursor on brace)
]p   Paste text, aligning indentation with surroundings

=i{  Re-indent the 'inner block', i.e. the contents of the block
=a{  Re-indent 'a block', i.e. block and containing braces
=2a{ Re-indent '2 blocks', i.e. this block and containing block

>i{  Increase inner block indent
<i{  Decrease inner block indent
You can replace { with } or B, e.g. =iB is a valid block indent command.
Take a look at "Indent a Code Block" for a nice example
to try these commands out on.
Also, remember that
. Repeat last command
, so indentation commands can be easily and conveniently repeated.
Re-indenting complete files
Another common situation is requiring indentation to be fixed throughout a source file:
gg=G Re-indent entire buffer
You can extend this idea to multiple files:
" Re-indent all your c source code:
:args *.c
:argdo normal gg=G
:wall
Or multiple buffers:
" Re-indent all open buffers:
:bufdo normal gg=G:wall
In Visual Mode
Vjj> Visually mark and then indent 3 lines
In insert mode
These commands apply to the current line:
CTRL-t   insert indent at start of line
CTRL-d   remove indent at start of line
0 CTRL-d remove all indentation from line
Ex commands
These are useful when you want to indent a specific range of lines, without moving your cursor.
:< and :> Given a range, apply indentation e.g.
:4,8>   indent lines 4 to 8, inclusive
set expandtab       "Use softtabstop spaces instead of tab characters for indentation
set shiftwidth=4    "Indent by 4 spaces when using >>, <<, == etc.
set softtabstop=4   "Indent by 4 spaces when pressing <TAB>

set autoindent      "Keep indentation from previous line
set smartindent     "Automatically inserts indentation in some cases
set cindent         "Like smartindent, but stricter and more customisable
Vim has intelligent indentation based on filetype. Try adding this to your .vimrc:
if has ("autocmd")
    " File type detection. Indent based on filetype. Recommended.
    filetype plugin indent on
endif
Both this answer and the one above it were great. But I +1'd this because it reminded me of the 'dot' operator, which repeats
the last command. This is extremely useful when needing to indent an entire block several shiftspaces (or indentations)
without needing to keep pressing >} . Thanks a long –
Amit
Aug 10 '11 at 13:26
5>> Indent 5 lines : This command indents the fifth line, not 5 lines. Could this be due to my VIM settings, or is your
wording incorrect? – Wipqozn
Aug 24 '11 at 16:00
Great summary! Also note that the "indent inside block" and "indent all block" (<i{ >a{ etc.) also works with parentheses and
brackets: >a( <i] etc. (And while I'm at it, in addition to <>'s, they also work with d,c,y etc.) –
aqn
Mar 6 '13 at 4:42
Using Python a lot, I find myself needing frequently needing to shift blocks by more than one indent. You can do this by using
any of the block selection methods, and then just enter the number of indents you wish to jump right before the >
Eg. V5j3> will indent 5 lines 3 times - which is 12 spaces if you use 4 spaces for indents
The beauty of vim's UI is that it's consistent. Editing commands are made up of the command and a cursor move. The cursor moves
are always the same:
H to top of screen, L to bottom, M to middle
n G to go to line n, G alone to bottom of file, gg to top
n to move to next search match, N to previous
} to end of paragraph
% to next matching bracket, either of the parentheses or the tag kind
enter to the next line
'x to mark x where x is a letter or another '
many more, including w and W for word, $ or 0 to tips of the
line, etc, that don't apply here because are not line movements.
So, in order to use vim you have to learn to move the cursor and remember a repertoire of commands like, for example, >
to indent (and < to "outdent").
Thus, for indenting the lines from the cursor position to the top of the screen you do >H, >G to indent
to the bottom of the file.
If, instead of typing >H, you type dH then you are deleting the same block of lines, cH
for replacing it, etc.
Some cursor movements fit better with specific commands. In particular, the % command is handy to indent a whole
HTML or XML block.
If the file has syntax highlighted ( :syn on ) then setting the cursor in the text of a tag (like, in the "i" of
<div> and entering >% will indent up to the closing </div> tag.
This is how vim works: one has to remember only the cursor movements and the commands, and how to mix them.
So my answer to this question would be "go to one end of the block of lines you want to indent, and then type the >
command and a movement to the other end of the block" if indent is interpreted as shifting the lines, =
if indent is interpreted as in pretty-printing.
When the 'expandtab' option is off (this is the default) Vim uses <Tab>s as much as possible to make the indent. ( :help :> )
– Kent Fredric
Mar 16 '11 at 8:36
The only tab/space related vim setting I've changed is :set tabstop=3. It's actually inserting this every time I use >>: "<tab><space><space>".
Same with indenting a block. Any ideas? – Shane
Reustle
Dec 2 '12 at 3:17
The three settings you want to look at for "spaces vs tabs" are 1. tabstop 2. shiftwidth 3. expandtab. You probably have "shiftwidth=5
noexpandtab", so a "tab" is 3 spaces, and an indentation level is "5" spaces, so it makes up the 5 with 1 tab, and 2 spaces. –
Kent Fredric
Dec 2 '12 at 17:08
For me, the MacVim (Visual) solution was, select with mouse and press ">", but after putting the following lines in "~/.vimrc"
since I like spaces instead of tabs:
set expandtab
set tabstop=2
set shiftwidth=2
Also it's useful to be able to call MacVim from the command-line (Terminal.app), so since I have the following helper directory
"~/bin", where I place a script called "macvim":
#!/usr/bin/env bash
/usr/bin/open -a /Applications/MacPorts/MacVim.app $@
And of course in "~/.bashrc":
export PATH=$PATH:$HOME/bin
Macports messes with "~/.profile" a lot, so the PATH environment variable can get quite long.
A quick way to do this using VISUAL MODE uses the same process as commenting a block of code.
This is useful if you would prefer not to change your shiftwidth or use any set directives and is
flexible enough to work with TABS or SPACES or any other character.
Position cursor at the beginning on the block
v to switch to -- VISUAL MODE --
Select the text to be indented
Type : to switch to the prompt
Replacing with 3 leading spaces:
:'<,'>s/^/ /g
Or replacing with leading tabs:
:'<,'>s/^/\t/g
Brief Explanation:
'<,'> - Within the Visually Selected Range
s/^/ /g - Insert 3 spaces at the beginning of every line within the whole range
(or)
s/^/\t/g - Insert Tab at the beginning of every line within the whole range
Yup, and this is why one of my big peeves is white spaces on an otherwise empty line: they messes up vim's notion of a "paragraph".
– aqn
Mar 6 '13 at 4:47
In addition to the answer already given and accepted, it is also possible to place a marker and then indent everything from the
current cursor to the marker. Thus, enter ma where you want the top of your indented block, cursor down as far as
you need and then type >'a (note that " a " can be substituted for any valid marker name). This is sometimes
easier than 5>> or vjjj> .
And you can select the lines in visual mode, then press : to get :'<,'> (equivalent to the :1,3
part in your answer), and add mo N . If you want to move a single line, just :mo N . If you are really
lazy, you can omit the space (e.g. :mo5 ). Use marks with mo '{a-zA-Z} . –
Júda Ronén
Jan 18 '17 at 21:20
I've heard a lot about Vim, both pros and
cons. It really seems you should be (as a developer) faster with Vim than with any other
editor. I'm using Vim to do some basic stuff and I'm at best 10 times less
productive with Vim.
The only two things you should care about when you talk about speed (you may not care
enough about them, but you should) are:
Using alternatively left and right hands is the fastest way to use the keyboard.
Never touching the mouse is the second way to be as fast as possible. It takes ages for
you to move your hand, grab the mouse, move it, and bring it back to the keyboard (and you
often have to look at the keyboard to be sure you returned your hand properly to the right
place)
Here are two examples demonstrating why I'm far less productive with Vim.
Copy/Cut & paste. I do it all the time. With all the contemporary editors you press
Shift with the left hand, and you move the cursor with your right hand to select
text. Then Ctrl + C copies, you move the cursor and Ctrl +
V pastes.
With Vim it's horrible:
yy to copy one line (you almost never want the whole line!)
[number xx]yy to copy xx lines into the buffer. But you never
know exactly if you've selected what you wanted. I often have to do [number
xx]dd then u to undo!
Another example? Search & replace.
In PSPad :
Ctrl + f then type what you want you search for, then press
Enter .
In Vim: /, then type what you want to search for, then if there are some
special characters put \ before each special character, then press
Enter .
And everything with Vim is like that: it seems I don't know how to handle it the right
way.
You mention cutting with yy and complain that you almost never want to cut
whole lines. In fact programmers, editing source code, very often want to work on whole
lines, ranges of lines and blocks of code. However, yy is only one of many way
to yank text into the anonymous copy buffer (or "register" as it's called in vi ).
The "Zen" of vi is that you're speaking a language. The initial y is a verb.
The statement yy is a synonym for y_ . The y is
doubled up to make it easier to type, since it is such a common operation.
This can also be expressed as ddP (delete the current line and
paste a copy back into place; leaving a copy in the anonymous register as a side effect). The
y and d "verbs" take any movement as their "subject." Thus
yW is "yank from here (the cursor) to the end of the current/next (big) word"
and y'a is "yank from here to the line containing the mark named ' a
'."
If you only understand basic up, down, left, and right cursor movements then vi will be no
more productive than a copy of "notepad" for you. (Okay, you'll still have syntax
highlighting and the ability to handle files larger than a piddling ~45KB or so; but work
with me here).
vi has 26 "marks" and 26 "registers." A mark is set to any cursor location using the
m command. Each mark is designated by a single lower case letter. Thus
ma sets the ' a ' mark to the current location, and mz
sets the ' z ' mark. You can move to the line containing a mark using the
' (single quote) command. Thus 'a moves to the beginning of the
line containing the ' a ' mark. You can move to the precise location of any mark
using the ` (backquote) command. Thus `z will move directly to the
exact location of the ' z ' mark.
Because these are "movements" they can also be used as subjects for other
"statements."
So, one way to cut an arbitrary selection of text would be to drop a mark (I usually use '
a ' as my "first" mark, ' z ' as my next mark, ' b ' as another,
and ' e ' as yet another (I don't recall ever having interactively used more than
four marks in 15 years of using vi ; one creates one's own conventions regarding how marks
and registers are used by macros that don't disturb one's interactive context). Then we go to
the other end of our desired text; we can start at either end, it doesn't matter. Then we can
simply use d`a to cut or y`a to copy. Thus the whole process has a
5 keystrokes overhead (six if we started in "insert" mode and needed to Esc out
command mode). Once we've cut or copied then pasting in a copy is a single keystroke:
p .
I say that this is one way to cut or copy text. However, it is only one of many.
Frequently we can more succinctly describe the range of text without moving our cursor around
and dropping a mark. For example if I'm in a paragraph of text I can use { and
} movements to the beginning or end of the paragraph respectively. So, to move a
paragraph of text I cut it using {d} (3 keystrokes). (If I happen
to already be on the first or last line of the paragraph I can then simply use
d} or d{ respectively.
The notion of "paragraph" defaults to something which is usually intuitively reasonable.
Thus it often works for code as well as prose.
Frequently we know some pattern (regular expression) that marks one end or the other of
the text in which we're interested. Searching forwards or backwards are movements in vi .
Thus they can also be used as "subjects" in our "statements." So I can use d/foo
to cut from the current line to the next line containing the string "foo" and
y?bar to copy from the current line to the most recent (previous) line
containing "bar." If I don't want whole lines I can still use the search movements (as
statements of their own), drop my mark(s) and use the `x commands as described
previously.
In addition to "verbs" and "subjects" vi also has "objects" (in the grammatical sense of
the term). So far I've only described the use of the anonymous register. However, I can use
any of the 26 "named" registers by prefixing the "object" reference with
" (the double quote modifier). Thus if I use "add I'm cutting the
current line into the ' a ' register and if I use "by/foo then I'm
yanking a copy of the text from here to the next line containing "foo" into the ' b
' register. To paste from a register I simply prefix the paste with the same modifier
sequence: "ap pastes a copy of the ' a ' register's contents into the
text after the cursor and "bP pastes a copy from ' b ' to before the
current line.
This notion of "prefixes" also adds the analogs of grammatical "adjectives" and "adverbs'
to our text manipulation "language." Most commands (verbs) and movement (verbs or objects,
depending on context) can also take numeric prefixes. Thus 3J means "join the
next three lines" and d5} means "delete from the current line through the end of
the fifth paragraph down from here."
This is all intermediate level vi . None of it is Vim specific and there are far more
advanced tricks in vi if you're ready to learn them. If you were to master just these
intermediate concepts then you'd probably find that you rarely need to write any macros
because the text manipulation language is sufficiently concise and expressive to do most
things easily enough using the editor's "native" language.
A sampling of more advanced tricks:
There are a number of : commands, most notably the :%
s/foo/bar/g global substitution technique. (That's not advanced but other
: commands can be). The whole : set of commands was historically
inherited by vi 's previous incarnations as the ed (line editor) and later the ex (extended
line editor) utilities. In fact vi is so named because it's the visual interface to ex .
: commands normally operate over lines of text. ed and ex were written in an
era when terminal screens were uncommon and many terminals were "teletype" (TTY) devices. So
it was common to work from printed copies of the text, using commands through an extremely
terse interface (common connection speeds were 110 baud, or, roughly, 11 characters per
second -- which is slower than a fast typist; lags were common on multi-user interactive
sessions; additionally there was often some motivation to conserve paper).
So the syntax of most : commands includes an address or range of addresses
(line number) followed by a command. Naturally one could use literal line numbers:
:127,215 s/foo/bar to change the first occurrence of "foo" into "bar" on each
line between 127 and 215. One could also use some abbreviations such as . or
$ for current and last lines respectively. One could also use relative prefixes
+ and - to refer to offsets after or before the curent line,
respectively. Thus: :.,$j meaning "from the current line to the last line, join
them all into one line". :% is synonymous with :1,$ (all the
lines).
The :... g and :... v commands bear some explanation as they are
incredibly powerful. :... g is a prefix for "globally" applying a subsequent
command to all lines which match a pattern (regular expression) while :... v
applies such a command to all lines which do NOT match the given pattern ("v" from
"conVerse"). As with other ex commands these can be prefixed by addressing/range references.
Thus :.,+21g/foo/d means "delete any lines containing the string "foo" from the
current one through the next 21 lines" while :.,$v/bar/d means "from here to the
end of the file, delete any lines which DON'T contain the string "bar."
It's interesting that the common Unix command grep was actually inspired by this ex
command (and is named after the way in which it was documented). The ex command
:g/re/p (grep) was the way they documented how to "globally" "print" lines
containing a "regular expression" (re). When ed and ex were used, the :p command
was one of the first that anyone learned and often the first one used when editing any file.
It was how you printed the current contents (usually just one page full at a time using
:.,+25p or some such).
Note that :% g/.../d or (its reVerse/conVerse counterpart: :%
v/.../d are the most common usage patterns. However there are couple of other
ex commands which are worth remembering:
We can use m to move lines around, and j to join lines. For
example if you have a list and you want to separate all the stuff matching (or conversely NOT
matching some pattern) without deleting them, then you can use something like: :%
g/foo/m$ ... and all the "foo" lines will have been moved to the end of the file.
(Note the other tip about using the end of your file as a scratch space). This will have
preserved the relative order of all the "foo" lines while having extracted them from the rest
of the list. (This would be equivalent to doing something like: 1G!GGmap!Ggrep
foo<ENTER>1G:1,'a g/foo'/d (copy the file to its own tail, filter the tail
through grep, and delete all the stuff from the head).
To join lines usually I can find a pattern for all the lines which need to be joined to
their predecessor (all the lines which start with "^ " rather than "^ * " in some bullet
list, for example). For that case I'd use: :% g/^ /-1j (for every matching line,
go up one line and join them). (BTW: for bullet lists trying to search for the bullet lines
and join to the next doesn't work for a couple reasons ... it can join one bullet line to
another, and it won't join any bullet line to all of its continuations; it'll only
work pairwise on the matches).
Almost needless to mention you can use our old friend s (substitute) with the
g and v (global/converse-global) commands. Usually you don't need
to do so. However, consider some case where you want to perform a substitution only on lines
matching some other pattern. Often you can use a complicated pattern with captures and use
back references to preserve the portions of the lines that you DON'T want to change. However,
it will often be easier to separate the match from the substitution: :%
g/foo/s/bar/zzz/g -- for every line containing "foo" substitute all "bar" with "zzz."
(Something like :% s/\(.*foo.*\)bar\(.*\)/\1zzz\2/g would only work for the
cases those instances of "bar" which were PRECEDED by "foo" on the same line; it's ungainly
enough already, and would have to be mangled further to catch all the cases where "bar"
preceded "foo")
The point is that there are more than just p, s, and
d lines in the ex command set.
The : addresses can also refer to marks. Thus you can use:
:'a,'bg/foo/j to join any line containing the string foo to its subsequent line,
if it lies between the lines between the ' a ' and ' b ' marks. (Yes, all
of the preceding ex command examples can be limited to subsets of the file's
lines by prefixing with these sorts of addressing expressions).
That's pretty obscure (I've only used something like that a few times in the last 15
years). However, I'll freely admit that I've often done things iteratively and interactively
that could probably have been done more efficiently if I'd taken the time to think out the
correct incantation.
Another very useful vi or ex command is :r to read in the contents of another
file. Thus: :r foo inserts the contents of the file named "foo" at the current
line.
More powerful is the :r! command. This reads the results of a command. It's
the same as suspending the vi session, running a command, redirecting its output to a
temporary file, resuming your vi session, and reading in the contents from the temp.
file.
Even more powerful are the ! (bang) and :... ! ( ex bang)
commands. These also execute external commands and read the results into the current text.
However, they also filter selections of our text through the command! This we can sort all
the lines in our file using 1G!Gsort ( G is the vi "goto" command;
it defaults to going to the last line of the file, but can be prefixed by a line number, such
as 1, the first line). This is equivalent to the ex variant :1,$!sort . Writers
often use ! with the Unix fmt or fold utilities for reformating or "word
wrapping" selections of text. A very common macro is {!}fmt (reformat the
current paragraph). Programmers sometimes use it to run their code, or just portions of it,
through indent or other code reformatting tools.
Using the :r! and ! commands means that any external utility or
filter can be treated as an extension of our editor. I have occasionally used these with
scripts that pulled data from a database, or with wget or lynx commands that pulled data off
a website, or ssh commands that pulled data from remote systems.
Another useful ex command is :so (short for :source ). This
reads the contents of a file as a series of commands. When you start vi it normally,
implicitly, performs a :source on ~/.exinitrc file (and Vim usually
does this on ~/.vimrc, naturally enough). The use of this is that you can
change your editor profile on the fly by simply sourcing in a new set of macros,
abbreviations, and editor settings. If you're sneaky you can even use this as a trick for
storing sequences of ex editing commands to apply to files on demand.
For example I have a seven line file (36 characters) which runs a file through wc, and
inserts a C-style comment at the top of the file containing that word count data. I can apply
that "macro" to a file by using a command like: vim +'so mymacro.ex'
./mytarget
(The + command line option to vi and Vim is normally used to start the
editing session at a given line number. However it's a little known fact that one can follow
the + by any valid ex command/expression, such as a "source" command as I've
done here; for a simple example I have scripts which invoke: vi +'/foo/d|wq!'
~/.ssh/known_hosts to remove an entry from my SSH known hosts file non-interactively
while I'm re-imaging a set of servers).
Usually it's far easier to write such "macros" using Perl, AWK, sed (which is, in fact,
like grep a utility inspired by the ed command).
The @ command is probably the most obscure vi command. In occasionally
teaching advanced systems administration courses for close to a decade I've met very few
people who've ever used it. @ executes the contents of a register as if it were
a vi or ex command.
Example: I often use: :r!locate ... to find some file on my system and read its
name into my document. From there I delete any extraneous hits, leaving only the full path to
the file I'm interested in. Rather than laboriously Tab -ing through each
component of the path (or worse, if I happen to be stuck on a machine without Tab completion
support in its copy of vi ) I just use:
0i:r (to turn the current line into a valid :r command),
"cdd (to delete the line into the "c" register) and
@c execute that command.
That's only 10 keystrokes (and the expression "cdd@c is
effectively a finger macro for me, so I can type it almost as quickly as any common six
letter word).
A sobering thought
I've only scratched to surface of vi 's power and none of what I've described here is even
part of the "improvements" for which vim is named! All of what I've described here should
work on any old copy of vi from 20 or 30 years ago.
There are people who have used considerably more of vi 's power than I ever will.
@Wahnfieden -- grok is exactly what I meant: en.wikipedia.org/wiki/Grok (It's apparently even in
the OED --- the closest we anglophones have to a canonical lexicon). To "grok" an editor is
to find yourself using its commands fluently ... as if they were your natural language.
– Jim
Dennis
Feb 12 '10 at 4:08
wow, a very well written answer! i couldn't agree more, although i use the @
command a lot (in combination with q : record macro) – knittl
Feb 27 '10 at 13:15
Superb answer that utterly redeems a really horrible question. I am going to upvote this
question, that normally I would downvote, just so that this answer becomes easier to find.
(And I'm an Emacs guy! But this way I'll have somewhere to point new folks who want a good
explanation of what vi power users find fun about vi. Then I'll tell them about Emacs and
they can decide.) – Brandon Rhodes
Mar 29 '10 at 15:26
Can you make a website and put this tutorial there, so it doesn't get burried here on
stackoverflow. I have yet to read better introduction to vi then this. – Marko
Apr 1 '10 at 14:47
You are talking about text selecting and copying, I think that you should give a look to the
Vim Visual Mode .
In the visual mode, you are able to select text using Vim commands, then you can do
whatever you want with the selection.
Consider the following common scenarios:
You need to select to the next matching parenthesis.
You could do:
v% if the cursor is on the starting/ending parenthesis
vib if the cursor is inside the parenthesis block
You want to select text between quotes:
vi" for double quotes
vi' for single quotes
You want to select a curly brace block (very common on C-style languages):
viB
vi{
You want to select the entire file:
ggVG
Visual
block selection is another really useful feature, it allows you to select a rectangular
area of text, you just have to press Ctrl - V to start it, and then
select the text block you want and perform any type of operation such as yank, delete, paste,
edit, etc. It's great to edit column oriented text.
Yes, but it was a specific complaint of the poster. Visual mode is Vim's best method of
direct text-selection and manipulation. And since vim's buffer traversal methods are superb,
I find text selection in vim fairly pleasurable. – guns
Aug 2 '09 at 9:54
I think it is also worth mentioning Ctrl-V to select a block - ie an arbitrary rectangle of
text. When you need it it's a lifesaver. – Hamish Downer
Mar 16 '10 at 13:34
Also, if you've got a visual selection and want to adjust it, o will hop to the
other end. So you can move both the beginning and the end of the selection as much as you
like. – Nathan Long
Mar 1 '11 at 19:05
* and # search for the word under the cursor
forward/backward.
w to the next word
W to the next space-separated word
b / e to the begin/end of the current word. ( B
/ E for space separated only)
gg / G jump to the begin/end of the file.
% jump to the matching { .. } or ( .. ), etc..
{ / } jump to next paragraph.
'. jump back to last edited line.
g; jump back to last edited position.
Quick editing commands
I insert at the begin.
A append to end.
o / O open a new line after/before the current.
v / V / Ctrl+V visual mode (to select
text!)
Shift+R replace text
C change remaining part of line.
Combining commands
Most commands accept a amount and direction, for example:
cW = change till end of word
3cW = change 3 words
BcW = to begin of full word, change full word
ciW = change inner word.
ci" = change inner between ".."
ci( = change text between ( .. )
ci< = change text between < .. > (needs set
matchpairs+=<:> in vimrc)
4dd = delete 4 lines
3x = delete 3 characters.
3s = substitute 3 characters.
Useful programmer commands
r replace one character (e.g. rd replaces the current char
with d ).
~ changes case.
J joins two lines
Ctrl+A / Ctrl+X increments/decrements a number.
. repeat last command (a simple macro)
== fix line indent
> indent block (in visual mode)
< unindent block (in visual mode)
Macro recording
Press q[ key ] to start recording.
Then hit q to stop recording.
The macro can be played with @[ key ] .
By using very specific commands and movements, VIM can replay those exact actions for the
next lines. (e.g. A for append-to-end, b / e to move the cursor to
the begin or end of a word respectively)
Example of well built settings
# reset to vim-defaults
if &compatible # only if not set before:
set nocompatible # use vim-defaults instead of vi-defaults (easier, more user friendly)
endif
# display settings
set background=dark # enable for dark terminals
set nowrap # dont wrap lines
set scrolloff=2 # 2 lines above/below cursor when scrolling
set number # show line numbers
set showmatch # show matching bracket (briefly jump)
set showmode # show mode in status bar (insert/replace/...)
set showcmd # show typed command in status bar
set ruler # show cursor position in status bar
set title # show file in titlebar
set wildmenu # completion with menu
set wildignore=*.o,*.obj,*.bak,*.exe,*.py[co],*.swp,*~,*.pyc,.svn
set laststatus=2 # use 2 lines for the status bar
set matchtime=2 # show matching bracket for 0.2 seconds
set matchpairs+=<:> # specially for html
# editor settings
set esckeys # map missed escape sequences (enables keypad keys)
set ignorecase # case insensitive searching
set smartcase # but become case sensitive if you type uppercase characters
set smartindent # smart auto indenting
set smarttab # smart tab handling for indenting
set magic # change the way backslashes are used in search patterns
set bs=indent,eol,start # Allow backspacing over everything in insert mode
set tabstop=4 # number of spaces a tab counts for
set shiftwidth=4 # spaces for autoindents
#set expandtab # turn a tabs into spaces
set fileformat=unix # file mode is unix
#set fileformats=unix,dos # only detect unix file format, displays that ^M with dos files
# system settings
set lazyredraw # no redraws in macros
set confirm # get a dialog when :q, :w, or :wq fails
set nobackup # no backup~ files.
set viminfo='20,\"500 # remember copy registers after quitting in the .viminfo file -- 20 jump links, regs up to 500 lines'
set hidden # remember undo after quitting
set history=50 # keep 50 lines of command history
set mouse=v # use mouse in visual mode (not normal,insert,command,help mode
# color settings (if terminal/gui supports it)
if &t_Co > 2 || has("gui_running")
syntax on # enable colors
set hlsearch # highlight search (very useful!)
set incsearch # search incremently (search while typing)
endif
# paste mode toggle (needed when using autoindent/smartindent)
map <F10> :set paste<CR>
map <F11> :set nopaste<CR>
imap <F10> <C-O>:set paste<CR>
imap <F11> <nop>
set pastetoggle=<F11>
# Use of the filetype plugins, auto completion and indentation support
filetype plugin indent on
# file type specific settings
if has("autocmd")
# For debugging
#set verbose=9
# if bash is sh.
let bash_is_sh=1
# change to directory of current file automatically
autocmd BufEnter * lcd %:p:h
# Put these in an autocmd group, so that we can delete them easily.
augroup mysettings
au FileType xslt,xml,css,html,xhtml,javascript,sh,config,c,cpp,docbook set smartindent shiftwidth=2 softtabstop=2 expandtab
au FileType tex set wrap shiftwidth=2 softtabstop=2 expandtab
# Confirm to PEP8
au FileType python set tabstop=4 softtabstop=4 expandtab shiftwidth=4 cinwords=if,elif,else,for,while,try,except,finally,def,class
augroup END
augroup perl
# reset (disable previous 'augroup perl' settings)
au!
au BufReadPre,BufNewFile
\ *.pl,*.pm
\ set formatoptions=croq smartindent shiftwidth=2 softtabstop=2 cindent cinkeys='0{,0},!^F,o,O,e' " tags=./tags,tags,~/devel/tags,~/devel/C
# formatoption:
# t - wrap text using textwidth
# c - wrap comments using textwidth (and auto insert comment leader)
# r - auto insert comment leader when pressing <return> in insert mode
# o - auto insert comment leader when pressing 'o' or 'O'.
# q - allow formatting of comments with "gq"
# a - auto formatting for paragraphs
# n - auto wrap numbered lists
#
augroup END
# Always jump to the last known cursor position.
# Don't do it when the position is invalid or when inside
# an event handler (happens when dropping a file on gvim).
autocmd BufReadPost *
\ if line("'\"") > 0 && line("'\"") <= line("$") |
\ exe "normal g`\"" |
\ endif
endif # has("autocmd")
The settings can be stored in ~/.vimrc, or system-wide in
/etc/vimrc.local and then by read from the /etc/vimrc file
using:
source /etc/vimrc.local
(you'll have to replace the # comment character with " to make
it work in VIM, I wanted to give proper syntax highlighting here).
The commands I've listed here are pretty basic, and the main ones I use so far. They
already make me quite more productive, without having to know all the fancy stuff.
Better than '. is g;, which jumps back through the
changelist . Goes to the last edited position, instead of last edited line
– naught101
Apr 28 '12 at 2:09
The Control + R mechanism is very useful :-) In either insert mode or
command mode (i.e. on the : line when typing commands), continue with a numbered
or named register:
a - z the named registers
" the unnamed register, containing the text of the last delete or
yank
% the current file name
# the alternate file name
* the clipboard contents (X11: primary selection)
+ the clipboard contents
/ the last search pattern
: the last command-line
. the last inserted text
- the last small (less than a line) delete
=5*5 insert 25 into text (mini-calculator)
See :help i_CTRL-R and :help c_CTRL-R for more details, and
snoop around nearby for more CTRL-R goodness.
+1 for current/alternate file name. Control-A also works in insert mode for last
inserted text, and Control-@ to both insert last inserted text and immediately
switch to normal mode. – Aryeh Leib Taurog
Feb 26 '12 at 19:06
There are a lot of good answers here, and one amazing one about the zen of vi. One thing I
don't see mentioned is that vim is extremely extensible via plugins. There are scripts and
plugins to make it do all kinds of crazy things the original author never considered. Here
are a few examples of incredibly handy vim plugins:
Rails.vim is a plugin written by tpope. It's an incredible tool for people doing rails
development. It does magical context-sensitive things that allow you to easily jump from a
method in a controller to the associated view, over to a model, and down to unit tests for
that model. It has saved dozens if not hundreds of hours as a rails
developer.
This plugin allows you to select a region of text in visual mode and type a quick command
to post it to gist.github.com . This
allows for easy pastebin access, which is incredibly handy if you're collaborating with
someone over IRC or IM.
This plugin provides special functionality to the spacebar. It turns the spacebar into
something analogous to the period, but instead of repeating actions it repeats motions. This
can be very handy for moving quickly through a file in a way you define on the
fly.
This plugin gives you the ability to work with text that is delimited in some fashion. It
gives you objects which denote things inside of parens, things inside of quotes, etc. It can
come in handy for manipulating delimited text.
This script brings fancy tab completion functionality to vim. The autocomplete stuff is
already there in the core of vim, but this brings it to a quick tab rather than multiple
different multikey shortcuts. Very handy, and incredibly fun to use. While it's not VS's
intellisense, it's a great step and brings a great deal of the functionality you'd like to
expect from a tab completion tool.
This tool brings external syntax checking commands into vim. I haven't used it personally,
but I've heard great things about it and the concept is hard to beat. Checking syntax without
having to do it manually is a great time saver and can help you catch syntactic bugs as you
introduce them rather than when you finally stop to test.
Direct access to git from inside of vim. Again, I haven't used this plugin, but I can see
the utility. Unfortunately I'm in a culture where svn is considered "new", so I won't likely
see git at work for quite some time.
A tree browser for vim. I started using this recently, and it's really handy. It lets you
put a treeview in a vertical split and open files easily. This is great for a project with a
lot of source files you frequently jump between.
This is an unmaintained plugin, but still incredibly useful. It provides the ability to
open files using a "fuzzy" descriptive syntax. It means that in a sparse tree of files you
need only type enough characters to disambiguate the files you're interested in from the rest
of the cruft.
Conclusion
There are a lot of incredible tools available for vim. I'm sure I've only scratched the
surface here, and it's well worth searching for tools applicable to your domain. The
combination of traditional vi's powerful toolset, vim's improvements on it, and plugins which
extend vim even further, it's one of the most powerful ways to edit text ever conceived. Vim
is easily as powerful as emacs, eclipse, visual studio, and textmate.
Thanks
Thanks to duwanis for his
vim configs from which I
have learned much and borrowed most of the plugins listed here.
The magical tests-to-class navigation in rails.vim is one of the more general things I wish
Vim had that TextMate absolutely nails across all languages: if I am working on Person.scala
and I do Cmd+T, usually the first thing in the list is PersonTest.scala. – Tom Morris
Apr 1 '10 at 8:50
@Benson Great list! I'd toss in snipMate as well. Very helpful
automation of common coding stuff. if<tab> instant if block, etc. – AlG
Sep 13 '11 at 17:37
Visual mode was mentioned previously, but block visual mode has saved me a lot of time
when editing fixed size columns in text file. (accessed with Ctrl-V).
Additionally, if you use a concise command (e.g. A for append-at-end) to edit the text, vim
can repeat that exact same action for the next line you press the . key at.
– vdboor
Apr 1 '10 at 8:34
Go to last edited location (very useful if you performed some searching and than want go
back to edit)
^P and ^N
Complete previous (^P) or next (^N) text.
^O and ^I
Go to previous ( ^O - "O" for old) location or to the next (
^I - "I" just near to "O" ). When you perform
searches, edit files etc., you can navigate through these "jumps" forward and back.
@Kungi `. will take you to the last edit `` will take you back to the position you were in
before the last 'jump' - which /might/ also be the position of the last edit. –
Grant
McLean
Aug 23 '11 at 8:21
It's pretty new and really really good. The guy who is running the site switched from
textmate to vim and hosts very good and concise casts on specific vim topics. Check it
out!
@SolutionYogi: Consider that you want to add line number to the beginning of each line.
Solution: ggI1<space><esc>0qqyawjP0<c-a>0q9999@q – hcs42
Feb 27 '10 at 19:05
Extremely useful with Vimperator, where it increments (or decrements, Ctrl-X) the last number
in the URL. Useful for quickly surfing through image galleries etc. – blueyed
Apr 1 '10 at 14:47
Whoa, I didn't know about the * and # (search forward/back for word under cursor) binding.
That's kinda cool. The f/F and t/T and ; commands are quick jumps to characters on the
current line. f/F put the cursor on the indicated character while t/T puts it just up "to"
the character (the character just before or after it according to the direction chosen. ;
simply repeats the most recent f/F/t/T jump (in the same direction). – Jim Dennis
Mar 14 '10 at 6:38
:) The tagline at the top of the tips page at vim.org: "Can you imagine how many keystrokes
could have been saved, if I only had known the "*" command in time?" - Juergen Salk,
1/19/2001" – Steve K
Apr 3 '10 at 23:50
As Jim mentioned, the "t/T" combo is often just as good, if not better, for example,
ct( will erase the word and put you in insert mode, but keep the parantheses!
– puk
Feb 24 '12 at 6:45
CTRL-A ;Add [count] to the number or alphabetic character at or after the cursor. {not
in Vi
CTRL-X ;Subtract [count] from the number or alphabetic character at or after the cursor.
{not in Vi}
b. Window key unmapping
In window, Ctrl-A already mapped for whole file selection you need to unmap in rc file.
mark mswin.vim CTRL-A mapping part as comment or add your rc file with unmap
c. With Macro
The CTRL-A command is very useful in a macro. Example: Use the following steps to make a
numbered list.
Create the first list entry, make sure it starts with a number.
Last week at work our project inherited a lot of Python code from another project.
Unfortunately the code did not fit into our existing architecture - it was all done with
global variables and functions, which would not work in a multi-threaded environment.
We had ~80 files that needed to be reworked to be object oriented - all the functions
moved into classes, parameters changed, import statements added, etc. We had a list of about
20 types of fix that needed to be done to each file. I would estimate that doing it by hand
one person could do maybe 2-4 per day.
So I did the first one by hand and then wrote a vim script to automate the changes. Most
of it was a list of vim commands e.g.
" delete an un-needed function "
g/someFunction(/ d

" add wibble parameter to function foo "
%s/foo(/foo( wibble,/

" convert all function calls bar(thing) into method calls thing.bar() "
g/bar(/ normal nmaf(ldi(`aPa.
The last one deserves a bit of explanation:
g/bar(/  executes the following command on every line that contains "bar("
normal   execute the following text as if it was typed in in normal mode
n        goes to the next match of "bar(" (since the :g command leaves the cursor position at the start of the line)
ma       saves the cursor position in mark a
f(       moves forward to the next opening bracket
l        moves right one character, so the cursor is now inside the brackets
di(      delete all the text inside the brackets
`a       go back to the position saved as mark a (i.e. the first character of "bar")
P        paste the deleted text before the current cursor position
a.       go into insert mode and add a "."
For a couple of more complex transformations such as generating all the import statements
I embedded some python into the vim script.
After a few hours of working on it I had a script that will do at least 95% of the
conversion. I just open a file in vim then run :source fixit.vim and the file is
transformed in a blink of the eye.
We still have the work of changing the remaining 5% that was not worth automating and of
testing the results, but by spending a day writing this script I estimate we have saved weeks
of work.
Of course it would have been possible to automate this with a scripting language like
Python or Ruby, but it would have taken far longer to write and would be less flexible - the
last example would have been difficult since regex alone would not be able to handle nested
brackets, e.g. to convert bar(foo(xxx)) to foo(xxx).bar() . Vim was
perfect for the task.
@lpsquiggle: your suggestion would not handle complex expressions with more than one set of
brackets. e.g. if bar(foo(xxx)) or wibble(xxx): becomes if foo(xxx)) or
wibble(xxx.bar(): which is completely wrong. – Dave Kirby
Mar 23 '10 at 17:16
Use the builtin file explorer! The command is :Explore and it allows you to
navigate through your source code very very fast. I have these mapping in my
.vimrc :
I always thought the default methods for browsing kinda sucked for most stuff. It's just slow
to browse, if you know where you wanna go. LustyExplorer from vim.org's script section is a
much needed improvement. – Svend
Aug 2 '09 at 8:48
I recommend NERDtree instead of the built-in explorer. It has changed the way I used vim for
projects and made me much more productive. Just google for it. – kprobst
Apr 1 '10 at 3:53
I never feel the need to explore the source tree, I just use :find,
:tag and the various related keystrokes to jump around. (Maybe this is because
the source trees I work on are big and organized differently than I would have done? :) )
– dash-tom-bang
Aug 24 '11 at 0:35
I am a member of the American Cryptogram Association. The bimonthly magazine includes over
100 cryptograms of various sorts. Roughly 15 of these are "cryptarithms" - various types of
arithmetic problems with letters substituted for the digits. Two or three of these are
sudokus, except with letters instead of numbers. When the grid is completed, the nine
distinct letters will spell out a word or words, on some line, diagonal, spiral, etc.,
somewhere in the grid.
Rather than working with pencil, or typing the problems in by hand, I download the
problems from the members area of their website.
When working with these sudokus, I use vi, simply because I'm using facilities that vi has
that few other editors have. Mostly in converting the lettered grid into a numbered grid,
because I find it easier to solve, and then the completed numbered grid back into the
lettered grid to find the solution word or words.
The problem is formatted as nine groups of nine letters, with - s
representing the blanks, written in two lines. The first step is to format these into nine
lines of nine characters each. There's nothing special about this, just inserting eight
linebreaks in the appropriate places.
So, first step in converting this into numbers is to make a list of the distinct letters.
First, I make a copy of the block. I position the cursor at the top of the block, then type
:y}}p . : puts me in command mode, y yanks the next
movement command. Since } is a move to the end of the next paragraph,
y} yanks the paragraph. } then moves the cursor to the end of the
paragraph, and p pastes what we had yanked just after the cursor. So
y}}p creates a copy of the next paragraph, and ends up with the cursor between
the two copies.
Next, I to turn one of those copies into a list of distinct letters. That command is a bit
more complex:
: again puts me in command mode. ! indicates that the content of
the next yank should be piped through a command line. } yanks the next
paragraph, and the command line then uses the tr command to strip out everything
except for upper-case letters, the sed command to print each letter on a single
line, and the sort command to sort those lines, removing duplicates, and then
tr strips out the newlines, leaving the nine distinct letters in a single line,
replacing the nine lines that had made up the paragraph originally. In this case, the letters
are: ACELNOPST .
Next step is to make another copy of the grid. And then to use the letters I've just
identified to replace each of those letters with a digit from 1 to 9. That's simple:
:!}tr ACELNOPST 0-9 . The result is:
This can then be solved in the usual way, or entered into any sudoku solver you might
prefer. The completed solution can then be converted back into letters with :!}tr 1-9
ACELNOPST .
There is power in vi that is matched by very few others. The biggest problem is that only
a very few of the vi tutorial books, websites, help-files, etc., do more than barely touch
the surface of what is possible.
and an irritation is that some distros such as ubuntu has aliases from the word "vi" to "vim"
so people won't really see vi. Excellent example, have to try... +1 – hhh
Jan 14 '11 at 17:12
I'm baffled by this repeated error: you say you need : to go into command mode,
but then invariably you specify normal mode commands (like y}}p ) which
cannot possibly work from the command mode?! – sehe
Mar 4 '12 at 20:47
My take on the unique chars challenge: :se tw=1 fo= (preparation)
VG:s/./& /g (insert spaces), gvgq (split onto separate lines),
V{:sort u (sort and remove duplicates) – sehe
Mar 4 '12 at 20:56
I find the following trick increasingly useful ... for cases where you want to join lines
that match (or that do NOT match) some pattern to the previous line: :%
g/foo/-1j or :'a,'z v/bar/-1j for example (where the former is "all lines
and matching the pattern" while the latter is "lines between mark a and mark z which fail to
match the pattern"). The part after the patter in a g or v ex
command can be any other ex commmands, -1j is just a relative line movement and join command.
– Jim
Dennis
Feb 12 '10 at 4:15
of course, if you name your macro '2', then when it comes time to use it, you don't even have
to move your finger from the '@' key to the 'q' key. Probably saves 50 to 100 milliseconds
every time right there. =P – JustJeff
Feb 27 '10 at 12:54
I recently discovered q: . It opens the "command window" and shows your most
recent ex-mode (command-mode) commands. You can move as usual within the window, and pressing
<CR> executes the command. You can edit, etc. too. Priceless when you're
messing around with some complex command or regex and you don't want to retype the whole
thing, or if the complex thing you want to do was 3 commands back. It's almost like bash's
set -o vi, but for vim itself (heh!).
See :help q: for more interesting bits for going back and forth.
I just discovered Vim's omnicompletion the other day, and while I'll admit I'm a bit hazy on
what does which, I've had surprisingly good results just mashing either Ctrl +
xCtrl + u or Ctrl + n /
Ctrl + p in insert mode. It's not quite IntelliSense, but I'm still learning it.
<Ctrl> + W and j/k will let you navigate absolutely (j up, k down, as with normal vim).
This is great when you have 3+ splits. – Andrew Scagnelli
Apr 1 '10 at 2:58
after bashing my keyboard I have deduced that <C-w>n or
<C-w>s is new horizontal window, <C-w>b is bottom right
window, <C-w>c or <C-w>q is close window,
<C-w>x is increase and then decrease window width (??),
<C-w>p is last window, <C-w>backspace is move left(ish)
window – puk
Feb 24 '12 at 7:00
As several other people have said, visual mode is the answer to your copy/cut & paste
problem. Vim gives you 'v', 'V', and C-v. Lower case 'v' in vim is essentially the same as
the shift key in notepad. The nice thing is that you don't have to hold it down. You can use
any movement technique to navigate efficiently to the starting (or ending) point of your
selection. Then hit 'v', and use efficient movement techniques again to navigate to the other
end of your selection. Then 'd' or 'y' allows you to cut or copy that selection.
The advantage vim's visual mode has over Jim Dennis's description of cut/copy/paste in vi
is that you don't have to get the location exactly right. Sometimes it's more efficient to
use a quick movement to get to the general vicinity of where you want to go and then refine
that with other movements than to think up a more complex single movement command that gets
you exactly where you want to go.
The downside to using visual mode extensively in this manner is that it can become a
crutch that you use all the time which prevents you from learning new vi(m) commands that
might allow you to do things more efficiently. However, if you are very proactive about
learning new aspects of vi(m), then this probably won't affect you much.
I'll also re-emphasize that the visual line and visual block modes give you variations on
this same theme that can be very powerful...especially the visual block mode.
On Efficient Use of the Keyboard
I also disagree with your assertion that alternating hands is the fastest way to use the
keyboard. It has an element of truth in it. Speaking very generally, repeated use of the same
thing is slow. This most significant example of this principle is that consecutive keystrokes
typed with the same finger are very slow. Your assertion probably stems from the natural
tendency to use the s/finger/hand/ transformation on this pattern. To some extent it's
correct, but at the extremely high end of the efficiency spectrum it's incorrect.
Just ask any pianist. Ask them whether it's faster to play a succession of a few notes
alternating hands or using consecutive fingers of a single hand in sequence. The fastest way
to type 4 keystrokes is not to alternate hands, but to type them with 4 fingers of the same
hand in either ascending or descending order (call this a "run"). This should be self-evident
once you've considered this possibility.
The more difficult problem is optimizing for this. It's pretty easy to optimize for
absolute distance on the keyboard. Vim does that. It's much harder to optimize at the "run"
level, but vi(m) with it's modal editing gives you a better chance at being able to do it
than any non-modal approach (ahem, emacs) ever could.
On Emacs
Lest the emacs zealots completely disregard my whole post on account of that last
parenthetical comment, I feel I must describe the root of the difference between the emacs
and vim religions. I've never spoken up in the editor wars and I probably won't do it again,
but I've never heard anyone describe the differences this way, so here it goes. The
difference is the following tradeoff:
Vim gives you unmatched raw text editing efficiency Emacs gives you unmatched ability to
customize and program the editor
The blind vim zealots will claim that vim has a scripting language. But it's an obscure,
ad-hoc language that was designed to serve the editor. Emacs has Lisp! Enough said. If you
don't appreciate the significance of those last two sentences or have a desire to learn
enough about functional programming and Lisp to develop that appreciation, then you should
use vim.
The emacs zealots will claim that emacs has viper mode, and so it is a superset of vim.
But viper mode isn't standard. My understanding is that viper mode is not used by the
majority of emacs users. Since it's not the default, most emacs users probably don't develop
a true appreciation for the benefits of the modal paradigm.
In my opinion these differences are orthogonal. I believe the benefits of vim and emacs as
I have stated them are both valid. This means that the ultimate editor doesn't exist yet.
It's probably true that emacs would be the easiest platform on which to base the ultimate
editor. But modal editing is not entrenched in the emacs mindset. The emacs community could
move that way in the future, but that doesn't seem very likely.
So if you want raw editing efficiency, use vim. If you want the ultimate environment for
scripting and programming your editor use emacs. If you want some of both with an emphasis on
programmability, use emacs with viper mode (or program your own mode). If you want the best
of both worlds, you're out of luck for now.
Spend 30 mins doing the vim tutorial (run vimtutor instead of vim in terminal). You will
learn the basic movements, and some keystrokes, this will make you at least as productive
with vim as with the text editor you used before. After that, well, read Jim Dennis' answer
again :)
This is the first thing I thought of when reading the OP. It's obvious that the poster has
never run this; I ran through it when first learning vim two years ago and it cemented in my
mind the superiority of Vim to any of the other editors I've used (including, for me, Emacs
since the key combos are annoying to use on a Mac). – dash-tom-bang
Aug 24 '11 at 0:47
Use \c anywhere in a search to ignore case (overriding your ignorecase or
smartcase settings). E.g. /\cfoo or /foo\c will match
foo, Foo, fOO, FOO, etc.
Use \C anywhere in a search to force case matching. E.g. /\Cfoo
or /foo\C will only match foo.
Odd nobody's mentioned ctags. Download "exuberant ctags" and put it ahead of the crappy
preinstalled version you already have in your search path. Cd to the root of whatever you're
working on; for example the Android kernel distribution. Type "ctags -R ." to build an index
of source files anywhere beneath that dir in a file named "tags". This contains all tags,
nomatter the language nor where in the dir, in one file, so cross-language work is easy.
Then open vim in that folder and read :help ctags for some commands. A few I use
often:
Put cursor on a method call and type CTRL-] to go to the method definition.
You asked about productive shortcuts, but I think your real question is: Is vim worth it? The
answer to this stackoverflow question is -> "Yes"
You must have noticed two things. Vim is powerful, and vim is hard to learn. Much of it's
power lies in it's expandability and endless combination of commands. Don't feel overwhelmed.
Go slow. One command, one plugin at a time. Don't overdo it.
All that investment you put into vim will pay back a thousand fold. You're going to be
inside a text editor for many, many hours before you die. Vim will be your companion.
Multiple buffers, and in particular fast jumping between them to compare two files with
:bp and :bn (properly remapped to a single Shift +
p or Shift + n )
vimdiff mode (splits in two vertical buffers, with colors to show the
differences)
Area-copy with Ctrl + v
And finally, tab completion of identifiers (search for "mosh_tab_or_complete"). That's a
life changer.
Probably better to set the clipboard option to unnamed ( set
clipboard=unnamed in your .vimrc) to use the system clipboard by default. Or if you
still want the system clipboard separate from the unnamed register, use the appropriately
named clipboard register: "*p . – R. Martinho Fernandes
Apr 1 '10 at 3:17
Love it! After being exasperated by pasting code examples from the web and I was just
starting to feel proficient in vim. That was the command I dreamed up on the spot. This was
when vim totally hooked me. – kevpie
Oct 12 '10 at 22:38
There are a plethora of questions where people talk about common tricks, notably " Vim+ctags
tips and tricks ".
However, I don't refer to commonly used shortcuts that someone new to Vim would find cool.
I am talking about a seasoned Unix user (be they a developer, administrator, both, etc.), who
thinks they know something 99% of us never heard or dreamed about. Something that not only
makes their work easier, but also is COOL and hackish .
After all, Vim resides in
the most dark-corner-rich OS in the world, thus it should have intricacies that only a few
privileged know about and want to share with us.
Might not be one that 99% of Vim users don't know about, but it's something I use daily and
that any Linux+Vim poweruser must know.
Basic command, yet extremely useful.
:w !sudo tee %
I often forget to sudo before editing a file I don't have write permissions on. When I
come to save that file and get a permission error, I just issue that vim command in order to
save the file without the need to save it to a temp file and then copy it back again.
You obviously have to be on a system with sudo installed and have sudo rights.
Something I just discovered recently that I thought was very cool:
:earlier 15m
Reverts the document back to how it was 15 minutes ago. Can take various arguments for the
amount of time you want to roll back, and is dependent on undolevels. Can be reversed with
the opposite command :later
@skinp: If you undo and then make further changes from the undone state, you lose that redo
history. This lets you go back to a state which is no longer in the undo stack. –
ephemient
Apr 8 '09 at 16:15
Also very usefull is g+ and g- to go backward and forward in time. This is so much more
powerfull than an undo/redo stack since you don't loose the history when you do something
after an undo. – Etienne PIERRE
Jul 21 '09 at 13:53
You don't lose the redo history if you make a change after an undo. It's just not easily
accessed. There are plugins to help you visualize this, like Gundo.vim – Ehtesh Choudhury
Nov 29 '11 at 12:09
This is quite similar to :r! The only difference as far as I can tell is that :r! opens a new
line, :.! overwrites the current line. – saffsd
May 6 '09 at 14:41
An alternative to :.!date is to write "date" on a line and then run
!$sh (alternatively having the command followed by a blank line and run
!jsh ). This will pipe the line to the "sh" shell and substitute with the output
from the command. – hlovdal
Jan 25 '10 at 21:11
:.! is actually a special case of :{range}!, which filters a range
of lines (the current line when the range is . ) through a command and replaces
those lines with the output. I find :%! useful for filtering whole buffers.
– Nefrubyr
Mar 25 '10 at 16:24
And also note that '!' is like 'y', 'd', 'c' etc. i.e. you can do: !!, number!!, !motion
(e.g. !Gshell_command<cr> replace from current line to end of file ('G') with output of
shell_command). – aqn
Apr 26 '13 at 20:52
dab "delete arounb brackets", daB for around curly brackets, t for xml type tags,
combinations with normal commands are as expected cib/yaB/dit/vat etc – sjh
Apr 8 '09 at 15:33
This is possibly the biggest reason for me staying with Vim. That and its equivalent "change"
commands: ciw, ci(, ci", as well as dt<space> and ct<space> – thomasrutter
Apr 26 '09 at 11:11
de Delete everything till the end of the word by pressing . at your heart's desire.
ci(xyz[Esc] -- This is a weird one. Here, the 'i' does not mean insert mode. Instead it
means inside the parenthesis. So this sequence cuts the text inside parenthesis you're
standing in and replaces it with "xyz". It also works inside square and figure brackets --
just do ci[ or ci{ correspondingly. Naturally, you can do di (if you just want to delete all
text without typing anything. You can also do a instead of i if you
want to delete the parentheses as well and not just text inside them.
ci" - cuts the text in current quotes
ciw - cuts the current word. This works just like the previous one except that
( is replaced with w .
C - cut the rest of the line and switch to insert mode.
ZZ -- save and close current file (WAY faster than Ctrl-F4 to close the current tab!)
ddp - move current line one row down
xp -- move current character one position to the right
U - uppercase, so viwU upercases the word
~ - switches case, so viw~ will reverse casing of entire word
Ctrl+u / Ctrl+d scroll the page half-a-screen up or down. This seems to be more useful
than the usual full-screen paging as it makes it easier to see how the two screens relate.
For those who still want to scroll entire screen at a time there's Ctrl+f for Forward and
Ctrl+b for Backward. Ctrl+Y and Ctrl+E scroll down or up one line at a time.
Crazy but very useful command is zz -- it scrolls the screen to make this line appear in
the middle. This is excellent for putting the piece of code you're working on in the center
of your attention. Sibling commands -- zt and zb -- make this line the top or the bottom one
on the sreen which is not quite as useful.
% finds and jumps to the matching parenthesis.
de -- delete from cursor to the end of the word (you can also do dE to delete
until the next space)
bde -- delete the current word, from left to right delimiter
df[space] -- delete up until and including the next space
dt. -- delete until next dot
dd -- delete this entire line
ye (or yE) -- yanks text from here to the end of the word
ce - cuts through the end of the word
bye -- copies current word (makes me wonder what "hi" does!)
yy -- copies the current line
cc -- cuts the current line, you can also do S instead. There's also lower
cap s which cuts current character and switches to insert mode.
viwy or viwc . Yank or change current word. Hit w multiple times to keep
selecting each subsequent word, use b to move backwards
vi{ - select all text in figure brackets. va{ - select all text including {}s
vi(p - highlight everything inside the ()s and replace with the pasted text
b and e move the cursor word-by-word, similarly to how Ctrl+Arrows normally do . The
definition of word is a little different though, as several consecutive delmiters are treated
as one word. If you start at the middle of a word, pressing b will always get you to the
beginning of the current word, and each consecutive b will jump to the beginning of the next
word. Similarly, and easy to remember, e gets the cursor to the end of the
current, and each subsequent, word.
similar to b / e, capital B and E
move the cursor word-by-word using only whitespaces as delimiters.
capital D (take a deep breath) Deletes the rest of the line to the right of the cursor,
same as Shift+End/Del in normal editors (notice 2 keypresses -- Shift+D -- instead of 3)
All the things you're calling "cut" is "change". eg: C is change until the end of the line.
Vim's equivalent of "cut" is "delete", done with d/D. The main difference between change and
delete is that delete leaves you in normal mode but change puts you into a sort of insert
mode (though you're still in the change command which is handy as the whole change can be
repeated with . ). – Laurence Gonsalves
Feb 19 '11 at 23:49
One that I rarely find in most Vim tutorials, but it's INCREDIBLY useful (at least to me), is
the
g; and g,
to move (forward, backward) through the changelist.
Let me show how I use it. Sometimes I need to copy and paste a piece of code or string,
say a hex color code in a CSS file, so I search, jump (not caring where the match is), copy
it and then jump back (g;) to where I was editing the code to finally paste it. No need to
create marks. Simpler.
Ctrl-O and Ctrl-I (tab) will work similarly, but not the same. They move backward and forward
in the "jump list", which you can view by doing :jumps or :ju For more information do a :help
jumplist – Kimball Robinson
Apr 16 '10 at 0:29
@JoshLee: If one is careful not to traverse newlines, is it safe to not use the -b option? I
ask because sometimes I want to make a hex change, but I don't want to close and
reopen the file to do so. – dotancohen
Jun 7 '13 at 5:50
Sometimes a setting in your .vimrc will get overridden by a plugin or autocommand. To debug
this a useful trick is to use the :verbose command in conjunction with :set. For example, to
figure out where cindent got set/unset:
:verbose set cindent?
This will output something like:
cindent
    Last set from /usr/share/vim/vim71/indent/c.vim
This also works with maps and highlights. (Thanks joeytwiddle for pointing this out.) For
example:
:verbose nmap U
n  U             <C-R>
        Last set from ~/.vimrc

:verbose highlight Normal
Normal         xxx guifg=#dddddd guibg=#111111 font=Inconsolata Medium 14
        Last set from ~/src/vim-holodark/colors/holodark.vim
:verbose can also be used before nmap l or highlight
Normal to find out where the l keymap or the Normal
highlight were last defined. Very useful for debugging! – joeytwiddle
Jul 5 '14 at 22:08
When you get into creating custom mappings, this will save your ass so many times, probably
one of the most useful ones here (IMO)! – SidOfc
Sep 24 '17 at 11:26
Not sure if this counts as dark-corner-ish at all, but I've only just learnt it...
:g/match/y A
will yank (copy) all lines containing "match" into the "a / @a
register. (The capitalization as A makes vim append yankings instead of
replacing the previous register contents.) I used it a lot recently when making Internet
Explorer stylesheets.
Sometimes it's better to do what tsukimi said and just filter out lines that don't match your
pattern. An abbreviated version of that command though: :v/PATTERN/d
Explanation: :v is an abbreviation for :g!, and the
:g command applies any ex command to lines. :y[ank] works and so
does :normal, but here the most natural thing to do is just
:d[elete] . – pandubear
Oct 12 '13 at 8:39
You can also do :g/match/normal "Ayy -- the normal keyword lets you
tell it to run normal-mode commands (which you are probably more familiar with). –
Kimball
Robinson
Feb 5 '16 at 17:58
Hitting <C-f> after : or / (or any time you're in command mode) will bring up the same
history menu. So you can remap q: if you hit it accidentally a lot and still access this
awesome mode. – idbrii
Feb 23 '11 at 19:07
For me it didn't open the source; instead it apparently used elinks to dump rendered page
into a buffer, and then opened that. – Ivan Vučica
Sep 21 '10 at 8:07
@Vdt: It'd be useful if you posted your error. If it's this one: " error (netrw)
neither the wget nor the fetch command is available" you obviously need to make one of those
tools available from your PATH environment variable. – Isaac Remuant
Jun 3 '13 at 15:23
I find this one particularly useful when people send links to a paste service and forgot to
select a syntax highlighting, I generally just have to open the link in vim after appending
"&raw". – Dettorer
Oct 29 '14 at 13:47
I didn't know macros could repeat themselves. Cool. Note: qx starts recording into register x
(he uses qq for register q). 0 moves to the start of the line. dw delets a word. j moves down
a line. @q will run the macro again (defining a loop). But you forgot to end the recording
with a final "q", then actually run the macro by typing @q. – Kimball Robinson
Apr 16 '10 at 0:39
Another way of accomplishing this is to record a macro in register a that does some
transformation to a single line, then linewise highlight a bunch of lines with V and type
:normal! @a to applyyour macro to every line in your selection. –
Nathan Long
Aug 29 '11 at 15:33
I found this post googling recursive VIM macros. I could find no way to stop the macro other
than killing the VIM process. – dotancohen
May 14 '13 at 6:00
Assuming you have Perl and/or Ruby support compiled in, :rubydo and
:perldo will run a Ruby or Perl one-liner on every line in a range (defaults to
entire buffer), with $_ bound to the text of the current line (minus the
newline). Manipulating $_ will change the text of that line.
You can use this to do certain things that are easy to do in a scripting language but not
so obvious using Vim builtins. For example to reverse the order of the words in a line:
:perldo $_ = join ' ', reverse split
To insert a random string of 8 characters (A-Z) at the end of every line:
Sadly not, it just adds a funky control character to the end of the line. You could then use
a Vim search/replace to change all those control characters to real newlines though. –
Brian Carper
Jul 2 '09 at 17:26
Go to older/newer position. When you are moving through the file (by searching, moving
commands etc.) vim rember these "jumps", so you can repeat these jumps backward (^O - O for
old) and forward (^I - just next to I on keyboard). I find it very useful when writing code
and performing a lot of searches.
gi
Go to position where Insert mode was stopped last. I find myself often editing and then
searching for something. To return to editing place press gi.
gf
put cursor on file name (e.g. include header file), press gf and the file is opened
gF
similar to gf but recognizes format "[file name]:[line number]". Pressing gF will open
[file name] and set cursor to [line number].
^P and ^N
Auto complete text while editing (^P - previous match and ^N next match)
^X^L
While editing completes to the same line (useful for programming). You write code and then
you recall that you have the same code somewhere in file. Just press ^X^L and the full line
completed
^X^F
Complete file names. You write "/etc/pass" Hmm. You forgot the file name. Just press ^X^F
and the filename is completed
^Z or :sh
Move temporary to the shell. If you need a quick bashing:
press ^Z (to put vi in background) to return to original shell and press fg to return
to vim back
press :sh to go to sub shell and press ^D/exit to return to vi back
With ^X^F my pet peeve is that filenames include = signs, making it
do rotten things in many occasions (ini files, makefiles etc). I use se
isfname-== to end that nuisance – sehe
Mar 4 '12 at 21:50
This is a nice trick to reopen the current file with a different encoding:
:e ++enc=cp1250 %:p
Useful when you have to work with legacy encodings. The supported encodings are listed in
a table under encoding-values (see helpencoding-values ). Similar thing also works for ++ff, so that you
can reopen file with Windows/Unix line ends if you get it wrong for the first time (see
helpff ).
>, Apr 7, 2009 at 18:43
Never had to use this sort of a thing, but we'll certainly add to my arsenal of tricks...
– Sasha
Apr 7 '09 at 18:43
I have used this today, but I think I didn't need to specify "%:p"; just opening the file and
:e ++enc=cp1250 was enough. I – Ivan Vučica
Jul 8 '09 at 19:29
This is a terrific answer. Not the bit about creating the IP addresses, but the bit that
implies that VIM can use for loops in commands . – dotancohen
Nov 30 '14 at 14:56
No need, usually, to be exactly on the braces. Thought frequently I'd just =} or
vaBaB= because it is less dependent. Also, v}}:!astyle -bj matches
my code style better, but I can get it back into your style with a simple %!astyle
-aj – sehe
Mar 4 '12 at 22:03
I remapped capslock to esc instead, as it's an otherwise useless key. My mapping was OS wide
though, so it has the added benefit of never having to worry about accidentally hitting it.
The only drawback IS ITS HARDER TO YELL AT PEOPLE. :) – Alex
Oct 5 '09 at 5:32
@ojblass: Not sure how many people ever right matlab code in Vim, but ii and
jj are commonly used for counter variables, because i and
j are reserved for complex numbers. – brianmearns
Oct 3 '12 at 12:45
@rlbond - It comes down to how good is the regex engine in the IDE. Vim's regexes are pretty
powerful; others.. not so much sometimes. – romandas
Jun 19 '09 at 16:58
The * will be greedy, so this regex assumes you have just two columns. If you want it to be
nongreedy use {-} instead of * (see :help non-greedy for more information on the {}
multiplier) – Kimball Robinson
Apr 16 '10 at 0:32
Not exactly a dark secret, but I like to put the following mapping into my .vimrc file, so I
can hit "-" (minus) anytime to open the file explorer to show files adjacent to the one I
just edit . In the file explorer, I can hit another "-" to move up one directory,
providing seamless browsing of a complex directory structures (like the ones used by the MVC
frameworks nowadays):
map - :Explore<cr>
These may be also useful for somebody. I like to scroll the screen and advance the cursor
at the same time:
map <c-j> j<c-e>
map <c-k> k<c-y>
Tab navigation - I love tabs and I need to move easily between them:
I suppose it would override autochdir temporarily (until you switched buffers again).
Basically, it changes directory to the root directory of the current file. It gives me a bit
more manual control than autochdir does. – rampion
May 8 '09 at 2:55
:set autochdir //this also serves the same functionality and it changes the current directory
to that of file in buffer – Naga Kiran
Jul 8 '09 at 13:44
I like to use 'sudo bash', and my sysadmin hates this. He locked down 'sudo' so it could only
be used with a handful of commands (ls, chmod, chown, vi, etc), but I was able to use vim to
get a root shell anyway:
bash$ sudo vi +'silent !bash' +q
Password: ******
root#
yeah... I'd hate you too ;) you should only need a root shell VERY RARELY, unless you're
already in the habit of running too many commands as root which means your permissions are
all screwed up. – jnylen
Feb 22 '11 at 15:58
Don't forget you can prepend numbers to perform an action multiple times in Vim. So to expand
the current window height by 8 lines: 8<C-W>+ – joeytwiddle
Jan 29 '12 at 18:12
well, if you haven't done anything else to the file, you can simply type u for undo.
Otherwise, I haven't figured that out yet. – Grant Limberg
Jun 17 '09 at 19:29
Commented out code is probably one of the worst types of comment you could possibly put in
your code. There are better uses for the awesome block insert. – Braden Best
Feb 4 '16 at 16:23
I use vim for just about any text editing I do, so I often times use copy and paste. The
problem is that vim by default will often times distort imported text via paste. The way to
stop this is to use
:set paste
before pasting in your data. This will keep it from messing up.
Note that you will have to issue :set nopaste to recover auto-indentation.
Alternative ways of pasting pre-formatted text are the clipboard registers ( *
and + ), and :r!cat (you will have to end the pasted fragment with
^D).
It is also sometimes helpful to turn on a high contrast color scheme. This can be done
with
:color blue
I've noticed that it does not work on all the versions of vim I use but it does on
most.
The "distortion" is happening because you have some form of automatic indentation enabled.
Using set paste or specifying a key for the pastetoggle option is a
common way to work around this, but the same effect can be achieved with set
mouse=a as then Vim knows that the flood of text it sees is a paste triggered by the
mouse. – jamessan
Dec 28 '09 at 8:27
If you have gvim installed you can often (though it depends on what your options your distro
compiles vim with) use the X clipboard directly from vim through the * register. For example
"*p to paste from the X xlipboard. (It works from terminal vim, too, it's just
that you might need the gvim package if they're separate) – kyrias
Oct 19 '13 at 12:15
Here's something not obvious. If you have a lot of custom plugins / extensions in your $HOME
and you need to work from su / sudo / ... sometimes, then this might be useful.
In your ~/.bashrc:
export VIMINIT=":so $HOME/.vimrc"
In your ~/.vimrc:
if $HOME=='/root'
        if $USER=='root'
                if isdirectory('/home/your_typical_username')
                        let rtuser = 'your_typical_username'
                elseif isdirectory('/home/your_other_username')
                        let rtuser = 'your_other_username'
                endif
        else
                let rtuser = $USER
        endif
        let &runtimepath = substitute(&runtimepath, $HOME, '/home/'.rtuser, 'g')
endif
It will allow your local plugins to load - whatever way you use to change the user.
You might also like to take the *.swp files out of your current path and into ~/vimtmp
(this goes into .vimrc):
if ! isdirectory(expand('~/vimtmp'))
   call mkdir(expand('~/vimtmp'))
endif
if isdirectory(expand('~/vimtmp'))
   set directory=~/vimtmp
else
   set directory=.,/var/tmp,/tmp
endif
Also, some mappings I use to make editing easier - makes ctrl+s work like escape and
ctrl+h/l switch the tabs:
I prefer never to run vim as root/under sudo - and would just run the command from vim e.g.
:!sudo tee %, :!sudo mv % /etc or even launch a login shell
:!sudo -i – shalomb
Aug 24 '15 at 8:02
Ctrl-n while in insert mode will auto complete whatever word you're typing based on all the
words that are in open buffers. If there is more than one match it will give you a list of
possible words that you can cycle through using ctrl-n and ctrl-p.
Ability to run Vim on a client/server based modes.
For example, suppose you're working on a project with a lot of buffers, tabs and other
info saved on a session file called session.vim.
You can open your session and create a server by issuing the following command:
vim --servername SAMPLESERVER -S session.vim
Note that you can open regular text files if you want to create a server and it doesn't
have to be necessarily a session.
Now, suppose you're in another terminal and need to open another file. If you open it
regularly by issuing:
vim new_file.txt
Your file would be opened in a separate Vim buffer, which is hard to do interactions with
the files on your session. In order to open new_file.txt in a new tab on your server use this
command:
vim --servername SAMPLESERVER --remote-tab-silent new_file.txt
If there's no server running, this file will be opened just like a regular file.
Since providing those flags every time you want to run them is very tedious, you can
create a separate alias for creating client and server.
I placed the followings on my bashrc file:
alias vims='vim --servername SAMPLESERVER'
alias vimc='vim --servername SAMPLESERVER --remote-tab-silent'
HOWTO: Auto-complete Ctags when using Vim in Bash. For anyone else who uses Vim and Ctags,
I've written a small auto-completer function for Bash. Add the following into your
~/.bash_completion file (create it if it does not exist):
Thanks go to stylishpants for his many fixes and improvements.
_vim_ctags() {
    local cur prev

    COMPREPLY=()
    cur="${COMP_WORDS[COMP_CWORD]}"
    prev="${COMP_WORDS[COMP_CWORD-1]}"

    case "${prev}" in
        -t)
            # Avoid the complaint message when no tags file exists
            if [ ! -r ./tags ]
            then
                return
            fi

            # Escape slashes to avoid confusing awk
            cur=${cur////\\/}

            COMPREPLY=( $(compgen -W "`awk -vORS=" "  "/^${cur}/ { print \\$1 }" tags`" ) )
            ;;
        *)
            _filedir_xspec
            ;;
    esac
}

# Files matching this pattern are excluded
excludelist='*.@(o|O|so|SO|so.!(conf)|SO.!(CONF)|a|A|rpm|RPM|deb|DEB|gif|GIF|jp?(e)g|JP?(E)G|mp3|MP3|mp?(e)g|MP?(E)G|avi|AVI|asf|ASF|ogg|OGG|class|CLASS)'

complete -F _vim_ctags -f -X "${excludelist}" vi vim gvim rvim view rview rgvim rgview gview
Once you restart your Bash session (or create a new one) you can type:
Code:
~$ vim -t MyC<tab key>
and it will auto-complete the tag the same way it does for files and directories:
Code:
MyClass MyClassFactory
~$ vim -t MyC
I find it really useful when I'm jumping into a quick bug fix.
Auto reloads the current buffer..especially useful while viewing log files and it almost
serves the functionality of "tail" program in unix from within vim.
Checking for compile errors from within vim. set the makeprg variable depending on the
language let's say for perl
:setlocal makeprg = perl\ -c \ %
For PHP
set makeprg=php\ -l\ %
set errorformat=%m\ in\ %f\ on\ line\ %l
Issuing ":make" runs the associated makeprg and displays the compilation errors/warnings
in quickfix window and can easily navigate to the corresponding line numbers.
:make will run the makefile in the current directory, parse the compiler
output, you can then use :cn and :cp to step through the compiler
errors opening each file and seeking to the line number in question.
I was sure someone would have posted this already, but here goes.
Take any build system you please; make, mvn, ant, whatever. In the root of the project
directory, create a file of the commands you use all the time, like this:
mvn install
mvn clean install
... and so forth
To do a build, put the cursor on the line and type !!sh. I.e. filter that line; write it
to a shell and replace with the results.
The build log replaces the line, ready to scroll, search, whatever.
When you're done viewing the log, type u to undo and you're back to your file of
commands.
Why wouldn't you just set makeprg to the proper tool you use for your build (if
it isn't set already) and then use :make ? :copen will show you the
output of the build as well as allowing you to jump to any warnings/errors. –
jamessan
Dec 28 '09 at 8:29
==========================================================
In normal mode
==========================================================
gf ................ open file under cursor in same window --> see :h path
Ctrl-w f .......... open file under cursor in new window
Ctrl-w q .......... close current window
Ctrl-w 6 .......... open alternate file --> see :h #
gi ................ init insert mode in last insertion position
'0 ................ place the cursor where it was when the file was last edited
Due to the latency and lack of colors (I love color schemes :) I don't like programming on
remote machines in PuTTY .
So I developed this trick to work around this problem. I use it on Windows.
You will need
1x gVim
1x rsync on remote and local machines
1x SSH private key auth to the remote machine so you don't need to type the
password
Configure rsync to make your working directory accessible. I use an SSH tunnel and only
allow connections from the tunnel:
address = 127.0.0.1
hosts allow = 127.0.0.1
port = 40000
use chroot = false
[bledge_ce]
    path = /home/xplasil/divine/bledge_ce
    read only = false
Then start rsyncd: rsync --daemon --config=rsyncd.conf
Setting up local machine
Install rsync from Cygwin. Start Pageant and load your private key for the remote machine.
If you're using SSH tunelling, start PuTTY to create the tunnel. Create a batch file push.bat
in your working directory which will upload changed files to the remote machine using
rsync:
SConstruct is a build file for scons. Modify the list of files to suit your needs. Replace
localhost with the name of remote machine if you don't use SSH tunelling.
Configuring Vim That is now easy. We will use the quickfix feature (:make and error list),
but the compilation will run on the remote machine. So we need to set makeprg:
This will first start the push.bat task to upload the files and then execute the commands
on remote machine using SSH ( Plink from the PuTTY
suite). The command first changes directory to the working dir and then starts build (I use
scons).
The results of build will show conviniently in your local gVim errors list.
I use Vim for everything. When I'm editing an e-mail message, I use:
gqap (or gwap )
extensively to easily and correctly reformat on a paragraph-by-paragraph basis, even with
quote leadin characters. In order to achieve this functionality, I also add:
-c 'set fo=tcrq' -c 'set tw=76'
to the command to invoke the editor externally. One noteworthy addition would be to add '
a ' to the fo (formatoptions) parameter. This will automatically reformat the paragraph as
you type and navigate the content, but may interfere or cause problems with errant or odd
formatting contained in the message.
autocmd FileType mail set tw=76 fo=tcrq in your ~/.vimrc will also
work, if you can't edit the external editor command. – Andrew Ferrier
Jul 14 '14 at 22:22
":e ." does the same thing for your current working directory which will be the same as your
current file's directory if you set autochdir – bpw1621
Feb 19 '11 at 15:13
retab 1. This sets the tab size to one. But it also goes through the code and adds extra
tabs and spaces so that the formatting does not move any of the actual text (ie the text
looks the same after ratab).
% s/^I/ /g: Note the ^I is tthe result of hitting tab. This searches for all tabs and
replaces them with a single space. Since we just did a retab this should not cause the
formatting to change but since putting tabs into a website is hit and miss it is good to
remove them.
% s/^/ /: Replace the beginning of the line with four spaces. Since you cant actually
replace the beginning of the line with anything it inserts four spaces at the beging of the
line (this is needed by SO formatting to make the code stand out).
Note that you can achieve the same thing with cat <file> | awk '{print " "
$line}' . So try :w ! awk '{print " " $line}' | xclip -i . That's
supposed to be four spaces between the "" – Braden Best
Feb 4 '16 at 16:40
When working on a project where the build process is slow I always build in the background
and pipe the output to a file called errors.err (something like make debug 2>&1
| tee errors.err ). This makes it possible for me to continue editing or reviewing the
source code during the build process. When it is ready (using pynotify on GTK to inform me
that it is complete) I can look at the result in vim using quickfix . Start by
issuing :cf[ile] which reads the error file and jumps to the first error. I personally like
to use cwindow to get the build result in a separate window.
A short explanation would be appreciated... I tried it and could be very usefull! You can
even do something like set colorcolumn=+1,+10,+20 :-) – Luc M
Oct 31 '12 at 15:12
colorcolumn allows you to specify columns that are highlighted (it's ideal for
making sure your lines aren't too long). In the original answer, set cc=+1
highlights the column after textwidth . See the documentation for
more information. – mjturner
Aug 19 '15 at 11:16
Yes, but that's like saying yank/paste functions make an editor "a little" more like an IDE.
Those are editor functions. Pretty much everything that goes with the editor that concerns
editing text and that particular area is an editor function. IDE functions would be, for
example, project/files management, connectivity with compiler&linker, error reporting,
building automation tools, debugger ... i.e. the stuff that doesn't actually do nothing with
editing text. Vim has some functions & plugins so he can gravitate a little more towards
being an IDE, but these are not the ones in question. – Rook
May 12 '09 at 21:25
Also, just FYI, vim has an option to set invnumber. That way you don't have to "set nu" and
"set nonu", i.e. remember two functions - you can just toggle. – Rook
May 12 '09 at 21:31
:ls lists all the currently opened buffers. :be opens a file in a
new buffer, :bn goes to the next buffer, :bp to the previous,
:b filename opens buffer filename (it auto-completes too). buffers are distinct
from tabs, which i'm told are more analogous to views. – Nona Urbiz
Dec 20 '10 at 8:25
In insert mode, ctrl + x, ctrl + p will complete
(with menu of possible completions if that's how you like it) the current long identifier
that you are typing.
if (SomeCall(LONG_ID_ <-- type c-x c-p here
            [LONG_ID_I_CANT_POSSIBLY_REMEMBER]
             LONG_ID_BUT_I_NEW_IT_WASNT_THIS_ONE
             LONG_ID_GOSH_FORGOT_THIS
             LONG_ID_ETC
             ∶
Neither of the following is really diehard, but I find it extremely useful.
Trivial bindings, but I just can't live without. It enables hjkl-style movement in insert
mode (using the ctrl key). In normal mode: ctrl-k/j scrolls half a screen up/down and
ctrl-l/h goes to the next/previous buffer. The µ and ù mappings are especially
for an AZERTY-keyboard and go to the next/previous make error.
A small function I wrote to highlight functions, globals, macro's, structs and typedefs.
(Might be slow on very large files). Each type gets different highlighting (see ":help
group-name" to get an idea of your current colortheme's settings) Usage: save the file with
ww (default "\ww"). You need ctags for this.
nmap <Leader>ww :call SaveCtagsHighlight()<CR>

"Based on: http://stackoverflow.com/questions/736701/class-function-names-highlighting-in-vim
function SaveCtagsHighlight()
    write

    let extension = expand("%:e")
    if extension!="c" && extension!="cpp" && extension!="h" && extension!="hpp"
        return
    endif

    silent !ctags --fields=+KS *
    redraw!

    let list = taglist('.*')
    for item in list
        let kind = item.kind

        if     kind == 'member'
            let kw = 'Identifier'
        elseif kind == 'function'
            let kw = 'Function'
        elseif kind == 'macro'
            let kw = 'Macro'
        elseif kind == 'struct'
            let kw = 'Structure'
        elseif kind == 'typedef'
            let kw = 'Typedef'
        else
            continue
        endif

        let name = item.name
        if name != 'operator=' && name != 'operator ='
            exec 'syntax keyword '.kw.' '.name
        endif
    endfor
    echo expand("%")." written, tags updated"
endfunction
I have the habit of writing lots of code and functions and I don't like to write
prototypes for them. So I made some function to generate a list of prototypes within a
C-style sourcefile. It comes in two flavors: one that removes the formal parameter's name and
one that preserves it. I just refresh the entire list every time I need to update the
prototypes. It avoids having out of sync prototypes and function definitions. Also needs
ctags.
"Usage: in normal mode, where you want the prototypes to be pasted:
":call GenerateProptotypes()
function GeneratePrototypes()
    execute "silent !ctags --fields=+KS ".expand("%")
    redraw!
    let list = taglist('.*')
    let line = line(".")
    for item in list
        if item.kind == "function"  &&  item.name != "main"
            let name = item.name
            let retType = item.cmd
            let retType = substitute( retType, '^/\^\s*','','' )
            let retType = substitute( retType, '\s*'.name.'.*', '', '' )

            if has_key( item, 'signature' )
                let sig = item.signature
                let sig = substitute( sig, '\s*\w\+\s*,',        ',',   'g')
                let sig = substitute( sig, '\s*\w\+\(\s)\)', '\1', '' )
            else
                let sig = '()'
            endif
            let proto = retType . "\t" . name . sig . ';'
            call append( line, proto )
            let line = line + 1
        endif
    endfor
endfunction


function GeneratePrototypesFullSignature()
    "execute "silent !ctags --fields=+KS ".expand("%")
    let dir = expand("%:p:h");
    execute "silent !ctags --fields=+KSi --extra=+q".dir."/* "
    redraw!
    let list = taglist('.*')
    let line = line(".")
    for item in list
        if item.kind == "function"  &&  item.name != "main"
            let name = item.name
            let retType = item.cmd
            let retType = substitute( retType, '^/\^\s*','','' )
            let retType = substitute( retType, '\s*'.name.'.*', '', '' )

            if has_key( item, 'signature' )
                let sig = item.signature
            else
                let sig = '(void)'
            endif
            let proto = retType . "\t" . name . sig . ';'
            call append( line, proto )
            let line = line + 1
        endif
    endfor
endfunction
" Pasting in normal mode should append to the right of cursor
nmap <C-V>      a<C-V><ESC>
" Saving
imap <C-S>      <C-o>:up<CR>
nmap <C-S>      :up<CR>
" Insert mode control delete
imap <C-Backspace> <C-W>
imap <C-Delete> <C-O>dw
nmap    <Leader>o       o<ESC>k
nmap    <Leader>O       O<ESC>j
" tired of my typo
nmap :W     :w
I rather often find it useful to on-the-fly define some key mapping just like one would
define a macro. The twist here is, that the mapping is recursive and is executed
until it fails.
I am completely aware of all the downsides - it just so happens that I found it rather
useful in some occasions. Also it can be interesting to watch it at work ;).
Macros are also allowed to be recursive and work in pretty much the same fashion when they
are, so it's not particularly necessary to use a mapping for this. – 00dani
Aug 2 '13 at 11:25
"... The .vimrc settings should be heavily commented ..."
"... Look also at perl-support.vim (a Perl IDE for Vim/gVim). Comes with suggestions for customizing Vim (.vimrc), gVim (.gvimrc), ctags, perltidy, and Devel:SmallProf beside many other things. ..."
"... Perl Best Practices has an appendix on Editor Configurations . vim is the first editor listed. ..."
"... Andy Lester and others maintain the official Perl, Perl 6 and Pod support files for Vim on Github: https://github.com/vim-perl/vim-perl ..."
There are a lot of threads pertaining to how to configure Vim/GVim for Perl
development on PerlMonks.org .
My purpose in posting this question is to try to create, as much as possible, an ideal configuration for Perl development using
Vim/GVim. Please post your suggestions for .vimrc settings as well as useful plugins.
I will try to merge the recommendations into a set of .vimrc settings and to a list of recommended plugins, ftplugins
and syntax files.
.vimrc settings
"Create a command :Tidy to invoke perltidy"
"By default it operates on the whole file, but you can give it a"
"range or visual range as well if you know what you're doing."
command -range=% -nargs=* Tidy <line1>,<line2>!
    \perltidy -your -preferred -default -options <args>

vmap <tab> >gv    "make tab in v mode indent code"
vmap <s-tab> <gv

nmap <tab> I<tab><esc> "make tab in normal mode indent code"
nmap <s-tab> ^i<bs><esc>

let perl_include_pod   = 1    "include pod.vim syntax file with perl.vim"
let perl_extended_vars = 1    "highlight complex expressions such as @{[$x, $y]}"
let perl_sync_dist     = 250  "use more context for highlighting"

set nocompatible "Use Vim defaults"
set backspace=2  "Allow backspacing over everything in insert mode"

set autoindent   "Always set auto-indenting on"
set expandtab    "Insert spaces instead of tabs in insert mode. Use spaces for indents"
set tabstop=4    "Number of spaces that a <Tab> in the file counts for"
set shiftwidth=4 "Number of spaces to use for each step of (auto)indent"

set showmatch    "When a bracket is inserted, briefly jump to the matching one"
@Manni: You are welcome. I have been using the same .vimrc for many years and a recent bunch of vim related questions
got me curious. I was too lazy to wade through everything that was posted on PerlMonks (and see what was current etc.), so I figured
we could put together something here. – Sinan Ünür
Oct 15 '09 at 20:02
Rather than closepairs, I would recommend delimitMate or one of the various autoclose plugins. (There are about three named autoclose,
I think.) The closepairs plugin can't handle a single apostrophe inside a string (i.e. print "This isn't so hard, is it?"
), but delimitMate and others can. github.com/Raimondi/delimitMate
– Telemachus
Jul 8 '10 at 0:40
Three hours later: turns out that the 'p' in that mapping is a really bad idea. It will bite you when vim's got something to paste.
– innaM
Oct 21 '09 at 13:22
@Manni: I just gave it a try: if you type, pt, vim waits for you to type something else (e.g. <cr>) as a signal that
the command is ended. Hitting, ptv will immediately format the region. So I would expect that vim recognizes that
there is overlap between the mappings, and waits for disambiguation before proceeding. –
Ether
Oct 21 '09 at 19:44
" Create a command :Tidy to invoke perltidy.
" By default it operates on the whole file, but you can give it a
" range or visual range as well if you know what you're doing.
command -range=% -nargs=* Tidy <line1>,<line2>!
    \perltidy -your -preferred -default -options <args>
Look also at perl-support.vim (a Perl
IDE for Vim/gVim). Comes with suggestions for customizing Vim (.vimrc), gVim (.gvimrc), ctags, perltidy, and Devel:SmallProf beside
many other things.
I hate the fact that \$ is changed automatically to a "my $" declaration (same with \@ and \%). Does the author never use references
or what?! – sundar
Mar 11 '10 at 20:54
" Allow :make to run 'perl -c' on the current buffer, jumping to
" errors as appropriate
" My copy of vimparse: http://irc.peeron.com/~zigdon/misc/vimparse.pl

set makeprg=$HOME/bin/vimparse.pl\ -c\ %\ $*

" point at wherever you keep the output of pltags.pl, allowing use of ^-]
" to jump to function definitions.

set tags+=/path/to/tags
@sinan it enables quickfix - all it does is reformat the output of perl -c so that vim parses it as compiler errors. The the usual
quickfix commands work. – zigdon
Oct 16 '09 at 18:51
Here's an interesting module I found on the weekend:
App::EditorTools::Vim
. Its most interesting feature seems to be its ability to rename lexical variables. Unfortunately, my tests revealed that it doesn't
seem to be ready yet for any production use, but it sure seems worth to keep an eye on.
Here are a couple of my .vimrc settings. They may not be Perl specific, but I couldn't work without them:
set nocompatible        " Use Vim defaults (much better!) "
set bs=2                " Allow backspacing over everything in insert mode "
set ai                  " Always set auto-indenting on "
set showmatch           " show matching brackets "

" for quick scripts, just open a new buffer and type '_perls' "
iab _perls #!/usr/bin/perl<CR><BS><CR>use strict;<CR>use warnings;<CR>
The first one I know I picked up part of it from someone else, but I can't remember who. Sorry unknown person. Here's how I
made "C^N" auto complete work with Perl. Here's my .vimrc commands.
" to use CTRL+N with modules for autocomplete "
set iskeyword+=:
set complete+=k~/.vim_extras/installed_modules.dat
Then I set up a cron to create the installed_modules.dat file. Mine is for my mandriva system. Adjust accordingly.
locate *.pm | grep "perl5" | sed -e "s/\/usr\/lib\/perl5\///" | sed -e "s/5.8.8\///" | sed -e "s/5.8.7\///" | sed -e "s/vendor_perl\///" | sed -e "s/site_perl\///" | sed -e "s/x86_64-linux\///" | sed -e "s/\//::/g" | sed -e "s/\.pm//" >/home/jeremy/.vim_extras/installed_modules.dat
The second one allows me to use gf in Perl. Gf is a shortcut to other files. just place your cursor over the file and type
gf and it will open that file.
" To use gf with perl "
set path+=$PWD/**,
set path +=/usr/lib/perl5/*,
set path+=/CompanyCode/*,   " directory containing work code "
autocmd BufRead *.p? set include=^use
autocmd BufRead *.pl set includeexpr=substitute(v:fname,'\\(.*\\)','\\1.pm','i')
I can't believe you want to turn recording off! I would show a really annoying popup 'Are you
sure?' if one asks to turn it off (or probably would like to give options like the Windows 10
update gives). – 0xc0de
Aug 12 '16 at 9:04
As seen other places, it's q followed by a register. A really cool (and possibly
non-intuitive) part of this is that these are the same registers used by things like
delete, yank, and put. This means that you can yank text from the editor into a register,
then execute it as a command. – Cascabel
Oct 6 '09 at 20:13
One more thing to note is you can hit any number before the @ to replay the recording that
many times like (100@<letter>) will play your actions 100 times – Tolga E
Aug 17 '13 at 3:07
You could add it afterward, by editing the register with put/yank. But I don't know why you'd
want to turn recording on or off as part of a macro. ('q' doesn't affect anything when typed
in insert mode.) – anisoptera
Dec 4 '14 at 9:43
                           *q* *recording*
q{0-9a-zA-Z"}           Record typed characters into register {0-9a-zA-Z"}
                        (uppercase to append).  The 'q' command is disabled
                        while executing a register, and it doesn't work inside
                        a mapping.  {Vi: no recording}

q                       Stops recording.  (Implementation note: The 'q' that
                        stops recording is not stored in the register, unless
                        it was the result of a mapping)  {Vi: no recording}


                                                        *@*
@{0-9a-z".=*}           Execute the contents of register {0-9a-z".=*} [count]
                        times.  Note that register '%' (name of the current
                        file) and '#' (name of the alternate file) cannot be
                        used.  For "@=" you are prompted to enter an
                        expression.  The result of the expression is then
                        executed.  See also |@:|.  {Vi: only named registers}
only answer about "how to turn off" part of the question. Well, it makes recording
inaccessible, effectively turning it off - at least noone expects vi to have a separate
thread for this code, I guess, including me. – n611x007
Oct 4 '15 at 7:16
Actually, it's q{0-9a-zA-Z"} - you can record a macro into any register (named by digit,
letter, "). In case you actually want to use it... you execute the contents of a register
with @<register>. See :help q and :help @ if you're
interested in using it. – Cascabel
Oct 6 '09 at 20:08
Vim provides an incredibly powerful (and flexible) set of commands, which allow a set of
arbitrary commands to be executed against an entire list. In Vim parlance a "list" could be one
of the following: a group of open buffers, tabs, windows, and even Vim's argument list (which
I'll explain near the end of this chapter).
For each list type (buffer list, tab list, window list, argument list) Vim provides a
command which enables us to carry out actions in bulk (i.e., across multiple items). Let's take
a look at each of these commands in turn.
bufdo
windo
tabdo
argdo
bufdo
As we already know, when you open a file in Vim, you're, in fact, actually opening a buffer
that holds a copy of the file you requested. (If you're unsure, I suggest going back and
reading Chapter 3 ).
Every buffer we create in Vim is added into an internal buffer list. This internal list is
what allows Vim to keep track of the current buffer and facilitates commands such as bn and bp
, among others, for navigating back and forth among all open buffers.
If we wanted to execute the same command for each buffer that exists in our buffer list, we
would have to use the :bufdo command
. The flow of how this looks internally is something like the following:
:bf : Vim moves to the first buffer.
:{command} : Vim executes the command specified.
:bn : Vim moves to the next buffer in the list.
:{command} : Vim executes the command specified.
. . . etc. . . .
At this point, if an error occurs, Vim will stop processing the buffers and return the
error. If, on the other hand, Vim manages to process all the buffers, the last one becomes the
current buffer within the viewport.
Simple Example
Now that we have an understanding of what a buffer list is, we can look at how the bufdo
command works. Let's consider a simple example, in which we have a set of buffers already open
within Vim and we've made changes to each of the buffers already.
We want to exit Vim, but as we do, we have to make sure that each buffer is written back to
the relevant file it corresponds to, so we don't lose any of our changes. The following command
demonstrates how to do this:
:bufdo wq
Effectively, we've told Vim to process each buffer (using the bufdo command), and within
each buffer, we want Vim to execute the command wq (meaning we want it to first write the
buffer, then close the buffer).
Note In the preceding example, you can also achieve the same result with :wa ( :h :wa ),
which effectively allows you to write only the buffers that have been changed in some way.
Vim's Visual mode allows us to define a selection of text and then operate upon it. This
should feel pretty intuitive, since it is the model that most editing software follows. But
Vim's take is characteristically different, so we'll start by making sure we grok Visual mode (
Tip
20 ).
Vim has three variants of Visual mode involving working with characters, lines, or
rectangular blocks of text. We'll explore ways of switching between these modes as well as some
useful tricks for modifying the bounds of a selection ( Tip
21 ).
We'll see that the dot command can be used to repeat Visual mode commands, but that it's
especially effective when operating on line-wise regions. When working with character-wise
selections, the dot command can sometimes fall short of our expectations. We'll see that in
these scenarios, operator commands may be preferable.
Visual-Block mode is rather special in that it allows us to operate on rectangular columns
of text. You'll find many uses for this feature, but we'll focus on three tips that demonstrate
some of its capabilities.
Visual mode allows us to select a range of text and then operate upon it. However intuitive
this might seem, Vim's perspective on selecting text is different from other text editors.
Suppose for a minute that we're not working with Vim but instead filling out a text area on
a web page. We've written the word "March," but it should read "April," so using the mouse, we
double-click the word to select it. Having highlighted the word, we could hit the backspace key
to delete it and then type out the correct month as a replacement.
You probably already know that there's no need to hit the backspace key in this example.
With the word "March" selected, we would only have to type the letter "A" and it would replace
the selection, preparing the way so that we could type out the rest of the word "April." It's
not much, but a keystroke saved is a keystroke earned.
If you expect this behavior to carry over to Vim's Visual mode, you're in for a surprise.
The clue is right there in the name: Visual mode is just another mode, which means that each
key performs a different function.
Many of the commands that you are familiar with from Normal mode work just the same in
Visual mode. We can still use h , j , k , and l as cursor keys. We can use f{char} to jump to a
character on the current line and then repeat or reverse the jump with the ; and , commands,
respectively. We can even use the search command (and n / N ) to jump to pattern matches. Each
time we move our cursor in Visual mode, we change the bounds of the selection.
Some Visual mode commands perform the same basic function as in Normal mode but with a
slight twist. For example, the c command is consistent in both modes in that it deletes the
specified text and then switches to Insert mode. The difference is in how we specify the range
on which to act. From Normal mode, we trigger the change command first and then specify the
range as a motion. This, if you'll remember from Tip 12 , is
called an operator command. Whereas in Visual mode, we start off by making the selection and
then trigger the change command. This inversion of control can be generalized for all operator
commands (see Table 2,
Vim's Operator Commands
). For most people, the Visual mode approach feels more intuitive.
Let's revisit the simple example where we wanted to change the word "March" to "April." This
time, suppose that we have left the confines of the text area on a web page and we're
comfortably back inside Vim. We place our cursor somewhere on the word "March" and run viw to
visually select the word. Now, we can't just type the word "April" because that would trigger
the A command and append the text "pril"! Instead, we'll use the c command to change the
selection, deleting the word and dropping us into Insert mode, where we can type out the word
"April" in full. This pattern of usage is similar to our original example, except that we use
the c key instead of backspace.
Meet Select Mode
In a typical text editing environment, selected text is deleted when we type any printable
character. Vim's Visual mode doesn't follow this convention -- but Select mode does. According
to Vim's built-in documentation, it "resembles the selection mode in Microsoft Windows" (see
Select-mode ⓘ ). Printable characters
cause the selection to be deleted, Vim enters Insert mode, and the typed character is
inserted.
We can toggle between Visual and Select modes by pressing <C-g> . The only visible
difference is the message at the bottom of screen, which switches between -- VISUAL -- and --
SELECT -- . But if we type any printable character in Select mode, it will replace the
selection and switch to Insert mode. Of course, from Visual mode you could just as well use the
c key to change the selection.
If you are happy to embrace the modal nature of Vim, then you should find little use for
Select mode, which holds the hand of users who want to make Vim behave more like other text
editors. I can think of only one place where I consistently use Select mode: when using a
plugin that emulates TextMate's snippet functionality, Select mode highlights the active
placeholder.
I have been using vim for quite some time and am aware that selecting blocks of text in
visual mode is as simple as SHIFT + V and moving the arrow key up or
down line-by-line until I reach the end of the block of text that I want selected.
My question is - is there a faster way in visual mode to select a block of text for
example by SHIFT + V followed by specifying the line number in which I
want the selection to stop? (via :35 for example, where 35 is the line number I
want to select up to - this obviously does not work so my question is to find how if
something similar to this can be done...)
+1 Good question as I have found myself doing something like this often. I am wondering if
perhaps this isn't the place start using using v% or v/pattern or
something else? – user786653
Sep 13 '11 at 19:08
V35G will visually select from current line to line 35, also V10j
or V10k will visually select the next or previous 10 lines – Stephan
Sep 29 '14 at 22:49
for line selecting I use shortcut: nnoremap <Space> V . When in visual
line mode just right-click with mouse to define selection (at least on linux it is so).
Anyway, more effective than with keyboard only. – Mikhail V
Mar 27 '15 at 16:52
In addition to what others have said, you can also expand your selection using pattern
searches.
For example, v/foo will select from your current position to the next instance
of "foo." If you actually wanted to expand to the next instance of "foo," on line
35, for example, just press n to expand selection to the next instance, and so
on.
update
I don't often do it, but I know that some people use marks extensively to make visual
selections. For example, if I'm on line 5 and I want to select to line 35, I might press
ma to place mark a on line 5, then :35 to move to line 35.
Shift + v to enter linewise visual mode, and finally `a to
select back to mark a .
@DanielPark To select the current word, use viw . If
you want to select the current contiguous non-whitespace, use viShift + w . The difference would be when the caret is here
MyCla|ss.Method , the first combo would select MyClass and second
would select the whole thing. – Jay
Oct 31 '13 at 0:18
G                       Goto line [count], default last line, on the first
                        non-blank character linewise.  If 'startofline' not
                        set, keep the same column.
                        G is a one of jump-motions.
Vim is a language. To really understand Vim, you have to know the language. Many commands are
verbs, and vim also has objects and prepositions.
V100G
V100gg
This means "select the current line up to and including line 100."
Text objects are where a lot of the power is at. They introduce more objects with
prepositions.
Vap
This means "select around the current paragraph", that is select the current paragraph and
the blank line following it.
V2ap
This means "select around the current paragraph and the next paragraph."
}V-2ap
This means "go to the end of the current paragraph and then visually select it and the
preceding paragraph."
Understanding Vim as a language will help you to get the best mileage out of it.
After you have selecting down, then you can combine with other commands:
Vapd
With the above command, you can select around a paragraph and delete it. Change the
d to a y to copy or to a c to change or to a
p to paste over.
Once you get the hang of how all these commands work together, then you will eventually
not need to visually select anything. Instead of visually selecting and then deleting a
paragraph, you can just delete the paragraph with the dap command.
I've compiled a list of essential Vim commands that I use every day. I then give a
few instructions on how to making Vim as great as it should be, because it's painful without
configuration.
##Cursor movement (Inside command/normal mode)
w - jump by start of words (punctuation considered words)
W - jump by words (spaces separate words)
e - jump to end of words (punctuation considered words)
E - jump to end of words (no punctuation)
b - jump backward by words (punctuation considered words)
B - jump backward by words (no punctuation)
0 - (zero) start of line
^ - first non-blank character of line (same as 0w)
$ - end of line
Advanced (in order of what I find useful)
Ctrl+d - move down half a page
Ctrl+u - move up half a page
} - go forward by paragraph (the next blank line)
{ - go backward by paragraph (the next blank line)
gg - go to the top of the page
G - go the bottom of the page
: [num] [enter] - Go To that line in the document
Searching
f [char] - Move to the next char on the current line after the
cursor
F [char] - Move to the next char on the current line before the
cursor
t [char] - Move to before the next char on the current line after
the cursor
T [char] - Move to before the next char on the current line before
the cursor
All these commands can be followed by ; (semicolon) to go to the
next searched item, and , (comma) to go the the previous searched
item
##Insert/Appending/Editing Text
Results in insert mode
i - start insert mode at cursor
I - insert at the beginning of the line
a - append after the cursor
A - append at the end of the line
o - open (append) blank line below current line (no need to press
return)
O - open blank line above current line
cc - change (replace) an entire line
c [movement command] - change (replace) from the cursor to the move-to
point.
ex. ce changes from the cursor to the end of the cursor word
Esc or Ctrl+[ - exit insert mode
r [char] - replace a single character with the specified char (does not use
insert mode)
d - delete
d - [movement command] deletes from the cursor to the move-to
point.
ex. de deletes from the cursor to the end of the current word
dd - delete the current line
Advanced
J - join line below to the current one
##Marking text (visual mode)
v - starts visual mode
From here you can move around as in normal mode (hjkl, etc.) and can then do a
command (such as y , d , or c )
V - starts linewise visual mode
Ctrl+v - start visual block mode
Esc or Ctrl+[ - exit visual mode
Advanced
O - move to Other corner of block
o - move to other end of marked area
##Visual commands Type any of these while some text is selected to apply the action
y - yank (copy) marked text
d - delete marked text
c - delete the marked text and go into insert mode (like c does above)
##Cut and Paste
yy - yank (copy) a line
p - put (paste) the clipboard after cursor
P - put (paste) before cursor
dd - delete (cut) a line
x - delete (cut) current character
X - delete previous character (like backspace)
##Exiting
:w - write (save) the file, but don't exit
:wq - write (save) and quit
:q - quit (fails if anything has changed)
:q! - quit and throw away changes
##Search/Replace
/pattern - search for pattern
?pattern - search backward for pattern
n - repeat search in same direction
N - repeat search in opposite direction
:%s/old/new/g - replace all old with new throughout file ( gn is better though)
:%s/old/new/gc - replace all old with new throughout file with
confirmations
##Working with multiple files
:e filename - Edit a file
:tabe - Make a new tab
gt - Go to the next tab
gT - Go to the previous tab
Advanced
:vsp - vertically split windows
ctrl+ws - Split windows horizontally
ctrl+wv - Split windows vertically
ctrl+ww - switch between windows
ctrl+wq - Quit a window
##Marks Marks allow you to jump to designated points in your code.
m{a-z} - Set mark {a-z} at cursor position
A capital mark {A-Z} sets a global mark and will work between files
'{a-z} - move the cursor to the start of the line where the mark was
set
'' - go back to the previous jump location
##General
u - undo
Ctrl+r - redo
. - repeat last command
#Making Vim actually useful Vim is quite unpleasant out of the box. For example, typeing
:w for every file save is awkward and copying and pasting to the system clipboard
does not work. But a few changes will get you much closer to the editor of your dreams.
##.vimrc
My
.vimrc file has some pretty great ideas I haven't seen elsewhere.
This is a minimal vimrc that focuses on three priorities:
adding options that are strictly better (like more information showing in
autocomplete)
more convenient keystrokes (like [space]w for write, instead of :w
[enter] )
a similar workflow to normal text editors (like enabling the mouse)
Installation
Copy this to your home directory and restart Vim. Read through it to see what you can now
do (like [space]w to save a file)
Mac users - making a hidden normal file is suprisingly tricky. Here's one way:
in the command line, go to the home directory
type nano .vimrc
paste in the contents of the .vimrc file
ctrl+x , y , [enter] to save
You should now be able to press [space]w in normal mode to save a file.
[space]p should paste from the system clipboard (outside of Vim).
If you can't paste, it's probably because Vim was not built with the system clipboard
option. To check, run vim --version and see if +clipboard
exists. If it says -clipboard , you will not be able to copy from outside of
Vim.
For Mac users, homebrew install Vim with the clipboard option. Install homebrew and
then run brew install vim .
then move the old Vim binary: $ mv /usr/bin/vim /usr/bin/vimold
restart your terminal and you should see vim --version now with
+clipboard
##Plugins
The easiest way to make Vim more powerful is to use Vintageous in Sublime Text (version
3). This gives you Vim mode inside sublime. I suggest this (or a similar setup with the Atom
editor) if you aren't a Vim master. Check out Advanced Vim if you are.
Vintageous is great, but I suggest you change a few settings to make it better.
Clone this
repository to ~/.config/sublime-text-3/Packages/Vintageous , or similar.
Then check out the "custom" branch.
Alternatively, you can get a more updated Vintageous version by cloning
the official
repository and then copying over
this patch .
Change the user settings ( User/Preferences.sublime-settings ) to
include:
"caret_style": "solid"
This will make the cursor not blink, like in Vim.
Sublime Text might freeze when you do this. It's a bug; just restart Sublime Text
after changing the file.
ctrl+r in Vim means "redo". But there is a handy Ctrl + R shortcut in
Sublime Text that gives an "outline" of a file. I remapped it to alt+r by putting this
in the User keymap
Mac users: you will not have the ability to hold down a navigation key (like holding
j to go down). To fix this, run the commands specified here: https://gist.github.com/kconragan/2510186
Now you should be able to restart sublime and have a great vim environment! Sweet
Dude.
##Switch Caps Lock and Escape
I highly recommend you switch the mapping of your caps lock and escape keys. You'll love
it, promise! Switching the two keys is platform dependent; Google should get you the
answer
##Other I don't personally use these yet, but I've heard other people do!
:wqa - Write and quit all open tabs (thanks Brian Zick)
  ZZ      Exit, saving changes           t<x>   Up to <x> forward
  Q       Enter ex mode                  T<x>   Back up to <x>
  <ESC>   End of insert                  <x>|   Go to column <x>
  :<cmd>  Execute ex command             w,W    Forward one word
  :!<cmd> Shell command                  b,B    Back one word
  ^g      Show filename/size             e,E    End of word
  ^f      Forward one screen             ^h     Erase last character
  ^b      Back one screen                ^w     Erase last word
  ^d      Forward half screen            ^?     Interrupt
  ^u      Backward half screen           ~      Toggle character case
  <x>G    Go to line <x>                 a      Append after
  /<x>    Search forward for <x>         i,I    Insert before
  ?<x>    Search backward for <x>        A      Append at end of line
  n       Repeat last search             o      Open line below
  N       Reverse last search            O      Open line above
  ]]      Next section/function          r      Replace character
  [[      Previous section/function      R      Replace characters
  %       Find matching () { or }        d      Delete
  ^l      Redraw screen                  dd     Delete line
  ^r      Refresh screen                 c      Change
  z<CR>   Current line at top            y      Yank lines to buffer
  z-      Current line at bottom         C      Change rest of line
  ^e      Scroll down one line           D      Delete rest of line
  ^y      Scroll up one line             s      Substitute character
  ``      Previous context               S      Substitute lines
  H       Home window line               J      Join lines
  L       Last window line               x      Delete after
  M       Middle window line             X      Delete before
  +       Next line                      Y      Yank current line
  hjkl    Cursor movement:               p      Put back lines
          left/down/up/right             P      Put before
  0       Beginning of line              <<     Shift line left
  $       End of line                    >>     Shift line right
  f<x>    Find <x> forward               u      Undo last change
  F<x>    Find <x> backward              U      Restore current line
Ex mode commands:
  q       Quit                        set <x>   Enable option
  q!      Quit, discard changes       set no<v> Disable option
  r <f>   Read in file <f>            set all   Show all options
  sh      Invoke shell
  vi      Vi mode
  wq      Write and quit
  w <f>   Write file <f>
  w! <f>  Overwrite file <f>
Options:
  autoindent      Automatic line indentation
  autowrite       Write before quit
  ignorecase      Ignore case in searches
  number          Display line numbers
  showmatch       Show matches to ) and } as typed
  terse           Quiet mode
  wrapscan        Wraparound in searches
  wrapmargin      Automatic line splitting
The book "Unix in a Nutshell" discusses about accessing multiple files on pages 572-573.
There seem to be very useful commands such as ":e", ":e #", ":e new_file", ":n files",
":args", ":prev" and ":n!". The commands confuse me:
":n Edit next file in the list of files."
":args Display list of files to be edited."
":prev Edit previous file in the list of files."
I cannot see no real list when I do ":args". There is only a small text at the corner. I
would like to see all files that I accessed with ":e", ie a list of files in the buffer.
Where can I see the list when I do the command ":n files"? What are the commands ":prev"
and ":n" supposed to do? I got the error message:
Regarding the last part: If you have only one buffer open, then you cannot toggle through
them ('cause there is only one open). – Rook
Apr 19 '09 at 3:25
Is the notation of buffer the same as in Emacs? Interestingly, the book defines buffer only
for Emacs :( It states "When you open a file in Emacs, the file is put into a Buffer. -- The
view of the buffer contents that you have at any point in time is called a window." Are the
buffers and windows different to the things in Vim? – Léo
Léopold Hertz 준영
Apr 19 '09 at 3:57
Yes, you could say that. There are some differences in types of available buffers, but in
principle, that's it. I'm not sure about emacs, he has windows/frames .., while vim has
windows/tabs. Regarding vim: a window is only y method of showing what vim has in a buffer. A
tab is a method of showing several windows on screen (tabs in vim have only recently been
introduced). – Rook
Apr 19 '09 at 11:08
In addition to what Jonathan Leffler said, if you don't invoke Vim with multiple files from
the commandline, you can set Vim's argument list after Vim is open via:
:args *.c
Note that the argument list is different from the list of open buffers you get from
:ls . Even if you close all open buffers in Vim, the argument list stays the
same. :n and :prev may open a brand new buffer in Vim (if a buffer
for that file isn't already open), or may take you to an existing buffer.
Similarly you can open multiple buffers in Vim without affecting the argument list (or
even if the arg list is empty). :e opens a new buffer but doesn't necessarily
affect the argument list. The list of open buffers and the argument list are independent. If
you want to iterate through the list of open buffers rather than iterate through the argument
list, use :bn and :bp and friends.
The :n :p :ar :rew :last operate on the command line argument list.
E.g.
> touch aaa.txt bbb.txt ccc.txt
> gvim *.txt
vim opens in aaa.txt
:ar gives a status line

[aaa.txt] bbb.txt ccc.txt

:n moves to bbb.txt

:ar gives the status line

aaa.txt [bbb.txt] ccc.txt

:rew rewinds us back to the start of the command line arg list to aaa.txt

:last sends us to ccc.txt

:e ddd.txt edits a new file ddd.txt

:ar gives the status line

aaa.txt bbb.txt [ccc.txt]
So the command set only operates on the initial command line argument list.
,
To clarify, Vim has the argument list, the buffer list, windows, and tab pages. The argument
list is the list of files you invoked vim with (e.g. vim file1 file2); the :n and :p commands
work with this. The buffer list is the list of in-memory copies of the files you are editing,
just like emacs. Note that all the files loaded at start (in the argument list) are also in
the buffer list. Try :help buffer-list for more information on both.
Windows are viewports for buffers. Think of windows as "desks" on which you can put
buffers to work on them. Windows can be empty or be displaying buffers that can also be
displayed in other windows, which you can use for example to look at two different areas of
the same buffer at the same time. Try :help windows for more info.
Tabs are collections of windows. For example, you can have one tab with one window, and
another tab with two windows vertically split. Try :help tabpage for more info
This tip shows how to apply a command multiple times using
:argdo
(all files in argument list), or
:bufdo
(all buffers), or
:tabdo
(all tabs), or
:windo
(all windows in the
current tab). See
search and replace in multiple buffers
for the common requirement to perform a substitute multiple times.
You may want to perform the same operation on each buffer. For example, you may have
recorded a macro
to register
a
and want
to apply the macro to each buffer. You could do that by entering:
:bufdo execute "normal! @a" | w
The
w
will write each buffer to disk (whether the buffer was changed or not). To only write if
changed, use:
:bufdo execute "normal! @a" | update
An alternative is to set the
'autowrite'
option so changed buffers are automatically saved when
switching to another buffer:
:set autowrite
:bufdo normal! @a
Yet another alternative is to set the
'hidden'
option so buffers do not need to be saved, then use
:wa
to save all changes (only changed buffers are written):
:set hidden
:bufdo normal! @a
:wa
TO DO
Refactor following.
The command to do normal commands from the command-line is "normal" and I wanted to run the macro recorded in
register
a
, so that explains the "normal @a".
I also wanted to do this over multiple buffers, which explains the "bufdo".
However, I also wanted to make the changes and then save the file so it moved happily onto the next buffer and
everything was saved. This required the use of the | w. Initially I tried:
:bufdo normal @a | w
but that didn't work as the "| w" part was interpreted as a normal command, so that's where the exe command
comes from.
The commands bufdo, windo and tabdo are great for operating on all buffers or windows or tabs. However, the
commands finish in a different place from where you started.
These versions (Bufdo, Windo and Tabdo) restore the current window or buffer or tab, when the command is
finished.
For example, to turn on line numbers everywhere, I use
:Windo set nu
. Using
:windo set nu
does the same, but the cursor finishes in a different window.
" Like windo but restore the current window.
function! WinDo(command)
  let currwin=winnr()
  execute 'windo ' . a:command
  execute currwin . 'wincmd w'
endfunction
com! -nargs=+ -complete=command Windo call WinDo(<q-args>)
" Like bufdo but restore the current buffer.
function! BufDo(command)
  let currBuff=bufnr("%")
  execute 'bufdo ' . a:command
  execute 'buffer ' . currBuff
endfunction
com! -nargs=+ -complete=command Bufdo call BufDo(<q-args>)
" Like tabdo but restore the current tab.
function! TabDo(command)
  let currTab=tabpagenr()
  execute 'tabdo ' . a:command
  execute 'tabn ' . currTab
endfunction
com! -nargs=+ -complete=command Tabdo call TabDo(<q-args>)
If you care about the alternate window or buffer as well, you can save these along with the current window or
buffer:
" Like windo but restore the current window.
function! WinDo(command)
  let currwin=winnr()
  let curaltwin=winnr('#')
  execute 'windo ' . a:command
  " restore previous/alt window
  execute curaltwin . 'wincmd w'
  " restore current window
  execute currwin . 'wincmd w'
endfunction
com! -nargs=+ -complete=command Windo call WinDo(<q-args>)
Tips 1160 and 1161 have some interesting code (although I would never use it). Tip 1160 mentions 'autowrite',
and can be used as a 'see also' here. Although perhaps my new examples are sufficient?
Tip 1161 has a WinDo command. Perhaps move anything useful from there to here (or perhaps move all the "Xdo and
restore" from here to there?).
Need to explain argdo somewhere, and need a little more on windo and tabdo. Should start this tip with
something that does not use 'normal' (which requires the tricky execute when using bar).
If you're like me and don't keep your buffer list very tidy, or just work on multiple things at once in a
single Vim, bufdo is rarely useful. If you want to act on a bunch of files, too many to readily open a new tab
with a window for each of them, then windo is not very useful either. argdo shines for quickly doing a command
on a large batch of files when you're already using Vim with a bunch of buffers unrelated to the task. For
example, I recently had to:
cd /doc/directory/of/unnamed/tool
args *.html
argdo 0put ='<!DOCTYPE HTML PUBLIC \"-//W3C//DTD HTML 4.01 Transitional//EN\" \"http://www.w3.org/TR/html1/DTD/html-trad.dtd\">' | w
A tool which will remain unnamed because they ought to know better, distributed their tool with HTML
documentation which is broken partially due to the lack of a doctype causing IE8 to parse it in "quirks mode"
(even though they specifically targeted this browser version for the tool itself). So, I used the above command
to very quickly correct the problem on every html file in their documentation directory in my install location.
Truth be told, in reality I did not use argdo, I instead recorded a macro to do
ggP:wnext<CR>
and just pressed @@ on each file (because I wanted to check for a doctype on each before adding one). But, were
I confident I needed to do this on ALL the files, I would have used argdo as above.
I wanted to put the cursor on the next occurrence of pattern in each buffer, but I found that
:bufdo
                  normal! n
or other search attempts did not work. I thought I had searched before, but I could not make it
work without the trick above. Any insight?
JohnBeckett
08:15, August 12,
2011 (UTC)
No idea, I would expect this to work. Maybe you've got some autocmd in your .vimrc to restore a search or
something when loading a buffer? I note that search history is in the .viminfo file, but that should only be
loaded on startup.
It seems to work for me, though for some reason the current buffer jumps the cursor to the line containing
the match, but not to the match itself. Probably that's something in my config.
Very strange, I just tried it again and there was no problem. Must have been a blunder or some temporary
config glitch. Thanks. I'm getting converted to argdo, and I'm planning a rewrite featuring argdo, and
mentioning the others.
JohnBeckett
10:37, August 13, 2011 (UTC)
Yeah, I almost never used the arglist until I discovered
:args
and
:argl
. Now I use it almost exclusively when doing batch edits. Although, I normally use
:next
and
:wnext
rather than
:argdo
.
Fritzophrenic
15:33, August 15, 2011 (UTC)
The "files" is not strictly correct since it might be just a buffer with no file. However, for simplicity (and
Google searching), using "files" for the title seems best?
JohnBeckett
10:37, August 13,
2011 (UTC)
I'm all for simplicity. But what about making the actual tip say "buffers" and make a redirect with
"files"? I'm not sure how well Google handles that but obviously the wikia search handles it well. That way we
can satisfy both the pedantic and those searching for an answer. --
Fritzophrenic
15:33, August 15, 2011 (UTC)
OK. Tips will be "buffers", and redirects "files". Will do, and will remove these comments.
JohnBeckett
03:52, August
16, 2011 (UTC)
created 2001 · complexity basic · author Yegappan
· version 6.0
Vim provides various commands and options to support editing multiple buffers. This document
covers some of the questions asked about using multiple buffers with Vim. You can get more
detailed information about Vim buffer support using the :help windows.txt command in
Vim. You can also use the help keywords mentioned in this document to read more about a
particular command or option. To read more about a particular command or option use the ":help
<helpkeyword>" command (replace helpkeyword with the command or option name).
Vim buffers are identified using a name and a number. The name of the buffer is the name of
the file associated with that buffer. The buffer number is a unique sequential number assigned
by Vim. This buffer number will not change in a single Vim session.
When you open a file using any of the Vim commands, a buffer is automatically created. For
example, if you use :edit file to edit a file, a new buffer is automatically
created. An empty buffer can be created by entering :new or :vnew
.
How do I add a new buffer for a file to the buffer list without opening the file?
You can add a new buffer for a file without opening it, using the ":badd" command. For
example,
:badd f1.txt
:badd f2.txt
The above commands will add two new buffers for the files f1.txt and f2.txt to the buffer
list.
You can delete a buffer using the ":bdelete" command. You can use either the buffer name or
the buffer number to specify a buffer. For example,
:bdelete f1.txt
:bdelete 4
The above commands will delete the buffer named "f1.txt" and the fourth buffer in the buffer
list. The ":bdelete" command will remove the buffer from the buffer list.
When a buffer is deleted, the buffer becomes an unlisted-buffer and is no longer included in
the buffer list. But the buffer name and other information associated with the buffer is still
remembered. To completely delete the buffer, use the ":bwipeout" command. This command will
remove the buffer completely (i.e. the buffer will not become a unlisted buffer).
You can remove a buffer displayed in a window in several ways:
Close the window or edit another buffer/file in that window.
Use the ":bunload" command. This command will remove the buffer from the window and
unload the buffer contents from memory. The buffer will not be removed from the buffer
list.
How do I edit an existing buffer from the buffer list?
You can edit or jump to a buffer in the buffer list in several ways:
Use the ":buffer" command passing the name of an existing buffer or the buffer number.
Note that buffer name completion can be used here by pressing the <Tab> key.
You can enter the buffer number you want to jump/edit and press the Ctrl-^ key.
Use the ":sbuffer" command passing the name of the buffer or the buffer number. Vim will
split open a new window and open the specified buffer in that window.
You can enter the buffer number you want to jump/edit and press the Ctrl-W ^ or Ctrl-W
Ctrl-^ keys. This will open the specified buffer in a new window.
You can open all the loaded buffers in the buffer list using the ":unhide" or ":sunhide"
commands. Each buffer will be loaded in a separate new window.
You can open the next or a specific modified buffer using the ":bmodified" command. You can
open the next or a specific modified buffer in a new window using the ":sbmodified"
command.
Is there a simpler way for using the buffers under gvim (GUI Vim)?
Yes, use the 'Buffers' menu to list all the buffers. You can select a buffer name to edit
the buffer. You can also delete a buffer or browse the buffer list. Click the dashed line at
the top of the menu to tear it off so you can always see a list of the buffers.
Is it possible to save and restore the buffer list across Vim sessions?
Yes. To save and restore the buffer list across Vim session, include the '%' flag in the
'viminfo' option. Note that if Vim is invoked with a filename argument, then the buffer list
will not be restored from the last session. To use buffer lists across sessions, invoke Vim
without passing filename arguments.
The point is to overwrite the global setting by calling local setting after the 'viminfo'
setting, for example.
set viminfo='1025,f1,%1024
call SetLocalOptions(".")
How do I remove all the entries from the buffer list?
You can remove all the entries in the buffer list by starting Vim with a file argument. You
can also manually remove all the buffers using the ":bdelete" command.
What is a hidden buffer?
A hidden buffer is a buffer with some unsaved modifications and is not displayed in a
window. Hidden buffers are useful, if you want to edit multiple buffers without saving the
modifications made to a buffer while loading other buffers.
How do I load buffers in a window, which currently has a buffer with unsaved
modifications?
By setting the option 'hidden', you can load a buffer in a window that currently has a
modified buffer. Vim will remember your modifications to the buffer. When you quit Vim, you
will be asked to save the modified buffers. It is important to note that, if you have the
'hidden' option set, and you quit Vim forcibly, for example using ":quit!", then you will lose
all your modifications to the hidden buffers.
Is it possible to unload or delete a buffer when it becomes hidden?
By setting the 'bufhidden' option to either 'hide' or 'unload' or 'delete', you can control
what happens to a buffer when it becomes hidden. When 'bufhidden' is set to 'delete', the
buffer is deleted when it becomes hidden. When 'bufhidden' is set to 'unload', the buffer is
unloaded when it becomes hidden. When 'bufhidden' is set to 'hide', the buffer is hidden.
When I open an existing buffer from the buffer list, if the buffer is already displayed
in one of the existing windows, I want Vim to jump to that window instead of creating a new
window for this buffer. How do I do this?
When opening a buffer using one of the split open buffer commands (:sbuffer, :sbnext), Vim
will open the specified buffer in a new window. If the buffer is already opened in one of the
existing windows, then you will have two windows containing the same buffer. You can change
this behavior by setting the 'switchbuf' option to 'useopen'. With this setting, if a buffer is
already opened in one of the windows, Vim will jump to that window, instead of creating a new
window.
Every buffer in the buffer list contains information about the last cursor position, marks,
jump list, etc.
What is the difference between deleting a buffer and unloading a buffer?
When a buffer is unloaded, it is not removed from the buffer list. Only the file contents
associated with the buffer are removed from memory. When a buffer is deleted, it is unloaded
and removed from the buffer list. A deleted buffer becomes an 'unlisted' buffer.
Is it possible to configure Vim, by setting some option, to re-use the number of a
deleted buffer for a new buffer?
No. Vim will not re-use the buffer number of a deleted buffer for a new buffer. Vim will
always assign the next sequential number for a new buffer. The buffer number assignment is
implemented this way, so that you can always jump to a buffer using the same buffer number. One
method to achieve buffer number reordering is to restart Vim. If you restart Vim, it will
re-assign numbers sequentially to all the buffers in the buffer list (assuming you have
properly set 'viminfo' to save and restore the buffer list across Vim sessions).
This creates a temporary buffer which is not associated with a file, which does not have an
associated swap file, and which will be hidden when its window is closed. On exit, Vim discards
any text in a scratch buffer without warning.
Also you can use scratch.vim for creating a scratch
buffer.
How do I determine whether a buffer is modified or not?
There are several ways to find out whether a buffer is modified or not. The simplest way is
to look at the status line or the title bar. If the displayed string contains a '+' character,
then the buffer is modified. Another way is to check whether the 'modified' option is set or
not. If 'modified' is set, then the buffer is modified. To check the value of modified, use
:set modified?
You can also explicitly set the 'modified' option to mark the buffer as modified like
this:
How does one execute a command in a new buffer? For example, execute :tj from the function
you're on, in a new buffer window? This is very useful if you don't want to close the buffer
you're on, but want to open a new buffer where the code is located.
You're confusing the terminology. What you're really asking for is not a new
buffer, but a new window. You can get a new window in many ways. See :help opening-window for
the basic commands. In addition, there are many commands (like :tj ) that also
have a duplicate command that automatically splits the window first (like :stj
). -- Fritzophrenic 19:36, September 3, 2010
(UTC)
How can one take all open buffers and merge content into a single Buffer? I will try a small
script to walk through the bufferlist yank'ing the data to a single buffer but if anyone has a
neater way... then thanks in advance. -- Chumbawumba69 06:22, October 5, 2011 (UTC)
(sorry if answered but could not find)
I don't think such an answer would belong in an FAQ, but you can probably accomplish this
using the Bufdo command,
combined with :yank . -- Fritzophrenic 17:39, October 5, 2011
(UTC)
Try uppercase register to keep appending conent like "Ayy and then put "ap. Try also
articles on the wiki about the global command Power_of_g
Regarding the section on "creating" a scratch buffer, do those commands actually
create a buffer, or do they simply transform an existing buffer into a scratch
buffer? (I believe it's the latter.) -- Joe Sewell ( talk ) 19:59, April 8, 2014 (UTC)
Yes, you're right. I edited the section to clarify. JohnBeckett ( talk ) 11:50, April 9, 2014 (UTC)
How do I
open and edit multiple files on a VIM text editor running under Ubuntu Linux / UNIX-like
operating systems to improve my productivity?
Vim offers multiple file editing with the help of windows. You can easily open multiple
files and edit them using the concept of buffers.
Understanding vim buffer
A buffer is nothing but a file loaded into memory for editing. The original file remains
unchanged until you write the buffer to the file using w or other file saving
related commands.
Understanding vim window
A window is noting but a viewport onto a buffer. You can use multiple windows on one buffer,
or several windows on different buffers. By default, Vim starts with one window, for example
open /etc/passwd file, enter: $ vim /etc/passwd
Open two windows using vim at shell promot
Start vim as follows to open two windows stacked, i.e. split horizontally : $ vim -o /etc/passwd /etc/hosts
OR $ vim -o file1.txt resume.txt
Sample outputs:
(Fig.01: split horizontal windows under VIM)
The -O option allows you to open two windows side by side, i.e. split vertically ,
enter: $ vim -O /etc/passwd /etc/hostsHow do I switch or jump between open
windows?
This operation is also known as moving cursor to other windows. You need to use the
following keys:
Press CTRL + W + <Left arrow key> to activate left windows
Press CTRL + W + <Right arrow key> to activate right windows
Press CTRL + W + <Up arrow key> to activate to windows above current one
Press CTRL + W + <Down arrow key> to activate to windows down current one
Press CTRL-W + CTRL-W (hit CTRL+W twice) to move quickly between all open windows
How do I edit current buffer?
Use all your regular vim command such as i, w and so on for editing and saving
text.
How do I close windows?
Press CTRL+W CTRL-Q to close the current windows. You can also press [ESC]+:q to
quit current window.
How do I open new empty window?
Press CTRL+W + n to create a new window and start editing an empty file in
it.
Press [ESC]+:new /path/to/file. This will create a new window and start editing file
/path/to/file in it. For example, open file called /etc/hosts.deny, enter: :new /etc/hosts.deny
Sample outputs:
(Fig.02: Create a new window and start editing file /etc/hosts.deny in it.)
(Fig.03: Two files opened in a two windows)
How do I resize Window?
You can increase or decrease windows size by N number. For example, increase windows size by
5, press [ESC] + 5 + CTRL + W+ + . To decrease windows size by 5, press [ESC]+
5 + CTRL+ W + - .
Moving windows cheat sheet
Key combination
Action
CTRL-W h
move to the window on the left
CTRL-W j
move to the window below
CTRL-W k
move to the window above
CTRL-W l
move to the window on the right
CTRL-W t
move to the TOP window
CTRL-W b
move to the BOTTOM window
How do I quit all windows?
Type the following command (also known as quit all command): :qall
If any of the windows contain changes, Vim will not exit. The cursor will automatically be
positioned in a window with changes. You can then either use ":write" to save the changes: :write
or ":quit!" to throw them away: :quit!
How do save and quit all windows?
To save all changes in all windows and quite , use this command: :wqall
This writes all modified files and quits Vim. Finally, there is a command that quits Vim and
throws away all changes: :qall!
Further readings:
Refer "Splitting windows" help by typing :help under vim itself.
To open multiple files, command would be same as is for a single file; we just add the file
name for second file as well.
$ vi file1 file2 file 3
Now to browse to next file, we can use
$ :n
or we can also use
$ :e filename
Run external commands inside the editor
We can run external Linux/Unix commands from inside the vi editor, i.e. without exiting the
editor. To issue a command from editor, go back to Command Mode if in Insert mode & we use
the BANG i.e. '!' followed by the command that needs to be used. Syntax for running a command
is,
$ :! command
An example for this would be
$ :! df -H
Searching for a pattern
To search for a word or pattern in the text file, we use following two commands in command
mode,
command '/' searches the pattern in forward direction
command '?' searched the pattern in backward direction
Both of these commands are used for same purpose, only difference being the direction they
search in. An example would be,
$ :/ search pattern (If at beginning of the file)
$ :/ search pattern (If at the end of the file)
Searching & replacing a
pattern
We might be required to search & replace a word or a pattern from our text files. So
rather than finding the occurrence of word from whole text file & replace it, we can issue
a command from the command mode to replace the word automatically. Syntax for using search
& replacement is,
$ :s/pattern_to_be_found/New_pattern/g
Suppose we want to find word "alpha" & replace it with word "beta", the command would
be
$ :s/alpha/beta/g
If we want to only replace the first occurrence of word "alpha", then the command would
be
$ :s/alpha/beta/
Using Set commands
We can also customize the behaviour, the and feel of the vi/vim editor by using the set
command. Here is a list of some options that can be use set command to modify the behaviour of
vi/vim editor,
$ :set ic ignores cases while searching
$ :set smartcase enforce case sensitive search
$ :set nu display line number at the begining of the line
$ :set hlsearch highlights the matching words
$ : set ro change the file type to read only
$ : set term prints the terminal type
$ : set ai sets auto-indent
$ :set noai unsets the auto-indent
Some other commands to modify vi editors are,
$ :colorscheme its used to change the color scheme for the editor. (for VIM editor only)
$ :syntax on will turn on the color syntax for .xml, .html files etc. (for VIM editor
only)
This complete our tutorial, do mention your queries/questions or suggestions in the comment
box below.
"...I often forget to sudo before editing a file I don't have write permissions on.
When you come to save that file and get the infamous "E212: Can't open file for
writing", just issue that vim command in order to save the file without the need
to save it to a temp file and then copy it back again."
1) Save a file you edited in vim without the needed permissions
:w !sudo tee %
I often forget to sudo before editing a file I don't have write permissions on.
When you come to save that file and get the infamous "E212: Can't open file for
writing", just issue that vim command in order to save the file without the need
to save it to a temp file and then copy it back again.
[Dec 05, 2013] If your colors are screwed and elements of text are not visible well
If you colors are screwed you can see text without system highlighting by turning it off
: syntax off
Another way to deal with this situation is to change the colorscheme. See
Color schemes in VIM
just thought you might like to know, that vim does actually support windows keybindings. There should be an mswin.vim file on your system, which you can
load to get ctrl-x, ctrl-v etc. You may just owe me a White Russian
Useful options for .exrc file:
set ai
set wrapmargin=1
map @* I/*^[A*/^[
map @f !}fmt^M
map @d :r !date +"\%a \%b \%d \%y"^M
map @t :%s/^I/    /g^M
Some set command options are really useful. for example
set number . It makes sense to put it in your in
your .exrc :
set showmode number ai
set shiftwidth=3
set tabstop=4
set showmatch
#The shiftwidth
options allows one to easily indent blocks of code. At any line
enter >> ; the line should be shifted 3 spaces; enter 3<< and
the 3 lines at the cursor should be shifted 4 spaces. This is useful for increasing
the indentation of a block of code.
#Most programmers like tab stops of 4, but the
rest of the world use tab stops of 8. If we wish to communicate with the rest
of the world, (i.e. send code over email and have it look reasonable) it would
be a good idea to remove the tabs, replacing all tabs with spaces. The command
that does this from the shell is: pr -t -e4 file.c > file.txt
A solution for the non-writable files problem
Have you ever started editing a file, made a bunch of changes, and then typed
:w to write your changes, only to find that the file is read-only?
You can deal with that in a couple of ways, but one of the easiest things to
do is to invoke a shell from within Vim and change the file's permissions before
you save it again.
While the vi editor has been known to be a little rough
around the edges, it still has some pretty nice features. One of those features
is the ability to define cool macros. Here we'll show you how to create two
macros--one to display line numbers of the file you're editing, and one to hide
the line numbers.
First, create a file named .exrc in your home directory (or edit the current
file if it already exists). This is the configuration file that vi reads when
it is started. Put the following two lines into this file:
:map #1 :set number^M
:map #2 :set nonumber^M
(A very important note: create the ^M characters in this file by typing the
key sequence [CTRL-V][CTRL-M]. This key sequence embeds an actual ^M
character (the carriage return) into the file.)
Now, save this file and re-start vi. From vi's command-mode, you'll now be able
to display line numbers beside your file contents by hitting the [F1] function
key, and clear line numbers by hitting the [F2] key. If you like these macros,
create your own powerful macros by following this same technique!
[Dec 31, 2005] Seven useful tips from Editor of Softpanorama (New Year present
for readers of this page):
Find a word under cursor: "*" - forward, "#" - backward
Matching bracket - "%".
autocompletion of words: Ctrl-N
change of case in the line: "guu", "gUU"
goto the line with the last change: "'." ("`.")
cursor walk back: Ctrl-O, Ctrl-I.
Visual selection of the block: v - start of the block (V like, Ctrl-V
- vertical block), after that any operation like d or y
Tip 1:
frequently you need to do S&R in a text which contains UNIX file paths -
text strings with slashes ("/") inside. Because S&R command uses slashes for
pattern/replacement separation you have to escape every slash in your pattern,
i.e. use "\/" for every "/" in your pattern:
s/\/dir1\/dir2\/dir3\/file/dir4\/dir5\/file2/g
To avoid this so-called "backslashitis" you can use different separators
in S&R (I prefer ":")
s:/dir1/dir2/dir3/file:/dir4/dir5/file2:g
Tip 2: You may find these mappings useful (put them in your .vimrc
file)
These mappings save you some keystrokes and put you where you start typing
your search pattern. After typing it you move to the replacement part , type
it and hit return. The second version adds confirmation flag.
For this example you need to know a bit of HTML. We want to make a table
of contents out of h1 and h2 headings, which I will
call majors and minors. HTML heading h1 is a text enclosed by
<h1> tags as in <h1>Heading</h1>.
(1) First let's make named anchors in all headings, i.e. put <h1><a
name="anchor">Heading</a></h1> around all headings. The "anchor"
is a unique identifier of this particular place in HTML document. The following
S&R does exactly this:
Explanation: the first pair of \(\) saves the opening
tag (h1 or h2) to the \1, the second
pair saves all heading text before the closing tag, the third pair saves the
last word in the heading which we will later use for "anchor" and the last pair
saves the closing tag. The replacement is quite obvious - we just reconstruct
a new "named" heading using \1-\4 and link tag <a>.
The developers of the VI editor designed VI
to be used without line numbers, feeling that the average user would locate
and manipulate text by content rather than by line numbers. Additionally, because
line numbers are constantly changing due to insertions and deletions, adjusting
what you "think" is in a particular line can be dangerous.
The VI editor allows you to view line numbers in your
file four ways: determining your current line number, a quick glance at line
numbers for the complete file, insertion of line numbers for the current editing
session only, and inclusion of line numbers for every session.
To determine the line number for the line the cursor is on,
type "control g" as discussed in the Positioning Text on the Screen
section.
To have a quick one time glance at line numbers, while you
are in the file, type:
:%nu
This will cause line numbers to be assigned to all lines;
unfortunately, this also causes the complete file to scroll past quickly stopping
on the last screenful of text. Now if you are working with a short 20-line file,
this is great; however, if your file contains 200 lines, you will see the first
180 lines whiz past. To stop the scrolling action, you must press the "control
s" to "stop" screen movement and later "control q" to "quit" the
frozen screen. Some people get very good at timing the "control s" in
order to get the exact point of the file to stop on the screen, most do not.
Many users find it more convenient to have numbers added to
a file for the current editing session; knowing that the next time the editor
is invoked, the numbers will not appear. To have line numbers inserted for the
current session, type:
:set number
Immediately you will see the line numbers appear in your file
and they will remain until you exit the editor or type:
:set nonu
The long-term line numbering option available with VI
is to place a line numbering command in the .exrc file located in your
HOME directory. The .exrc file is your personal control file to instruct
all faces of the editor (VI, EX, and EDIT) on how you want
it to perform when invoked. Not everyone creates a .exrc file. For those
without this file, the automatic defaults of the editor are imposed, such as
no line numbers. If you place the command "set number" in your .exrc
file, the next time you invoke VI the editor will check this file for
instructions and will present the file to you with line numbers. Later, if you
decide you prefer to forgo line numbers, open your .exrc file and delete
the "set number" line.
Type the following to get automatic line numbering each and
every time you use the VI editor on all files in your .exrc:
     %  cd
     %  echo  'set number'  >>  .exrc
     %
Alternately, you can set the EXINIT to set nu.
You can set this in your .login or your
shell start-up files.
Open your editor to edit your .login or your
shell start-up file. Add the following lines:
For C-Shell:
setenv EXINIT "set nu"
For Bourne or Korn Shell:
EXINIT="set nu"; export EXINIT
For Korn Shell Only (alternate method):
typeset -x EXINIT="set nu"
Either log-out and log back in or "source" your shell
start-up file.
2 Lines and Sentences in VI
To be successful in your editing, it is necessary to understand
what the editor considers a line and a sentence. Just for clarity, a line and
a sentence are different animals to the editor. To the editor, a line begins
on the left of a screen and terminates at a carriage return
. The carriage return is the invisible character
placed in your file every time you press the "RETURN" key. A sentence
to the editor is a string of characters of unspecified length (a few characters
to many lines) terminating with the punctuation marks " . ", " ? ", " ! " followed
by either a carriage return or two blank spaces.
Technical typists, secretaries, and students who produce lots
of reports and papers find that editing is much easier to complete if as you
are keying in text you make lines very short. The breaking up of sentences into
many lines is helpful. Placing a carriage return
after phrases and punctuation will make editing
words and lines less of a problem.
Some people like wraparound typing (straight typing without
inserting carriage returns), this is not recommended. The next example
demonstrates the use of the delete operator with the end-of-line scope "d$"
on text where the "RETURN" key follows phrases and punctuation versus
using the same operator-scope command on wraparound typing. The results are
drastically different.
When you print out your file using a text processor, the computer
will connect lines and phrases plus insert spacing between sentences to make
your material look presentable. For example:
3. Joining Lines
As you are editing files, you will find it is desirable to
combine or join lines. This is easily done using the "J" (join) command.
An illustration of joining lines is given below. The cursor is located on the
top line when the "J" command is issued. VI will move the lower
line and butt it to the end of the upper line. The editor takes care of necessary
spacing for you.
4 Redrawing the Screen
The VI editor requires cpu (central processing unit)
time to function. Each command and action takes a minute amount of time. This
interaction is not a problem if only one or two people are accessing the system.
However, the Engineering Computer Network has thousands of users and at any
given moment many hundreds of users may be editing, running programs, and other
system jobs, all competing for cpu time.
The VI designers foresaw that the editor could be a
"time hog" and decided that one way to reduce some of the editing interaction
with the cpu was to minimize redrawing the screen. This is why when you are
in the text input mode you do not see the screen being updated until
the action is completed and you return to command mode.
With time conservation as the impetus, the screen is also
not redrawn each time a line is deleted. Rather, a removed line is replaced
with the "@" symbol to symbolize an empty line, much as the tilde (~) is used.
Further editing of the text that remains on the screen is still possible. These
"@" symbols remain viewable as long as editing continues on this screen even
though they are never inserted into the text.
Sometimes these "@" symbols are distracting and annoying.
If a user would prefer not to see the "@" symbols, the screen may be redrawn
and the "@" symbols eliminated by issuing the command "control r" or
"control l". Experiment to see which command works on the terminal you
are using.
5 Accessing the EX Editor
The VI editor has a powerful and useful companion editor,
EX. In reality VI and EX are different faces of the same
editor; both were developed from and use the same program base. VI is
a screen oriented editor, while EX is a line oriented editor. Since both
of these editors are built upon the same base, when one editor face is installed
on a computer by default the other editor face is also there. This offers great
advantages to the user because each face possesses individual strengths. Easy
to use commands allow you to transfer from one face to another in order to increase
your editing power by permitting you to use the desirable features of both editors
and thereby better meet your editing requirements. The "global substitute" and
"text marking" are two favorite EX commands.
All VI users, frequently without knowing it, make use
of the dual face capability of this editor. For example, ":w", ":wq",
or the ":quit!" are in reality EX commands. Also, the "read" command
discussed in the Text Insertion section is an EX command! During
an editing session, anytime you wish to invoke a single EX command, you
must first make sure you are in command mode then type ":" followed
by the command. The cursor will hop to the bottom of the screen and the command
is echoed. When you press "RETURN", the EX command is executed
and you are brought back to the command mode of VI.
Sometimes it is useful to issue a series of EX commands.
This is done by typing "Q" while in command mode and you will
enter and remain in the EX face until you type "vi" at the
EX prompt (:), such as ":vi". Immediately you are returned to
VI and can continue the editing session using VI commands.
It is suggested that users do not try to learn both VI
and EX at the same time. Learn VI well, then proceed to learn
EX. Attempting to learn both faces of the editor at the same time leads
to frustration and confusion, as invariably the user mixes up which command
to use when.
The ability to access the UNIX shell while keeping the current
file open with VI is a true convenience. To do this, you should first
"write" the current buffer contents to the disk file with ":w". The current
editing session may be interrupted by then typing ":!" followed by the
desired command. When the requested command action is completed, the message:
[Hit return to continue]
will appear at the bottom of the screen. After pressing "RETURN",
you will be returned to the VI editor to the same location you were at
when you temporarily interrupted the editing session.
A common way to use this interrupt ability during a current
editing session is to read a recently received mail message, ":! mail".
As you work more with UNIX, you will begin to see many ways to make this command
work for you.
8 Editing Multiple Files Using VI
The VI editor provides an advanced feature which allows
a user to invoke the editor and then edit multiple files by use of the ":e"
(edit) command. This ability to access multiple files without leaving the editor
permits a user to look up information in another file without exiting the editor.
Additionally, because files are opened within the same editor invocation they
can share the same named buffers, thereby making the transfer of text possible
between the files. The example on page 40 demonstrates how two lines can be
"yanked" from the file oranges, placed into a named buffer "k", and then
"put" into the file apples.
When VI is invoked, a work area called a buffer is
created for editing purposes. It is into this work space that a copy of a specified
disk file is placed. The editor permits only one file copy in this buffer space
at a time. Thus after making changes to a file (delete, add, or change), you
must inform the editor what you wish done to the current buffer contents before
you will be permitted to bring another file into this space. You do this by
use of the ":w" (write current buffer contents to opened file), ":e!\
newfile" (toss current buffer contents, no update to opened file, and place
a copy of newly called file in buffer), or ":quit!" (exit editor and
toss buffer and buffer contents). The editor is smart enough to know that if
all you have done is copy or read from a file, it can dispose of the unneeded
buffer copy without further instructions from you when a new file is called.
When you have two files open, VI permits toggling between
files by use of ":e\ #". This works because whenever VI sees the
character "#" used in a command where a filename is expected, it substitutes
the "#" with the name of the previous file. For example if you had been in
apples then opened oranges, the command ":e #" would return
you to where you were in the apples file. Repeat ":e #" and you
would be back in oranges.
Another method to "cut" and "paste" between files is to use
the mark command (m) in conjunction with named buffers ("). Move the
cursor to the first line you wish to copy from oranges and type "ma"
(m to mark the line and a to specify which mark). Next move the
cursor to the last line you wish to copy and type ""zy'a". This command
tells VI to open up "z (buffer named z) and y (yank) a copy of
all the lines from the line marked 'a to the current line and place them
in the aforementioned buffer. Return to apples with ":e #" and
proceed to paste the contents of "z by moving to the desired location and
p (put) the buffer contents by typing ""zp".
Open the original file with "vi apples".
Correct typo.
Write the contents of the buffer to the file apples
using the ":w" command.
Issue the command ":e oranges" to open the second
file.
Yank a copy of two lines from the file oranges
and put them into the named buffer "k" using the ""k2yy" command.
Recall the original file, apples, to the buffer
using the ":e apples" or ":e #" command.
Contents of buffer discarded when apples is recalled
to the buffer. The disk copy of oranges remains unaltered.
Position the cursor and put the lines from the buffer
"k" into apples using the ""kp" command.
Write and quit the editor with the ":wq" command.
Buffer is discarded upon leaving the editor.
9 Printing from VI
Print the current file (printer name is required if no default
printer is set):
:!lp [-d printername] %
Print others files
:!lp [-d printername] filename
I stumbled across this factoid on a website about vi. I haven't been able
to locate it in the Vim documentation, but it works in Vim, and it's very handy.
There are times that you might like to go through a file and change the case
of characters that match some arbitrary criteria. If you understand regular
expressions well, you can actually do this fairly easily.
It's as simple as placing \U or \L in front of any backreferences in your regular
expressions. Vim will make the text in the backreference uppercase or lowercase
(respectively).
(A "backreference" is a part of a regular expression that refers to a previous
part of a regular expression. The most common backrefernces are &, \1, \2, \3,
... , \9).
Some examples that demonstrate the power of this technique:
Lowercase the entire file -
:%s/.*/\L&/g
(& is a handy backreference that refers to the complete text of the match.)
Uppercase all words that are preceded by a < (i.e. opening HTML tag names):
:%s/<\(\w*\)/<\U\1/g
Please add a note if you know where this is in the documentation. I have done
Ctrl-D searches on upper, lower, \U, and \L with no luck.
Have you made edits that left some of your lines too short or
long? The fmt utility
can clean that up. Here's an example. Let's say you're editing a file (email
message, whatever) in vi and the lines aren't even.
They look like this:
This file is a mess
with some short lines
and some lines that are too long - like this one, which goes on and on for quite a while and etc.
Let's see what 'fmt' does with it.
You put your cursor on the first line and type (in command mode):
5!!
5!!fmt
which means " filter 5 lines through
fmt." Then the lines will look like this:
This file is a mess with some short lines and some lines that are too
long - like this one, which goes on and on for quite a while and etc.
Let's see what 'fmt' does with it.
This is handiest for formatting paragraphs. Put your cursor
on the first line of the paragraph and type (in command mode):
!}fmt
If you don't have any text in your file that needs to be kept
as is, you can neaten the whole file at once by typing:
%
:%!fmt
There are a few different versions of fmt,
some fancier than others. Most of the articles in the chapter about editing-related
tools can be handy too. For example,
recomment (35.4)
reformats program comment blocks.
cut (35.14)
can remove columns, fields, or shorten lines;
To neaten columns, try filtering through with the setup in article
35.22. In general, if the utility will read its standard input and write converted
text to its standard output, you can use the utility as a
vi filter.
35 buffers based on 26 letters and 9 numbers.

"a5yy - copy 5 lines in buffer a
"ap - paste buffer a

"4p - paste 4th delete

"r5dd - delete five lines, place in bufffer r
"R2dd - delete 2 lines and APPEND them to buffer r

To copy text from a named buffer preface the p or P (put) command,
aka, "paste", with a double quote and the lowercase letter naming the buffer.
markers
ma - mark block of text for buffer a
d'a - delete from cursor to ma
y'a - copy from cursor to ma

If you type 'a you will move to the location of marker a

To sort a section:  mk
	            !'ksort

to sort a list and then place into three columns:
	!'ksort | pr -3tw50

aaaaaa
ccccc
cccc
ddddd
ffff
zzzz

pr option -3 specifies columns,
	the -t suppresses the header
	and the -w50 causes the output to fit within a page of 50 characters.
more ex
:args - lists file(s) working on
:rew - rewind, when editing multiple files

:w !spell to check spelling in work area
more magic
:set magic - enables * and . for pattern searches
:set nomagic - disables, to use meta characters, escape them (\).

:set wrapscan (ws) - allows wrapping of searches
viTricks
-- What every lazy C programmer should know about VI
Running any shell command with within vi . The command
:! command
will run the command without leaving vi. In particular
:! a.sh
will run a.sh
:! cc z.c
will compile the program z.c After : the % is a short hand for the current
file, so you can compile the current file with the command
:! cc %
:!!
repeats last shell command you entered. This cuts down on typing when
you do repeated compiles. you can compile the current file, place error
messages on a file list
:! cc % 2> err_lst
You can move back and forth between two files easily. If you are in file
a , and want to edit file b enter :e b . Now you want
to go back to file a enter :e # . This is useful if you place the
compilation errors on the file err_lst (see above) and want to go
back and forth between your file and the error file.
Vi has options which may be useful in programming
the show match option allows one to check check opposite parenthesis
or braces. Enter
:set showmatch
and type the following
        while ( blah blah blah ) {
            do this loop }
When you type the closing parenthesis or closing brace you should see
the cursor jump to the opening parenthesis or brace. Next place the cursor
at one of the parens or braces, and press the % key. The cursor should jump
to the matching paren or brace. (also works for square brackets).
the shiftwidth options allows one to easily
      indent blocks of code. enter
:set shiftwidth=4
Now at any line enter >> ; the line should be shifted 4 spaces;
enter 3<< and the 3 lines at the cursor should be shifted 4 spaces.
This is useful for increasing the indentation of a block of code.
the tabstop option allows one to tab over when in insert mode.
Enter the command
:set tabstop=4
and pressing the tab key in insert mode will move the code over 4 spaces
Most programmers like tab stops of 4, but the rest of the world use
tab stops of 8. If we wish to communicate with the rest of the world, (i.e.
send code over email and have it look reasonable) it would be a good idea
to remove the tabs, replacing all tabs with spaces. The command that does
this from the shell is:
pr -t -e4 file.c > file.txt
It is too much trouble to set all the options everytime we login. In
your home directory name .exrc and put in it
    :set showmatch
    :set shiftwidth=4
    :set tabstop=4
Everytime vi starts up, it looks for this file and executes all
commands in it
How to cut and paste from a terminal. Suppose you had some text like
   while  (a > 0 ) {
        do thing

    }
    .....
    more stuff
    .....
and you wanted to copy the while loop after the more stuff. There are
several ways to do the; the more general way may
mark the while loop. Place the cursor at line including
      the enter :ma (create marker a at current position )
move cursor to end of while loop and enter :mb
      create a marker at the end of while loop
enter 'a (that's apostrophe a) to move to marker
      a
enter "aY'b This will copy the text between the
      between the current postion and 'b into a buffer called a
move the cursor to were you want to place the while
      loop, i.e. after more stuff.
enter "aP this will put what's in buffer a
      into current position.
You can move text from file a to file b .
    Suppose you want to place the while loop into another file. Copy the while
    loop into the buffer a as above, move to the to file b , and
    paste the while loop into the file.
This command will replace the 3rd character from the end
    of each and every line with '::' (nothing else will be changed). Try doing
    this in Word!
EX Command Mode
EX commands begin with a : and are are often used with a command address
range to indicate which lines the EX command should be applied to. :
commands are executed only after you press Enter. If you want to exit
last line mode without executing a command, type Ctrl-c.
The following EX command deletes lines 10 through 25: :10,25d
The address in the above example is 10,25. The : indicates that this
is an EX command, and d is the actual command (delete).
Some of the commonly used ex command addresses are:
.
the current line.
$
the last line in the file.
%
all the lines in the file.
n
line n
n,m
lines n through m
-n
start at n lines above the current line
+n
start at n lines below the current line
For example, to delete the first line in the file through the current line,
type: :1,.d
Summary of EX commands
:n1,n2d
Delete from line n1 through line n2.
:n1,n2y
Yank lines n1 through n2 into the default buffer.
:n1mn2
Move line n1 below line n2.
:n1,n2mn3
Move lines n1 through n2 below line n3.
:n1tn2
Copy line n1 below line n2.
:n1,n2tn3
Copy lines n1 through n2 below line n3.
:rfilename
Insert file filename below current line.
:r !command
Inserts the results of command at the cursor.
:nr !command
Same as above, but place output at line n.
:w!file
Force write to file.
:n1,n2w !command
Send address specified to command.
:n1,n2wnewfile
Place lines n1 through n2 into the file newfile.
:n1,n2w >> otherfile
Append lines n1 through n2 to otherfile.
:!command
Execute a single command.
:n1,n2!command
Run the lines specified by the address range through
the command and replace with the output.
:sh
Execute a shell.
:vi
Leave EX mode and return to VI mode.
:args
Show files in edit list.
:rew
Move to the front of the file edit list.
Search & Substitution
The search and substitute command has two option flags: the g flag
for making global changes, and the c flag for making conditional changes
(these are described below). The format of the search and substitute command
is:
:[address]s/search_string/replace_string/flags
Changing case
:n1,n2s/[a-z]/\U&/g Changes lowercase letters to uppercase in lines n1 through
n2.
:n1,n2s/[A-Z]/\L&/g Changes uppercase letters to lowercase in lines n1 through
n2.
Global Actions
Global actions allow you to run commands (substitution, delete, etc.) against
all lines in a file. The format of the search and substitute command is:
:[address]g/search_string/command
Conversly, you can use the following format to run commands against any lines
not matching the pattern:
:[address]v/search_string/command
If [address] is not specified, all lines in the file are evaluated against
the EX command.
Jumping to a file
One of VIM's enhanced features allow for a quick jump to a file name. This
is usefull in editting HTML documents that have the same directory structure.
For example:
<a href="products/index.html">Our products</a>
by placing the cursor on the word products in the anchor tag, then pressing
Ctrl-W f, the file will be brought up in a split window for viewing/editing.
Counting words, lines, etc.
To count how often any pattern occurs in a buffer, set 'report' to 0, and
use the substitute command to replace the pattern with itself. The reported
number of substitutions is the number of items. Examples:
To use most of the following macros you will need to know how to key in control
characters in the map string. For example an escape character is: ^] , to key this
in you cannot just hit the escape character or the control and the right bracket
keys. You will have to key in a ^V, this character in unix quotes a control character.
Basically when you hit CTRL and V keys together you will see a ^ symbol. This is
the indication that it is waiting to quote a control character.
To invert order of characters - xp
To pluralize a word - eas
To delete till beginning of the line - d0
To browse all lines with 'pattern' - :g/pattern/p
To browse through numbered buffers - "1pu.u.u (u and . alternating)
To substitute 'str' with 'replace' globally -

        :g/str/s//replace/[g][c]
Use word erase, line erase while inserting to backup, for ex:

        hello tim^W     -       would back cursor to 't' of tim
        hello tim^U     -       backs up cursor to beginning of line
Since these keys can be redefined check their status by the Unix
command :
        stty -a
look for : werase , kill
To copy a set of lines from one file to another:
(1)     save current file use :w
(2)     edit the file with reqd. data, use :e <filename>

(3)     now yank lines into a buffer e.g. "a3Y would
        yank 3 lines into buffer `a`.
(4)     edit original file use :e! <filename>

(5)     place cursor where using command "ap or "aP the text in
        the buffer 'a' will be pasted.

To switch back to the place in previous file being edited use:
        CTRL^ (hold control key while pressing ^ key)
this is a short key for :e #
To comment in C language (/*...*/) you can map characters say v
& V in the following manner:

        map v I/*^[$a*/^[^M
        map V /\/\*/^MNxx/\*\//^Mxx``

v will comment a single line by placing /* and */ at the
beginning and end of the line respectively, and V will remove
these from a commented line or paragraph (you must be at or
within the comments).
To print a certain range of lines straight to printer without
having to save in between in a file :

:#1,#2 w !lpr

would send lines from #1 to #2 to the default printer.
Deleted lines can be recovered by going through the numbered buffers:
The nubered buffers 1 through 9 hold the last 9 deletes.
To look through the buffers :

(1) type :       "1p      : this will echo the buffer #1
(2) type :       u        : this will undo the paste
(3) type :       .        : this will exec. the last cmd "1p ..but
                          : in this unique case adds 1 and execs.
                          : "2p another . would exec. "3p
(4) when you hit the correct buffer ... keep it!
   Here's a good one. This macro searches for text that is right under the
cursor. It eases the pain of typing search strings.  This map is for
^A (this comes standard in "elvis"), so when your cursor is at
the beginning of a word, and ^A is typed, the cursor will jump
to the next occurrence.

map ^A mz:.t.`zd0:s/[0-9a-zA-Z-><\*\.\:\"#@%&_]*/& /^MEa/ ^[DI/^[:.d z^M@z

Explanation :
mz    mark current position as z
:.t.  copy line below
`z    jump back to marked position z ( note the ` instead of ' )
d0    delete till beginning of line
:s/.../& /^M  find a whole word; include in the word: alphanumeric, and
        some assorted junk characters. substitute the word with
        a word and a space after.
E     go to end of word ( note E instead of e )
a/ ^[ add a  slash and a space (if the word was at eol then D won't work)
D     delete from the space till eol
I/    insert slash at beginning of line
:.d z delete line into buffer z
@z    execute buffer z ( which is /word/ , will grab same word on same line)

executing a `n' command in vi would go to the `next' occurrence.

        COOL!
 A similar mapping for ^K, this one EDITS the file which is defined by the
  string in the file. For example if you are in a file called `a' and this file
  contains a string such as: jump to file b
  then setting cursor on `b' and typing ^K jumps to file b.
  the word is delimited slightly differently in this mapping.

                        W A R N I N G
This macro uses :e! , the exclamation will implies that if this command
is used before saving the edits will be lost. Therefore save the file
then use this command. This was necessary because the command itself
edits the file, and hence to jump to another file needs the :e!


map ^K mz:.t.^M`zd0:s/[0-9a-zA-Z-/\._]*/& /^MElDI:e! ^[:.d z^M@z

explanation:

pretty much the same as above.

instead of adding a `/` adds the line :e!
yy      yanks lines into a temporary buffer, where they are
        saved for later use
p pastes the previously yanked lines
The yanked lines can be put as often as one likes, which is a good way to
repeat things. Also, deleted lines can be put as well, so dd is the same
as yy dd. Also, there is only one default buffer. To move two things,
or to yank and put with other work in between, you can save to named buffers.
For example "ayy will yank a line in buffer a. Then buffer
a can be pasted using "ap.
d/pattern ESC deletes up to the pattern, but leaves the pattern. Then
neat thing about this principle is it works with most other Vi commands
such as y.
:s/pattern/xx/ changes firstpattern in current line to xx
:s/pattern/xx/g changes everypattern in current line to xx
:%s/pattern/xx/g changes everypattern in all lines to xx
:%s/pat/xx&yy/g changes everypat in all lines to xxpatyy
:3s/pattern/\U& changes firstpattern in third line to PATTERN
As usual, type u to undo and & to repeat a substitution.
NOTE: The following collection of tips and tricks is intended for advanced
vi users. If you need an introduction to the vi Editor, buy "Learning the vi
Editor" by Linda Lamb (from O'Reilly & Associates) or try these
online
references.
You might also want to take a look at
some
simple Perl one-liners I wrote that can be used with filtering in vi.
If you want to join every two lines, and you don't have any markings to guide
you, you can do
this. This script also illustrates
VIM's ability to define functions
etc. VIM is really closing the functionality gap of vi to EMACS ;-).
:set tabstop=4 # the tabstop option allows
one to tab over when in insert mode. Enter the command
The Last but not LeastTechnology is dominated by
two types of people: those who understand what they do not manage and those who manage what they do not understand ~Archibald Putt.
Ph.D
FAIR USE NOTICEThis site contains
copyrighted material the use of which has not always been specifically
authorized by the copyright owner. We are making such material available
to advance understanding of computer science, IT technology, economic, scientific, and social
issues. We believe this constitutes a 'fair use' of any such
copyrighted material as provided by section 107 of the US Copyright Law according to which
such material can be distributed without profit exclusively for research and educational purposes.
This is a Spartan WHYFF (We Help You For Free)
site written by people for whom English is not a native language. Grammar and spelling errors should
be expected. The site contain some broken links as it develops like a living tree...
You can use PayPal to to buy a cup of coffee for authors
of this site
Disclaimer:
The statements, views and opinions presented on this web page are those of the author (or
referenced source) and are
not endorsed by, nor do they necessarily reflect, the opinions of the Softpanorama society.We do not warrant the correctness
of the information provided or its fitness for any purpose. The site uses AdSense so you need to be aware of Google privacy policy. You you do not want to be
tracked by Google please disable Javascript for this site. This site is perfectly usable without
Javascript.


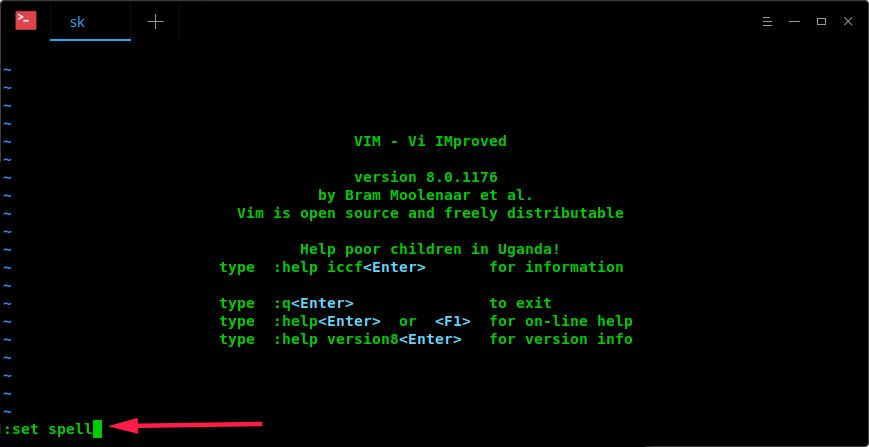
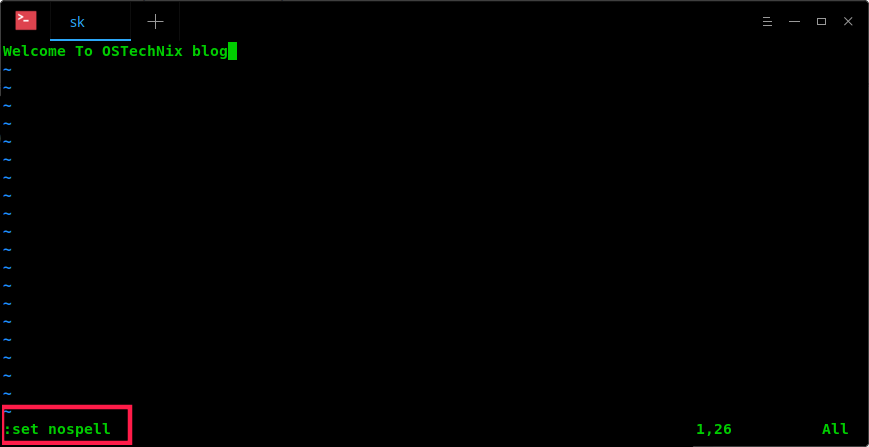
Note In the preceding example, you can also achieve the same result with :wa ( :h :wa ), which effectively allows you to write only the buffers that have been changed in some way.
Edit