MediaWiki
Note: Content is based on wikipedia article
MediaWiki was originally written for Wikipedia
by the German
University of Cologne student and developer
Magnus Manske. Wikipedia had previously used a small wiki engine called
UseModWiki written in
Perl. On January 25, 2002, Wikipedia was switched to
Manske's software to offer more functionality and build upon a scalable infrastructure (i.e. a MySQL
database). However, the first implementation actually led to significant performance issues, and the
software was substantially rewritten by Lee Daniel Crocker. Later on, Brion Vibber would take up the
role of release manager and most active developer.
The most interesting feature of software that is combine Wiki and blog, allowing content developers
to engage in discussions about changes on the page and their views on the content. See discussions of
"Talk:" namespace.
Some companies use MediaWiki as a
content management system.
Novell has deployed it for several of its product
websites, including openSUSE.
The main shortcoming of Mediawiki is that is uses wikiwiki markup language called
Wikitext, instead of HTML. While very elegant for simple use, for complex
documents it long
outlived its usefulness, and now represents a serious shortcoming.
While MediWiki engine enhanced it
in some ways but outside very basic formatting, it is still remains no less complex and much less flexible then HTML. For example MediaWiki
uses of "free links" instead of CamelCase, but
still this is very limiting and belong to the class of "reinventing the wheel". It's complexity is now
no less then complexity of HTML 3.2.
For example let's look at "free links" enhancement. While in a typical wiki, you would have to type
a text like "DemoCracy" (or "DemocracyPoliticalSystem") and the link to a page about democracy (say,
DemoCracy.html will be automatically created. "Free links" replaced this idea in the following
way: links in MediaWiki are created by surrounding words with double square brackets, and
any spaces between them are left intact.
So the purpose is the accuracy of titles, but the result
is pretty wild naming of pages. If this a progress in comparison with HTML tag <a ? I strongly
doubt it. It's just reinvention of the wheel.
To rectify this problem Wikitext supports HTML5 within it. See
HelpHTML in wikitext - Wikipedia. Some problem arise because WikiTest H1-h5 heading are automatically entered into the
table of content, while html markup is not.
The MediaWiki software, which drives Wikipedia, allows the use of a subset of
HTML5
elements, or tags and their
attributes, for presentation
formatting.
[1]
But most HTML can be included by using equivalent
wiki markup
or
templates; these are generally
preferred within articles, as they are sometimes simpler for most editors and less intrusive in the editing window;
but
Wikipedia's Manual of Style recommends their use in certain cases. And HTML is useful outside of articles, for
example for formatting within templates. For help with Cascading Style Sheet use within Wikipedia see
Help:Cascading Style Sheets.
Some tags look like HTML, but are actually MediaWiki
parser and extension tags,
and so are really wiki markup. HTML in pages can be checked for HTML5 compliance by using
validation. Some elements and attributes
are supported by MediaWiki and browsers, but have been
deprecated by HTML5, and
therefore should no longer be used.
... ... ...
Attributes[edit]
HTML attributes provide additional
information about an element and are always specified in the start tag. They are formatted as a name/value pair like
name="value".
Global attributes apply to all tags. Attributes not listed here are not allowed by MediaWiki[1]:
class: one or more classifications to which the element belongs. See
Wikipedia:Catalogue of CSS classes.dir: text direction— "ltr" (left-to-right), "rtl" (right-to-left) or
"auto".id: unique identifier for the element.lang: primary language for the contents of the element per
BCP 47. The MediaWiki
software automatically adds the xml:lang attribute whenever lang is defined, but
xml:lang will no longer be passed when included as a separate attribute.style: applies CSS styling to the contents of the element.title: advisory information associated with the element.
... ... ...
Other tags such as
<table> support specific attributes – these are listed in
the appropriate section.
| Markup |
Renders as |
This is <span style="color:red;">red</span> text.
|
This is red text.
|
| |
|
The MediaWiki
Sanitizer.php does some cleanup on attributes. A best practice is to use the proper syntax.
- Discards attributes not on a whitelist for the given element.
- Turns broken or invalid entities into plaintext.
- Double-quotes all attribute values.
- Attributes without values are given the name as value.
- Double attributes are discarded.
- Unsafe style attributes are discarded.
- Prepends space if there are attributes.
... ... ...
Templates:
{{fake
                           heading}}
for use in documentation
<p>...</p> tag places content into a separate paragraph.
| Markup |
Renders as |
<p>HyperText Markup Language</p><p>HyperText Markup Language</p>
|
HyperText Markup Language HyperText Markup Language |
| |
|
Wikimarkup: Separate paragraphs by a single blank line.
| Markup |
Renders as |
HyperText Markup Language
HyperText Markup Language
|
HyperText Markup Language HyperText Markup Language |
| |
|
<p>...</p> is especially useful in lists, for list items with multiple
paragraphs:
| Markup |
Renders as |
* <p>This is a paragraph.</p><p>This is another paragraph in the same item.</p>
* This is a different item.
|
|
| |
|
Note that the closing tag </p> is not strictly necessary for MediaWiki
installations that output HTML 5 (such as Wikipedia).
<br> or <br /> inserts a line break. Both
versions of the break are supported by HTML5. </br> is invalid.
| Markup |
Renders as |
HyperText<br>Markup Language
|
HyperText
Markup Language
|
| |
|
Templates:
{{break}}
adds multiple line breaks.{{crlf2}}
adds a true carriage return and line feed.{{clear}}
adds a break with styling to clear floating elements.{{plainlist}}
creates an unbulleted list.
<hr> or <hr /> represents a paragraph-level
thematic break and presents as a horizontal rule.
Wikimarkup: use ----
Templates: {{hr}}
<!--...--> formats the enclosed text as a hidden comment.
| Markup |
Renders as |
HyperText<!--Markup Language-->
|
HyperText
|
| |
|
Be careful with spacing around comments. Surrounding a comment with blank lines will result in a blank
paragraph, perceived as an extra two blank lines:
| Markup |
Renders as |
Content line 1

<!-- Comment -->

Content line 2
|
Content line 1
Content line 2
|
| |
|
Formatting[edit]
<abbr>...</abbr> creates a tooltip to define an abbreviation or acronym
that is displayed on mouse-over.
| Markup |
Renders as |
<abbr title="HyperText Markup Language">HTML</abbr>
|
|
| |
|
Templates: {{abbr}}
<b>...</b> formats text stylistically offset from other text (bold)
without conveying extra importance.
| Markup |
Renders as |
<b>HyperText Markup Language</b>
|
HyperText Markup Language
|
| |
|
Wikimarkup: Use ''' to open and close bold text.
| Markup |
Renders as |
'''HyperText Markup Language'''
|
HyperText Markup Language
|
| |
|
<bdi>...</bdi> isolates the content from the surrounding text-direction
settings.
| Markup |
Renders as |
اليمين إلى اليسارleft to right
|
اليمين إلى اليسارleft to right
|
اليمين إلى اليسار<bdi>left to right</bdi>
|
اليمين إلى اليسارleft to right
|
| |
|
Support: Firefox, Chrome
<bdo>...</bdo> specifies the text direction.
Attributes and values:
dir — Specifies the text direction.
| Markup |
Renders as |
<bdo dir="rtl">HyperText Markup Language</bdo>
|
HyperText Markup Language
|
| |
|
blockquote[edit]
<blockquote>...</blockquote> presents text in an offset block.
| Markup |
Renders as |
<blockquote>HyperText Markup Language</blockquote>
|
HyperText Markup Language
|
| |
|
Templates: {{quote}};
supports pre-formatted attribution and source parameters. For other specialized quotation templates, see
Category:Quotation templates.
<cite>...</cite> contains the title of a work. This is a new definition in
HTML5— in the previous XML implementation <cite> was used to contain a
citation or a reference to other sources. No formatting is applied when this tag is used.
| Markup |
Renders as |
<cite>HyperText Markup Language</cite>
|
HyperText Markup Language
|
| |
|
<code>...</code> formats a section of computer code. Styled with CSS
through
mediawiki.skinning/elements.css as a Courier monospaced slab serif typeface with border.
| Markup |
Renders as |
<code>HyperText Markup Language</code>
|
HyperText Markup Language
|
| |
|
Templates: {{code}}
uses <syntaxhighlight>.
See the "See also" section at the template page for additional code-markup templates.
See the § samp and
§ kbd sections of this page for
semantic markup of output and input, respectively.
<data>...</data> formats a machine-readable version of contents.
| Markup |
Renders as |
<data value="978-0764502149">HTML for Dummies</data>
|
HTML for Dummies
|
| |
|
Attributes: value
<del>...</del> formats deleted text.
| Markup |
Renders as |
<del>HyperText Markup Language</del>
|
HyperText Markup Language
|
| |
|
<dfn>...</dfn> is used for indicating the defining instance of a term.
| Markup |
Renders as |
<dfn>Definition</dfn>
|
Definition
|
| |
|
Templates: {{dfn}}
<em>...</em> represents a span of text with emphatic stress (i.e. semantic
emphasis). In most browsers, it renders as italic.
| Markup |
Renders as |
<em>HyperText Markup Language</em>
|
HyperText Markup Language
|
| |
|
Templates: {{em}}
<i>...</i> represents a span of text offset from its surrounding content
without conveying any extra emphasis or importance, and for which the conventional typographic
presentation is italic text.
| Markup |
Renders as |
<i>HyperText Markup Language</i>
|
HyperText Markup Language
|
| |
|
Wikimarkup: Use '' to open and close italic text.
| Markup |
Renders as |
''HyperText Markup Language''
|
HyperText Markup Language
|
| |
|
<ins>...</ins> indicates a range of text that has been added. Styled as
underlined text. Used on talk pages to indicate refactored text; see
WP:REDACT.
| Markup |
Renders as |
<ins>HyperText Markup Language</ins>
|
HyperText Markup Language
|
| |
|
<kbd>...</kbd> indicates user input such as keyboard input or voice
commands.
| Markup |
Renders as |
Press <kbd>Enter</kbd>
|
Press Enter
|
| |
|
Templates:
{{kbd}}
applies monospace styling, and a light-grey background to distinguish from code (<code>)
and output (<samp> or {{samp}}).{{key
press}} renders illustrated keys and keystrokes.
<mark>...</mark> represents a run of text in one document marked or
highlighted for reference purposes, due to its relevance in another context. Marked text is formatted
with a yellow background by default.
| Markup |
Renders as |
<mark>HyperText Markup Language</mark>
|
HyperText Markup Language
|
<mark style="background:lightblue;">HyperText Markup Language</mark>
|
HyperText Markup Language
|
| |
|
Support: Not supported by Internet Explorer 8 and below.
<pre>...</pre> element represents a block of preformatted text. In
MediaWiki, <pre>
is actually a parser tag and not HTML, but the function is the same. It also prevents the parsing of
templates.
| Markup |
Renders as |
<pre>HyperText Markup Language</pre>
|
HyperText Markup Language
|
MediaWiki provides some interesting features for structuring content. One such feature is namespaces.
It is directed at solving the problem of the separation of encyclopedic content from discussions
surrounding it, as well as personal pages about encyclopedia editors.
Namespaces are prefixes before a page title (like "User:" or "Talk:")
which allow a page to exist under multiple names, but serving different purposes depending on their
prefix. For instance, a page "[[The Terminator]]" could describe the 1984 movie starring
Arnold Schwarzenegger, while a page
"[[User:The Terminator]]" could be a profile describing a user who chooses this name as a pseudonym.
More commonly, each page has an associated "Talk:" page which can be used to discuss
its contents., essentially a built-in blog.
Namespaces can be viewed as folders which
separate different basic types of information or functionality and can be used for string parametrized
templaces providing some basic macro functionality.
Among available namespaces are:
| Namespace name |
Namespace function |
| Special: |
Prefix to identify functionality provided by MediaWiki that is not regular page content.
For instance, "Special:Recentchanges" shows the most recent activitiy in the wiki. Cannot contain
regular wiki pages. |
| Media: |
Prefix for linking to any uploaded media file directly, i.e., without passing through a
file description page. Cannot contain regular wiki pages. |
| No prefix |
The primary "article namespace" where content is stored if the page title does not have
a namespace prefix. |
| User: |
Personal profiles of wiki users. |
| Project: |
Typically named after the project itself, e.g. "Wikipedia:". Policies, processes and project
background. |
| Image: |
Description pages for images and other files. Associated with special functionality related
to files. |
| MediaWiki: |
Editable user interface messages. Only editable by sysops. |
| Template: |
Reusable blocks of information, which can optionally be parametrized. |
| Help: |
Documentation. Has to be manually imported when setting up a new wiki. |
| Category: |
Descriptions for categories added to articles that can also be used to build category hierarchies
(by categorizing the category page). |
| Talk:, User talk:, Project talk:, Image talk:, etc. |
Various discussion namespaces associated with the above primary namespaces. There are no
talk namespaces for "Media:" or "Special:". User talk pages come with a special notification
feature when new text is added to them. |
In addition to namespaces, pages can be structured using subpages. This simple feature
provides automatic backlinks from a page of the pattern [[Page title/Subpage title]]
to the component before the slash (in this case, "Page title").
Another important feature of MediaWiki engine is that it supports user-created categories.
These are similar to tags used in many web applications,
but unlike tags they are hierarchical and descriptive. In large wikis like
Wikipedia, very complex hierarchies have grown
using this system without any central planning.
The entire MediaWiki user interface can be edited through the wiki itself by users with the necessary
permissions (typically so-called "administrators"). This is done through a special namespace with the
prefix "MediaWiki:", where each page title identifies a particular user interface message.
The "MediaWiki:" namespace was also originally used for creating custom text blocks that could
then be dynamically loaded into other pages using a special syntax.
This content was later moved into its own namespace, "Template:". Templates are text blocks
which can be dynamically loaded inside another page whenever that page is requested. Templates support
parameters, so that parts of the text can be substituted
for each specific use case.
Templates have found many different uses, such as:
- Identifying problems with a Wikipedia article by putting a template (also called "tag" in this
context) such as {{Disputed}} on the article. This template will then output a graphical
box stating that the article is disputed, and also categorize it so that articles of this nature
can be located.
- Creating complex table layouts which are used consistently across multiple pages, and where
only the content of the tables gets inserted using template parameters.
- Sending users standard messages when they are blocked from editing, when their behavior is considered
inappropriate, and so on. For this purpose, template substitution can be used: Instead of
loading the template contents dynamically whenever the page is loaded, the contents of the template
are inserted exactly once into the target page, similar to a
copy and paste operation.
As the name MediaWiki suggests, the provides capability of using a wide variety of uploaded
media files. Its richest functionality is in the area of images, where image galleries and thumbnails
can be generated with relative ease if the software is set up correctly. There is also support for
EXIF
metadata. The use of MediaWiki to operate the
Wikimedia Commons, one of the largest
free content media archives, has driven the
need for further functionality in this area.
On the level of editing, MediaWiki currently provides no native
WYSIWYG support, though has basic toolbar which
simplifes the process of learning the wikiwiki language syntax. To make editing long pages such as comprehensive
Wikipedia articles easier, MediaWiki supports editing only a subsections identified by headers. The
wiki software allows use of external editors for uploaded files and wiki pages.
MediaWiki also supports rich content generated by other popular packages. For example, it supports
mathematical formulas using LaTeX and a special parser
written in OCaml. Similar functionality for other content,
ranging from graphical timelines over mathematical plotting
and musical scores to
hieroglyphics, is available in the form of
extensions.
MediaWiki comes with several so-called "special pages" to analyze relations between pages and page
content, while also providing importer and exporter utilities. Additional software to analyze page content,
such as Erik Zachte's "Wikistats" toolset, is available. An experimental
API for external access to the wiki is under development,
and a variety of scripts can be used to create "bots" which automatically perform specific tasks on
a MediaWiki installation.
If the feature is enabled, users can also customize their stylesheets and configure client-side
JavaScript to be executed with every pageview.
On Wikipedia, this has led to a large number of additional tools and helpers developed through the wiki
and shared among users. For instance, Wikipedia user "Lupin" created a custom JavaScript tool that shows
previews of articles when the user hovers over links, and also provides shortcuts for common maintenance
tasks.
While MediaWiki comes with a basic set of features related to restricting access and defining
user groups, page access control does not tend to be given high priority in development. For instance,
it is not possible to define the access permissions to pages on a per-namespace basis. Here, wikis like
TWiki and
MoinMoin provide more power by supporting advanced
security mechanisms like Access Control Lists.
Choice of PDF as development language means that quality of software is generally average, due to
low quality of PDF as a development language. Still despite shortcomings of PDF as a development language
MediaWiki runs one of the highest traffic sites on the World Wide Web,.
Performance and scalability have been optimized
via use of Squid caches,
load balanced database replication,
client-side caching, memcached or table-based caching
for frequently accessed processing or query results, a simple static file cache, feature-reduced operation,
revision compression, and a job queue for database operations.
MediaWiki may be an overkill for small-scale usage. The software makes sense mostly for the operation
of large scale wiki farms, such as the Wikimedia
project and language family, or the wikis hosted by Wikia.
Notable quotes:
"... http://wiki.hakase-labs.me/ ..."
How to Install VisualEditor for MediaWiki on CentOS 7 On this page
-
Prerequisites
-
What we will do
-
Step 1 - Check MediaWiki installation
-
Step 2 - Install dependencies
-
Step 3 - Install and configure Parsoid
-
Step 4 - Install and configure VisualEditor
-
Step 5 - Testing
-
Reference
VisualEditor is a rich-text editor for MediaWiki. It's available as an extension and relies
on the Parsoid parser service to be up and running for editing MediaWiki pages.
Coming to Parsoid, it is a parser service based on Nodejs. It's being used by many MediaWiki
extensions, including VisualEditor, Flow, Content Translation, and other applications.
In this tutorial, I will show you how to step-by-step install and configure VisualEditor for
latest MediaWiki version 1.30. It's worth sharing that our MediaWiki is installed under CentOS
7 operating system, and we will add and install Nodejs, Parsoid service, and configure
VisualEditor for MediaWiki Editor.
Prerequisites
What we will do
- Check the MediaWiki Installation
- Install dependencies
- Install and configure Parsoid service
- Install and configure VisualEditor for MediaWiki
- Test the setup
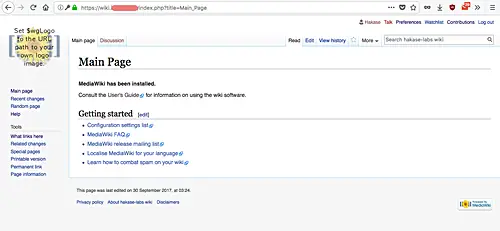
Step 1 - Check MediaWiki installation
In this step, we will check our MediaWiki installation. MediaWiki is installed under the
domain name 'http://wiki.hakase-labs.me'. Open the web browser and visit the following
MediaWiki URL address, mine is: http://wiki.hakase-labs.me/
You will be redirected to the HTTPS connection, following which you will get to the
MediaWiki page with 'Vector' skin similar to the one shown below.
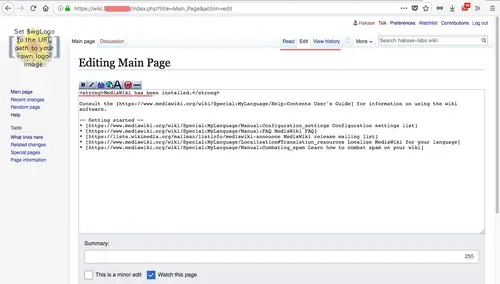
Next, log in as admin user and try to edit the page. Click on the 'Edit' tab and you will
get the default MediaWiki editor as below.

The MediaWiki is up and running without any error.
Step 2 - Install dependencies
To install the Parsoid service and configure VisualEditor, we need some CentOS packages to
be installed on the system. Specifically, we will install Nodejs, npm, vim, and git.
Install all packages needed using yum command below.
yum -y install nodejs npm vim-enhanced git
All packages and dependencies have been installed.
Step 3 - Install and configure
Parsoid
Parsoid can be installed on a separate MediaWiki server. But for this tutorial, and we will
be using only 1 CentOS 7 server for both MediaWiki and Parsoid.
Now, since we're using the CentOS 7 server, we need to install the Parsoid service manually
from source because official packages are only available for Ubuntu/Debian based operating
systems.
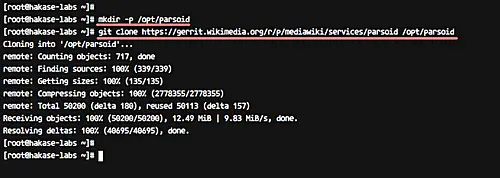
So to start with, create a new '/opt/parsoid' directory and clone the latest parsoid using
the git command, as shown below.
mkdir -p /opt/parsoid
git clone https://gerrit.wikimedia.org/r/p/mediawiki/services/parsoid /opt/parsoid

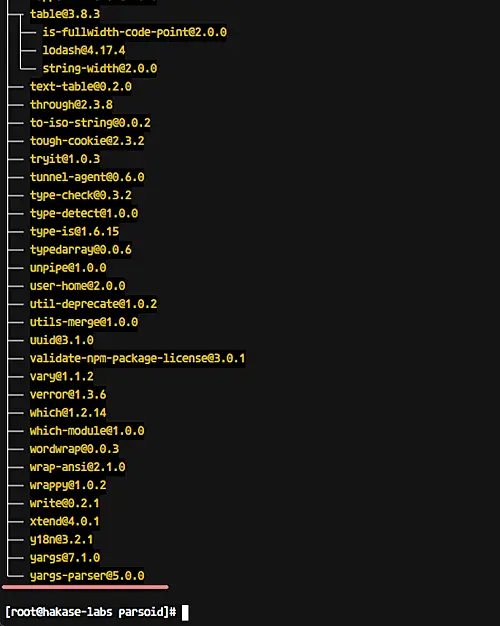
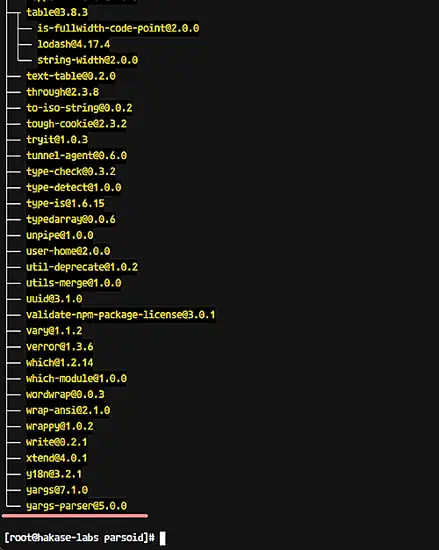
Now go to the '/opt/parsoid' directory and install the Parsoid service using the following
npm command.
cd /opt/parsoid
npm install
After the installation is complete, you will get the result as below.
Next, configure the Parsoid service by editing the corresponding configuration files.
Copy the example configuration 'localsettings.example.js' to 'localsettings.js', and then
edit the file using vim
.
cp localsettings.example.js localsettings.js
vim localsettings.js
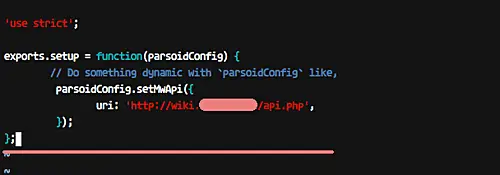
Uncomment the 'parsoidConfig.setMwApi' line and change the 'uri' value with your MediaWiki
API URL as below.
exports.setup = function(parsoidConfig) {
         // Do something dynamic with `parsoidConfig` like,
         parsoidConfig.setMwApi({
                 uri: 'http://wiki.hakase-labs.me/api.php',
          });
 };

That's it. Save and exit.
Now copy the 'config.example.yaml' configuration to 'config.yaml' and edit it with vim
editor.
cp config.example.yaml config.yaml
vim config.yaml
On the 'mwApis' line (line number 34), change the 'uri' value with your MediaWiki API URL
and the 'domain' value with your own domain name.
 mwApis:
         - # This is the only required parameter,
           # the URL of you MediaWiki API endpoint.
           uri: 'http://wiki.hakase-labs.me/api.php'
           # The "domain" is used for communication with Visual Editor
           # and RESTBase.  It defaults to the hostname portion of
           # the `uri` property above, but you can manually set it
           # to an arbitrary string. It must match the "domain" set
           # in $wgVirtualRestConfig.
           domain: 'wiki.hakase-labs.me'
           #optional
Save and exit.
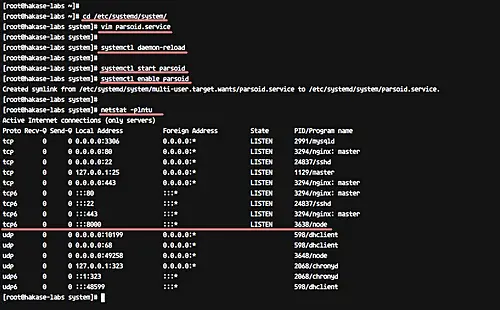
Next, we will configure Parsoid as a service. For this, go to the '/etc/systemd/system'
directory and create a new service file dubbed 'parsoid.service'.
cd /etc/systemd/system/
vim parsoid.service
Paste the Parsoid service configuration below.
[Unit]
 Description=Mediawiki Parsoid web service on node.js
 Documentation=http://www.mediawiki.org/wiki/Parsoid
 Wants=local-fs.target network.target
 After=local-fs.target network.target

 [Install]
 WantedBy=multi-user.target

 [Service]
 Type=simple
 User=root
 Group=root
 WorkingDirectory=/opt/parsoid
 ExecStart=/usr/bin/node /opt/parsoid/bin/server.js
 KillMode=process
 Restart=on-success
 PrivateTmp=true
 StandardOutput=syslog
Save and exit. Then execute the following reload command.
systemctl daemon-reload
Now, start the Parsoid service, and enable it to execute everytime at system boot.
systemctl start parsoid
systemctl enable parsoid
Parsoid should now be running as a service on CentOS 7, using port 8000. You can check it
with the netstat command in the following way.
netstat -plntu
And you should get a result similar to the following:

The parsoid installation and configuration has been completed.
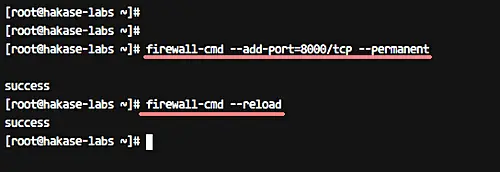
Note:
If you have Firewalld running on your server, add the parsoid port 8000 to the firewalld
configuration using the following commands.
firewall-cmd --add-port=8000/tcp --permanent
firewall-cmd --reload

Step
4 - Install and configure VisualEditor
In this step, we will install and configure VisualEditor extensions for MediaWiki.
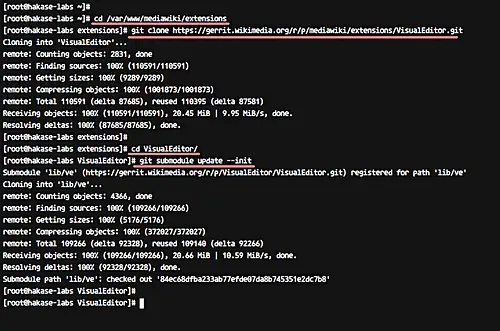
Go to the MediaWiki installation directory '/var/www/mediawiki/extensions' and download the
latest VisualEditor version using git.
cd /var/www/mediawiki/extensions
git clone https://gerrit.wikimedia.org/r/p/mediawiki/extensions/VisualEditor.git
Now go to the VisualEditor directory, and initialize and update all submodules inside
it.
cd VisualEditor/
git submodule update --init
Next, we need to edit the Mediawiki configuration file 'LocalSettings.php' to enable
VisualEditor. For this, head to the mediawiki directory and edit the 'LocalSettings.php' file
using vim.
cd /var/www/mediawiki
vim LocalSettings.php
Paste configuration below towards the end of the file.
wfLoadExtension( 'VisualEditor' );

 // Enable by default for everybody
 $wgDefaultUserOptions['visualeditor-enable'] = 1;

 // Optional: Set VisualEditor as the default for anonymous users
 // otherwise they will have to switch to VE
 // $wgDefaultUserOptions['visualeditor-editor'] = "visualeditor";

 // Don't allow users to disable it
 $wgHiddenPrefs[] = 'visualeditor-enable';

 // OPTIONAL: Enable VisualEditor's experimental code features
 #$wgDefaultUserOptions['visualeditor-enable-experimental'] = 1;


 $wgVirtualRestConfig['modules']['parsoid'] = array(
     // URL to the Parsoid instance
     // Use port 8142 if you use the Debian package
     'url' => 'http://wiki.hakase-labs.me:8000',
     // Parsoid "domain", see below (optional)
     'domain' => 'wiki.hakase-labs.me',
     // Parsoid "prefix", see below (optional)
     'prefix' => 'wiki.hakase-labs.me'
 );
That's it. Save and exit.
Note:
Please change the URL with your own domain name.
Next, change the ownership permissions for the mediawiki directory to the 'nginx' user and
group.
chown -R nginx:nginx /var/www/mediawiki
VisualEditor extensions installation has been completed.
How to Install VisualEditor for MediaWiki on CentOS 7 On this page
-
Prerequisites
-
What we will do
-
Step 1 - Check MediaWiki installation
-
Step 2 - Install dependencies
-
Step 3 - Install and configure Parsoid
-
Step 4 - Install and configure VisualEditor
-
Step 5 - Testing
-
Reference
VisualEditor is a rich-text editor for MediaWiki. It's available as an extension and relies
on the Parsoid parser service to be up and running for editing MediaWiki pages.
Coming to Parsoid, it is a parser service based on Nodejs. It's being used by many MediaWiki
extensions, including VisualEditor, Flow, Content Translation, and other applications.
In this tutorial, I will show you how to step-by-step install and configure VisualEditor for
latest MediaWiki version 1.30. It's worth sharing that our MediaWiki is installed under CentOS
7 operating system, and we will add and install Nodejs, Parsoid service, and configure
VisualEditor for MediaWiki Editor.
Prerequisites
What we will do
- Check the MediaWiki Installation
- Install dependencies
- Install and configure Parsoid service
- Install and configure VisualEditor for MediaWiki
- Test the setup
Step 1 - Check MediaWiki installation
In this step, we will check our MediaWiki installation. MediaWiki is installed under the
domain name 'http://wiki.hakase-labs.me'. Open the web browser and visit the following
MediaWiki URL address, mine is: http://wiki.hakase-labs.me/
You will be redirected to the HTTPS connection, following which you will get to the
MediaWiki page with 'Vector' skin similar to the one shown below.
Next, log in as admin user and try to edit the page. Click on the 'Edit' tab and you will
get the default MediaWiki editor as below.
The MediaWiki is up and running without any error.
Step 2 - Install dependencies
To install the Parsoid service and configure VisualEditor, we need some CentOS packages to
be installed on the system. Specifically, we will install Nodejs, npm, vim, and git.
Install all packages needed using yum command below.
yum -y install nodejs npm vim-enhanced git
All packages and dependencies have been installed.
Step 3 - Install and configure
Parsoid
Parsoid can be installed on a separate MediaWiki server. But for this tutorial, and we will
be using only 1 CentOS 7 server for both MediaWiki and Parsoid.
Now, since we're using the CentOS 7 server, we need to install the Parsoid service manually
from source because official packages are only available for Ubuntu/Debian based operating
systems.
So to start with, create a new '/opt/parsoid' directory and clone the latest parsoid using
the git command, as shown below.
mkdir -p /opt/parsoid
git clone https://gerrit.wikimedia.org/r/p/mediawiki/services/parsoid /opt/parsoid
Now go to the '/opt/parsoid' directory and install the Parsoid service using the following
npm command.
cd /opt/parsoid
npm install
After the installation is complete, you will get the result as below.
Next, configure the Parsoid service by editing the corresponding configuration files.
Copy the example configuration 'localsettings.example.js' to 'localsettings.js', and then
edit the file using vim
.
cp localsettings.example.js localsettings.js
vim localsettings.js
Uncomment the 'parsoidConfig.setMwApi' line and change the 'uri' value with your MediaWiki
API URL as below.
exports.setup = function(parsoidConfig) {
         // Do something dynamic with `parsoidConfig` like,
         parsoidConfig.setMwApi({
                 uri: 'http://wiki.hakase-labs.me/api.php',
          });
 };
That's it. Save and exit.
Now copy the 'config.example.yaml' configuration to 'config.yaml' and edit it with vim
editor.
cp config.example.yaml config.yaml
vim config.yaml
On the 'mwApis' line (line number 34), change the 'uri' value with your MediaWiki API URL
and the 'domain' value with your own domain name.
 mwApis:
         - # This is the only required parameter,
           # the URL of you MediaWiki API endpoint.
           uri: 'http://wiki.hakase-labs.me/api.php'
           # The "domain" is used for communication with Visual Editor
           # and RESTBase.  It defaults to the hostname portion of
           # the `uri` property above, but you can manually set it
           # to an arbitrary string. It must match the "domain" set
           # in $wgVirtualRestConfig.
           domain: 'wiki.hakase-labs.me'
           #optional
Save and exit.
Next, we will configure Parsoid as a service. For this, go to the '/etc/systemd/system'
directory and create a new service file dubbed 'parsoid.service'.
cd /etc/systemd/system/
vim parsoid.service
Paste the Parsoid service configuration below.
[Unit]
 Description=Mediawiki Parsoid web service on node.js
 Documentation=http://www.mediawiki.org/wiki/Parsoid
 Wants=local-fs.target network.target
 After=local-fs.target network.target

 [Install]
 WantedBy=multi-user.target

 [Service]
 Type=simple
 User=root
 Group=root
 WorkingDirectory=/opt/parsoid
 ExecStart=/usr/bin/node /opt/parsoid/bin/server.js
 KillMode=process
 Restart=on-success
 PrivateTmp=true
 StandardOutput=syslog
Save and exit. Then execute the following reload command.
systemctl daemon-reload
Now, start the Parsoid service, and enable it to execute everytime at system boot.
systemctl start parsoid
systemctl enable parsoid
Parsoid should now be running as a service on CentOS 7, using port 8000. You can check it
with the netstat command in the following way.
netstat -plntu
And you should get a result similar to the following:
The parsoid installation and configuration has been completed.
Note:
If you have Firewalld running on your server, add the parsoid port 8000 to the firewalld
configuration using the following commands.
firewall-cmd --add-port=8000/tcp --permanent
firewall-cmd --reload
Step
4 - Install and configure VisualEditor
In this step, we will install and configure VisualEditor extensions for MediaWiki.
Go to the MediaWiki installation directory '/var/www/mediawiki/extensions' and download the
latest VisualEditor version using git.
cd /var/www/mediawiki/extensions
git clone https://gerrit.wikimedia.org/r/p/mediawiki/extensions/VisualEditor.git
Now go to the VisualEditor directory, and initialize and update all submodules inside
it.
cd VisualEditor/
git submodule update --init
Next, we need to edit the Mediawiki configuration file 'LocalSettings.php' to enable
VisualEditor. For this, head to the mediawiki directory and edit the 'LocalSettings.php' file
using vim.
cd /var/www/mediawiki
vim LocalSettings.php
Paste configuration below towards the end of the file.
wfLoadExtension( 'VisualEditor' );

 // Enable by default for everybody
 $wgDefaultUserOptions['visualeditor-enable'] = 1;

 // Optional: Set VisualEditor as the default for anonymous users
 // otherwise they will have to switch to VE
 // $wgDefaultUserOptions['visualeditor-editor'] = "visualeditor";

 // Don't allow users to disable it
 $wgHiddenPrefs[] = 'visualeditor-enable';

 // OPTIONAL: Enable VisualEditor's experimental code features
 #$wgDefaultUserOptions['visualeditor-enable-experimental'] = 1;


 $wgVirtualRestConfig['modules']['parsoid'] = array(
     // URL to the Parsoid instance
     // Use port 8142 if you use the Debian package
     'url' => 'http://wiki.hakase-labs.me:8000',
     // Parsoid "domain", see below (optional)
     'domain' => 'wiki.hakase-labs.me',
     // Parsoid "prefix", see below (optional)
     'prefix' => 'wiki.hakase-labs.me'
 );
That's it. Save and exit.
Note:
Please change the URL with your own domain name.
Next, change the ownership permissions for the mediawiki directory to the 'nginx' user and
group.
chown -R nginx:nginx /var/www/mediawiki
VisualEditor extensions installation has been completed.
Imagine how useful it would be to have an online knowledge base that can easily be updated created
by key people within your organization. That's the promise of a wiki -- a Web application that "allows
users to easily add, remove, or otherwise edit all content, very quickly and easily," as Wikipedia,
perhaps the best-known wiki, puts it. Why not bring the benefits of a wiki to your organization?
If you're sold on the concept, the first thing you need to do is to pick the software that you're
going to use for your wiki. If you want hunt around to find out what's out there, a good place to
start is Wikipedia's wiki software
wiki. If you say, "I'll use whatever Wikipedia is using," that'll be
MediaWiki.
MediaWiki installation is easy -- either follow the
instructions on MediaWiki's
site or read "The
open source wiki behind Wikipedia." Install MediaWiki on a server that can be seen by everyone
in your organization. You'll then be able to access it from a Web browser by typing in something
like http://servername/wiki.
With a brand new wiki there's absolutely no security or control built into it. Anyone that can
access the Web page will be able to add pages, comments, and discussions. We're going to stop that.
First add a new user account -- you'll need to be able to log on once you've disabled anonymous
access. Next, find the LocalSettings.php file in your wiki directory. Add the following lines:
$wgGroupPermissions['*']['createaccount'] = false;
$wgGroupPermissions['*']['edit'] = false;
$wgShowIPinHeader = false;
With that done, anyone on the network will be able to view the wiki, but only someone with an
account will be able to create or edit pages.
You may also want to enhance the wiki pages by adding PHP functionality. To do this, add a function
into the includes/Setup.php file:
function ParsePHPTag($Content)
{
 global $wgOut;
 $wgOut->enableClientCache(false);
 ob_start();
 eval($Content);
 $Result = ob_get_contents();
 ob_end_clean();
  return($Result);
}
$wgParser->setHook('php','ParsePHPTag');
Then, if you want to use PHP in any of your wiki pages, don't use the normal <?PHP ... ?> tags;
instead use <PHP> ... </PHP>.
Now you can even access data in a MySQL database by adding code like this to a wiki page:
<PHP>

$db = mysql_connect("localhost", "userid", "userpassword");
mysql_select_db("cstellar",$db);

$result = mysql_query("SELECT COUNT(*) stars FROM chyg85",$db);

printf("Records: %s\n", mysql_result($result,0,"stars"));
</PHP>
In this example, all I'm doing is connecting to a database and counting the number of records
in a table. Obviously you'd have to use your own database and user details.
MediaWiki is based on PHP, and so as well as being able to use any PHP functionality within a
page, you can actually build your own extensions to MediaWiki. If you're interested in doing that,
have a look at MediaWiki's documentation on
extending
wiki markup.
While you're setting parameters, look at your php.ini file. In php.ini, the line session.gc_maxlifetime
sets the length of time (in seconds) that a PHP session is allowed to exist, like this:
session.gc_maxlifetime = 1440
This means that if you're editing the wiki then you must click on the "Save page" button at least
once every 24 minutes or risk losing your work. You can increase the time to a value that will suit
you better -- say to one hour, or 3600 seconds.
At this point you may be saying, "There's nothing here that I can't do with a text editor, an
ordinary Web server, and giving group access to the Web files." True -- so let's see where the wiki
comes into its own. Try editing the Main page, save the changes, and then click on the History tab.
You'll see that MediaWiki tracks who made all changes and when. You can compare the differences
between different versions. In one fell swoop you've got yourself a document management system as
well as a potential in-house knowledge base.
"Aha!" I hear you say, "if this is just operating in a browser then how can I do spell check
or word counts? What about formating?" If you use Firefox as your browser, you can add
Firefox extensions
to implement those functions. If you're using Firefox 1.5.x, install
Spellbound dev and restart Firefox. When you then try editing one of your wiki pages, you'll
find that misspelled words are underlined in red. Right-clicking in any editing areas (text boxes,
for example) will allow you to display the spell check front end. Once there then it's just like
spell checking in any other application.
It's just as easy to get a word count going, this time use
roachfiend.com's
Word Count. Again, don't forget to restart Firefox after installing the extension. However,
the word count doesn't work within the text editing areas. to get around that problem, click MediaWiki's
"Show Preview" button tp see your work displayed as a normal Web page. Now you can then select any
area of the text, right-click on it, and you'll see that "Word Count" function is available. Click
on it to see the number of words in a message box.
Finally you can install a WYSYWIG HTML editor called
Xinha Here! Both the
spell check and word count extensions also work in the Xinha window.
With MediaWiki set up, you're ready to create your knowledge base; I can't help you there, it's
all up to you. MediaWiki and the Firefox extensions have enhanced the way that I do my day-to-day
work, and I'm sure that they can revolutionize the flow of information and knowledge around your
organization.
MediaWiki is a wiki software
package licensed under the GNU
General Public License. It is written in PHP
and requires the MySQL
relational database
management system (although it has some PostgreSQL
support). Historically, MediaWiki was developed to serve the needs of
Wikipedia, a free wiki-based
encyclopedia, but it has since become one
of the most popular general wiki solutions. Today, it is used by all projects of the
Wikimedia Foundation, all wikis
hosted by Wikia, and many other popular and large
wikis.[1] It has also been deployed by companies
as an internal knowledge management
solution, and as a content management
system.
Notably, Novell uses it to operate several
of its high traffic websites, which are not editable by the general public.
MediaWiki provides a rich core feature set and a mechanism to attach
extensions to provide additional
functionality. Due to the strong emphasis on multilinguality in the Wikimedia projects,
internationalization has received
significant attention by developers. The user interface has been fully or partially translated into
more than 70 languages, and can be further customized by site administrators (the entire interface
is editable through the wiki). Due to Wikipedia being one of the world's largest websites, achieving
scalability through multiple layers of caching
and database replication has also
been a major concern for developers. Wikipedia and other Wikimedia projects continue to define a
large part of the requirement set for MediaWiki.
Society
Groupthink :
Two Party System
as Polyarchy :
Corruption of Regulators :
Bureaucracies :
Understanding Micromanagers
and Control Freaks : Toxic Managers :
Harvard Mafia :
Diplomatic Communication
: Surviving a Bad Performance
Review : Insufficient Retirement Funds as
Immanent Problem of Neoliberal Regime : PseudoScience :
Who Rules America :
Neoliberalism
: The Iron
Law of Oligarchy :
Libertarian Philosophy
Quotes
War and Peace
: Skeptical
Finance : John
Kenneth Galbraith :Talleyrand :
Oscar Wilde :
Otto Von Bismarck :
Keynes :
George Carlin :
Skeptics :
Propaganda : SE
quotes : Language Design and Programming Quotes :
Random IT-related quotes :
Somerset Maugham :
Marcus Aurelius :
Kurt Vonnegut :
Eric Hoffer :
Winston Churchill :
Napoleon Bonaparte :
Ambrose Bierce :
Bernard Shaw :
Mark Twain Quotes
Bulletin:
Vol 25, No.12 (December, 2013) Rational Fools vs. Efficient Crooks The efficient
markets hypothesis :
Political Skeptic Bulletin, 2013 :
Unemployment Bulletin, 2010 :
Vol 23, No.10
(October, 2011) An observation about corporate security departments :
Slightly Skeptical Euromaydan Chronicles, June 2014 :
Greenspan legacy bulletin, 2008 :
Vol 25, No.10 (October, 2013) Cryptolocker Trojan
(Win32/Crilock.A) :
Vol 25, No.08 (August, 2013) Cloud providers
as intelligence collection hubs :
Financial Humor Bulletin, 2010 :
Inequality Bulletin, 2009 :
Financial Humor Bulletin, 2008 :
Copyleft Problems
Bulletin, 2004 :
Financial Humor Bulletin, 2011 :
Energy Bulletin, 2010 :
Malware Protection Bulletin, 2010 : Vol 26,
No.1 (January, 2013) Object-Oriented Cult :
Political Skeptic Bulletin, 2011 :
Vol 23, No.11 (November, 2011) Softpanorama classification
of sysadmin horror stories : Vol 25, No.05
(May, 2013) Corporate bullshit as a communication method :
Vol 25, No.06 (June, 2013) A Note on the Relationship of Brooks Law and Conway Law
History:
Fifty glorious years (1950-2000):
the triumph of the US computer engineering :
Donald Knuth : TAoCP
and its Influence of Computer Science : Richard Stallman
: Linus Torvalds :
Larry Wall :
John K. Ousterhout :
CTSS : Multix OS Unix
History : Unix shell history :
VI editor :
History of pipes concept :
Solaris : MS DOS
: Programming Languages History :
PL/1 : Simula 67 :
C :
History of GCC development :
Scripting Languages :
Perl history :
OS History : Mail :
DNS : SSH
: CPU Instruction Sets :
SPARC systems 1987-2006 :
Norton Commander :
Norton Utilities :
Norton Ghost :
Frontpage history :
Malware Defense History :
GNU Screen :
OSS early history
Classic books:
The Peter
Principle : Parkinson
Law : 1984 :
The Mythical Man-Month :
How to Solve It by George Polya :
The Art of Computer Programming :
The Elements of Programming Style :
The Unix Hater’s Handbook :
The Jargon file :
The True Believer :
Programming Pearls :
The Good Soldier Svejk :
The Power Elite
Most popular humor pages:
Manifest of the Softpanorama IT Slacker Society :
Ten Commandments
of the IT Slackers Society : Computer Humor Collection
: BSD Logo Story :
The Cuckoo's Egg :
IT Slang : C++ Humor
: ARE YOU A BBS ADDICT? :
The Perl Purity Test :
Object oriented programmers of all nations
: Financial Humor :
Financial Humor Bulletin,
2008 : Financial
Humor Bulletin, 2010 : The Most Comprehensive Collection of Editor-related
Humor : Programming Language Humor :
Goldman Sachs related humor :
Greenspan humor : C Humor :
Scripting Humor :
Real Programmers Humor :
Web Humor : GPL-related Humor
: OFM Humor :
Politically Incorrect Humor :
IDS Humor :
"Linux Sucks" Humor : Russian
Musical Humor : Best Russian Programmer
Humor : Microsoft plans to buy Catholic Church
: Richard Stallman Related Humor :
Admin Humor : Perl-related
Humor : Linus Torvalds Related
humor : PseudoScience Related Humor :
Networking Humor :
Shell Humor :
Financial Humor Bulletin,
2011 : Financial
Humor Bulletin, 2012 :
Financial Humor Bulletin,
2013 : Java Humor : Software
Engineering Humor : Sun Solaris Related Humor :
Education Humor : IBM
Humor : Assembler-related Humor :
VIM Humor : Computer
Viruses Humor : Bright tomorrow is rescheduled
to a day after tomorrow : Classic Computer
Humor
The Last but not Least Technology is dominated by
two types of people: those who understand what they do not manage and those who manage what they do not understand ~Archibald Putt.
Ph.D
Copyright © 1996-2021 by Softpanorama Society. www.softpanorama.org
was initially created as a service to the (now defunct) UN Sustainable Development Networking Programme (SDNP)
without any remuneration. This document is an industrial compilation designed and created exclusively
for educational use and is distributed under the Softpanorama Content License.
Original materials copyright belong
to respective owners. Quotes are made for educational purposes only
in compliance with the fair use doctrine.
FAIR USE NOTICE This site contains
copyrighted material the use of which has not always been specifically
authorized by the copyright owner. We are making such material available
to advance understanding of computer science, IT technology, economic, scientific, and social
issues. We believe this constitutes a 'fair use' of any such
copyrighted material as provided by section 107 of the US Copyright Law according to which
such material can be distributed without profit exclusively for research and educational purposes.
This is a Spartan WHYFF (We Help You For Free)
site written by people for whom English is not a native language. Grammar and spelling errors should
be expected. The site contain some broken links as it develops like a living tree...
Disclaimer:
The statements, views and opinions presented on this web page are those of the author (or
referenced source) and are
not endorsed by, nor do they necessarily reflect, the opinions of the Softpanorama society. We do not warrant the correctness
of the information provided or its fitness for any purpose. The site uses AdSense so you need to be aware of Google privacy policy. You you do not want to be
tracked by Google please disable Javascript for this site. This site is perfectly usable without
Javascript.
Last modified: March 29, 2020