SSH can be used to secure connections between systems. It allows application
traffic such as that generated by TELNET, FTP POP3, or even X Windows to be both
encrypted and compressed. Compression is useful over slow modem links. Implementations
can allow the user a choice of encryption methods. Client software often offers
both SSH1 and SSH2 support. The user is authenticated by password or public/private
key.
The SSH suite includes the
ssh program which replaces rlogin and telnet,
scp which replaces rcp, and
sftp which replaces ftp. Also included is
sshd which is the server side of the package, and the other basic utilities
like
ssh-add,
ssh-agent,
ssh-keysign,
ssh-keyscan,
ssh-keygen and
sftp-server. OpenSSH supports SSH protocol versions 1.3, 1.5, and 2.0.
OpenSSH is primarily developed by
the OpenBSD Project, and its
first inclusion into an operating system was in
OpenBSD 2.6.
The software is developed outside the USA, using code from roughly 10 countries,
and is freely useable and re-useable by everyone under a BSD license.
Managing the distribution of OpenSSH is split into two teams. One team does strictly
OpenBSD-based development, aiming to produce code that is as clean, simple, and
secure as possible. We believe that simplicity without the portability "goop" allows
for better code quality control and easier review. The other team then takes the
clean version and makes it portable, by adding the portability "goop" so that it
will run on many operating systems (these are known as the p releases,
and named like "OpenSSH 4.0p1"). Please click on the provided link for your operating
system.
One major benefit of SSH, besides the obvious advantage of cryptographically
secure connections, is that it allows you to log on to a server without ever having
to type your password. You do have to type a password (only once -- but we'll get
to that in a minute), but it doesn't have to be the password for your account on
the server, and it will be the same password for every system to which you log in.
That is possible through the magic of authentication via cryptographic keys.
Normally, when you log in to a system, you authenticate by entering your password
for that system. Your password goes, as it is typed, to the remote system, which
authenticates it against the /etc/passwd or /etc/shadow file.
By contrast, SSH uses an authentication method with public-key cryptography. Essentially,
it's a challenge-response mechanism: You can authenticate against a public key on
the server, so when the client connects, the server encrypts a random number with
the public key. If the client possesses the private key, then it can decrypt the
random number and report it back to the server. That proves to the server that the
person logging in has the authorized private key. The private key is further protected
when you encrypt it with a password. The password you type to authenticate via public
key cryptography is the password for your private key.
That sort of authentication requires you to first generate a pair of public and
private keys. The ssh-keygen command does that. Because of the different
versions of the SSH protocol out there, OpenSSH 2.5 and higher can generate three
different types of keys: rsa1, for compatibility with SSH version 1 clients; DSA,
for connecting to SSH protocol version 2 clients using the Digital Signature Algorithm;
and RSA, for connecting to SSH protocol version 2 clients using the standard RSA
algorithm. You can set the type of key SSH generates with the -t option.
Thus to generate your rsa2 public and private key pair, you would run ssh-keygen
-t rsa2. For the three key types, the keys generated are by default stored
in your .ssh directory beneath your home directory. The rsa1 keys
are named identity, DSA keys are named id_dsa, and protocol version
2 RSA keys are named id_rsa. Each key has a corresponding public key with
a .pub extension. You want to check the permissions on the private keys
and make sure that they're not world-readable; these are secrets not intended for
sharing.
To allow authentication, you must make the public key available on the computer
into which you would like to log in. The name of the file into which you put the
public key is $HOME/.ssh/authorized_keys. Each public key is a single line,
so you can use scp to copy the public keys to the destination system and then, on
the remote system, type cat id_dsa.pub >> .ssh/authorized_keys. After that
you can authenticate without sending any sort of password over the network. (The
private key is decrypted on the client only.)
You can set your system to require authentication only once. You can do that
with the SSH authentication agent, ssh-agent. The ssh-agent syntax is rather strange:
because it must set some shell variables, you must use eval `ssh-agent`.
The ssh-agent tries to determine the shell syntax necessary, but occasionally it
fails and you need to pass it the -s option for Bourne shell derivatives such as
ksh and zsh, or the -c option for C Shell derivatives.
You must execute the ssh-agent in your top-level shell for maximum usability.
For a console or ssh-based session that means in your top login shell or, for X-based
sessions, in your .Xclients or another startup script. In either case, you must
kill the ssh-agent with ssh-agent -k prior to quitting, or lots of startup
files will be left around.
The ssh-agent only manages keys; you have to tell it which keys to use. To do
that, you can ssh-add private-key-file, where private-key-file
is $HOME/.ssh/id_dsa or one of your other private keys. Once you type the
passphrase for your key, ssh-agent remembers it and automatically handles the key
requests from new SSH sessions. To handle all contingencies, I add all three of
my keys at login time and forget about it until I'm ready to quit. I end up typing
three passwords, and then I need not enter any more passwords for the rest of the
day.
If I plan on connecting through one server to another server, I connect via SSH
to that first server with the -A option, which allows the server to pass any authentication
requests it gets back to the initial client. (You can make that operation the default
by setting ForwardAgent yes in your ssh configuration file. The per-user
configuration file is $HOME/.ssh/config, and the systemwide configuration
file is probably either /etc/ssh/ssh_config or /usr/local/etc/ssh_config,
depending on how you installed OpenSSH. (In either configuration file, you can set
the parameters on a host-by-host basis, so that different options can apply to different
target systems.)
Forwarding traffic with SSH
Not only can SSH forward your authentication requests, but it can forward your
X Window System traffic as well. And SSH not only forwards the traffic, but also
automatically sets X's DISPLAY variable on the remote system, thus simplifying your
side of things substantially. Nobody likes messing with the DISPLAY variable, Magic
Cookies, or any other part of remote X configuration. SSH can handle all of those
at once. You just need to connect SSH using the -X option, or set ForwardX11
yes in the appropriate config files, and run your X application from the remote
system's command prompt.
When using X, I always make sure to turn compression on with the -C option (Compression
yes in the config file), as X is bandwidth-intensive, to put it politely. With
compression on and a fast cipher such as blowfish (the default for recent versions
of OpenSSH), Netscape is just about usable over a 10-Mb network. Without compression,
it is rather painful, and I would certainly not recommend running any complex X
application on less than 10 Mb.
Perhaps even more interesting is SSH's ability to forward arbitrary ports. Maybe
you read mail on a server that you can also SSH into, and POP3 mail is running while
secure POP3 is not. You therefore wish to forward a port on your workstation to
the POP3 port on the server. Let's pick an arbitrary port, such as 2048. Configure
your mail client (such as Netscape) to connect POP3 to port 2048 on localhost (that
is, your workstation). Then you can run the following command: ssh -N -f -L
2048:mailserver.example.com:110 [email protected] and you'll be able
to connect securely.
What's happening here? -N tells SSH that you're not interested in running a command
on the remote system, only in forwarding the connection, and -f tells SSH to go
into the background once you've authenticated your connection. That way, after you've
entered your passphrase (or once ssh-agent has authenticated you), you won't need
to type more. The magical part is -L 2048:mailserver.example.com:110. That
tells SSH to forward the local port 2048 to mailserver.example.com's port 110. (Port
110 is the standard POP3 port.) So you log in to the mail server, and then anything
on local port 2048 is sent over the SSH connection to port 110 on the remote side,
thus allowing you to safely retrieve your mail.
That method works very nicely for most protocols, including POP3, HTTP, and IMAP,
just so long as you're able to tell the client server to use the local system and
the appropriate port on your local system. For FTP, be sure to use passive FTP,
because active FTP opens a second connection that will not be forwarded via the
SSH port forwarding. Recent versions of OpenSSH, and Commercial SSH version 2, support
SFTP, which works like FTP and uses SSH without the difficulty of port forwarding
and passive mode.
Tricks and traps
Because SSH command syntax descends from the outdated and dangerous rsh syntax,
several neat tricks are possible. My favorite is piping data through SSH to a program
on the remote side. For example, I haven't configured printing on my laptop, as
I can't be sure what device I'll want to print to. Instead, I can run cat /my/file/to/print.txt
| ssh [email protected] lpr -Pwhich_printer, which pipes the file to
the program lpr on the remote side of things. Essentially, anything after the destination
host on the SSH command is passed as a command to the remote server. If disk space
is tight, you can also use that trick to tar files to a storage place on a different
system: tar cvf - source_directory | ssh user@remote_host 'cat > my-tar-file.tar'.
The quotes are necessary to ensure that the remote system, not the local system,
redirects output.
One trap associated with executing commands via SSH is that interactive programs
tend to die reluctantly. That is generally because they expect a terminal to be
available, and SSH does not allocate a terminal for commands that it does not believe
to be interactive. For example, I keep nethack on one system and I execute it via
a script that calls ssh jon@remote-system nethack. For a long time I did
not understand why nethack failed to run properly, but then I discovered SSH's -t
option, which forces allocation of a pseudo-TTY. Using ssh -t jon@remote-system
nethack does the trick just fine.
Another trap is that dangerous configurations of the SSH client drop back to
the notoriously insecure rsh program if the remote system does not have SSH installed.
Your SSH client should print out an error message under those circumstances, and
you would be ill-advised to ignore it. You can disable that behavior with a line
reading FallBackToRsh No in your ssh configuration file.
Although this article hardly covers every facet of SSH, I hope you have learned
a few new ways to use it. I've recently freed myself from the annoyance of typing
passwords frequently. As a system administrator, I find that using SSH to run commands
on remote systems helps me manage them efficiently, both in executing the same command
on multiple systems (such as package upgrades) and in collecting remote data (such
as running uptime and sending the output to a file). As a user, I find that, once
ssh-agent is configured properly, my workday proceeds more smoothly.
ssh (Secure Shell) is a program for logging into a remote machine
and for executing commands on a remote machine. It is intended to replace
rlogin and rsh, and to provide secure encrypted communications
between two untrusted hosts over an insecure network. X11 connections and arbitrary
TCP/IP ports can also be forwarded over the secure channel.
ssh connects and logs into the specified hostname. The user must
prove his or her identity to the remote machine using one of several methods
depending on the protocol version used:
SSH protocol version 1
First, if the machine the user logs in from is listed in /etc/hosts.equiv
or /etc/shosts.equiv on the remote machine, and the user names
are the same on both sides, the user is immediately permitted to log in.
Second, if .rhosts or .shosts exists in the user's home
directory on the remote machine and contains a line containing the name
of the client machine and the name of the user on that machine, the user
is permitted to log in. This form of authentication alone is normally not
allowed by the server because it is not secure.
The second (and primary) authentication method is the rhosts
or hosts.equiv method combined with RSA-based host authentication.
It means that if the login would be permitted by $HOME/.rhosts,
$HOME/.shosts, /etc/hosts.equiv, or /etc/shosts.equiv,
and if additionally the server can verify the client's host key (see
/etc/ssh_known_hosts in the FILES section), only then is login permitted.
This authentication method closes security holes due to IP spoofing, DNS
spoofing, and routing spoofing.
Note to the administrator: /etc/hosts.equiv, $HOME/.rhosts,
and the rlogin/rsh protocol in general, are inherently insecure and should
be disabled if security is desired.
As a third authentication method, ssh supports RSA-based authentication.
The scheme is based on public-key cryptography. There are cryptosystems
where encryption and decryption are done using separate keys, and it is
not possible to derive the decryption key from the encryption key. RSA is
one such system. The idea is that each user creates a public/private key
pair for authentication purposes. The server knows the public key, and only
the user knows the private key. The file $HOME/.ssh/authorized_keys
lists the public keys that are permitted for logging in. When the user logs
in, the ssh program tells the server which key pair it would like
to use for authentication. The server checks if this key is permitted, and
if so, sends the user (actually the ssh program running on behalf
of the user) a challenge in the form of a random number, encrypted by the
user's public key. The challenge can only be decrypted using the proper
private key. The user's client then decrypts the challenge using the private
key, proving that he or she knows the private key but without disclosing
it to the server.
ssh implements the RSA authentication protocol automatically.
The user creates his or her RSA key pair by running
ssh-keygen(1). This stores the private key in $HOME/.ssh/identity
and the public key in $HOME/.ssh/identity.pub in the user's home
directory. The user should then copy the identity.pub to $HOME/.ssh/authorized_keys
in his or her home directory on the remote machine (the authorized_keys
file corresponds to the conventional $HOME/.rhosts file, and has
one key per line, though the lines can be very long). After this, the user
can log in without giving the password. RSA authentication is much more
secure than rhosts authentication.
The most convenient way to use RSA authentication may be with an authentication
agent. See
ssh-agent(1) for more information.
If other authentication methods fail, ssh prompts the user for
a password. The password is sent to the remote host for checking. However,
since all communications are encrypted, the password cannot be seen by someone
listening on the network.
SSH protocol version 2
When a user connects using the protocol version 2, different authentication
methods are available. At first, the client attempts to authenticate using
the public key method. If this method fails, password authentication is
tried.
The public key method is similar to RSA authentication described
in the previous section except that the DSA algorithm is used instead of
the patented RSA algorithm. The client uses his private DSA key
$HOME/.ssh/id_dsa to sign the session identifier and sends the
result to the server. The server checks whether the matching public key
is listed in $HOME/.ssh/authorized_keys and grants access if both
the key is found and the signature is correct. The session identifier is
derived from a shared Diffie-Hellman value and is known only to the client
and the server.
If public key authentication fails or is not available, a password can
be sent encrypted to the remote host for proving the user's identity. This
protocol 2 implementation does not yet support Kerberos or S/Key authentication.
Protocol 2 provides additional mechanisms for confidentiality (the traffic
is encrypted using 3DES, Blowfish, CAST128 or Arcfour) and integrity (hmac-sha1,
hmac-md5). Notice that protocol 1 lacks a strong mechanism for
ensuring the integrity of the connection.
Login session and remote execution
When the user's identity has been accepted by the server, the server
either executes the given command, or logs into the machine and gives the
user a normal shell on the remote machine. All communication with the remote
command or shell will be automatically encrypted.
If a pseudo-terminal has been allocated (normal login session), the user
can disconnect with ~., and suspend ssh with ~^Z.
All forwarded connections can be listed with ~#. If the session
blocks waiting for forwarded X11 or TCP/IP connections to terminate,
ssh can be backgrounded with ~&, although this should not
be used while the user shell is active, as it can cause the shell to hang.
All available escapes can be listed with ~?.
A single tilde character can be sent as ~~ (or by following
the tilde by a character other than those described above). The escape character
must always follow a newline to be interpreted as special. The escape character
can be changed in configuration files or on the command line.
If no pseudo tty has been allocated, the session is transparent and can
be used to reliably transfer binary data. On most systems, setting the escape
character to "none" will also make the session transparent even
if a tty is used.
The session terminates when the command or shell in the remote machine
exits and all X11 and TCP/IP connections have been closed. The exit status
of the remote program is returned as the exit status of ssh.
X11 and TCP forwarding
If the user is using X11 (the DISPLAY environment variable is
set), the connection to the X11 display is automatically forwarded to the
remote side in such a way that any X11 programs started from the shell (or
command) will go through the encrypted channel, and the connection to the
real X server will be made from the local machine. The user should not manually
set DISPLAY. Forwarding of X11 connections can be configured on
the command line or in configuration files.
The DISPLAY value set by ssh will point to the server
machine, but with a display number greater than zero. This is normal behavior,
because ssh creates a "proxy" X server on the server machine for
forwarding the connections over the encrypted channel.
ssh will also automatically set up Xauthority data on the server
machine. For this purpose, it will generate a random authorization cookie,
store it in Xauthority on the server, and verify that any forwarded connections
carry this cookie and replace it by the real cookie when the connection
is opened. The real authentication cookie is never sent to the server machine
(and no cookies are sent in the plain).
If the user is using an authentication agent, the connection to the agent
is automatically forwarded to the remote side unless disabled on the command
line or in a configuration file.
Forwarding of arbitrary TCP/IP connections over the secure channel can
be specified either on the command line or in a configuration file. One
possible application of TCP/IP forwarding is a secure connection to an electronic
purse. Another possible application is going through firewalls.
Server authentication
ssh automatically maintains and checks a database containing
identifications for all hosts it has ever been used with. RSA host keys
are stored in $HOME/.ssh/known_hosts in the user's home directory.
Additionally, the file /etc/ssh_known_hosts is automatically
checked for known hosts. Any new hosts are automatically added to
the user's file. If a host's identification ever changes, ssh warns
about this and disables password authentication to prevent a trojan horse
from getting the user's password. Another purpose of this mechanism is to
prevent man-in-the-middle attacks which could otherwise be used to circumvent
the encryption. The StrictHostKeyChecking option (see below)
can be used to prevent logins to machines whose host key is not known or
has changed.
OPTIONS
The following options are supported:
-2
Forces ssh to try protocol version 2 only.
-4
Forces ssh to use IPv4 addresses only.
-6
Forces ssh to use IPv6 addresses only.
-a
Disables forwarding of the authentication agent connection.
-A
Enables forwarding of the authentication agent connection. This can also
be specified on a per-host basis in a configuration file.
-cblowfish | 3des
Selects the cipher to use for encrypting the session. 3des is used
by default. It is believed to be secure. 3des (triple-des) is an
encrypt-decrypt-encrypt triple with three different keys. It is presumably
more secure than the des cipher, which is no longer fully supported
in ssh. blowfish is a fast block cipher, it appears very
secure and is much faster than 3des.
-c3des-cbc,blowfish-cbc,aes128-cbc
Additionally, for protocol version 2 a comma-separated list of ciphers can
be specified in order of preference. Protocol version 2 supports 3DES, Blowfish,
and AES 128 in CBC mode.
-C
Requests compression of all data (including stdin, stdout, stderr,
and data for forwarded X11 and TCP/IP connections). The compression algorithm
is the same used by gzip(1). (The gzip man page is available in
the SUNWsfman package.) The "level" can be controlled by the
CompressionLevel option (see below). Compression is desirable
on modem lines and other slow connections, but will only slow down things
on fast networks. The default value can be set on a host-by-host basis in
the configuration files. See the Compress option below.
-ech | ^ch | none
Sets the escape character for sessions with a pty (default: `~').
The escape character is only recognized at the beginning of a line. The
escape character followed by a dot (".") closes the connection. If followed
by control-Z, the escape character suspends the connection. If followed
by itself, the escape character sends itself once. Setting the character
to "none" disables any escapes and makes the session fully transparent.
-f
Requests ssh to go to background just before command execution.
This is useful if ssh is going to ask for passwords or passphrases,
but the user wants it in the background. This implies the -n
option. The recommended way to start X11 programs at a remote site is with
something like ssh-fhostxterm.
-g
Allows remote hosts to connect to local forwarded ports.
-iidentity_file
Selects the file from which the identity (private key) for RSA authentication
is read. Default is $HOME/.ssh/identity in the user's home directory.
Identity files may also be specified on a per-host basis in the configuration
file. It is possible to have multiple -i options (and multiple
identities specified in configuration files).
-llogin_name
Specifies the user to log in as on the remote machine. This also may be
specified on a per-host basis in the configuration file.
-Lport:host:hostport
Specifies that the given port on the local (client) host is to be forwarded
to the given host and port on the remote side. This works by allocating
a socket to listen to the port on the local side. Then, whenever a connection
is made to this port, the connection is forwarded over the secure channel
and a connection is made to hostporthostport
from the remote machine. Port forwardings can also be specified in the configuration
file. Only root can forward privileged ports. IPv6 addresses can be specified
with an alternative syntax: port/host/hostport.
-n
Redirects stdin from /dev/null (actually, prevents reading from
stdin). This must be used when ssh is run in the background. A
common trick is to use this to run X11 programs on a remote machine. For
example,
ssh -n shadows.cs.hut.fi emacs &
will start an emacs on shadows.cs.hut.fi, and the X11 connection
will be automatically forwarded over an encrypted channel. The ssh
program will be put in the background. This does not work if ssh
needs to ask for a password or passphrase. See also the -f
option.)
-N
Does not execute a remote command. This is useful if you just want to forward
ports (protocol version 2 only).
-ooption
Can be used to give options in the format used in the configuration file.
This is useful for specifying options for which there is no separate command-line
flag. The option has the same format as a line in the configuration file.
-pport
Specifies the port to connect to on the remote host. This can be specified
on a per-host basis in the configuration file.
-P
Uses a non-privileged port for outgoing connections. This can be used if
your firewall does not permit connections from privileged ports. Notice
that this option turns off RhostsAuthentication and RhostsRSAAuthentication.
-q
Quiet mode. Causes all warning and diagnostic messages to be suppressed.
Only fatal errors are displayed.
-Rport:host:hostport
Specifies that the given port on the remote (server) host is to be forwarded
to the given host and port on the local side. This works by allocating a
socket to listen to the port on the remote side. Then, whenever a connection
is made to this port, the connection is forwarded over the secure channel
and a connection is made to hostporthostport
from the local machine. Port forwardings can also be specified in the configuration
file. Privileged ports can be forwarded only when logging in as root on
the remote machine.
-t
Forces pseudo-tty allocation. This can be used to execute arbitrary screen-based
programs on a remote machine, which can be very useful, for example, when
implementing menu services.
-T
Disables pseudo-tty allocation (protocol version 2 only).
-v
Verbose mode. Causes ssh to print debugging messages about its
progress. This is helpful in debugging connection, authentication, and configuration
problems. Multiple -v options increase the verbosity. Maximum
is 3.
-x
Disables X11 forwarding.
-X
Enables X11 forwarding. This can also be specified on a per-host basis in
a configuration file.
ENVIRONMENT VARIABLES
ssh will normally set the following environment variables:
DISPLAY
The DISPLAY variable indicates the location of the X11 server.
It is automatically set by ssh to point to a value of the form
hostname:n where hostname indicates the
host where the shell runs, and n is an integer greater than or
equal to 1. ssh uses this special value to forward X11 connections
over the secure channel. The user should normally not set DISPLAY
explicitly, as that will render the X11 connection insecure (and will require
the user to manually copy any required authorization cookies).
HOME
Set to the path of the user's home directory.
LOGNAME
Synonym for USER. Set for compatibility with systems that use this
variable.
MAIL
Set to point to the user's mailbox.
PATH
Set to the default PATH, as specified when compiling ssh.
SSH_AUTH_SOCK
Indicates the path of a unix-domain socket used to communicate with the
agent.
SSH_CLIENT
Identifies the client end of the connection. The variable contains three
space-separated values: client ip-address, client port number, and server
port number.
SSH_TTY
This is set to the name of the tty (path to the device) associated with
the current shell or command. If the current session has no tty, this variable
is not set.
TZ
The timezone variable is set to indicate the present timezone if it was
set when the daemon was started, that is, the daemon passes the value on
to new connections.
USER
Set to the name of the user logging in.
Additionally, ssh reads $HOME/.ssh/environment and adds
lines of the format VARNAME=value to the environment
EXIT STATUS
The following exit values are returned:
0
Successful completion.
1
An error occurred.
FILES
$HOME/.ssh/known_hosts
Records host keys for all hosts the user has logged into that are not in
/etc/ssh_known_hosts. See
sshd(1M).
$HOME/.ssh/identity
$HOME/.ssh/id_dsa
Contains the RSA and the DSA authentication identity of the user. These
files contain sensitive data and should be readable by the user but not
accessible by others (read/write/execute). Notice that ssh ignores
a private key file if it is accessible by others. It is possible to specify
a passphrase when generating the key. The passphrase will be used to encrypt
the sensitive part of this file using 3DES.
$HOME/.ssh/identity.pub
$HOME/.ssh/id_dsa.pub
Contains the public key for authentication, that is, the public part of
the identity file in human-readable form. The contents of the $HOME/.ssh/identity.pub
file should be added to $HOME/.ssh/authorized_keys on all machines
where you wish to log in using RSA authentication. The contents of the
$HOME/.ssh/id_dsa.pub file should be added to $HOME/.ssh/authorized_keys
on all machines where you wish to log in using DSA authentication. These
files are not sensitive and can, but need not, be readable by anyone. These
files are never used automatically and are not necessary. They are provided
only for the convenience of the user.
$HOME/.ssh/config
This is the per-user configuration file. The format of this file is described
above. This file is used by the ssh client. This file does not
usually contain any sensitive information, but the recommended permissions
are read/write for the user and not accessible by others.
$HOME/.ssh/authorized_keys
Lists the DSA keys that can be used for logging in as this user. This file
is not highly sensitive, but the recommended permissions are read/write
for the user and not accessible by others.
/etc/ssh/ssh_known_hosts
Systemwide list of known host keys. /etc/ssh_known_hosts contains
RSA keys. This file should be prepared by the system administrator to contain
the public host keys of all machines in the organization and should be world-readable.
The file contains public keys, one per line, in the following format, with
fields separated by spaces: system name, number of bits in modulus, public
exponent, modulus, and optional comment field. When different names are
used for the same machine, all such names should be listed, separated by
commas. See
sshd(1M).
The canonical system name (as returned by name servers)
is used by sshd(1M) to verify the client host when logging in. Other names
are needed because ssh does not convert the user-supplied name
to a canonical name before checking the key, to prevent someone with access
to the name servers from being able able to fool host authentication.
/etc/ssh/ssh_config
Systemwide configuration file. This file provides defaults for those values
that are not specified in the user's configuration file, and for those users
who do not have a configuration file. This file must be world-readable.
$HOME/.rhosts
This file is used in .rhosts authentication to list the host/user
pairs that are permitted to log in. (Notice that this file is also used
by rlogin and rsh, which makes using this file insecure.)
Each line of the file contains a host name (in the canonical form returned
by name servers), and then a user name on that host, separated by a space.
On some machines, this file may need to be world-readable if the user's
home directory is on an NFS partition, because sshd(1M) reads it as root.
Additionally, this file must be owned by the user and must not have write
permissions for anyone else. The recommended permission for most machines
is read/write for the user and not accessible by others.
Notice that,
by default, sshd(1M) will be installed so that it requires successful RSA
host authentication before permitting .rhosts authentication. If
your server machine does not have the client's host key in /etc/ssh_known_hosts,
you can store it in $HOME/.ssh/known_hosts. The easiest way to
do this is to connect back to the client from the server machine using
ssh. This will automatically add the host key to $HOME/.ssh/known_hosts.
$HOME/.shosts
This file is used exactly the same way as .rhosts. The purpose
for having this file is to be able to use rhosts authentication with
ssh without permitting login with
rlogin(1) or
rsh(1).
/etc/hosts.equiv
This file is used during .rhosts authentication. It contains canonical
hosts names, one per line. (See sshd(1M) for the full format description.).
If the client host is found in this file, login is automatically permitted,
provided that client and server user names are the same. In addition, successful
RSA host authentication is normally required. This file should only be writable
by root.
/etc/ssh/shosts.equiv
This file is processed exactly as /etc/hosts.equiv. This file may
be useful to permit logins using ssh but not using rsh
or rlogin.
/etc/ssh/sshrc
Commands in this file are executed by ssh when the user logs in
just before the user's shell or command is started. See sshd(1M) for more
information.
$HOME/.ssh/rc
Commands in this file are executed by ssh when the user logs in
just before the user's shell or command is started. See sshd(1M) for more
information.
The scp utility copies files between hosts on a network. It uses
ssh(1) for data transfer, and uses the same authentication and provides
the same security as ssh(1). Unlike
rcp(1), scp will ask for passwords or passphrases if they are needed
for authentication.
Any file name may contain a host and user specification to indicate that
the file is to be copied to/from that host. Copies between two remote hosts
are permitted.
OPTIONS
The following options are supported:
-4
Forces scp to use IPv4 addresses only.
-6
Forces scp to use IPv6 addresses only.
-B
Selects batch mode. (Prevents asking for passwords or passphrases.)
-ccipher
Selects the cipher to use for encrypting the data transfer. This option
is directly passed to
ssh(1).
-C
Compression enable. Passes the -C flag to ssh(1) to enable
compression.
-iidentity_file
Selects the file from which the identity (private key) for RSA authentication
is read. This option is directly passed to ssh(1).
-ooption
The given option is directly passed to ssh(1).
-p
Preserves modification times, access times, and modes from the original
file.
-Pport
Specifies the port to connect to on the remote host. Notice that this option
is written with a capital `P', because -p is already reserved
for preserving the times and modes of the file in
rcp(1).
-q
Disables the progress meter.
-r
Recursively copies entire directories.
-Sprogram
Specifies the name of the program to use for the encrypted connection. The
program must understand ssh(1) options.
-v
Verbose mode. Causes scp and ssh(1) to print debugging messages
about their progress. This is helpful in debugging connection, authentication,
and configuration problems.
OPERANDS
The following operands are supported:
host1, host2,...
The name(s) of the host from or to which the file is to be copied.
file1, file2,...
The file(s) to be copied.
EXIT STATUS
The following exit values are returned:
0
Successful completion.
1
An error occurred.
ATTRIBUTES
See
attributes(5) for descriptions of the following attributes:
To view license terms, attribution, and copyright for OpenSSH, the default
path is /var/sadm/pkg/SUNWsshdr/install/copyright. If the Solaris operating
environment has been installed anywhere other than the default, modify the given
path to access the file at the installed location.
AUTHORS
scp is based on the rcp(1) program in the BSD source code from the
Regents of the University of California. The authors are Timo Rinne and Tatu
Ylonen.
How to Configure Clients
The clients ssh and scp are quite configurable, with many settings
that can be changed to suit your whim. If you want to modify the behavior of these
clients, three general techniques are at your disposal:
Environment variables For minor changes to the behavior of
scp
Command-line options For changing the behavior of ssh
or scp for a single invocation
Configuration keywords For changes that remain in force until
you change them again; these are stored in a client configuration file
We now present a general overview of these three methods.
Environment Variables
Several client features are controlled by environment variables. For example,
scp prints statistics about each file it transfers if the environment variable
SSH_ALL_SCP_STATS is set. Environment variables may be set in your current shell
by the standard methods:
# C shell family (csh, tcsh)
$ setenv SSH_ALL_SCP_STATS 1

# Bourne shell family (sh, ksh, bash)
$ SSH_ALL_SCP_STATS=1
$ export SSH_ALL_SCP_STATS
Alternatively, environment variables and values may be specified in a file. System
administrators can set environment variables for all users in /etc/environment,
and users can set them in ~/.ssh/environment (SSH1, OpenSSH) and ~/.ssh2/environment
(SSH2). These files contain lines of the format:
NAME=VALUE
where NAME is the name of an environment variable, and VALUE is its value. The value is taken literally, read from the equals
sign to the end of the line. Don't enclose the value in quotes, even if it contains
whitespace, unless you want the quotes to be part of the value.
Command-Line Options
Command-line options let you change a client's behavior just once at invocation.
For example, if you're using ssh1 over a slow modem connection, you can tell
SSH1 to compress the data with the -C command-line option:
$ ssh1 -C server.example.com
ssh, scp, and most of their support programs, when invoked with
the -h option, print a help message listing all of their command-line options.
For example:
# SSH1, SSH2
$ ssh -h
$ ssh-keygen2 -h
Client Configuration Files
If you don't want to retype command-line options continually, configuration
files let you change a client's behavior now and in the future, until you change
the configuration file again. For example, you can enable compression for all clients
you invoke by inserting this line into a client configuration file:
Compression yes
In a client configuration file, client settings are changed by specifying keywords
and values.
In the example, the keyword is Compression and the value is yes.
In SSH1 and OpenSSH, you may optionally separate the keyword and value with an equals
sign:
Compression = yes
SSH2 doesn't support this syntax, however, so it can be easier always to use
the "keyword <space> value" format to avoid confusion.
You may configure clients to behave differently for each remote host you visit.
This can be done on the fly with command-line options, but for anything reasonably
complex, you'll end up typing long, inconvenient command lines like:
Alternatively, you can set these options within a configuration file. The following
entry duplicates the function of the command-line options above, collecting them
under the name "myserver":
# SSH2, OpenSSH
Host myserver
 ForwardAgent no
 Port 220
 Cipher blowfish
 User sally
 IdentityFile myself
 HostName server.example.com
To run a client with these options enabled, simply type:
$ ssh1 myserver
Configuration files take some time to set up, but in the long run they are significant
timesavers.
We've given you a peek at the structure of a configuration file: a
Host specification, followed by a bunch of keyword/value pairs. In the coming
sections, we continue this philosophy, defining the structure and general rules
before explaining the meanings of keywords. Once the generalities are covered, we'll
dive into specific keywords. Sound good? Let's go.
Keywords versus command-line options
As we cover the many configuration keywords, note that all can be supplied on
the command line if desired. The -o command-line option exists for this purpose.
For any configuration line of the form:
Keyword Value
you may type:
SSH1 and OpenSSH allow use of the equals sign (=) between the keyword and
value, which allows you to omit the quotes on the command line: ssh -o Keyword=Value.
Another relationship between command-line options and configuration keywords
is found in the -F option (SSH2 only). This option instructs an SSH2 client
to use a different configuration file instead of ~/.ssh2/ssh2_config. For
example:
$ ssh2 -F ~/.ssh2/other_config
Unfortunately there's no equivalent option for SSH1 or OpenSSH clients.
Global and local files
Client configuration files come in two flavors. A single, global client
configuration file, usually created by a system administrator, governs client behavior
for an entire computer. The file is traditionally /etc/ssh_config (SSH1,
OpenSSH) or /etc/ssh2/ssh2_config (SSH2). (Don't confuse these with the
server configuration files in the same directories.) Each user may also create
a local client configuration file within his or her account, usually ~/.ssh/config
(SSH1, OpenSSH) or ~/.ssh2/ssh2_config (SSH2). This file controls the behavior
of clients run in the user's login session.
Note: The system administrator may change the locations of client configuration
files, using the compile-time flag --with-etcdir or the serverwide
keyword UserConfigDirectory.
Values in a user's local file take precedence over those in the global file.
For instance, if the global file turns on data compression, and your local file
turns it off, the local file wins for clients run in your account. We cover precedence
in more detail soon.
Configuration file sections
Client configuration files are divided into sections. Each section contains
settings for one remote host or for a set of related remote hosts, such as all hosts
in a given domain.
The beginning of a section is marked differently in different SSH implementations.
For SSH1 and OpenSSH, the keyword Host begins a new section, followed by
a string called a host specification. The string may be a hostname:
Host server.example.com
an IP address:
Host 123.61.4.10
a nickname for a host:
Host my-nickname
or a wildcard pattern representing a set of hosts, where ? matches any single character
and * any sequence of characters (just like filename wildcards in your favorite
Unix shell):
Host *.example.com
Host 128.220.19.*
Some further examples of wildcards:
Host *.edu
Any hostname in the edu domain
Host a*				Any hostname whose
name begins with "a"
Host *1*				Any hostname
(or IP address!) with 1 in it
Host *				Any hostname or IP address
For SSH2, a new section is marked by a host specification string followed by
a colon. The string, like the argument of Host, may be a computer name:
server.example.com:
an IP address:
123.61.4.10:
a nickname:
my-nickname:
or a wildcard pattern:
*.example.com:

128.220.19.*:
Following the host-specification line are one or more settings, i.e., configuration
keywords and values, as in the example we saw earlier. The following table contrasts
SSH1 and SSH2 configuration files:
SSH1, OpenSSH
SSH2
Host myserver
 User sally
 IdentityFile myself
 ForwardAgent no
 Port 220
 Cipher blowfish
myserver:
 User sally
 IdentityFile myself
 ForwardAgent no
 Port 220
 Ciphers blowfish
The settings apply to the hosts named in the host specification. The section
ends at the next host specification or the end of the file, whichever comes first.
Multiple matches
Because wildcards are permitted in host specifications, a single hostname might
match two or more sections in the configuration file. For example, if one section
begins:
Host *.edu
and another begins:
Host *.harvard.edu
and you connect to server.harvard.edu, which section applies? Believe it or not,
they both do. Every matching section applies, and if a keyword is set more than
once with different values, the earliest value takes precedence.
Suppose your client configuration file contains two sections to control data
compression, password authentication, and password prompting:
Host *.edu
 Compression yes
 PasswordAuthentication yes

Host *.harvard.edu
 Compression no
 PasswordPromptLogin no
and you connect to server.harvard.edu:
$ ssh server.harvard.edu
Notice that the string server.harvard.edu matches both Host
patterns, *.edu and *.harvard.edu. As we've said, the keywords
in both sections apply to your connection. Therefore, the previous ssh command
sets values for keywords Compression, PasswordAuthentication,
and PasswordPromptLogin.
But notice, in the example, that the two sections set different values for
Compression. What happens? The rule is that the first value prevails, in
this case, yes. So in the previous example, the values used for server.harvard.edu
are:
Compression yes          The first of the Compression lines
PasswordAuthentication yes          Unique to first section
PasswordPromptLogin no          Unique to second section
and as shown in Figure below. Compressionno is ignored because
it is the second Compression line encountered. Likewise, if 10 different
Host lines match server.harvard.edu, all 10 of those sections apply, and
if a particular keyword is set multiple times, only the first value is used.
SSH1 client configuration file with multiple matches (SSH2 not shown)
While this feature might seem confusing, it has useful properties. Suppose you
want some settings applied to all remote hosts. Simply create a section beginning
with:
Host *
and place the common settings within it. This section should be either the first
or the last in the file. If first, its settings take precedence over any others.
This can be used to guard against your own errors. For example, if you want to make
sure you never, ever, accidentally configure SSH sessions to fall back to the insecure
rsh protocol, at the beginning of your configuration file put:
# First section of file
Host *
 FallBackToRsh no
Alternatively, if you place Host* as the last section in the
configuration file, its settings are used only if no other section overrides them.
This is useful for changing SSH's default behavior, while still permitting overrides.
For example, by default, data compression is disabled. You can make it enabled by
default by ending your configuration file with:
# Last section of file
Host *
 Compression yes
Voilá, you have changed the default behavior of ssh and scp for
your account! Any other section, earlier in the configuration file, can override
this default simply by setting Compression to no.
Making nicknames for hosts
Suppose your client configuration file contains a section for the remote host
myserver.example.com :
Host myserver.example.com
 ...
One day, while logged onto ourclient.example.com, you decide to establish an
SSH connection to myserver.example.com. Since both computers are in the same domain,
example.com, you can omit the domain name on the command line and simply type:
$ ssh myserver
This does establish the SSH connection, but you run into an unexpected nuance of
configuration files. ssh compares the command-line string "myserver" to the
Host string "myserver.example.com", determines that they don't match, and doesn't
apply the section of the configuration file. Yes, the software requires an exact
textual match between the hostnames on the command line and in the configuration
file.
You can get around this limitation by declaring myserver to be
a nickname for myserver.example.com. In SSH1 and OpenSSH, this is done with the
Host and HostName keywords. Simply use Host with the
nickname and HostName with the fully qualified hostname:
ssh will now recognize that this section applies to your command ssh
myserver. You may define any nickname you like for a given computer, even if
it isn't related to the original hostname:
Then you can use the nickname on the command line:
$ ssh1 simple
For SSH2, the syntax is different but the effect is the same. Use the nickname
in the host specification, and provide the full name to the Host keyword:
# SSH2 only
simple:
 Host myserver.example.com
 ...
Then type:
$ ssh2 simple
Nicknames are convenient for testing new client settings. Suppose you have an SSH1
configuration for server.example.com:
Host server.example.com
 ...
and you want to experiment with different settings. You can just modify the settings
in place, but if they don't work, you have to waste time changing them back. The
following steps demonstrate a more convenient way:
Within the configuration file, make a copy of the section you want
to change:
# Original
Host server.example.com
 ...
# Copy for testing
Host server.example.com
 ...
In the copy, change "Host" to "HostName":
# Original
Host server.example.com
 ...
# Copy for testing
HostName server.example.com
 ...
Add a new Host line at the beginning of the copy, using
a phony name, for example, "Host my-test":
# Original
Host server.example.com
...
# Copy for testing
Host my-test
 HostName server.example.com
 ...
Setup is done. In the copy (my-test), make all the changes
you want and connect using ssh my-test. You can conveniently compare
the old and new behavior by running ssh server.example.com versus ssh
my-test. If you decide against the changes, simply delete the my-test
section. If you like the changes, copy them to the original section
(or delete the original and keep the copy).
You can do the same with SSH2:
# Original
server.example.com:
 ...
# Copy for testing
my-test:
 Host server.example.com
 ...
Comments, indenting, and style
You probably noticed in the previous examples that we are using the # symbol
to represent comments:
# This is a comment
In fact, any line beginning with # in the configuration file is treated as a
comment and ignored. Likewise, blank lines (empty or containing only whitespace)
are also ignored.
You might also have noticed that the lines following a host specification are
indented:
Indenting is considered good style because it visually indicates the beginning of
a new section. It isn't required, but we recommend it.
What Is Forwarding?
Forwarding is a type of interaction with another network application, as shown
in Figure below.
SSH forwarding
SSH intercepts a service request from some other program on one side of an SSH
connection, sends it across the encrypted connection, and delivers it to the intended
recipient on the other side. This process is mostly transparent to both sides of
the connection: each believes it is talking directly to its partner and has no knowledge
that forwarding is taking place. Even more powerfully, SSH forwarding can achieve
certain types of communication that are impossible without it.
Forwarding isn't a new concept. The basic operation of a terminal connection
over a network (say, using telnet) is also a kind of forwarding. In a telnet
connection, you sit on one end, your remote shell is on the other, and both sides
operate as if directly connected by a serial cable. Nevertheless, sitting in the
middle is a cooperating telnet client and server, forwarding bytes back and forth.
SSH forwarding is much the same, except SSH plays fancy tricks with the data to
add security.
We have also seen another type of SSH forwarding, agent forwarding. This let
us create SSH connections from one computer, through a second computer, and onto
a third using public-key authentication, but without installing our private key
on the second machine. To accomplish this, an SSH server pretended to be an SSH
agent, while transparently forwarding data to and from a remote agent. This paradigm
holds true for TCP port forwarding and X forwarding, as the SSH server transparently
masquerades as another network application
Port Forwarding
SSH uses TCP/IP as its transport mechanism, usually TCP port 22 on the server
machine, as it encrypts and decrypts the traffic passing over the connection. We
will now discuss a cool feature that encrypts and decrypts TCP/IP traffic belonging
to other applications, on other TCP ports, using SSH. This process, called port
forwarding, is largely transparent and quite powerful. Telnet, SMTP, NNTP, IMAP,
and other insecure protocols running over TCP can be made secure by forwarding.
IMAP server machine must be running an SSH server for port forwarding to provide
real protection.
Our port forwarding example protects your IMAP connection but doesn't truly
protect your email messages. Before reaching your IMAP server, the messages
pass through other mail servers and may be intercepted in transit. For end-to-end
email security, you and your correspondent should use tools such as PGP or S/MIME
to sign and/or encrypt the messages themselves.
In short, with minimal configuration changes to your programs, SSH port forwarding
protects arbitrary TCP/IP connections by redirecting them through an SSH session.
Port forwarding can even pass a connection safely through a firewall if you configure
things properly. Once you start securing your communications with port forwarding,
you'll wonder how you ever got along without it. Here are examples of what you can
do:
Access various kinds of TCP servers (e.g., SMTP, IMAP, POP, LDAP, etc.) across
a firewall that prevents direct access.
Provide protection for your sessions with these same TCP servers, preventing
disclosure or alteration of passwords and other content that would otherwise
be sent in the clear as part of the session.
Tunnel the control connection of an FTP session, to encrypt your username,
password, and commands. (It isn't usually possible to protect the data channels
that carry the file contents, though. )
Use your ISP's SMTP servers for sending mail, even if you're connected outside
the ISP's network and the ISP forbids mail relaying from your current location.
SSH port forwarding is a general proxying mechanism for TCP only. (See Sidebar
"TCP Connections" for an overview of TCP concepts.) Forwarding can't work with protocols
not built on TCP, such as the UDP-based DNS, DHCP, NFS, and NetBIOS, or with non-IP-based
protocols, such as AppleTalk or Novell's SPX/IPX. We're being a little imprecise
here. DHCP is entirely based on UDP, so SSH port forwarding can't do anything with
it. The others, however, either use both TCP and UDP for different purposes or can
sometimes be configured to run over TCP, though they generally use UDP. Nevertheless,
in most common situations, SSH can't forward them.
Local Forwarding
In our earlier example, we had an IMAP server running on machine S, and an email
reader on home machine H, and we wanted to secure the IMAP connection using SSH.
Let's delve into that example in more detail.
IMAP uses TCP port 143; this means that an IMAP server will be listening for
connections on port 143 on the server machine. To tunnel the IMAP connection through
SSH, you need to pick a local port on home machine H (between 1024 and 65535) and
forward it to the remote socket (S,143). Suppose you randomly pick local port 2001.
The following command then creates the tunnel:
[3] You can also use
ssh -L2001:S:143 S, substituting "S" for localhost, but we will discuss
later why localhost is the better alternative when possible.
$ ssh -L2001:localhost:143 S
The -L option specifies local forwarding, in which the TCP client is on
the local machine with the SSH client. The option is followed by three values separated
by colons: a local port to listen on (2001), the remote machine name or IP address
(S), and the remote, target port number (143).
The previous command logs you into S, as it will if you just type sshS. However, this SSH session has also forwarded TCP port 2001 on H
to port 143 on S; the forwarding remains in effect until you log out of the session.
To make use of the tunnel, the final step is to tell your email reader to use the
forwarded port. Normally your email program connects to port 143 on the server machine,
that is, the socket (S,143). Instead, it's configured to connect to port 2001 on
home machine H itself, i.e., socket (localhost,2001). So the path of the connection
is now as follows:
The email reader on home machine H sends data to local port 2001.
The local SSH client on H reads port 2001, encrypts the data, and
sends it through the SSH connection to the SSH server on S.
The SSH server on S decrypts the data and sends it to the IMAP server
listening on port 143 on S.
Data is sent back from the IMAP server to home machine H by the same
process in reverse.
Port forwarding can be specified only when you create an SSH connection. You
can't add a forwarding to an existing SSH connection with any SSH implementation
we know of, though there's nothing intrinsic to the SSH protocol that would prevent
it, and it would sometimes be a useful feature. Instead of using the -L option
to establish a local forwarding, you can use the LocalForward keyword in
your client configuration file:
Note the small syntactic differences. In SSH1 and OpenSSH, there are two arguments:
the local port number, and the remote socket expressed as host:port. In SSH2,
the expression is just as on the command line, except that it must be enclosed in
double quotes. If you forget the quotes, ssh2 doesn't complain, but it doesn't
forward the port, either.
Our example with home machine H and IMAP server S can be set up like this:
# SSH1, OpenSSH
Host local-forwarding-example
 HostName S
 LocalForward 2001 localhost:143
# Run on home machine H
$ ssh local-forwarding-example
Local forwarding and GatewayPorts
In SSH1 and OpenSSH, by default, only the host running the SSH client can connect
to locally forwarded ports. This is because ssh listens only on the machine's
loopback interface for connections to the forwarded port; that is, it binds the
socket (localhost,2001), a.k.a. (127.0.0.1,2001), and not (H,2001). So, in the preceding
example, only machine H can use the forwarding; attempts by other machines to connect
to (H,2001) get "connection refused." However, ssh for SSH1 and OpenSSH has
a command-line option, -g, that disables this restriction, permitting any
host to connect to locally forwarded ports:
The client configuration keyword GatewayPorts also controls this feature;
the default value is no, and giving GatewayPorts=yes does the
same thing as -g:
# SSH1, OpenSSH
GatewayPorts yes
There's a reason why GatewayPorts and -g are disabled by default:
they represent a security risk.
Remote forwarding
A remotely forwarded port is just like a local one, but the directions are reversed.
This time the TCP client is remote, its server is local, and a forwarded connection
is initiated from the remote machine.
Continuing with our example, suppose instead that you are logged into server
machine S to begin with, where the IMAP server is running. You can now create a
secure tunnel for remote clients to reach the IMAP server on port 143. Once again,
you select a random port number to forward (say, 2001 again) and create the tunnel:
$ ssh -R2001:localhost:143 H
The -R option specifies remote forwarding. It is followed by three values,
separated by colons as before but interpreted slightly differently. The remote port
to be forwarded (2001) is now first, followed by the machine name or IP address
(localhost) and port number (143). SSH can now forward connections from (localhost,143)
to (H,2001).
Once this command has run, a secure tunnel has been constructed from the port
2001 on the remote machine H, to port 143 on the server machine S. Now any program
on H can use the secure tunnel by connecting to (localhost,2001). As before, the
command also runs an SSH terminal session on remote machine H, just as ssh H
does.
As with local forwarding, you may establish a remote forwarding using a keyword
in your client configuration file. The RemoteForward keyword is analogous
to LocalForward, with the same syntactic differences between SSH1 and SSH2:
For example, here's the preceding forwarding defined in an SSH2-format configuration
file:
# SSH2 only
remote-forwarding-example:
 Host H
 RemoteForward "2001:S:143"

$ ssh2 remote-forwarding-example
You might think that the GatewayPorts feature discussed in the last
section applies equally well to remote port forwardings. This would make sense as
a feature, but as it happens, it isn't done. There would have to be a way for the
client to communicate this parameter to the server for a given forwarding, and that
feature hasn't been included in the SSH protocol. In SSH1 and SSH2, remotely forwarded
ports always listen on all network interfaces and accept connections from anywhere.
The OpenSSH server does accept the GatewayPorts configuration option, and
it applies globally to all remote forwardings established by that server.
Trouble with Multiple Connections
If you use LocalForward or RemoteForward in your configuration
file, you might run into a subtle problem. Suppose you have set up a section in
your configuration file to forward local port 2001 to an IMAP server:
# SSH1 syntax used for illustration
Host server.example.com
 LocalForward 2001 server.example.com:143
This configuration works fine if you connect once:
$ ssh server.example.com
But if you try to open a second ssh connection to server.example.com at the
same time-perhaps to run a different program in another window of your workstation-the
attempt will fail:
$ ssh server.example.com
Local: bind: Address already in use
Why does this happen? Because your configuration file section tries to forward
port 2001 again but finds that port is already in use ("bound" for listening) by
the first instance of ssh. You need some way to make the connection but omit
the port forwarding.
SSH1 (but not OpenSSH) provides a solution, the client configuration keyword
ClearAllForwardings. From the name, you might think it terminates existing
forwardings, but it doesn't. Rather, it nullifies any forwardings specified in the
current ssh command. In the previous example, you can connect without forwardings
to server.example.com with:
# SSH1 only
$ ssh1 -o ClearAllForwardings=yes server.example.com
The original tunnel, set up by the first invocation, continues to exist, but
ClearAllForwardings prevents the second invocation from attempting to recreate
the tunnel. To illustrate the point further, here's a rather silly command:
The -L option specifies a forwarding, but ClearAllForwardings
cancels it. This silly command is identical in function to:
$ ssh1 mymachine
ClearAllForwardings may also be placed in your client configuration
file, of course. It seems more useful on the command line, however, where it can
be used on the fly without editing a file.
Comparing Local and Remote PortForwarding
The differences between local and remote forwarding can be subtle. It can get
a bit confusing to know which kind of forwarding to use in a given situation. The
quick rule is look for the TCP client application.
If the TCP client application (whose connections you want to
forward) is running locally on the SSH client machine, use local
forwarding. Otherwise, the client application is on the remote SSH
server machine, and you use remote forwarding.
The rest of this section is devoted to dissecting the forwarding process in detail
and understanding where this rule comes from.
Common elements
Local and remote forwarding can be confusing because of overloaded terminology.
In a given port forwarding situation, there are two clients and two servers lying
around. We have the SSH client and server programs (e.g., ssh and sshd
), plus the TCP application's client and server programs whose connection you
want to protect by port forwarding.
An SSH session has a direction of establishment. That is, you run an SSH client
on one machine, and it initiates a session with an SSH server on another. Likewise,
a forwarded connection has a direction of establishment: you run an application
client on one machine, and it initiates a session with a service on another. These
two directions may or may not match. This is the difference between local and remote
forwarding. Let's introduce some terminology and provide some diagrams to make sense
of this.
To begin with, we have an application client and server running on two hosts,
A and B. The application server is listening on a well-known port W for incoming
client connections. Without SSH, you can tell the application client that its server
is on host B, port W. The client makes a direct connection to the server, and all
application protocol data go in the clear over the network:
Direct client/server connection (no forwarding)
To protect the application protocol data by forwarding, you establish an SSH
session between these two hosts. When setting up the SSH session, you select an
unused port number P on the application client side (host A), and request SSH port
forwarding from the socket (A,P) to the socket (B,W). Once the session is established,
the SSH process on A is listening for incoming TCP connection requests on port P.
Tell the application client that its server is on (A,P) instead of (B,W), and the
stage is now set for port forwarding.
There are now two cooperating SSH processes with an established, encrypted SSH
session between them; you don't yet distinguish between the SSH client and server.
Inside that session, SSH creates multiple channels, or logical streams for carrying
data. It uses channels to carry and distinguish the input, output, and error streams
for an interactive login or remote command run via SSH, and similarly creates a
new channel for each use of a port forwarding, to carry the forwarded data inside
the protected SSH session.
As Figure above shows that now, when the application client tries to connect
to its server, it connects instead to the listening SSH process (1). The SSH listener
notices this and accepts the connection. It then notifies its partner SSH process
that a new instance of this port forwarding is starting up, and they cooperate to
establish a new channel for carrying the data for this forwarding instance (2).
Finally, the partner SSH process initiates a TCP connection to the target of the
port forwarding: the application server listening on (B,W) (3). Once this connection
succeeds, the port forwarding instance is in place. The SSH processes cooperate
to pass back and forth any data transmitted by the application client and server,
over the channel inside the SSH session. This allows them to communicate and secures
the application's activities on the network.
Local versus remote forwarding: the distinction
With this general framework in place, you can distinguish between local and remote
forwarding. First we introduce some terms. In the generic port forwarding description
in the last section, you saw that one SSH process listens for connections, while
the other is ready to initiate connections in response to connections accepted on
the other side, to complete the forwarded path. We call the first side the listening
side of the SSH session with respect to this forwarding, and the other, the connecting
side. For example, in the Figure above host A is the listening side, while host
B is the connecting side. Note that these terms aren't mutually exclusive. Since
a single SSH session may have multiple forwardings in place, the same side of a
session may be the listening side for some forwardings, and simultaneously the connecting
side for others. But with respect to any particular forwarding, it is one or the
other.
Now, recall that in the last section we didn't label the SSH processes according
to which was the SSH client and which the SSH server, but simply referred to two
cooperating SSH processes. We do so now, and can state succinctly the local versus
remote distinction:
In a local forwarding the application client and hence the listening side
are located with the SSH client. The application server and connecting side
are located with the SSH server.
In a remote forwarding the situation is reversed: the application client
and listening side are located with the SSH server, while the application server
and connecting side are located with the SSH client.
So, as we said at the beginning of this section: use a local forwarding when
the application client is on the local side of the SSH connection, and a remote
forwarding when it's on the remote side.
Forwarding Off-Host
In all our discussions of port forwarding so far, the application client and
server have been located on the machines on the ends of the SSH session. This is
reflected in our always using "localhost" in naming the target socket of a forwarding:
$ ssh -L2001:localhost:143 server.example.com
Since the application server is located on the same machine as the connecting
side of the SSH port forwarding, the target host can be "localhost." But the connections
between the application client and the SSH listening side, and between the application
server and the SSH connecting side, are themselves TCP connections. For convenience,
TCP implementations allow programs to make connections between two sockets on the
same host. The connection data is simply transferred from one process to another
without actually being transmitted on any real network interface. However, in principle,
either the application client or server-or both-could be on different machines,
potentially involving as many as four hosts in a single forwarding:
Off-host port forwarding
Although this situation is possible, you generally don't want to do it for security
reasons, namely privacy and access control.
Privacy
The complete path followed by forwarded data includes three TCP connections.
But only the second connection, between the two SSH processes, is protected as a
channel inside the SSH session. The other two connections are just simple TCP connections.
Normally each of these is on a single host, and is therefore protected from network
snooping or interference, so the entire forwarding path is secure. But if either
of these two connections is between different hosts, its data will be vulnerable
in transit.
Access control and the loopback address
The other security problem of off-host forwarding concerns the listening side.
In short, the listening side of a forwarding has no access control, so intruders
may gain access to it. To explain this problem, we must first discuss the loopback
address of a host.
In addition to any physical network interfaces it may have, a host running IP
has also has a virtual one called the loopback interface. This is a software construct,
not corresponding to any network hardware. Nonetheless, the loopback appears and
responds like a real interface. Under Unix, it is often named lo0 and is listed
by ifconfig:
$ ifconfig -a
...
lo0: flags=849<UP,LOOPBACK,RUNNING,MULTICAST> mtu 8232
        inet 127.0.0.1 netmask ff000000
The loopback interface leads back to the host itself. A datagram "transmitted" on
the loopback interface immediately appears as an incoming packet on the loopback
interface and is picked up and processed by IP as being destined for the local host.
The loopback interface is always assigned the same IP address: 127.0.0.1, the loopback
address,[4] and the local naming
service provides the name "localhost" for that address. This mechanism gives a reliable
way for processes to communicate with one another on the local host via IP, regardless
of what IP addresses the host may have on real connected networks, or indeed if
the host has no real network connections at all. You can always refer to your local
host using the well-known loopback address.
[4] Actually, the entire
network 127.0.0.0/8-comprising 24 million addresses-is reserved for addresses
that refer to the local host. Only the address 127.0.0.1 is commonly used, although
we have seen devices use a handful of others for special purposes, such as "reject"
interfaces on a terminal server or router.
By design, a loopback address is local to its host. One machine can't contact
the loopback address of another. Since the loopback address 127.0.0.1 is standard
on all IP hosts, any connection to 127.0.0.1 leads a machine to talk to itself.
(Plus, the loopback network isn't routed on the Internet.)
Listening on ("binding") an interface
When a host listens on a TCP port, it establishes a potential endpoint for a
TCP connection. But the endpoints of a TCP connection are sockets, and a socket
is an (address,port) pair, not a (host,port) pair. Listening must take place on
a particular socket and thus be associated with a particular address, hence a particular
interface on the host. This is called binding the interface. Unless otherwise specified,
when asked to listen on a particular port, TCP binds all the host's interfaces and
accepts connections on any of them. This is generally the right behavior for a server.
It doesn't care how many network interfaces the local host has: it just accepts
any connection made to its listening port, regardless of which host address was
requested.
[5] Named after the Berkeley
sockets library routine bind, commonly used to establish the association.
Consider, however, what this means in the case of SSH port forwarding. There
is no authentication or access control at all applied to the listening side of a
forwarding; it simply accepts any connection and forwards it. If the listening side
binds all the host's interfaces for the forwarded port, this means that anyone at
all with network connectivity to the listening host-possibly the whole Internet!-can
use your forwarding. This is obviously not a good situation. To address it, SSH
by default binds only the loopback address for the listening side of a forwarding.
This means that only other programs on the same host may connect to the forwarded
socket. This makes it reasonably safe to use port forwarding on a PC or other single-user
machine but is still a security problem on multiuser hosts. On most Unix machines,
for example, a knowledgeable user can connect to any listening sockets and see what's
on them. Keep this in mind when using port forwarding on a Unix machine.
If you want to allow off-host connections to your forwarded ports, you can use
the -g switch or GatewayPorts option to have the listening side
bind all interfaces, as we did in an earlier example:
$ ssh1 -g -L P:S:W B
But be aware of the security implications! You may want to exercise more control
over the use of forwarded ports in this situation by using TCP-wrappers, which we
discuss later in this chapter.
Bypassing a Firewall
Let's tackle a more complicated example of port forwarding. As shown in the Figure
below your home machine H talks to work machine W via a bastion host, B, and you
want to access your work email from home. Machine W runs an IMAP server, and your
home machine H has an IMAP-capable email reader, but you can't hook them up. Your
home IMAP client expects to make a TCP connection directly to the IMAP server on
W, but unfortunately that connection is blocked by the firewall. Since host B is
inside the firewall, and it's running an SSH server, there should be some way to
put all the pieces together and make the IMAP connection from H to W.
Port forwarding through a firewall
Port forwarding can solve this problem. As before, the IMAP server is on port
143, and we select a random local port number, 2001. This time, however, we use
a slightly different command to set up forwarding:
# Executed on home machine H
$ ssh -L2001:W:143 B
This establishes an interactive SSH session from home machine H to bastion host
B and also creates an SSH tunnel from local host H to the email server machine W.
Specifically, in response to a connection on port 2001, the local SSH client directs
the SSH server running on B to open a connection to port 143 on W, that is, socket
W:143. The SSH server can do this because B is inside the firewall. If you configure
your email reader to connect to local port 2001, as before, the communication path
is now:
The email reader on home machine H sends data to local port 2001.
The local SSH client reads port 2001, encrypts the data, and sends
it into the tunnel.
The tunnel passes through the firewall, because it is an SSH connection
(port 22) that the firewall accepts.
The SSH server on bastion host B decrypts the data and sends it to
port 143 on work machine W. This transmission isn't encrypted, but it's
protected behind the firewall, so encryption isn't necessary. (Assuming
you're not worried about snooping on your internal network.)
Data is sent back from the IMAP server to home machine H by the same
process in reverse.
You have now bypassed the firewall by tunneling the IMAP traffic through SSH.
Port Forwarding Without a Remote Login
It may happen that you'd like to forward a port via SSH but don't want an SSH
login session to the remote host. For example, if you're using the IMAP forwarding
example we've been harping on, you may want only to read email, not open an unnecessary
terminal connection at the same time. With SSH2, this is simple: just provide the
-f option to ssh2 in your port forwarding command:
# SSH2 only
$ ssh2 -f -L2001:localhost:143 server.example.com
or use the GoBackground keyword for the same effect:
# SSH2 only
GoBackground yes
As a result, ssh2 puts itself into the background and handles connections
to the forwarded port 2001, and that is all. It doesn't create an interactive terminal
session with standard input, output, and error channels. The -S option also
avoids starting a terminal session but unlike -f, it doesn't put the session
in the background (in other words, the -f option implies -S ):
# SSH2 only
$ ssh2 -S -L2001:localhost:143 server.example.com
The -f option is also supported by SSH1 and OpenSSH but its operation
is different from that of SSH2. It is intended more for executing remote commands
that don't require terminal interaction, such as graphical programs using X. Specifically:
It causes the backgrounded ssh to connect the local end of the terminal
session to /dev/null (that is, -f implies the -n option).
It requires you to specify a remote command, ideally one that doesn't read
from standard input, since the backgrounded ssh connects the local end
of the session channel to /dev/null (that is, -f implies the
-n option).
For example, if X forwarding is turned on (which we'll discuss later), the following
command puts itself into the background, popping up a graphical clock on your local
display, with the clock program running on the remote host zwei.uhr.org :
# SSH1, OpenSSH
$ ssh -f zwei.uhr.org xclock
This is equivalent to the background command:
# SSH1, OpenSSH
$ ssh -n zwei.uhr.org xclock &
In contrast, SSH2 doesn't require a remote command when using the -f option.
You may provide one as earlier, and ssh2 behaves in the same way as its SSH1
or OpenSSH counterparts:
$ ssh2 -f zwei.uhr.org xclock
but the remote command isn't necessary; you can set up a forwarding and put
ssh2 into the background conveniently:
$ ssh2 -f -L2001:localhost:143 server.example.com
If you tried this with SSH1 or OpenSSH, you see:
# SSH1, OpenSSH
$ ssh -f -L2001:localhost:143 server.example.com
Cannot fork into background without a command to execute.
To get around the nuisance of providing an unwanted remote command, use one that
does nothing for a long time, such as sleep :
When invoked with -f or GoBackground, ssh persists until
you explicitly kill it with the Unix kill command. (You can find its pid
with the ps command.) Alternatively, you can request one shot forwarding,
which causes the client to exit when forwarding is over with. Specifically, the
client waits indefinitely for the first forwarded connection. After that, when the
number of forwarded connections drops to zero, the client exits.
One shot forwarding is accomplished easily in SSH2 with the -fo command-line
option, a variation on -f (the "o" stands for "one shot "):
# SSH2 only
$ ssh2 -fo -L2001:localhost:143 server
One shot forwarding isn't directly supported by SSH1 or OpenSSH, but you can
get the same effect with the following method:
Set up the forwarding with ssh -f, and for the required remote
command, use sleep with a short duration:
$ ssh -f -L2001:localhost:143 server sleep 10
Before the sleep interval expires, use the forwarded connection:
$ ssh -p2001 localhost
Once the sleep command finishes, the first ssh tries to exit, but
it notices a forwarded connection is in use and refuses to exit, printing a warning
you can ignore:
Waiting for forwarded connections to terminate...
The following connections are open:
  port 2001, connection from localhost port 143
ssh waits until that connection ends and then terminates, providing the
behavior of one shot forwarding.
The Listening Port Number
Earlier, we suggested selecting any unused port for the listening side of a forwarding.
Port numbers are encoded in a 16-bit field and can have any value from 1 to 65535
(port is reserved). On multiuser operating systems such as Unix, ports 1 through
1023 are called privileged and are reserved for processes run by the superuser (user
ID zero). If a nonprivileged process tries to bind a privileged port for listening,
it will fail with an error message such as "insufficient permission."[6]
[6] Microsoft Windows and
MacOS have no privileged port restriction, so any user can listen on any free
port.
When setting up the listening side of a tunnel, you generally must select a port
number between 1024 and 65535, inclusive. This is because an SSH program running
under your user ID, not the superuser's, is responsible for listening on that port.
If SSH reports that your chosen port is in already in use, just choose another;
it shouldn't be hard to find a free one.
For the target side of the tunnel, you can specify any port number, privileged
or not. You are attempting to connect to the port, not listen on it. In fact, most
of the time the target side is a privileged port, since the most common TCP services
have ports in the privileged range.
If you are the superuser on a machine with SSH clients, you can perform local
forwarding with a privileged port. Likewise, you can forward a remote privileged
port if your remote account has superuser privileges.
Some TCP applications hardcode the server port numbers and don't permit them
to be changed. These applications aren't usable with port forwarding if the operating
system has a privileged port restriction. For example, suppose you have an FTP client
that's hardwired to connect to the server on the standard FTP control port, 21.
To set up port forwarding, you have to forward the local port 21 to the remote port
21. But since port 21 is privileged, you can't use it as a listening port number
unless you are the superuser. Fortunately, most Unix TCP-based programs let you
set the destination port number for connections, and on PCs and Macs, there's no
privileged port restriction.
Choosing the Target Forwarding Address
Suppose you want to forward a connection from your local machine to remote.host.net.
The following two commands both work:
The forwarded connection is made from the remote machine to either the loopback
address or remote.host.net, and in either case, the connection stays on the remote
machine and doesn't go over the network. However, the two connections are perceptibly
different to the server receiving the forwarded connection. This is because the
source sockets of the connections are different. The connection to localhost appears
to come from source address 127.0.0.1, whereas the connection to remote.host.net
is from the address associated with that name.
Most of the time this difference
doesn't matter, but sometimes you must take it into account. The application server
(e.g., the IMAP daemon) might be doing access control based on source address and
not be configured to accept the loopback address. Or it might be running on a multihomed
host and have bound only a subset of the addresses the host has, possibly not including
the loopback address. Each of these situations is usually an oversight, but you
might not be able to do anything about it. If you're getting "connection refused"
from the connecting side of the forwarding, but you've verified that the server
appears to be running and responding to normal clients, this might be the problem.
If the server machine is running Unix, the command netstat -a -n should list
all the network connections and listeners on that machine. Look for listeners on
the relevant port, and the addresses on which they are listening.
Sometimes, the problem can be more acute if the server uses the source IP address
itself as part of whatever protocol it's speaking. This problem crops up when trying
to forward FTP over SSH. [Section
11.2]
In general, we recommend using localhost as the forwarding target whenever possible.
This way, you are less likely to set up an insecure off-host forwarding by accident.
Termination
What happens to forwardings when an SSH connection terminates? The ports simply
cease being forwarded; that is, SSH is no longer listening on them, and connection
attempts to those ports get "connection refused."
What happens if you try to terminate an SSH session while it still has active
forwarded connections? SSH will notice and wait for them to disconnect before stopping
the session. The details of this behavior differ among implementations.
In SSH2, if you log out of a session that has an active forwarded connection,
the session stays open but sends itself into the background:
remote$ logout
warning: ssh2[7021]: number of forwarded channels still open, forkedto background
to wait for completion.
local$
The ssh2 process now waits in the background until the forwarded connections
terminate, and then it exits. In contrast, with SSH1 and OpenSSH, if you disconnect
a session with active forwardings, you get a warning, but the session stays in the
foreground:
remote$ logout
Waiting for forwarded connections to terminate...
The following connections are open:
  port 2002, connection from localhost port 1465
To send it into the background and return to your local shell prompt, use the
escape sequence return-tilde-ampersand:
~& [backgrounded]
local$
and as with SSH2, the connection exits only after its forwarded connections terminate.
Be careful not to use the SSH ^Z escape for this purpose. That sends
ssh into the background but suspended, unable to accept TCP connections to its
forwarded ports. If you do this accidentally, use your shell's job control commands
(e.g., fg and bg ) to resume the process.
The TIME_WAIT
problem
Sometimes a forwarded port mysteriously hangs around after the forwarding SSH
session has gone away. You try a command you've used successfully several times
in a row and suddenly get an error message:
$ ssh1 -L2001:localhost:21 server.example.com
Local: bind: Address already in use
(This happens commonly if you're experimenting with port forwarding, trying to
get something to work.) You know that you have no active SSH command listening on
port 2001, so what's going on? If you use the netstat command to look for
other listeners on that port, you may see a connection hanging around in the TIME_WAIT
state:
The TIME_WAIT state is an artifact of the TCP protocol. In certain situations,
the teardown of a TCP connection can leave one of its socket endpoints unusable
for a short period of time, usually only a few minutes. As a result, you cannot
reuse the port for TCP forwarding (or anything else) until the teardown completes.
If you're impatient, choose another port for the time being (say, 2002 instead of
2001) and get on with your work, or wait a short time for the port to become usable
again.
Configuring Port Forwarding in the Server
We've seen several keywords and command-line options for configuring SSH clients
for port forwarding, such as -L and -R. In addition, the SSH server
can be configured for port forwarding. We'll cover compile-time, serverwide, and
per-account configuration.
Compile-time configuration
You can enable or disable port forwarding at compile time with configure.
It is enabled by default. For SSH1, the configure flags -disable-server-port-forwardings
and -disable-client-port-forwardings turn off port forwarding capability
for sshd1 and SSH1 clients, respectively. For SSH2, the single flag -disable-tcp-port-forwarding
disables port forwarding for both clients and servers.
Port forwarding can be globally enabled or disabled in sshd. This is done
with the serverwide configuration keyword AllowTcpForwarding in /etc/sshd_config.
The keyword may have the value yes (the default, enabling forwarding) or
no (disabling forwarding):
# SSH1, SSH2, OpenSSH
AllowTcpForwarding no
In addition, SSH2 has the following options:
# SSH2 only
AllowTcpForwardingForUsers
AllowTcpForwardingForGroups
The syntax of these is the same as for the AllowUsers and AllowGroups
options. They specify a list of users or groups that are allowed to use port forwarding;
the server refuses to honor port forwarding requests for anyone else. Note that
these refer to the target account of the SSH session, not the client username (which
is often not known).
F-Secure SSH1 Server supports the additional keywords AllowForwardingPort,
DenyForwardingPort, AllowForwardingTo, and DenyForwardingTo
for finer-grained control over forwarding. The two ...Port keywords let
you control remote forwardings for given TCP ports, with support for wildcards and
numeric ranges. For example, to permit remote forwardings for ports 3000, 4000 through
4500 inclusive, 5000 and higher, and any port number ending in 7:
# F-Secure SSH1 only
AllowForwardingPort 3000 4000..4050 >5000 *7
The ...To keywords are similar but control forwardings to particular
hosts and ports (i.e., to particular sockets). Host and port specifications are
separated by colons and use the same metacharacters as the ...Port keywords:
# F-Secure SSH1 only
DenyForwardingTo server.example.com:80 other.net:* yoyodyne.com:<1024
The permissible metacharacters/wildcards are shown in the following table:
Metacharacter
Meaning
Example
*
Any digit
300*
<
All values less than
<200
>
All values greater than
>200
..
Range of values (inclusive)
10..20
It's important to realize that the directives in this section don't actually
prevent port forwarding, unless you also disable interactive logins and restrict
what programs may be run on the remote side. Otherwise, knowledgeable users can
simply run their own port-forwarding application over the SSH session. These settings
alone might be a sufficient deterrent in a nontechnical community, but they won't
stop someone who knows what she's doing.
Per-account configuration
In your account, you can disable port forwarding for any client that connects
via a particular key. Locate the public key in your authorized_keys file
and precede it with the option no-port-forwarding:
# SSH1, OpenSSH
no-port-forwarding ...key...
(SSH2 doesn't currently have this feature.) Any SSH client that authenticates
using this key can't perform port forwarding with your SSH server.
The same remarks we just made about serverwide port forwarding configuration
apply here: the restriction isn't really meaningful unless you further restrict
what this key is allowed to do
X Forwarding
Now that you've seen general TCP port forwarding, we move to a new topic: forwarding
of X protocol connections. X is a popular window system for Unix workstations, and
one of its best features is its transparency. Using X, you can run remote X applications
that open their windows on your local display (and vice versa, running local applications
on remote displays). Unfortunately, the inter-machine communication is insecure
and wide open to snoopers. But there's good news: SSH X forwarding makes the communication
secure by tunneling the X protocol.
X forwarding also addresses some firewall-related difficulties. Suppose you're
a system administrator with a set of exposed production machines on the other side
of a firewall from you. You log into one of these machines using SSH, and want to
run an graphical performance-monitoring tool, such as Solaris's perfmon,
that uses the X Window System. You can't, though, because to do that, the external
machine needs to make a TCP connection back to the internal machine you started
on, and the firewall blocks it (as it should, since X is quite insecure). X forwarding
solves this problem, permitting X protocol connections to pass through the firewall,
securely tunneled via SSH.
Our discussion begins with a brief overview of X and then explains the details
of X forwarding. In addition to explaining how to use X forwarding, we also expose
the internals of X authentication and how it interacts with SSH, as well as other
technical topics.
Sidebar 2. VNC Forwarding: An Alternative to X Forwarding
X forwarding is problematic from a security point of view, for the
same reason as X itself. As we will see, the design of X means that
remote programs must make separate network connections back to the user;
this requires yet another layer of authentication and authorization,
complicating the situation and opening an avenue of attack. SSH X forwarding
tries to secure this as much as possible, but it may still be unacceptable
in some environments.
An alternative technique is to use Virtual Network Computing (VNC)
over SSH. VNC is free software developed by AT&T Laboratories in the
United Kingdom, which provides remote GUI access for Unix and Windows
platforms. With VNC, you can open a window on your Unix machine running
X and have the desktop of a remote Windows machine appear there, so
you can operate the Windows box remotely. Conversely, you can run the
VNC client on a Windows machine and connect to a remote X display running
on a Unix host. Since VNC involves only a single outbound connection,
it is easier and safer to tunnel through SSH than X. You can find out
more about VNC (and download the software) at:
The X Window System, or X, is the most widely used graphical display system for
Unix machines. Like SSH, X has clients and servers. X clients are windowing application
programs, such as terminal emulators, paint programs, graphical clocks, and so forth.
An X server is the underlying display engine that processes requests from X clients,
communicating via a network protocol called the X protocol. A machine typically
runs a single X server but possibly many X clients.
Most important to our discussion, X supports sophisticated window management
over a network. X clients can open windows not only on their local machine but also
on other computers on the network, whether they are down the hall or across the
globe. To accomplish this, an X client makes a network connection to a remote X
server and carries on a conversation, using the X protocol to draw on the remote
screen, receive remote keyboard events, learn the remote mouse location, and so
on. This obviously requires some type of security, which we discuss soon.
A central concept of X is the display, an abstraction for the screen managed
by an X server. When an X client is invoked, it needs to know which display to use.
Displays are named by strings of the form HOST:n.v, where:
HOST is the name of the machine running the X server controlling the display.
n is the display number, an integer, usually 0. X allows for multiple displays
controlled by a single server; additional displays are numbered 1, 2, and so
on.
v is the visual number, another integer. A visual is a virtual display. X
supports multiple virtual displays on a single, physical display. If there's
only one virtual display (which is the most common scenario), you omit the ".v",
and the default is visual 0.
For example, on the machine server.example.com, display 0, visual 1 is represented
by the display string "server.example.com:0.1".
Under Unix, most X client programs let you specify the display string in two
ways: the -d or -display command-line option, or the environment variable
DISPLAY. For example, to run the X client program xterm on the only X display
of the workstation anacreon, use the command-line option:
$ xterm -d anacreon:0 &
or the environment variable:
$ setenv DISPLAY anacreon:0
$ xterm &
X is a large, deep software product whose documentation fills a dozen O'Reilly
books. We've barely scratched the surface with our explanation, but you've now seen
enough to understand X forwarding.
How X Forwarding Works
Although X clients can communicate with remote X servers, this communication
isn't secure. All interactions between the X client and server, such as keystrokes
and displayed text, can be easily monitored by network snooping because the connection
isn't encrypted. In addition, most X environments use primitive authentication methods
for connecting to a remote display. A knowledgeable attacker can get a connection
to your display, monitor your keystrokes, and control other programs you're running.
Once again, SSH comes to the rescue. An X protocol connection can be routed through
an SSH connection to provide security and stronger authentication. This feature
is called X forwarding.
X forwarding works in the following way. An SSH client requests X forwarding
when it connects to an SSH server (assuming X forwarding is enabled in the client).
If the server allows X forwarding for this connection, your login proceeds normally,
but the server takes some special steps behind the scenes. In addition to handling
your terminal session, it sets itself up as a proxy X server running on the remote
machine and sets the DISPLAY environment variable in your remote shell to point
to the proxy X display:
syrinx$ ssh sys1
Last login: Sat Nov 13 01:10:37 1999 from blackberry
Sun Microsystems Inc.   SunOS 5.6       Generic August 1997
You have new mail.
sys1$ echo $DISPLAY
sys1:10.0
sys1$ xeyes
The "xeyes" X client appears on the screen
X forwarding
The DISPLAY value appears to refer to X display #10 on sys1, but there's no such
display. (In fact, there might be no true displays on sys1 at all.) Instead, the
DISPLAY value points to the X proxy established by the SSH server, i.e., the SSH
server is masquerading as an X server. If you now run an X client program, it connects
to the proxy. The proxy behaves just like a "real" X server, and in turn instructs
the SSH client to behave as a proxy X client, connecting to the X server on your
local machine. The SSH client and server then cooperate to pass X protocol information
back and forth over the SSH pipe between the two X sessions, and the X client program
appears on your screen just as if it had connected directly to your display. That's
the general idea of X forwarding.
X forwarding can even solve the firewall problem mentioned earlier, as long as
the firewall permits SSH connections to pass through. If a firewall sits between
your local and remote machines, and you run an X client on the remote machine, X
forwarding tunnels the X connection through the firewall's SSH port to the local
machine. Therefore, the X client's windows can open on your local display. If X
forwarding isn't present, the firewall blocks the connection.
Some aspects of X forwarding probably sound familiar from our earlier explanation
of port forwarding. In fact, X forwarding is just a special case of port forwarding
for which SSH has special support.
Enabling X Forwarding
X forwarding is on by default in SSH1 and SSH2, but off in OpenSSH. If you need
to enable or disable X forwarding for your clients, here's how to do it. Unlike
general port forwarding, which requires you to fiddle with TCP port numbers, X forwarding
has only an on/off switch. In your SSH client configuration file, use the keyword
ForwardX11 with a value yes (the default, to enable) or no
(to disable):
# SSH1, SSH2, OpenSSH
ForwardX11 yes
On the command line, you may also use -x to disable X forwarding:
# SSH1, SSH2, OpenSSH
$ ssh -x server.example.com
SSH2 and OpenSSH enables X forwarding with the following options:
# SSH2 only
$ ssh2 +x server.example.com

# OpenSSH only
$ ssh -X server.example.com
Configuring X Forwarding
The behavior of X forwarding can be modified through compile-time configuration,
serverwide configuration, and per-account configuration.
Compile-time configuration
SSH1 and SSH2 can be compiled with or without X support. The compile-time flags
--with-x and -without-x make this determination:
# SSH1, SSH2
$ configure ... --without-x ...
In addition, if you compile with X support, you may set the default behavior
for X forwarding. In SSH1, you can enable or disable forwarding by default in the
client and the server separately, using the compile-time flags -enable-client-x11-forwarding
(or -disable-client-x11-forwarding) and -enable-server-x11-forwarding
(or -disable-server-x11-forwarding):
# SSH1 only
$ configure ... --disable-server-x11-forwarding ...
In SSH2, you can enable or disable all X forwarding by default with -enable-X11-forwarding
or -disable-X11-forwarding:
# SSH2 only
$ configure ... --enable-X11-forwarding ...
Remember, enable/disable flags simply set the default behavior. You can override
these defaults with serverwide and per-account configuration.
Serverwide configuration
The serverwide configuration keywords X11Forwarding (SSH1, SSH2, OpenSSH)
and its synonyms ForwardX11 (SSH2) and AllowX11Forwarding (SSH2)
enable or disable X forwarding in the SSH server. By default, it is enabled:
# SSH1, SSH2, OpenSSH
X11Forwarding no

# SSH2 only: either will work
ForwardX11 no
AllowX11Forwarding no
The X11DisplayOffset keyword lets you reserve some X11 display numbers
so sshd can't use them. This keyword specifies the lowest display number
SSH may use, preventing sshd from clashing with real X servers on the lower-numbered
displays. For example, if you normally run actual X servers on displays and 1, set:
# SSH1, OpenSSH
X11DisplayOffset 2
The XAuthLocation keyword specifies the path to the xauth program,
which manipulates authorization records for X. We describe this keyword later, after
we discuss xauth.
In your SSH1 or OpenSSH authorized_keys file, you may disallow X forwarding for
incoming SSH connections that use a particular key for authentication. This is done
with the option no-X11-forwarding:
# SSH1, OpenSSH
no-X11-forwarding ...rest of key...
X Authentication
We've mentioned in passing that X performs its own authentication when X clients
connect to X servers. Now we're going to dive into technical detail on the inner
workings of X authentication, why it's insecure, and how SSH X forwarding builds
on it to create a secure solution.
In most cases, X forwarding simply works, and you don't have to think about it.
The following material is to aid your understanding and satisfy any intense cravings
for tech talk (both yours and ours).
How X authentication works
When an X client requests a connection to an X server, the server authenticates
the client. That is, the X server determines the client's identity to decide whether
to allow a connection to the server's display. The current release of the X Window
system (X11R6) provides two categories of authentication: host-based and key-based:
Host-based X authentication
The simpler method. Using the program xhost, you indicate a list of
hosts that may connect to your X display. Notice that connections are authenticated
only by hostname, not by username. That is, any user on a listed host may connect
to your display.
Key-based X authentication
Uses the xauth program to maintain a list of X authentication keys, or display
keys, for X clients. Keys are kept in a file, usually ~/.Xauthority,
along with other data associated with the various displays the client wants
to access. When an X client connects to a server requiring authentication, the
client supplies the appropriate credentials for that display from the xauth
data. If authentication is successful, the X client can then connect to the
display managed by the X server.
Display keys are obtained from the X server in various ways depending on the
environment. For example, if you start the server directly on the console of a machine
using xinit or startx, these programs invoke an X server and insert
a copy of the server's key directly into your xauth data. Alternatively, if you
connect to a remote machine that runs the X Display Manager (XDM), the key is sent
to your remote account when establishing your XDM session.
xauth and the SSH rc files
SSH has startup files that can be set to execute on the server side when a client
logs in. These are the systemwide /etc/sshrc and the per-account ~/.ssh/rc.
These can be shell scripts or any kind of executable program.
An important thing to note is that sshd runs xauth only to add
the proxy display key if it doesn't run an rc program. If it does run an rc program,
it feeds the key type and data to the program on a single line to its standard input,
and it is up to the rc program to store the display key. This feature provides a
way to customize handling the display key, in case just running xauth isn't
the right thing to do in your situation.
Problems with X authentication
If you've used X, the authentication was probably transparent and seemed to work
fine. Behind the scenes, however, the mechanism is insecure. Here are the major
problems:
xhost is insecure
Once you give permission for a remote host to connect to your display, any
user on that host can connect. As with the r-commands, this authentication method
depends on the network address of the connecting host, which can be easy for
an attacker to usurp.
Key transfer may be manual and insecure
Some remote-login protocols, such as telnet, don't assist with X authentication.
If your display keys aren't available on a remote machine, you have to transfer
them yourself, either manually or by automating the transfer, perhaps in your
login script. This isn't only a nuisance but also insecure, since you're sending
the key in plaintext over the network.
The most common key-based method, MIT-MAGIC-COOKIE-1, is insecure
Although it uses a random string of bits, or cookie, as the xauth display
key, this key is transmitted in plaintext at the beginning of every connection,
where it can be intercepted and read.
The remote host might not support your chosen X authentication method
X11R6 supports other, more secure authentication methods. SUN-DES-1 employs
Sun's secure RPC system, XDM-AUTHORIZATION-1 uses DES, and MIT-KERBEROS-5 involves
Kerberos user-to-user authentication.[7]
Unfortunately, these methods are often not available in particular instances
of the X software. Sometimes they aren't compiled into X installations due to
cryptographic export restrictions; other times, the X version is too old to
support the more secure methods.
[7] See the X11R6 Xsecurity
(1) manpage for details on these methods. Also, remember that this is authentication
only, not encryption. The contents of your X connection remain unencrypted
and open to snooping or modification on the network.
If the remote host is insecure, your display key can be compromised
In the best scenario, where the X server supports strong authentication and
your key can be copied securely to the remote machine, you still have to store
your sensitive display key there. If that machine is untrustworthy, your key
can be at risk. (SSH doesn't have this problem, since only your public key is
stored on the SSH server machine.)
SSH and authentication spoofing
Through X forwarding, SSH provides transparent, secure authentication and key
transfer for X sessions. This is done by a technique called authentication spoofing.
Authentication spoofing involves a fake display key, which we call the proxy key,
that authenticates access to the SSH X proxy server on the remote side. When relaying
X traffic containing a key, SSH cleverly substitutes the real display key.
The players begin in the following positions. You are logged into a local machine
with a local display. The local machine runs an X server and SSH clients. On the
other side of the network connection, an SSH server is running on a remote machine,
where you invoke X clients. The goal is for the remote X clients to appear on your
local display by way of SSH.
First, you run a local SSH client, asking it to set up X forwarding. The SSH
client requests X forwarding from the remote SSH server, and it also reads your
local display key from your .Xauthority file.
Next, the SSH client generates a proxy key. This is a string of random data of
the same length as your local display key. The SSH client then sends the proxy key
and its key type (e.g., MIT-MAGIC-COOKIE-1) to the remote machine, and the SSH server
runs the xauth program on your behalf to associate the proxy key with your local
display. The stage is now set for X forwarding.
When you start a remote X client, your local SSH client connects to your local
X display. It then watches for the first X protocol message sent over the forwarded
connection and treats it specially. Specifically, the SSH client parses the message,
finds the X authentication key inside it, and compares it to the proxy key. If the
keys don't match, the SSH client rejects and closes the connection. Otherwise, if
the keys match, the SSH client substitutes the real display key in place of the
proxy key and relays the modified message to your local X server. The X server,
blissfully unaware that a key switch has taken place, reads the display key and
proceeds normally with X authentication. The forwarded X connection is now established.
X forwarding with authentication spoofing solves all but one of the X authentication
problems we raised earlier:
xhost
X forwarding doesn't use xhost. (By the way, make sure to disable all xhost
permissions when using X forwarding, or you will undermine the X security provided
by SSH.)
Key transfer
SSH transfers the X display key automatically and runs xauth on your behalf
to install it on the remote side. The transfer is secure since the key travels
over the encrypted SSH connection.
MIT-MAGIC-COOKIE-1 insecurity
The key transmitted at the beginning of every X session is now encrypted,
along with the rest of the X traffic, inside the SSH session. This greatly increases
the operational security of this common X authentication scheme.
Untrustworthy remote hosts
With authentication spoofing, only the proxy key, not the true display key,
is sent to the remote host. The proxy key is good only for connecting to your
display through SSH, not for connecting to your display directly. As soon as
your SSH session ends, the proxy key becomes useless. Since SSH sessions come
and go, but some people leave their X sessions up (with the same key) for days,
X forwarding can be a great improvement.
Improving authentication spoofing
The remaining problem with X forwarding is the possibility of unsupported X authentication
mechanisms. The local side can use a more sophisticated authentication method a
remote host might not support.
In theory, SSH X forwarding can solve this problem by always installing a proxy
key of type MIT-MAGIC-COOKIE-1, no matter what local authentication method is actually
in use. After the SSH client has checked the X client's key against the proxy key
for a match, its client could then generate and substitute whatever local authenticator
is required using the true authentication type and key.
Unfortunately, SSH implementations don't go this far. The server compares keys
literally as bit strings, and the SSH client substitutes keys verbatim, regardless
of the key types. As a result, if you use a stronger X authentication method such
as XDM-AUTHORIZATION-1, sshd blindly compares an encrypted authenticator
with the proxy key, rightly determine that they don't match, and invalidly rejects
the connection. The failure is silent and mysterious; we wish the software would
detect the presence of an unsupported mode and issue a warning when setting up the
connection.
If SSH knew the details of all X authentication modes, it could check the proxy
authenticators on one side and generate correct ones for the X server on the other.
However, this is a significant development effort, though perhaps one could link
SSH against the X11 libraries to obtain the necessary algorithms. SSH would also
have to deal with differing key data lengths, constructing a new X message to hold
the proxy key instead of copying it to an existing message.
It would also be useful if X forwarding could be used without authentication
spoofing. Then you could arrange your own security for the connection by, say, using
xhost to allow any connection from your local machine (and hence the SSH X proxy),
while still applying key-based authentication to X connections originating from
elsewhere. You can accomplish this with general port forwarding, as discussed in
the next section, but direct support is more convenient.
Nonstandard X clients
X clients generally do X xauth-style authentication by virtue of having
been linked against Xlib, the common X programming library. Occasionally, though,
you run across particular X client programs that don't use Xlib and simply ignore
authentication issues. Since you can't turn off SSH X authentication spoofing, you
can't use such programs across SSH X forwarding; you get this message:
X11 connection requests different authenticationprotocol: 'MIT-MAGIC-COOKIE-1'
vs. ''
You can, however, use a general port forwarding instead. For example:
foo% ssh -R6010:localhost:6000 bar
bar% setenv DISPLAY bar:10
Note that this bypasses the discipline imposed by X forwarding, of requiring
xauth authentication on forwarded X connections. If your real X server is using
xhost for access control, this port forwarding allows anyone on host foo
to connect to your X server. Use this sort of thing with caution if you need to.
Further Issues
As we've said, X forwarding usually works fine without any special effort on
your part. In some special situations, however, you might need to take some extra
steps.
X server configuration
In order for X forwarding to work, your X server must accept the proxy X connections
from your SSH client. This is sometimes not set up to begin with, because normal
use doesn't require it. For example, if you're using an X server on a PC to access
a remote Unix machine via XDM, you might never run local X clients at all, and they
may not be allowed by default. You can run xhost+localhost to
allow all connections from the your PC, while still applying key-based authentication
to connections from other sources. This allows SSH-forwarded (and authenticated)
connections to be accepted.
Setting your DISPLAY environment variable
SSH sets the DISPLAY variable automatically only if X forwarding is in effect.
If you don't use X forwarding but want to use X on a remote machine you logged into
via SSH, remember that you have to set the DISPLAY variable yourself. You should
only do this when the both machines are on the same, trusted network, as the X protocol
by itself is quite insecure.
Be careful not to set DISPLAY unintentionally! It is common for people to set
the DISPLAY variable in a login command file or by other means. If you're not careful,
this can make your X connections insecure without your noticing. If you use SSH
to tunnel through a firewall that blocks normal X connections, then of course you'll
notice because your X clients won't work. But if normal X connections are possible
but undesirable, and X forwarding isn't in effect, your X programs will work but
will (silently) not be secured. This is a good reason to block X traffic at the
firewall if it presents a security risk or to configure your X server to accept
connections only from the local host (the source of the SSH-forwarded X connections).
If that's not feasible, you may want to put something like this in your login script:
#!/bin/csh
if ($?DISPLAY) then
   set display_host   = `expr "$DISPLAY" : '\(.*\):'`
   set display_number = `expr "$DISPLAY" : '.*:\([^.]*\)'`
   set my_host = `hostname`
   set result  = `expr '(' "$display_host" = "$my_host" ')' '&' '(' \
                 "$display_number" '>' "0" ')'`
   if ($result == 0) then
      echo "WARNING: X display $DISPLAY does not appear to be protected by SSH!"
      echo "unsetting DISPLAY variable just to be safe"
      unsetenv DISPLAY
   endif
endif
Shared accounts
If you share a single account among multiple people, you may have some trouble
with X forwarding. For example, it is common for a group of sysadmins to share use
of the root account. For each person to retain their own environment when using
the root account, they may set their USER, LOGNAME, and HOME environment variables
explicitly to reflect their personal accounts rather than the root account. If you
use SSH to log into the root account with X forwarding turned on, though, it adds
the proxy xauth key to root's .Xauthority file before the shell reads your
login script and resets these environment variables. The result is that once you're
logged in and try to use X, it fails: the X client looks in your .Xauthority
file (because of the setting of your HOME variable), but the key isn't there.
You can deal with this problem by setting the XAUTHORITY variable to point to
root's .Xauthority file, or by using code like the following in your login
script to copy the needed key into your personal one:
if (($uid == 0) && ($?SSH_CLIENT) && ($?DISPLAY)) then
# If I do ssh -l root with X forwarding, the X proxy server's xauth key
# gets added to root's xauth db, not mine.  See if there's an entry for my
# display in root's xauth db...
  set key = `bash -c "xauth -i -f /.Xauthority list $DISPLAY 2> /dev/null"`
# ... and if so, copy it into mine.
  if ($? == 0) then
    xauth -bi add $key
    chown res ~res/.Xauthority >& /dev/null
  endif
endif
Location of the xauth program
Remember that sshd runs the xauth program on your behalf, to add the proxy
key to your .Xauthority file on the remote side. The location of the xauth
program is discovered when you configure the SSH package and compiled into the
sshd executable. If xauth is subsequently moved, X forwarding won't work
(ssh -v reveals this explicitly). For SSH1 and OpenSSH, the system administrator
on the server side can use the serverwide configuration keyword XAuthLocation to
set the path to the xauth program without having to recompile sshd1:
# SSH1, Open SSH
XAuthLocation /usr/local/bin/xauth
XAuthLocation can also appear in the client configuration file (OpenSSH
only); the client uses xauth to get the local X display key.
X
forwarding and the GatewayPorts feature
The GatewayPorts (-g) feature discussed earlier applies only
to general port forwarding, not to X forwarding. The X proxies in SSH1, SSH2, and
OpenSSH always listen on all network interfaces and accept connections from anywhere,
though those connections are then subject to X authentication as described earlier.
To restrict X client source addresses, use TCP-wrappers, which we discuss in the
next section.
Forwarding Security: TCP-wrappers and libwrap
At several points in this chapter, we have talked about security issues and limitations
of forwarding. So far, we've seen very little control over who can connect to a
forwarded port. The SSH1 and OpenSSH default is to allow connections only from the
local host, which is reasonably secure for a single-user machine. But if you need
to allow connections from elsewhere, you have a problem, since it's all or nothing:
to allow connections from elsewhere (using -g or GatewayPorts=yes),
you must allow them from anywhere. And with SSH2 it's worse: forwarded ports will
always accept connections from anywhere. X forwarding is in a slightly better position,
since the X protocol has its own authentication, but you might still prefer to restrict
access, preventing intruders from exploiting an unknown security flaw or performing
a denial-of-service attack. SSH on the Unix platform provides an optional feature
for access control based on the client address, called TCP-wrappers.
The term TCP-wrappers refers to software written by Wietse Venema. If it isn't
already installed in your Unix distribution, you can get it at:
TCP-wrappers are a global access control mechanism that integrates with other
TCP-based servers, such as sshd or telnetd. Access control is based
on the source address of incoming TCP connections. That is, a TCP-wrapper permits
or denies connections based on their origin, as specified in the configuration files
/etc/hosts.allow and /etc/hosts.deny.:
There are two ways to use TCP-wrappers. The most common method, wrapping, is
applied to TCP servers that are normally invoked by inetd. You "wrap" the
server by editing /etc/inetd.conf and modifying the server's configuration
line. Instead of invoking the server directly, you invoke the TCP-wrapper daemon,
tcpd, which in turn invokes the original server. Then, you edit the TCP-wrapper
configuration files to specify your desired access control. tcpd makes authorization
decisions based on the their contents.
The inetd technique applies access control without having to modify the TCP server
program. This is nice. However, sshd is usually not invoked by inetd,
so the second method, source code modification, must be applied. To participate
in TCP-wrapper control, the SSH server must be compiled with the flag -with-libwrap
to enable internal support for TCP-wrappers. sshd then invokes TCP-wrapper
library functions to do explicit access-control checks according to the rules in
/etc/hosts.allow and /etc/hosts.deny. So in a sense, the term "wrapper"
is misleading since sshd is modified, not wrapped, to support TCP-wrappers:
TCP-wrapper (libwrap) operation
TCP-wrappers Configuration
The access control language for TCP-wrappers has quite a few options and may
vary depending on whose package you use and what version it is. We won't cover the
language completely in this book. Consult your local documentation for a complete
understanding: the manpages on tcpd (8), hosts_access (5), and hosts_options (5).
We will just indicate some simple, common configurations.
The TCP-wrapper configuration is kept in the files /etc/hosts.allow and
/etc/hosts.deny. These files contain patterns of the form:
Each pattern matches some (server,client) pairs, and hence may match a particular
client/server TCP connection. Specifically, a connection between client C and server
S matches this rule if some service service_i matches S, and some client_j matches
C. (We explain the format and matching rules for these subpatterns shortly.) The
hosts.allow file is searched first, followed by hosts.deny. If a matching
pattern is found in hosts.allow, the connection is allowed. If none is found
there, but one matches in hosts.deny, the connection is dropped. Finally,
if no patterns match in either file, the connection is allowed. Nonexistence of
either file is treated as if the file existed and contained no matching patterns.
Note that the default, then, is to allow everything.
There is also an extended
syntax, documented on the hosts_options (5) manpage. It may or may not be
available, depending on how your TCP-wrapper library was built. It has many more
options, but in particular, it allows tagging an individual rule as denying or rejecting
a matching connection; for example:
sshd1 : bad.host.com : DENY
Using this syntax, you can put all your rules into the hosts.allow file,
rather than having to use both files. To reject anything not explicitly allowed,
just put ALL: ALL:DENY at the end of the file.
In a pattern, each service is a name indicating a server to which this pattern
applies. SSH recognizes the following service names:
sshd
The main SSH server. This can be sshd, sshd1, sshd2,
or whatever name you invoke the daemon under (its argv[0] value).
sshdfwd-x11
The X forwarding port.
sshdfwd-N
Forwarded TCP port N (e.g., forwarded port 2001 is servicesshdfwd-2001).
Each client is a pattern that matches a connecting client. It can be:
An IP address in dotted-quad notation (e.g., 192.168.10.1).
A hostname (DNS, or whatever naming services the host is using).
An IP network as network-number/mask (e.g., 192.168.10.0/255.255.255; note
that the "/n-mask-bits" syntax, 192.168.10.0/24, isn't recognized).
"ALL", matching any client source address.
Setup shown below allows connections to any service from the local host's loopback
address, and from all addresses 192.168.10.x. This host is running publicly available
servers for SSH1, POP, and IMAP, so we allow connections to these from anywhere,
but SSH-2 clients are restricted to sources in another particular range of networks.
Sample /etc/hosts.allow File
#
# /etc/hosts.allow
#
# network access control for programs invoked by tcpd (see inetd.conf) or
# using libwrap.  See the manpages hosts_access(5) and hosts_options(5).

# allow all connections from my network or localhost (loopback address)
#
ALL : 192.168.10.0/255.255.255.0 localhost

# allow connections to these services from anywhere
#
ipop3d imapd sshd1 : ALL

# allow SSH-2 connections from the class C networks
# 192.168.20.0, 192.168.21.0, ..., 192.168.27.0
#
sshd2 : 192.168.20.0/255.255.248.0

# allow connections to forwarded port 1234 from host blynken
sshdfwd-1234 : blynken.sleepy.net

# restrict X forwarding access to localhost
sshdfwd-x11 : localhost

# deny everything else
#
ALL : ALL : DENY
We allow connections to the forwarded port 1234 from a particular host, blynken.sleepy.net.
Note that this host doesn't have to be on any of the networks listed so far but
can be anywhere at all. The rules so far say what is allowed, but don't by themselves
forbid any connections. So for example, the forwarding established by the command
ssh1 -L1234:localhost:21 remote is accessible only to the local host, since
SSH1 defaults to binding only the loopback address in any case. But ssh1 -g -L1234:localhost:21
remote is accessible to blynken.sleepy.net as well, as is either command using
ssh2 instead (since ssh2 doesn't affect the localhost restriction
and ignores the -g option). The important difference is that with this use
of TCP-wrappers, sshd rejects connections to the forwarded port, 1234, from
any other address.
The sshdfwd-x11 line restricts X-forwarding connections to the local
host. This means that if ssh connects to this host with X forwarding, only
local X clients can use the forwarded X connection. X authentication does this already,
but this configuration provides an extra bit of protection.
The final line denies any connection that doesn't match the earlier lines, making
this a default-to-closed configuration. If you wanted instead to deny some particular
connections but allow all others, you would use something like this:
ALL : evil.mordor.net : DENY
telnetd : completely.horked.edu : DENY
ALL : ALL : ALLOW
The final line is technically not required, but it's a good idea to make your
intentions explicit. If you don't have the host_options syntax available, you instead
have an empty hosts.allow file and the following lines in hosts.deny :
ALL : evil.mordor.net
telnetd : completely.horked.edu
Notes About TCP-wrappers
Here are a few things to remember when using TCP-wrappers:
You can't distinguish between ports forwarded by SSH1 and SSH2: the sshdfwd-*
rules refer to both simultaneously. You can work around this limitation by linking
each against a different libwrap.a, compiled with different filenames for the
allow and deny files, or by patching the ssh and sshd executables
directly, but then you have to keep track of these changes and extra files.
The big drawback to TCP-wrappers is that it affects all users simultaneously.
An individual user can't specify custom access rules for himself; there's just
the single set of global configuration files for the machine. This limits its
usefulness on multiuser machines.
If you compile SSH with the -with-libwrap option, it is automatically
and always turned on; there's no configuration or command-line option to disable
the TCP-wrappers check. Remember that SSH does this check not only for forwarded
ports and X connections but for connections to the main SSH server. As soon
as you install a version of sshd with TCP-wrappers, you must ensure that
the TCP-wrappers configuration allows connections to the server, for instance
with the rule sshd1 sshd2sshd:ALL in
/etc/hosts.allow.
Using hostnames instead of addresses in the TCP-wrappers rule set involves
the usual security tradeoff. Names are more convenient, and their use avoids
breakage in the future if a host address changes. On the other hand, an attacker
can potentially subvert the naming service and circumvent the access control.
If the host machine is configured to use only its /etc/hosts file for
name lookup, this may be acceptable even in a highly secure environment.
The TCP-wrappers package includes a program called tcpdchk. This program
examines the wrapper control files and reports inconsistencies that might signal
problems. Many sites run this periodically as a safety check. Unfortunately,
tcpdchk is written only with explicit wrapping via inetd.conf in mind.
It doesn't have any way of knowing about programs that refer to the control
files via the libwrap routines, as does sshd. When tcpdchk reads
control files with SSH rules, it finds uses of the service names sshd1, sshdfwd-n,
etc., but no corresponding wrapped services in inetd.conf, and it generates
a warning. Unfortunately, we know of no workaround.
Supplement
Port Forwarding
To understand port forwarding, it's important to know some details about TCP,
the Transmission Control Protocol. TCP is a fundamental building block of the Internet.
Built on top of IP, it is the transport mechanism for many application-level Internet
protocols such as FTP, Telnet, HTTP, SMTP, POP, IMAP, and SSH itself.
TCP comes with strong guarantees. A TCP connection is a virtual, full-duplex
circuit between two communicating parties, acting like a two-way pipe. Either side
may write any number of bytes at any time to the pipe, and the bytes are guaranteed
to arrive unaltered and in order at the other side. The mechanisms that implement
these guarantees, though, are designed to counter transmission problems in the network,
such as routing around failed links, or retransmitting data corrupted by noise or
lost due to temporary network congestion. They aren't effective against deliberate
attempts to steal a connection or alter data in transit. SSH provides this protection
that TCP alone lacks.
If an application doesn't need these guarantees about data integrity and order,
or doesn't want the overhead associated with them, another protocol called User
Datagram Protocol (UDP) often suffices. It is packet-oriented, and has no guarantees
of delivery or packet ordering. Some protocols that run over UDP are NFS, DNS, DHCP,
NetBIOS, TFTP, Kerberos, SYSLOG, and NTP.
When a program establishes a TCP connection to a service, it needs two pieces
of information: the IP address of the destination machine and a way to identify
the desired service. TCP (and UDP) use a positive integer, called a port number,
to identify a service. For example, SSH uses port 22, telnet uses port 23, and IMAP
uses port 143. Port numbers allow multiple services at the same IP address.
The combination of an IP address and a port number is called a socket. For example,
if you run telnet to connect to port 23 on the machine at IP address 128.220.91.4,
the socket is denoted "(128.220.91.4,23)." Simply put, when you make a TCP connection,
its destination is a socket. The source (client program) also has a socket on its
end of the connection, and the connection as a whole is completely defined by the
pair of source and destination sockets.
In order for a connection attempt to a socket to succeed, something must be "listening"
on that socket. That is, a program running on the destination machine must ask TCP
to accept connection requests on that port and to pass the connections on to the
program. If you've ever attempted a TCP connection and received the response "connection
refused," it means that the remote machine is up and running, but nothing is listening
on the target socket.
How does a client program know the target port number of a listening server?
Port numbers for many protocols are standardized, assigned by the Internet Assigned
Numbers Authority or IANA. (IANA's complete list of port numbers is found at
http://www.isi.edu/in-notes/iana/assignments/port-numbers.) For instance, the
TCP port number assigned to the NNTP (Usenet news) protocol is 119. Therefore, news
servers listen on port 119, and newsreaders (clients) connect to them via port 119.
More specifically, if a newsreader is configured to talk to a news server at IP
address 10.1.2.3, it requests a TCP connection to the socket (10.1.2.3,119).
Port numbers aren't always hardcoded into programs. Many operating systems let
applications refer to protocols by name, instead of number, by defining a table
of TCP names and port numbers. Programs can then look up port numbers by the protocol
name. Under Unix, the table is often contained in the file /etc/services
or the NIS services map, and queries are performed using the library routines
getservbyname() , getservbyport() , and related procedures. Other
environments allow servers to register their listening ports dynamically via a naming
service, such as the AppleTalk Name Binding Protocol or DNS's WKS and SRV records.
So far, we've discussed the port number used by a TCP server when a TCP client
program wants to connect. We call this the target port number. The client also uses
a port number, called the source port number, so the server can transmit to the
client. If you combine the client's IP address and its source port number, you get
the client's socket.
Unlike target port numbers, source port numbers aren't standard. In most cases,
in fact, neither the client nor the server cares which source port number is used
by the client. Often a client will let TCP select an unused port number for the
source. (The Berkeley r-commands, however, do care about source ports. [Section
3.4.2.3]) If you examine the existing TCP connections on a machine with a command
such as netstat -a or lsof -i tcp , you will see connections to the
well-known port numbers for common services (e.g., 23 for Telnet, 22 for SSH), with
large, apparently random source port numbers on the other end. Those source ports
were chosen from the range of unassigned ports by TCP on the machines initiating
those connections.
Once established, a TCP connection is completely determined by the combination
of its source and target sockets. Therefore, multiple TCP clients may connect to
the same target socket. If the connections originate from different hosts, the IP
address portions of their source sockets will differ, distinguishing the connections.
If they come from two different programs running on the same host, TCP on that host
ensures they have different source port numbers.
SSH tunneling or SSH port forwarding is a method of creating an encrypted SSH connection between a client
and a server machine through which services ports can be relayed.
SSH forwarding is useful for
transporting network data of services that uses an unencrypted protocol, such as VNC or
FTP
, accessing
geo-restricted content or bypassing intermediate firewalls. Basically, you can forward any TCP port and
tunnel the traffic over a secure SSH connection.
There are three types of SSH port forwarding:
Local Port Forwarding. - Forwards a connection from the client host to the SSH server host and
then to the destination host port.
Remote Port Forwarding. - Forwards a port from the server host to the client host and then to the
destination host port.
Dynamic Port Forwarding. - Creates SOCKS proxy server which allows communication across a range of
ports.
In this article, we will talk about how to set up local, remote, and dynamic encrypted SSH tunnels.
Local Port Forwarding
Local port forwarding allows you to forward a port on the local (ssh client) machine to a port on the
remote (ssh server) machine, which is then forwarded to a port on the destination machine.
In this type of forwarding the SSH client listens on a given port and tunnels any connection to that
port to the specified port on the remote SSH server, which then connects to a port on the destination
machine. The destination machine can be the remote SSH server or any other machine.
Local port forwarding is mostly used to connect to a remote service on an internal network such as a
database or VNC server.
In Linux, macOS and other Unix systems to create a local port forwarding pass the
-L
option to the
ssh
client:
[LOCAL_IP:]LOCAL_PORT
- The local machine ip and port number. When
LOCAL_IP
is omitted the ssh client binds on localhost.
DESTINATION:DESTINATION_PORT
- The IP or hostname and the port of the destination
machine.
[USER@]SERVER_IP
- The remote SSH user and server IP address.
You can use any port number greater than
1024
as a
LOCAL_PORT
. Ports numbers
less than
1024
are privileged ports and can be used only by root. If your SSH server is
listening on a
port other than 22
(the default) use the
-p [PORT_NUMBER]
option.
The destination hostname must be resolvable from the SSH server.
Let's say you have a MySQL database server running on machine
db001.host
on an internal
(private) network, on port 3306 which is accessible from the machine
pub001.host
and you
want to connect using your local machine
mysql
client to the database server. To do so you
can forward the connection like so:
Once you run the command, you'll be prompted to enter the remote SSH user password. After entering it,
you will be logged in to the remote server and the SSH tunnel will be established. It is a good idea to
set up an SSH key-based
authentication
and connect to the server without entering a password.
Now if you point your local machine database client to
127.0.0.1:3336
, the connection
will be forwarded to the
db001.host:3306
MySQL server through the
pub001.host
machine which will act as an intermediate server.
You can forward multiple ports to multiple destinations in a single ssh command. For example, you have
another MySQL database server running on machine
db002.host
and you want to connect to both
servers from your local client you would run:
To connect to the second server you would use
127.0.0.1:3337
.
When the destination host is the same as the SSH server instead of specifying the destination host IP
or hostname you can use
localhost
.
Say you need to connect to a remote machine through VNC which runs on the same server and it is not
accessible from the outside. The command you would use is:
The
-f
option tells the
ssh
command to run in the background and
-N
not to execute a remote command. We are using
localhost
because the VNC and the SSH server
are running on the same host.
If you are having trouble setting up tunneling check your remote SSH server configuration and make
sure
AllowTcpForwarding
is not set to
no
. By default, forwarding is allowed.
Remote Port Forwarding
Remote port forwarding is the opposite of local port forwarding. It allows you to forward a port on
the remote (ssh server) machine to a port on the local (ssh client) machine, which is then forwarded to a
port on the destination machine.
In this type of forwarding the SSH server listens on a given port and tunnels any connection to that
port to the specified port on the local SSH client, which then connects to a port on the destination
machine. The destination machine can be the local or any other machine.
In Linux, macOS and other Unix systems to create a remote port forwarding pass the
-R
option to the
ssh
client:
[REMOTE:]REMOTE_PORT
- The IP and the port number on the remote SSH server. An empty
REMOTE
means that the remote SSH server will bind on all interfaces.
DESTINATION:DESTINATION_PORT
- The IP or hostname and the port of the destination
machine.
[USER@]SERVER_IP
- The remote SSH user and server IP address.
Local port forwarding is mostly used to give access to an internal service to someone from the
outside.
Let's say you are developing a web application on your local machine and you want to show a preview to
your fellow developer. You do not have a public IP so the other developer can't access the application
via the Internet.
If you have access to a remote SSH server you can set up a remote port forwarding as follows:
The command above will make ssh server to listen on port
8080
and tunnel all traffic from
this port to your local machine on port
3000
.
Now your fellow developer can type
the_ssh_server_ip:8080
in his/her browser and preview
your awesome application.
If you are having trouble setting up remote port forwarding make sure
GatewayPorts
is set
to
yes
in the remote SSH server configuration.
Dynamic Port Forwarding
Dynamic port forwarding allows you to create a socket on the local (ssh client) machine which acts as
a SOCKS proxy server. When a client connects to this port the connection is forwarded to the remote (ssh
server) machine, which is then forwarded to a dynamic port on the destination machine.
This way, all the applications using the SOCKS proxy will connect to the SSH server and the server
will forward all the traffic to its actual destination.
In Linux, macOS and other Unix systems to create a dynamic port forwarding (SOCKS) pass the
-D
option to the
ssh
client:
ssh -R [LOCAL_IP:]LOCAL_PORT [USER@]SSH_SERVER
The options used are as follows:
[LOCAL_IP:]LOCAL_PORT
- The local machine ip and port number. When
LOCAL_IP
is omitted the ssh client binds on localhost.
[USER@]SERVER_IP
- The remote SSH user and server IP address.
A typical example of a dynamic port forwarding is to tunnel the web browser traffic through an SSH
server.
The following command will create a SOCKS tunnel on port
9090
:
Once the tunneling is established you can configure your application to use it.
This article
explains how to configure Firefox and Google Chrome browser to use the SOCKS proxy.
The port forwarding has to be separately configured for each application that you want to tunnel the
traffic thought it.
Set up SSH Tunneling in Windows
Windows users can create SSH tunnels using the PuTTY SSH client. You can download PuTTY
here
.
Launch Putty and enter the SSH server IP Address in the
Host name (or IP address)
field.
<img alt="" src=/post/how-to-setup-ssh-tunneling/launch-putty.jpg>
Under the
Connection
menu, expand
SSH
and select
Tunnels
.
Check the
Local
radio button to setup local,
Remote
for remote, and
Dynamic
for dynamic port forwarding.
If setting up local forwarding enter the local forwarding port in the
Source Port
field and in
Destination
enter the destination host and IP, for example,
localhost:5901
.
For remote port forwarding enter the remote SSH server forwarding port in the
Source Port
field and in
Destination
enter the destination host and IP, for example,
localhost:3000
.
If setting up dynamic forwarding enter only the local SOCKS port in the
Source Port
field.
Click on the
Add
button as shown in the image below.
<img alt="" src=/post/how-to-setup-ssh-tunneling/add-tunnel-putty.jpg>
Go back to the
Session
page to save the settings so that you do not need to enter
them each time. Enter the session name in the
Saved Session
field and click on the
Save
button.
<img alt="" src=/post/how-to-setup-ssh-tunneling/save-session-putty.jpg>
Select the saved session and log in to the remote server by clicking on the
Open
button.
<img alt="" src=/post/how-to-setup-ssh-tunneling/open-session-putty.jpg>
A new window asking for your username and password will show up. Once you enter your username and
password you will be logged in to your server and the SSH tunnel will be started.
Setting up
public
key authentication
will allow you to connect to your server without entering a password.
Conclusion
We have shown you how to set up SSH tunnels and forward the traffic through a secure SSH connection.
For ease of use, you can define the SSH tunnel in your
SSH config file
or create a
Bash alias
that will set up the SSH
tunnel.
If you hit a problem or have feedback, leave a comment below.
"... A classic scenario is connecting from your desktop or laptop from inside your company's internal network, which is highly secured with firewalls to a DMZ. In order to easily manage a server in a DMZ, you may access it via a jump host . ..."
A jump host (also known as a jump server ) is an intermediary host or an SSH gateway
to a remote network, through which a connection can be made to another host in a dissimilar
security zone, for example a demilitarized zone ( DMZ ). It bridges two dissimilar security
zones and offers controlled access between them.
A jump host should be highly secured and monitored especially when it spans a private
network and a DMZ with servers providing services to users on the internet.
A classic scenario is connecting from your desktop or laptop from inside your company's
internal network, which is highly secured with firewalls to a DMZ. In order to easily manage a
server in a DMZ, you may access it via a jump host .
In this article, we will demonstrate how to access a remote Linux server via a jump host and
also we will configure necessary settings in your per-user SSH client configurations.
Consider the following scenario.
SSH Jump Host
In above scenario, you want to connect to HOST 2 , but you have to go through HOST 1 ,
because of firewalling, routing and access privileges. There is a number of valid reasons why
jumphosts are needed..
Dynamic Jumphost List
The simplest way to connect to a target server via a jump host is using the -J
flag from the command line. This tells ssh to make a connection to the jump host and then
establish a TCP forwarding to the target server, from there (make sure you've Passwordless
SSH Login between machines).
$ ssh -J host1 host2
If usernames or ports on machines differ, specify them on the terminal as shown.
$ ssh -J username@host1:port username@host2:port
Multiple Jumphosts List
The same syntax can be used to make jumps over multiple servers.
Static jumphost list means, that you know the jumphost or jumphosts that you need to connect
a machine. Therefore you need to add the following static jumphost 'routing' in
~/.ssh/config file and specify the host aliases as shown.
### First jumphost. Directly reachable
Host vps1
  HostName vps1.example.org

### Host to jump to via jumphost1.example.org
Host contabo
  HostName contabo.example.org
  ProxyJump contabo
Now try to connect to a target server via a jump host as shown.
$ ssh -J vps1 contabo
Login to Target Host via Jumphost
The second method is to use the ProxyCommand option to add the jumphost configuration in
your ~.ssh/config or $HOME/.ssh/config file as shown.
In this example, the target host is contabo and the jumphost is vps1 .
Host vps1
        HostName vps1.example.org
        IdentityFile ~/.ssh/vps1.pem
        User ec2-user

Host contabo
        HostName contabo.example.org
        IdentityFile ~/.ssh/contabovps
        Port 22
        User admin
        Proxy Command ssh -q -W %h:%p vps1
Where the command Proxy Command ssh -q -W %h:%p vps1 , means run ssh in quiet
mode (using -q ) and in stdio forwarding (using -W ) mode, redirect
the connection through an intermediate host ( vps1 ).
Then try to access your target host as shown.
$ ssh contabo
The above command will first open an ssh connection to vps1 in the background effected by
the ProxyCommand , and there after, start the ssh session to the target server contabo .
That's all for now! In this article, we have demonstrated how to access a remote server via
a jump host. Use the feedback form below to ask any questions or share your thoughts with
us.
Normally, you would forward a remote computer's X11 graphical display to your local computer
with the -X option, but the OpenSSH application places additional security limits on such
connections as a precaution. As long as you're starting a shell on a trusted machine, you can
use the -Y option to opt out of the excess security:
$ ssh -Y 93.184.216.34
Now you can launch an instance of any one of the remote computer's applications, but have it
appear on your screen. For instance, try launching the Nautilus file manager:
remote$ nautilus &
The result is a Nautilus file manager window on your screen, displaying files on the remote
computer. Your user can't see the window you're seeing, but at least you have graphical access
to what they are using. Through this, you can debug, modify settings, or perform actions that
are otherwise unavailable through a normal text-based SSH session.
Keep in mind, though, that a forwarded X11 session does not bring the whole remote session
to you. You don't have access to the target computer's audio playback, for example, though you
can make the remote system play audio through its speakers. You also can't access any custom
application themes on the target computer, and so on (at least, not without some skillful
redirection of environment variables).
However, if you only need to view files or use an application that you don't have access to
locally, forwarding X can be invaluable.
Learn to configure SSH port forwarding on your Linux system. Remote forwarding is also explained.
Regular Linux users know about
SSH
, as it is basically what allows them to connect to any server remotely to be able to manage it via command
line. However, this is not the only thing SSH can provide you for, it can also act as a great security tool to
encrypt your connections even when there is no encryption by default.
For example, let's say you have a remote Linux desktop that you wish to connect via
SMTP
or email but the firewall on that network currently blocks the SMTP port (25) which is very common. Through
a SSH tunnel you would simply connect to that particular SMTP service using another port by simply using SSH without
having to reconfigure SMTP configuration to a different port and on top of that, gaining the encryption capabilities
of SSH.
Configure OpenSSH for port forwarding
In order for
OpenSSH
Server to allow forwarding, you have to make sure it is active in the configuration. To do this, you must
edit your
/etc/ssh/ssh_config
file.
For Ubuntu 18.04 this file has changed a little bit so, you must un-comment one line in it:
By
default this line comes commented, you need to un-comment to allow forwarding
Once un-commented, you need to restart the SSH service to apply the changes:
restart
SSH Daemon to apply changes recently done in its configuration
Now that we have our target configured to allow SSH forwarding, we simply need to re-route things through a port
we know is not blocked. Let's use a very uncommonly blocked port like 3300:
So now we have done this, all traffic that comes to port 25 will automatically sent over to port 3300. From
another computer or client we simply will connect to this server to its port 3300 and we will then be able to
interact with it as it was SMTP server without any firewall restrictions to its 25 port, basically we simply
re-routed its port 25 traffic to another (non blocked) one to be able to access it.
We talked about forwarding a local port to another port, but let's say you want to do it exactly opposite: you
want to route a remote port or something you currently can access from the server to a local port.
To explain it easily, let's use an example similar to the previous one: from this server you access a particular
server through port 25 (SMTP) and you want to "share" that through a local port 3302 so anyone else can connect to
your server to the 3302 port and see whatever that server sees on port 25:
Summing up and some tips on SSH port forwarding
As you can see, this SSH forwarding acts like a very small VPN, because it routes things to given ports. Whenever
you execute these commands, they will open SSH shells, as it understands you need to interact to the server via SSH.
If you don't need this, it will be enough to simply add the "-N" option in them, so they will simply not open any
shell.
Liked the article? Please share it and help us grow :)
About
Helder
Systems Engineer, technology evangelist, Ubuntu user, Linux enthusiast, father and husband.
The simpler alternative is to route your local network traffic with an encrypted SOCKS proxy tunnel. This
way, all your applications using the proxy will connect to the SSH server and the server will forward all
the traffic to its actual destination. Your ISP (internet service provider) and other third parties will not
be able to inspect your traffic and block your access to websites.
This tutorial will walk you through the process of creating an encrypted SSH tunnel and configuring
Firefox and
Google Chrome
web browsers to use SOCKS proxy.
Prerequisites
Server running any flavor of Linux, with SSH access to route your traffic through it.
Web browser.
SSH client.
Set up the SSH tunnel
We'll create an SSH tunnel that will securely forwards traffic from your local machine on port
9090
to the SSH server on port
22
. You can use any port number greater than
1024
.
Linux and macOS
If you run Linux, macOS or any other Unix-based operating system on your local machine, you can easily
start an SSH tunnel with the following command:
ssh -N -D 9090 [USER]@[SERVER_IP]
The options used are as follows:
-N
- Tells SSH not to execute a remote command.
-D 9090
- Opens a SOCKS tunnel on the specified port number.
[USER]@[SERVER_IP]
- Your remote SSH user and server IP address.
To run the command in the background use the
-f
option.
If your SSH server is listening on a port other than port 22 (the default) use the
-p
                           [PORT_NUMBER]
option.
Once you run the command, you'll be prompted to enter your user password. After entering it, you will be
logged in to your server and the SSH tunnel will be established.
Windows users can create an SSH tunnel using the PuTTY SSH client. You can download PuTTY
here
.
Launch Putty and enter your server IP Address in the
Host name (or IP address)
field.
Under the
Connection
menu, expand
SSH
and select
Tunnels
.
Enter the port
9090
in the
Source Port
field , and check the
Dynamic
radio button.
Click on the
Add
button as shown in the image bellow.
Go back to the
Session
page to save the settings so that you do not need to enter them
each time. Enter the session name in the
Saved Session
field and click on the
Save
button.
Select the saved session and login to the remote server by clicking on the
Open
button.
A new window asking for your username and password will show up. Once you enter your username and
password you will be logged in to your server and the SSH tunnel will be started.
Configuring Your Browser to Use Proxy
Now that you have open the SSH SOCKS tunnel the last step is to configure your preferred browser to use
it.
Firefox
The steps bellow are the same for Windows, macOS, and Linux.
In the upper right hand corner, click on the hamburger icon
☰
to open Firefox's menu:
Click on the
⚙ Preferences
link.
Scroll down to the
Network Settings
section and click on the
Settings...
button.
A new window will open.
Select the
Manual proxy configuration
radio button.
Enter
127.0.0.1
in the
SOCKS Host
field and
9090
in the
Port
field.
Check the
Proxy DNS when using SOCKS v5
checkbox.
Click on the
OK
button to save the settings.
At this point your Firefox is configured and you can browse the Internet thought your SSH tunnel. To
verify it you can open
google.com
, type "what is my ip" and you should see your server IP
address.
To revert back to the default settings go to
Network Settings
, select the
Use system
                        proxy settings
radio button and save the settings.
There are also several plugins that can help you to configure Firefox's proxy settings such as
FoxyProxy
.
Google Chrome
Google Chrome uses the default system proxy settings. Instead of changing your operating system proxy
settings you can either use an addon such as
SwitchyOmega
or start Chrome web browser from the command line.
To launch Chrome using a new profile and your SSH tunnel use the following command:
The Last but not LeastTechnology is dominated by
two types of people: those who understand what they do not manage and those who manage what they do not understand ~Archibald Putt.
Ph.D
FAIR USE NOTICEThis site contains
copyrighted material the use of which has not always been specifically
authorized by the copyright owner. We are making such material available
to advance understanding of computer science, IT technology, economic, scientific, and social
issues. We believe this constitutes a 'fair use' of any such
copyrighted material as provided by section 107 of the US Copyright Law according to which
such material can be distributed without profit exclusively for research and educational purposes.
This is a Spartan WHYFF (We Help You For Free)
site written by people for whom English is not a native language. Grammar and spelling errors should
be expected. The site contain some broken links as it develops like a living tree...
You can use PayPal to to buy a cup of coffee for authors
of this site
Disclaimer:
The statements, views and opinions presented on this web page are those of the author (or
referenced source) and are
not endorsed by, nor do they necessarily reflect, the opinions of the Softpanorama society.We do not warrant the correctness
of the information provided or its fitness for any purpose. The site uses AdSense so you need to be aware of Google privacy policy. You you do not want to be
tracked by Google please disable Javascript for this site. This site is perfectly usable without
Javascript.
<img alt="" src=/post/how-to-setup-ssh-tunneling/launch-putty.jpg>
<img alt="" src=/post/how-to-setup-ssh-tunneling/configure-tunnel-putty.jpg>
<img alt="" src=/post/how-to-setup-ssh-tunneling/add-tunnel-putty.jpg>
<img alt="" src=/post/how-to-setup-ssh-tunneling/save-session-putty.jpg>
<img alt="" src=/post/how-to-setup-ssh-tunneling/open-session-putty.jpg>
SSH Jump Host
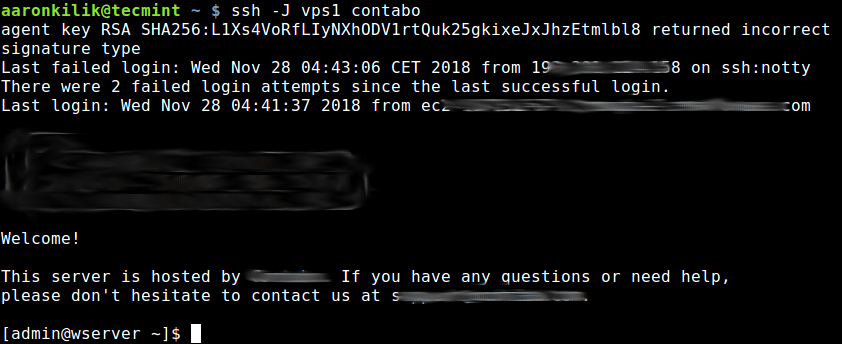
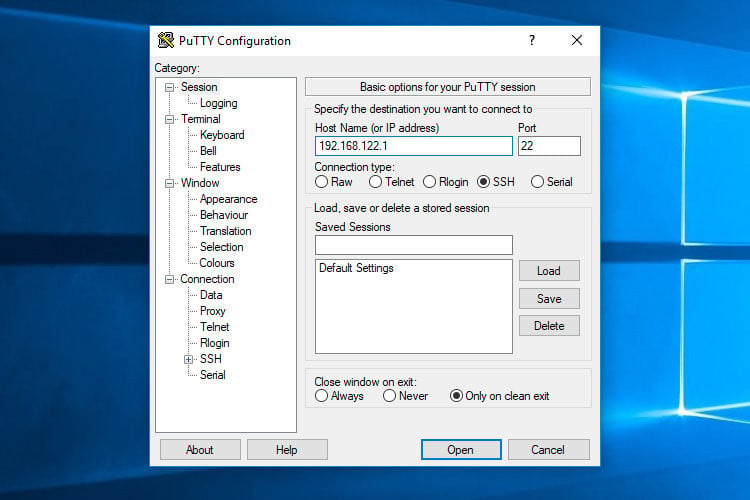
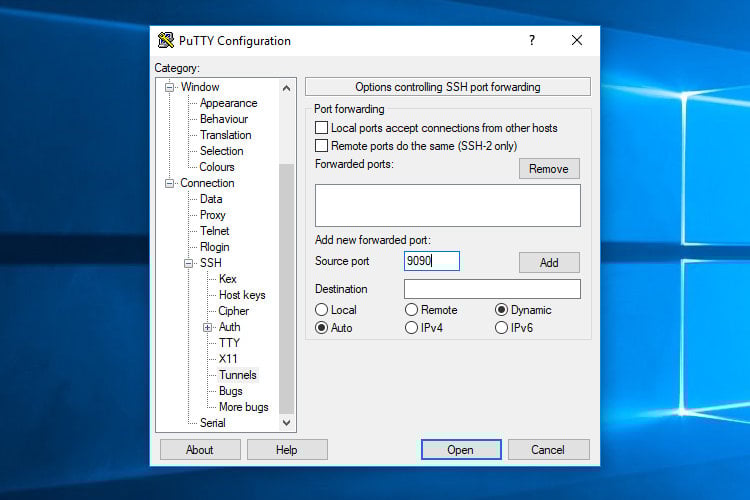

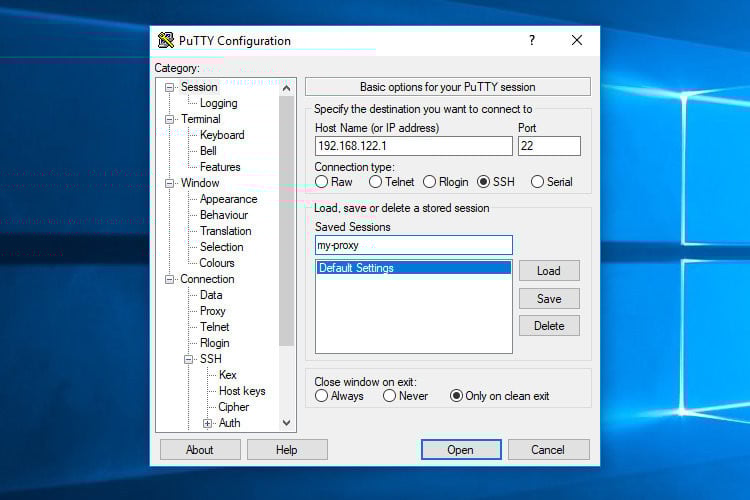
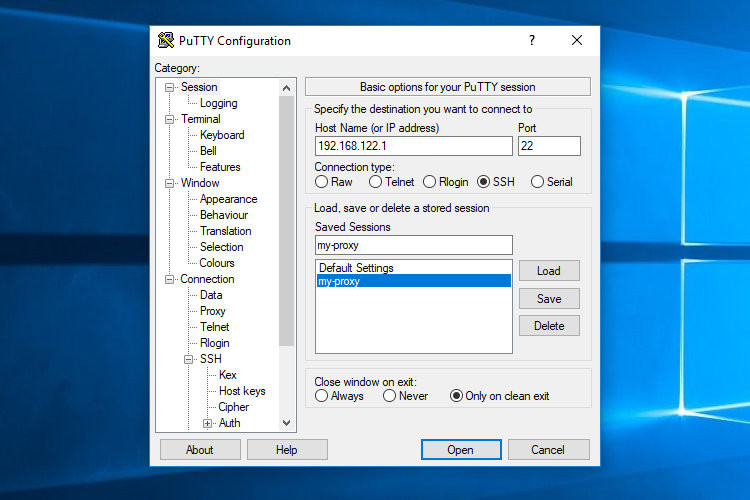
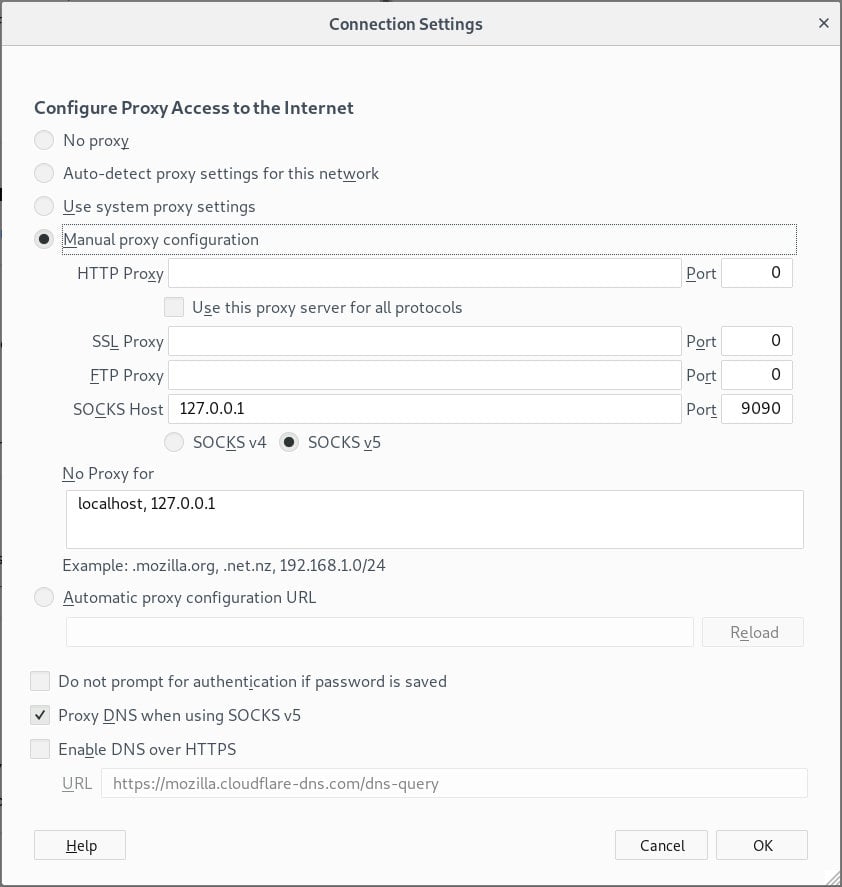
 <img alt="" src=/post/how-to-setup-ssh-tunneling/launch-putty.jpg>
 <img alt="" src=/post/how-to-setup-ssh-tunneling/configure-tunnel-putty.jpg>
 <img alt="" src=/post/how-to-setup-ssh-tunneling/add-tunnel-putty.jpg>
 <img alt="" src=/post/how-to-setup-ssh-tunneling/save-session-putty.jpg>
 <img alt="" src=/post/how-to-setup-ssh-tunneling/open-session-putty.jpg>