|
|
Home | Switchboard | Unix Administration | Red Hat | TCP/IP Networks | Neoliberalism | Toxic Managers |
| (slightly skeptical) Educational society promoting "Back to basics" movement against IT overcomplexity and bastardization of classic Unix | |||||||
|
|
|
|
The Yellow Dog Updater, Modified (YUM) was written at the Duke University department of Physics and is currently being maintained by Seth Vidal, who now works for Red Hat) and Michael Stenner, both of Duke University, as part of Duke University's Linux@DUKE project.
Yum is a rewrite in Python of its predecessor tool, Yellowdog Updater (YUP). The latter was originally written and maintained by Dan Burcaw, Bryan Stillwell, Stephen Edie, and Troy Bengegerdes of Yellowdog Linux (an RPM-based Linux distribution that runs on Macintoshes ).
YUM is a command line utility. There are also a couple of graphical frontends to yum:
There is also pup: graphical front-end for installing software updates, installed by default in Red Hat and its derivatives.
Yum is a very powerful tool for working with RPM packages organized into repositories. But it is pretty complex and road to hell is paved with good intentions. Now yum creates its own set of complex to debug bugs, especially if you work over the proxy.
Like any package manages is can do basic this like to display the list of installed and available for installation RPMs, extract and publish information from the RPM headers based on keywords or globs, find packages that provide particular files. But it can also do some not so basic operations. Yum is therefore of a higher level, more convenient tool them rpm. Yum can be used to synchronize already tested updates for multiple Linux servers or desktops. It this case it can be run from iether some parrale execution tool like cexec (tupically this is done for HPC clusters), or via some kind of cron or at script that picks up data from common NFS system or particular directory update by rsync.
Since RHEL5 Red Hat uses YUM as the default method for updating and installing RPM packages. Automatic software update can be done with either the yum-updatesd or the yum-updateonboot packages.
Yum's "intelligence" in performing updates is superior to most competitors (only smart comes close). But often it is not enough. It also creates complex bugs when higher level version of some package is installed.
Unlike typical unix utilities yum accepts options that are keywords without "-" sign in front. Classic unix utilities accept two type of options: a long option (features two hyphens and descriptive word) and a short option (with one hyphen and -- in most cases -- the first character of the full option). Yum is abnormal in this respect. In this respect yum is different from rpm which adhere to Unix conventions (i.e. either rpm --install [name] or rpm -i [name]).
yum localinstall /path/to/the/rpm
yum install "yast*"
yum localinstall *rpm
You can install using Web server as a source of RPMs.
yum install http://people.redhat.com/twoerner/BZ/477115/ipset-6.7-2.el6.x86_64.rpm http://people.redhat.com/twoerner/BZ/477115/libmnl-1.0.1-1.el6.x86_64.rpm http://people.redhat.com/twoerner/BZ/477115/libmnl-devel-1.0.1-1.el6.x86_64.rpm
yum remove kernel-2.4.1-10.i686
yum list extras
up2date --whatprovides=lib.so.5.2
yum provides lib.so.5.2
If you use yum on a remote server sometimes it is important to block any prompts. There are several options for that
Usually specifying -y is enough, for example
ssh b9 yum -y update
RPM packages are named in the following way:
package_name-version-release.architecture.rpm
package_name is the name of the package. For example, you saw how to install the php package earlier. version is the version of the software that the package contains. release is the CentOS release number.
Most packages are version locked, whereas the release changes as patches are added.
Architecture is what type of hardware the package is compiled to run on. For the vast majority of people, the architectures of interest are:
If you�re working with Yum and the standard repositories, you won�t need to do much with either architecture or version because Yum will make the correct choices for you. However, knowing how the packages are put together will let you search for specific versions and give you the option of manually locating and installing a file.
Yum has a sophisticated search facility that will allow you to find pretty much any package across your repositories. The key to actually finding a specific package, though, requires a more in-depth knowledge on how RPM packages are named�specifically, how the version numbers work.
Listing packages held on a repo:
yum list searchterm Here searchterm is a filter. Simple regex can be used.
Note: 'yum list all' and 'yum list' give the same output.
rpm -qa | grep "httpd*"
yum list installed httpd
up2date --whatprovides=lib.so.5.2
yum provides lib.so.5.2
yum search nss-softokn-freebl
yum deplist libXtst
up2date --whatprovides=lib.so.5.2
yum provides lib.so.5.2
YUM has the ability to install groups of packages. Which if you have a prove repository you can create yourself. This is really useful because many tasks require a collection of different software that may on first glance not look at all related. There are too types of packages in the group: mandatory and optional. Yum installs only those packages that are marked as mandatory. This is normally fine because it usually installs all of the key packages, but if you find it didn�t install what you�re looking for, you can still install any missing packages individually. To find out what groups are available (and also which ones you have already installed), you use the following:
yum grouplist
One of the groups that sysadmins tend to use a lot is Virtualization. This group contains all the packages you need such as the Xen kernel, support libraries, and administration tools.
To get information about the group including the list of packages use
yum groupinfo Virtualization
To install a group, you use the groupinstall command:
yum groupinstall Virtualization
If the group you want to install has a space in the name, enclose it in quotes:
yum groupinstall "Yum Utilities"
As with installing packages, Yum will present you with a list of packages that it needs to download and install in order to fulfill your request.
Classic example of using this capability is installing X11, if you missed it during the initial install:
yum -y groupinstall "X Window System" "Desktop" "Fonts" "General Purpose Desktop"
To remove all packages, of any type, in the named group use groupremove.
yum groupremove groupname
It will also remove any package that depends on any of these packages.
There is also yum-groups-manager which allows to create groups in the YUM repository. See manpage at yum-groups-manager(1) - Linux man page
|
|
Switchboard | ||||
| Latest | |||||
| Past week | |||||
| Past month | |||||
Jun 04, 2021 | www.2daygeek.com
Yum Package Manager has been replaced by DNF Package Manager since many long-standing issues in Yum remain unresolved.
These problems include poor performance, excessive memory usage, slowdown for dependency resolution.
DNF uses "libsolv"� for dependency resolution, developed and maintained by SUSE to improve performance.
It was written mostly in python, and it has its own way of coping with dependency resolution.
Its API is not fully documented, and its extension system only allows Python plugins.
Yum is a front-end tool for rpm that manages dependencies and repositories and then uses RPM to install, download and remove packages.
Both are used to manage packages on the rpm-based system (such as Red Hat, CentOS and Fedora), including installation, upgrade, search and remove.
Why would they want to build a new tool instead of fixing existing problems?Ales Kozamblak explained that fixing issues was not technically feasible and that the yum team was not ready to accept the changes immediately.
Also, the big challenge is that there are 56K lines for yum, but only 29K lines for DNF, so there is no way to fix it, except the fork.
However yum was working fine and it was a default package management tool until RHEL/CentOS 7.
https://googleads.g.doubleclick.net/pagead/ads?client=ca-pub-7730570141079407&output=html&h=280&slotname=3265433976&adk=1955548976&adf=1697281978&pi=t.ma~as.3265433976&w=336&lmt=1622856789&psa=1&format=336x280&url=https%3A%2F%2Fwww.2daygeek.com%2Fcomparison-difference-between-dnf-vs-yum%2F&flash=0&wgl=1&uach=WyJXaW5kb3dzIiwiMTAuMCIsIng4NiIsIiIsIjkxLjAuODY0LjM3IixbXV0.&dt=1622856789361&bpp=1&bdt=204&idt=252&shv=r20210601&cbv=%2Fr20190131&ptt=9&saldr=aa&abxe=1&cookie=ID%3D978f749437e7819d-22708b627e7a0028%3AT%3D1621992981%3AS%3DALNI_MY13eSRitp4LepWeDwTwXyjwdeREg&prev_fmts=728x90%2C300x600%2C336x280&correlator=2562027311128&frm=20&pv=1&ga_vid=1530848990.1621992982&ga_sid=1622856790&ga_hid=1239875811&ga_fc=0&u_tz=-240&u_his=1&u_java=0&u_h=1080&u_w=1920&u_ah=1040&u_aw=1920&u_cd=24&u_nplug=3&u_nmime=4&adx=392&ady=1385&biw=1903&bih=937&scr_x=0&scr_y=0&eid=182982000%2C182982200%2C44740386&oid=3&pvsid=969688249338081&pem=410&wsm=1&ref=https%3A%2F%2Fwww.linuxtoday.com%2F&eae=0&fc=640&brdim=1920%2C0%2C1920%2C0%2C1920%2C0%2C1920%2C1040%2C1920%2C937&vis=1&rsz=%7C%7CleEbr%7C&abl=CS&pfx=0&fu=0&bc=31&ifi=3&uci=a!3&btvi=1&fsb=1&xpc=cMOTcF5gZU&p=https%3A//www.2daygeek.com&dtd=255
S.No DNF (Dandified YUM) YUM (Yellowdog Updater, Modified) 1 DNF uses "�libsolv' for dependency resolution, developed and maintained by SUSE. YUM uses the public API for dependency resolution 2 API is fully documented API is not fully documented 3 It is written in C, C++, Python It is written only in Python 4 DNF is currently used in Fedora, Red Hat Enterprise Linux 8 (RHEL), CentOS 8, OEL 8 and Mageia 6/7. YUM is currently used in Red Hat Enterprise Linux 6/7 (RHEL), CentOS 6/7, OEL 6/7. 5 DNf supports various extensions Yum supports only Python-based extension 6 The API is well documented so it's easy to create new features It is very difficult to create new features because the API is not properly documented. 7 The DNF uses less memory when synchronizing the metadata of the repositories. The YUM uses excessive memory when synchronizing the metadata of the repositories. 8 DNF uses a satisfiability algorithm to solve dependency resolution (It's using a dictionary approach to store and retrieve package and dependency information). Yum dependency resolution gets sluggish due to public API. 9 All performance is good in terms of memory usage and dependency resolution of repository metadata. Overall performance is poor in terms of many factors. 10 DNF Update: If a package contains irrelevant dependencies during a DNF update process, the package will not be updated. YUM will update a package without verifying this. Closing Notes
S.No DNF (Dandified YUM) YUM (Yellowdog Updater, Modified) 11 If the enabled repository does not respond, dnf will skip it and continue the transaction with the available repositories. If a repository is not available, YUM will stop immediately. 12 dnf update and dnf upgrade are equals. It's different in yum 13 The dependencies on package installation are not updated Yum offered an option for this behavior 14 Clean-up Package Removal: When removing a package, dnf automatically removes any dependency packages not explicitly installed by the user. Yum didn't do this 15 Repo Cache Update Schedule: By default, ten minutes after the system boots, updates to configured repositories are checked by dnf hourly. This action is controlled by the system timer unit named "/usr/lib/systemd/system/dnf-makecache.timer"�. Yum do this too. 16 Kernel packages are not protected by dnf. Unlike Yum, you can delete all kernel packages, including one that runs. Yum will not allow you to remove the running kernel 17 libsolv: for solving packages and reading repositories. hawkey: hawkey, library providing simplified C and Python API to libsolv.
librepo: library providing C and Python (libcURL like) API for downloading linux repository metadata and packages.
libcomps: Libcomps is alternative for yum.comps library. It's written in pure C as library and there's bindings for python2 and python3
Yum does not use separate libraries to perform this function. 18 DNF contains 29k lines of code Yum contains 56k lines of code 19 DNF was developed by Ales Kozumplik YUM was developed by Zdenek Pavlas, Jan Silhan and team members In this guide, we have shown you several differences between DNF and YUM.
If you have any questions or feedback, feel free to comment below.
yum-plugin-security is already a part of yum
itself, no need to install anything.15 August 2019 12:12 AM IT Accounts NCVERJan 16, 2020 | access.redhat.com
It is now possible to limit
yumto install only security updates (as opposed to bug fixes or enhancements) using Red Hat Enterprise Linux 5,6, and 7. To do so, simply install theyum-securityplugin:For Red Hat Enterprise Linux 7 and 8
The plugin is already a part of
yumitself, no need to install anything.For Red Hat Enterprise Linux 5 and 6
# yum install yum-securityRaw
- To list all available erratas without installing them, run:
# yum list-secRaw
- To list all available security updates without installing them, run:
# yum list-security --securityFor Red Hat Enterprise Linux 5, 6, 7 and 8
Raw
- To list all available security updates with verbose descriptions of the issues they apply to:
# yum updateinfo info securityRaw
- Run the following command to download and apply all available security updates from Red Hat Network hosted or Red Hat Network Satellite:
# yum -y update --securityNOTE: It will install the last version available of any package with at least one security errata thus can install non-security erratas if they provide a more updated version of the package.
Raw
- To only install the packages that have a security errata use
# yum update-minimal --security -yRaw
yum-securityalso allows installing security updates based on the CVE reference of the issue. To install a security update using a CVE reference run:# yum update --cve <CVE>e.g.
Raw# yum update --cve CVE-2008-0947
11 September 2014 5:30 PM R. Hinton Community Leader
11 September 2014 5:34 PM R. Hinton Community LeaderFor those seeking to discover what CVEs are addressed in a given existing RPM, try this method that Marc Milgram from Red Hat kindly provided at this discussion .
1) First download the specific rpm you are interested in.
Raw
2) Use the below command...$ rpm -qp --changelog openssl-0.9.8e-27.el5_10.4.x86_64.rpm | grep CVE - fix CVE-2014-0221 - recursion in DTLS code leading to DoS - fix CVE-2014-3505 - doublefree in DTLS packet processing - fix CVE-2014-3506 - avoid memory exhaustion in DTLS - fix CVE-2014-3508 - fix OID handling to avoid information leak - fix CVE-2014-3510 - fix DoS in anonymous (EC)DH handling in DTLS - fix for CVE-2014-0224 - SSL/TLS MITM vulnerability - fix for CVE-2013-0169 - SSL/TLS CBC timing attack (#907589) - fix for CVE-2013-0166 - DoS in OCSP signatures checking (#908052) environment variable is set (fixes CVE-2012-4929 #857051) - fix for CVE-2012-2333 - improper checking for record length in DTLS (#820686) - fix for CVE-2012-2110 - memory corruption in asn1_d2i_read_bio() (#814185) - fix for CVE-2012-0884 - MMA weakness in CMS and PKCS#7 code (#802725) - fix for CVE-2012-1165 - NULL read dereference on bad MIME headers (#802489) - fix for CVE-2011-4108 & CVE-2012-0050 - DTLS plaintext recovery - fix for CVE-2011-4109 - double free in policy checks (#771771) - fix for CVE-2011-4576 - uninitialized SSL 3.0 padding (#771775) - fix for CVE-2011-4619 - SGC restart DoS attack (#771780) - fix CVE-2010-4180 - completely disable code for - fix CVE-2009-3245 - add missing bn_wexpand return checks (#570924) - fix CVE-2010-0433 - do not pass NULL princ to krb5_kt_get_entry which - fix CVE-2009-3555 - support the safe renegotiation extension and - fix CVE-2009-2409 - drop MD2 algorithm from EVP tables (#510197) - fix CVE-2009-4355 - do not leak memory when CRYPTO_cleanup_all_ex_data() - fix CVE-2009-1386 CVE-2009-1387 (DTLS DoS problems) - fix CVE-2009-1377 CVE-2009-1378 CVE-2009-1379 - fix CVE-2009-0590 - reject incorrectly encoded ASN.1 strings (#492304) - fix CVE-2008-5077 - incorrect checks for malformed signatures (#476671) - fix CVE-2007-3108 - side channel attack on private keys (#250581) - fix CVE-2007-5135 - off-by-one in SSL_get_shared_ciphers (#309881) - fix CVE-2007-4995 - out of order DTLS fragments buffer overflow (#321221) - CVE-2006-2940 fix was incorrect (#208744) - fix CVE-2006-2937 - mishandled error on ASN.1 parsing (#207276) - fix CVE-2006-2940 - parasitic public keys DoS (#207274) - fix CVE-2006-3738 - buffer overflow in SSL_get_shared_ciphers (#206940) - fix CVE-2006-4343 - sslv2 client DoS (#206940) - fix CVE-2006-4339 - prevent attack on PKCS#1 v1.5 signatures (#205180)7 January 2015 9:54 AM f3792625Additionally,
If you are interested to see if a given CVE, or list of CVEs are applicable, you can use this method:
1) get the list of all applicable CVEs from Red Hat you wish,
Raw
- If you wanted to limit the search to a specific rpm such as "openssl", then at that above Red Hat link, you can enter "openssl" and filter out only openssl items, or filter against any other search term
- Place these into a file, one line after another, such as this limited example:
NOTE : These CVEs below are from limiting the CVEs to "openssl" in the manner I described above, and the list is not completed, there are plenty more for your date range .CVE-2014-0016 CVE-2014-0017 CVE-2014-0036 CVE-2014-0041 ...2) Keep in mind the information in the article in this page, and run something like the following as root (a "for loop" will work in a bash shell):
Raw[root@yoursystem]# for i in `cat listofcves.txt`;yum update --cve $i;doneAnd if the cve applies, it will prompt you to take the update, if it does not apply, it will tell you
Alternatively, I used this "echo n |" prior to the "yum update" exit the yum command with "n" if it found a hit:
Raw[root@yoursystem]# for i in `cat listyoumade.txt`;echo n |yum update --cve $i;doneThen redirect the output to another file to make your determinations.
10 February 2016 1:00 PM Rackspace Customer'yum info-sec' actually lists all patches, you need to use 'yum info-sec --security'
20 September 2016 8:27 AM Walid ShaariHow is this the Severity information of RHSA updated populated?
Specifically the article shows the following output:
Raw# yum updateinfo list This system is receiving updates from RHN Classic or RHN Satellite. RHSA-2014:0159 Important/Sec. kernel-headers-2.6.32-431.5.1.el6.x86_64 RHSA-2014:0164 Moderate/Sec. mysql-5.1.73-3.el6_5.x86_64 RHSA-2014:0164 Moderate/Sec. mysql-devel-5.1.73-3.el6_5.x86_64 RHSA-2014:0164 Moderate/Sec. mysql-libs-5.1.73-3.el6_5.x86_64 RHSA-2014:0164 Moderate/Sec. mysql-server-5.1.73-3.el6_5.x86_64 RHBA-2014:0158 bugfix nss-sysinit-3.15.3-6.el6_5.x86_64 RHBA-2014:0158 bugfix nss-tools-3.15.3-6.el6_5.x86_64On all of my systems, the output seems to be missing the severity information:
Raw# yum updateinfo list This system is receiving updates from RHN Classic or RHN Satellite. RHSA-2014:0159 security kernel-headers-2.6.32-431.5.1.el6.x86_64 RHSA-2014:0164 security mysql-5.1.73-3.el6_5.x86_64 RHSA-2014:0164 security mysql-devel-5.1.73-3.el6_5.x86_64 RHSA-2014:0164 security mysql-libs-5.1.73-3.el6_5.x86_64 RHSA-2014:0164 security mysql-server-5.1.73-3.el6_5.x86_64 RHBA-2014:0158 bugfix nss-sysinit-3.15.3-6.el6_5.x86_64 RHBA-2014:0158 bugfix nss-tools-3.15.3-6.el6_5.x86_64I can't see how to configure it to transform "security" to "Severity/Sec."
20 June 2017 1:49 PM b.scaliosame in here, what I did was use info-sec with filters, like below: Raw
test-node# yum info-sec|grep  'Critical:'
  Critical: glibc security and bug fix update
  Critical: samba and samba4 security, bug fix, and enhancement update
  Critical: samba security update
  Critical: samba security update
  Critical: nss and nspr security, bug fix, and enhancement update
  Critical: nss, nss-util, and nspr security update
  Critical: nss-util security update
  Critical: samba4 security update
20 June 2017 2:05 PM Pavel MoravecWhat's annoying is that "yum update --security" shows 20 packages to update for security but when listing the installable errata in Satellite it shows 102 errata available and yet all those errata don't contain the errata.
14 August 2017 1:25 AM PixelDrift.NET Support Community LeaderYou might hit https://bugzilla.redhat.com/show_bug.cgi?id=1408508 where metadata generated has empty package list for some errata in some circumstances, causing
yumthinks such an errata is not applicable (as no package would be updated by applying that errata).I recommend finding out one of the errata that Sat WebUI offers but
Rawyumisnt aware of, and(z)grepthat errata id withinyumcache - if there will be something like:<pkglist> <collection short=""> <name>rhel-7-server-rpms__7Server__x86_64</name> </collection> </pkglist>with no package in it, you hit that bug.
16 January 2018 5:00 PM DSI POMONAI've got an interesting requirement in that a customer wants to only allow updates of packages with attached security errata (to limit unecessary drift/update of the OS platform). ie. restrict, warn or block the use of generic 'yum update' by an admin as it will update all packages.
There are other approaches which I have currently implemented, including limiting what is made available to the servers through Satellite so yum update doesn't 'see' non security errata.. but I guess what i'm really interested in is limiting (through client config) the inadvertant use "yum update" by an administrator, or redirecting/mapping 'yum update' to 'yum update --security'. I appreciate an admin can work around any restriction, but it's really to limit accidental use of full 'yum update' by well intentioned admins.
Current approaches are to alias yum, move yum and write a shim in its place (to warn/redirect if yum update is called), or patch the yum package itself (which i'd like to avoid). Any other suggestions appreciated.
12 March 2018 2:25 PM Rackspace Customer IN Newbie 14 pointswhy not creating a specific content-view for security patch purpose ?
In that content-view, you create a filter that filters only security updates.
In your patch management process, you can create a script that change on the fly the content-view of a host (or host-group) then apply security patches, and finally switching back to the original content-view (if you let to the admin the possibility to install additional programms if necessary).
hope this helps
15 August 2019 1:17 AM Marcus WestHi,
Is it necessary to reboot system after applying security updates ?
If it's a kernel update, you will have to. For other packages, it's recommended as to ensure that you are not still running the old libraries in memory. If you are just patching one particular independent service (ie, http), you can probably get away without a full system reboot.
More information can be found in the solution Which packages require a system reboot after the update? .
Jan 01, 2021 | askubuntu.com
In redhat-based distros, the yum tool has a distro-sync command which will synchronize packages to the current repositories. This command is useful for returning to a base state if base packages have been modified from an outside source. The docs for the command is:
distribution-synchronization or distro-sync Synchronizes the installed package set with the latest packages available, this is done by either obsoleting, upgrading or downgrading as appropriate. This will "normally" do the same thing as the upgrade command however if you have the package FOO installed at version 4, and the latest available is only version 3, then this command will downgrade FOO to version 3.
Oct 05, 2020 | developers.redhat.com
Modular Perl in Red Hat Enterprise Linux 8 By Petr Pisar May 16, 2019
Red Hat Enterprise Linux 8 comes with modules as a packaging concept that allows system administrators to select the desired software version from multiple packaged versions. This article will show you how to manage Perl as a module.
Installing from a default streamLet's install Perl:
# yum --allowerasing install perl
Last metadata expiration check: 1:37:36 ago on Tue 07 May 2019 04:18:01 PM CEST.
Dependencies resolved.
==========================================================================================
 Package                       Arch    Version                Repository             Size
==========================================================================================
Installing:
 perl                          x86_64  4:5.26.3-416.el8       rhel-8.0.z-appstream   72 k
Installing dependencies:
[ ]
Transaction Summary
==========================================================================================
Install  147 Packages

Total download size: 21 M
Installed size: 59 M
Is this ok [y/N]: y
[ ]
  perl-threads-shared-1.58-2.el8.x86_64

Complete!
Next, check which Perl you have:
$ perl -V:version
version='5.26.3';
You have 5.26.3 Perl version. This is the default version supported for the next 10 years and, if you are fine with it, you don't have to know anything about modules. But what if you want to try a different version?
Everything you need to grow your career.With your free Red Hat Developer program membership, unlock our library of cheat sheets and ebooks on next-generation application development.
SIGN UP Discovering streamsLet's find out what Perl modules are available using the
yum module listcommand:# yum module list Last metadata expiration check: 1:45:10 ago on Tue 07 May 2019 04:18:01 PM CEST. [ ] Name Stream Profiles Summary [ ] parfait 0.5 common Parfait Module perl 5.24 common [d], Practical Extraction and Report Languag minimal e perl 5.26 [d] common [d], Practical Extraction and Report Languag minimal e perl-App-cpanminus 1.7044 [d] common [d] Get, unpack, build and install CPAN mod ules perl-DBD-MySQL 4.046 [d] common [d] A MySQL interface for Perl perl-DBD-Pg 3.7 [d] common [d] A PostgreSQL interface for Perl perl-DBD-SQLite 1.58 [d] common [d] SQLite DBI driver perl-DBI 1.641 [d] common [d] A database access API for Perl perl-FCGI 0.78 [d] common [d] FastCGI Perl bindings perl-YAML 1.24 [d] common [d] Perl parser for YAML php 7.2 [d] common [d], PHP scripting language devel, minim al [ ]Here you can see a Perl module is available in versions 5.24 and 5.26. Those are called streams in the modularity world, and they denote an independent variant, usually a different version, of the same software stack. The [d] flag marks a default stream. That means if you do not explicitly enable a different stream, the default one will be used. That explains why yum installed Perl 5.26.3 and not some of the 5.24 micro versions.
Now suppose you have an old application that you are migrating from Red Hat Enterprise Linux 7, which was running in the rh-perl524 software collection environment, and you want to give it a try on Red Hat Enterprise Linux 8. Let's try Perl 5.24 on Red Hat Enterprise Linux 8.
Enabling a StreamFirst, switch the Perl module to the 5.24 stream:
# yum module enable perl:5.24
Last metadata expiration check: 2:03:16 ago on Tue 07 May 2019 04:18:01 PM CEST.
Problems in request:
Modular dependency problems with Defaults:

 Problem 1: conflicting requests
  - module freeradius:3.0:8000020190425181943:75ec4169-0.x86_64 requires module(perl:5.26), but none of the providers can be installed
  - module perl:5.26:820181219174508:9edba152-0.x86_64 conflicts with module(perl:5.24) provided by perl:5.24:820190207164249:ee766497-0.x86_64
  - module perl:5.24:820190207164249:ee766497-0.x86_64 conflicts with module(perl:5.26) provided by perl:5.26:820181219174508:9edba152-0.x86_64
 Problem 2: conflicting requests
  - module freeradius:3.0:820190131191847:fbe42456-0.x86_64 requires module(perl:5.26), but none of the providers can be installed
  - module perl:5.26:820181219174508:9edba152-0.x86_64 conflicts with module(perl:5.24) provided by perl:5.24:820190207164249:ee766497-0.x86_64
  - module perl:5.24:820190207164249:ee766497-0.x86_64 conflicts with module(perl:5.26) provided by perl:5.26:820181219174508:9edba152-0.x86_64
Dependencies resolved.
==========================================================================================
 Package              Arch                Version              Repository            Size
==========================================================================================
Enabling module streams:
 perl                                     5.24

Transaction Summary
==========================================================================================

Is this ok [y/N]: y
Complete!

Switching module streams does not alter installed packages (see 'module enable' in dnf(8)
for details)
Here you can see a warning that the freeradius:3.0 stream is not compatible with perl:5.24 . That's because FreeRADIUS was built for Perl 5.26 only. Not all modules are compatible with all other modules.
Next, you can see a confirmation for enabling the Perl 5.24 stream. And, finally, there is another warning about installed packages. The last warning means that the system still can have installed RPM packages from the 5.26 stream, and you need to explicitly sort it out.
Changing modules and changing packages are two separate phases. You can fix it by synchronizing a distribution content like this:
# yum --allowerasing distrosync
Last metadata expiration check: 0:00:56 ago on Tue 07 May 2019 06:33:36 PM CEST.
Modular dependency problems:

 Problem 1: module freeradius:3.0:8000020190425181943:75ec4169-0.x86_64 requires module(perl:5.26), but none of the providers can be installed
  - module perl:5.26:820181219174508:9edba152-0.x86_64 conflicts with module(perl:5.24) provided by perl:5.24:820190207164249:ee766497-0.x86_64
  - module perl:5.24:820190207164249:ee766497-0.x86_64 conflicts with module(perl:5.26) provided by perl:5.26:820181219174508:9edba152-0.x86_64
  - conflicting requests
 Problem 2: module freeradius:3.0:820190131191847:fbe42456-0.x86_64 requires module(perl:5.26), but none of the providers can be installed
  - module perl:5.26:820181219174508:9edba152-0.x86_64 conflicts with module(perl:5.24) provided by perl:5.24:820190207164249:ee766497-0.x86_64
  - module perl:5.24:820190207164249:ee766497-0.x86_64 conflicts with module(perl:5.26) provided by perl:5.26:820181219174508:9edba152-0.x86_64
  - conflicting requests
Dependencies resolved.
==========================================================================================
 Package           Arch   Version                              Repository            Size
==========================================================================================
[ ]
Downgrading:
 perl              x86_64 4:5.24.4-403.module+el8+2770+c759b41a
                                                               rhel-8.0.z-appstream 6.1 M
[ ]
Transaction Summary
==========================================================================================
Upgrade    69 Packages
Downgrade  66 Packages

Total download size: 20 M
Is this ok [y/N]: y
[ ]
Complete!
And try the
perlcommand again:$ perl -V:version version='5.24.4';Great! It works. We switched to a different Perl version, and the different Perl is still invoked with the
perlcommand and is installed to a standard path ( /usr/bin/perl ). Noscl enableincantation is needed, in contrast to the software collections.You could notice the repeated warning about FreeRADIUS. A future YUM update is going to clean up the unnecessary warning. Despite that, I can show you that other Perl-ish modules are compatible with any Perl stream.
Dependent modulesLet's say the old application mentioned before is using DBD::SQLite Perl module. (This nomenclature is a little ambiguous: Red Hat Enterprise Linux has modules; Perl has modules. If I want to emphasize the difference, I will say the Modularity modules or the CPAN modules.) So, let's install CPAN's DBD::SQLite module. Yum can search in a packaged CPAN module, so give a try:
# yum --allowerasing install 'perl(DBD::SQLite)'
[ ]
Dependencies resolved.
==========================================================================================
 Package          Arch    Version                             Repository             Size
==========================================================================================
Installing:
 perl-DBD-SQLite  x86_64  1.58-1.module+el8+2519+e351b2a7     rhel-8.0.z-appstream  186 k
Installing dependencies:
 perl-DBI         x86_64  1.641-2.module+el8+2701+78cee6b5    rhel-8.0.z-appstream  739 k
Enabling module streams:
 perl-DBD-SQLite          1.58
 perl-DBI                 1.641

Transaction Summary
==========================================================================================
Install  2 Packages

Total download size: 924 k
Installed size: 2.3 M
Is this ok [y/N]: y
[ ]
Installed:
  perl-DBD-SQLite-1.58-1.module+el8+2519+e351b2a7.x86_64
  perl-DBI-1.641-2.module+el8+2701+78cee6b5.x86_64

Complete!
Here you can see DBD::SQLite CPAN module was found in the perl-DBD-SQLite RPM package that's part of perl-DBD-SQLite:1.58 module, and apparently it requires some dependencies from the perl-DBI:1.641 module, too. Thus, yum asked for enabling the streams and installing the packages.
Before playing with DBD::SQLite under Perl 5.24, take a look at the listing of the Modularity modules and compare it with what you saw the first time:
# yum module list
[ ]
parfait              0.5              common       Parfait Module
perl                 5.24 [e]         common [d],  Practical Extraction and Report Languag
                                      minimal      e
perl                 5.26 [d]         common [d],  Practical Extraction and Report Languag
                                      minimal      e
perl-App-cpanminus   1.7044 [d]       common [d]   Get, unpack, build and install CPAN mod
                                                   ules
perl-DBD-MySQL       4.046 [d]        common [d]   A MySQL interface for Perl
perl-DBD-Pg          3.7 [d]          common [d]   A PostgreSQL interface for Perl
perl-DBD-SQLite      1.58 [d][e]      common [d]   SQLite DBI driver
perl-DBI             1.641 [d][e]     common [d]   A database access API for Perl
perl-FCGI            0.78 [d]         common [d]   FastCGI Perl bindings
perl-YAML            1.24 [d]         common [d]   Perl parser for YAML
php                  7.2 [d]          common [d],  PHP scripting language
                                      devel, minim
                                      al
[ ]
Notice that perl:5.24 is enabled ( [e] ) and thus takes precedence over perl:5.26, which would otherwise be a default one ( [d] ). Other enabled Modularity modules are perl-DBD-SQLite:1.58 and perl-DBI:1.641. Those are were enabled when you installed DBD::SQLite. These two modules have no other streams.
In general, any module can have multiple streams. At most, one stream of a module can be the default one. And, at most, one stream of a module can be enabled. An enabled stream takes precedence over a default one. If there is no enabled or a default stream, content of the module is unavailable.
If, for some reason, you need to disable a stream, even a default one, you do that with
yum module disable MODULE:STREAMcommand.Enough theory, back to some productive work. You are ready to test the DBD::SQLite CPAN module now. Let's create a test database, a foo table inside with one textual column called bar , and let's store a row with Hello text there:
$ perl -MDBI -e '$dbh=DBI->connect(q{dbi:SQLite:dbname=test});
    $dbh->do(q{CREATE TABLE foo (bar text)});
    $sth=$dbh->prepare(q{INSERT INTO foo(bar) VALUES(?)});
    $sth->execute(q{Hello})'
Next, verify the Hello string was indeed stored by querying the database:
$ perl -MDBI -e '$dbh=DBI->connect(q{dbi:SQLite:dbname=test}); print $dbh->selectrow_array(q{SELECT bar FROM foo}), qq{\n}'
Hello
It seems DBD::SQLite works.
Non-modular packages may not work with non-default streamsSo far, everything is great and working. Now I will show what happens if you try to install an RPM package that has not been modularized and is thus compatible only with the default Perl, perl:5.26:
# yum --allowerasing install 'perl(LWP)'
[ ]
Error:
 Problem: package perl-libwww-perl-6.34-1.el8.noarch requires perl(:MODULE_COMPAT_5.26.2), but none of the providers can be installed
  - cannot install the best candidate for the job
  - package perl-libs-4:5.26.3-416.el8.i686 is excluded
  - package perl-libs-4:5.26.3-416.el8.x86_64 is excluded
(try to add '--skip-broken' to skip uninstallable packages or '--nobest' to use not only best candidate packages)
Yum will report an error about perl-libwww-perl RPM package being incompatible. The LWP CPAN module that is packaged as perl-libwww-perl is built only for Perl 5.26, and therefore RPM dependencies cannot be satisfied. When a perl:5.24 stream is enabled, the packages from perl:5.26 stream are masked and become unavailable. However, this masking does not apply to non-modular packages, like perl-libwww-perl. There are plenty of packages that were not modularized yet. If you need some of them to be available and compatible with a non-default stream (e.g., not only with perl:5.26 but also with perl:5.24) do not hesitate to contact Red Hat support team with your request.
Resetting a moduleLet's say you tested your old application and now you want to find out if it works with the new Perl 5.26.
To do that, you need to switch back to the perl:5.26 stream. Unfortunately, switching from an enabled stream back to a default or to a yet another non-default stream is not straightforward. You'll need to perform a module reset:
# yum module reset perl
[ ]
Dependencies resolved.
==========================================================================================
 Package              Arch                Version              Repository            Size
==========================================================================================
Resetting module streams:
 perl                                     5.24

Transaction Summary
==========================================================================================

Is this ok [y/N]: y
Complete!
Well, that did not hurt. Now you can synchronize the distribution again to replace the 5.24 RPM packages with 5.26 ones:
# yum --allowerasing distrosync
[ ]
Transaction Summary
==========================================================================================
Upgrade    65 Packages
Downgrade  71 Packages

Total download size: 22 M
Is this ok [y/N]: y
[ ]
After that, you can check the Perl version:
$ perl -V:version
version='5.26.3';
And, check the enabled modules:
# yum module list
[ ]
parfait              0.5              common       Parfait Module
perl                 5.24             common [d],  Practical Extraction and Report Languag
                                      minimal      e
perl                 5.26 [d]         common [d],  Practical Extraction and Report Languag
                                      minimal      e
perl-App-cpanminus   1.7044 [d]       common [d]   Get, unpack, build and install CPAN mod
                                                   ules
perl-DBD-MySQL       4.046 [d]        common [d]   A MySQL interface for Perl
perl-DBD-Pg          3.7 [d]          common [d]   A PostgreSQL interface for Perl
perl-DBD-SQLite      1.58 [d][e]      common [d]   SQLite DBI driver
perl-DBI             1.641 [d][e]     common [d]   A database access API for Perl
perl-FCGI            0.78 [d]         common [d]   FastCGI Perl bindings
perl-YAML            1.24 [d]         common [d]   Perl parser for YAML
php                  7.2 [d]          common [d],  PHP scripting language
                                      devel, minim
                                      al
[ ]
As you can see, we are back at the square one. The perl:5.24 stream is not enabled, and perl:5.26 is the default and therefore preferred. Only perl-DBD-SQLite:1.58 and perl-DBI:1.641 streams remained enabled. It does not matter much because those are the only streams. Nonetheless, you can reset them back using
Multi-context streamsyum module reset perl-DBI perl-DBD-SQLiteif you like.What happened with the DBD::SQLite? It's still there and working:
$ perl -MDBI -e '$dbh=DBI->connect(q{dbi:SQLite:dbname=test}); print $dbh->selectrow_array(q{SELECT bar FROM foo}), qq{\n}'
Hello
That is possible because the perl-DBD-SQLite module is built for both 5.24 and 5.26 Perls. We call these modules multi-contextual . That's the case for perl-DBD-SQLite or perl-DBI, but not the case for FreeRADIUS, which explains the warning you saw earlier. If you want to see these low-level details, such which contexts are available, which dependencies are required, or which packages are contained in a module, you can use the
Afterwordyum module info MODULE:STREAMcommand.I hope this tutorial shed some light on modules -- the fresh feature of Red Hat Enterprise Linux 8 that enables us to provide you with multiple versions of software on top of one Linux platform. If you need more details, please read documentation accompanying the product (namely, user-space component management document and yum(8) manual page ) or ask the support team for help.
Aug 27, 2014 | www.unixmen.com
This tutorial describes how to setup a local Yum repository on CentOS 7 system. Also, the same steps should work on RHEL and Scientific Linux 7 systems too.
If you have to install software, security updates and fixes often in multiple systems in your local network, then having a local repository is an efficient way. Because all required packages are downloaded over the fast LAN connection from your local server, so that it will save your Internet bandwidth and reduces your annual cost of Internet.
In this tutorial, I use two systems as described below:
Yum Server OS : CentOS 7 (Minimal Install) Yum Server IP Address : 192.168.1.101 Client OS : CentOS 7 (Minimal Install) Client IP Address : 192.168.1.102PrerequisitesFirst, mount your CentOS 7 installation DVD. For example, let us mount the installation media on /mnt directory.
mount /dev/cdrom /mnt/Now the CentOS installation DVD is mounted under /mnt directory. Next install vsftpd package and let the packages available over FTP to your local clients.
To do that change to /mnt/Packages directory:
cd /mnt/Packages/Now install vsftpd package:
rpm -ivh vsftpd-3.0.2-9.el7.x86_64.rpmEnable and start vsftpd service:
systemctl enable vsftpd
systemctl start vsftpd
We need a package called "createrepo" to create our local repository. So let us install it too.
If you did a minimal CentOS installation, then you might need to install the following dependencies first:
rpm -ivh libxml2-python-2.9.1-5.el7.x86_64.rpm
rpm -ivh deltarpm-3.6-3.el7.x86_64.rpm
rpm -ivh python-deltarpm-3.6-3.el7.x86_64.rpm
Now install "createrepo" package:
rpm -ivh createrepo-0.9.9-23.el7.noarch.rpmBuild Local RepositoryIt's time to build our local repository. Create a storage directory to store all packages from CentOS DVD's.
As I noted above, we are going to use a FTP server to serve all packages to client systems. So let us create a storage location in our FTP server pub directory.
mkdir /var/ftp/pub/localrepoNow, copy all the files from CentOS DVD(s) i.e from /mnt/Packages/ directory to the "localrepo" directory:
cp -ar /mnt/Packages/*.* /var/ftp/pub/localrepo/Again, mount the CentOS installation DVD 2 and copy all the files to /var/ftp/pub/localrepo directory.
Once you copied all the files, create a repository file called "localrepo.repo" under /etc/yum.repos.d/ directory and add the following lines into the file. You can name this file as per your liking:
vi /etc/yum.repos.d/localrepo.repoAdd the following lines:
[localrepo]
name=Unixmen Repository
baseurl=file:///var/ftp/pub/localrepo
gpgcheck=0
enabled=1
Note: Use three slashes(///) in the baseurl.
Now, start building local repository:
createrepo -v /var/ftp/pub/localrepo/Now the repository building process will start.
Sample Output:
Now, list out the repositories using the following command:
yum repolistSample Output:
repo id                                                                    repo name                                                                     status
base/7/x86_64                                                              CentOS-7 - Base                                                               8,465
extras/7/x86_64                                                            CentOS-7 - Extras                                                                30
localrepo                                                                  Unixmen Repository                                                            3,538
updates/7/x86_64                                                           CentOS-7 - Updates                                                              726
Clean the Yum cache and update the repository lists:
yum clean all
yum update
After creating the repository, disable or rename the existing repositories if you only want to install packages from the local repository itself.
Alternatively, you can install packages only from the local repository by mentioning the repository as shown below.
yum install --disablerepo="*" --enablerepo="localrepo" httpdSample Output:
Loaded plugins: fastestmirror
Loading mirror speeds from cached hostfile
Resolving Dependencies
--> Running transaction check
---> Package httpd.x86_64 0:2.4.6-17.el7.centos.1 will be installed
--> Processing Dependency: httpd-tools = 2.4.6-17.el7.centos.1 for package: httpd-2.4.6-17.el7.centos.1.x86_64
--> Processing Dependency: /etc/mime.types for package: httpd-2.4.6-17.el7.centos.1.x86_64
--> Processing Dependency: libaprutil-1.so.0()(64bit) for package: httpd-2.4.6-17.el7.centos.1.x86_64
--> Processing Dependency: libapr-1.so.0()(64bit) for package: httpd-2.4.6-17.el7.centos.1.x86_64
--> Running transaction check
---> Package apr.x86_64 0:1.4.8-3.el7 will be installed
---> Package apr-util.x86_64 0:1.5.2-6.el7 will be installed
---> Package httpd-tools.x86_64 0:2.4.6-17.el7.centos.1 will be installed
---> Package mailcap.noarch 0:2.1.41-2.el7 will be installed
--> Finished Dependency Resolution

Dependencies Resolved

===============================================================================================================================================================
 Package                              Arch                            Version                                         Repository                          Size
===============================================================================================================================================================
Installing:
 httpd                                x86_64                          2.4.6-17.el7.centos.1                           localrepo                          2.7 M
Installing for dependencies:
 apr                                  x86_64                          1.4.8-3.el7                                     localrepo                          103 k
 apr-util                             x86_64                          1.5.2-6.el7                                     localrepo                           92 k
 httpd-tools                          x86_64                          2.4.6-17.el7.centos.1                           localrepo                           77 k
 mailcap                              noarch                          2.1.41-2.el7                                    localrepo                           31 k

Transaction Summary
===============================================================================================================================================================
Install  1 Package (+4 Dependent packages)

Total download size: 3.0 M
Installed size: 10 M
Is this ok [y/d/N]:
Disable Firewall And SELinux:
As we are going to use the local repository only in our local area network, there is no need for firewall and SELinux. So, to reduce the complexity, I disabled both Firewalld and SELInux.
To disable the Firewalld, enter the following commands:
systemctl stop firewalld
systemctl disable firewalld
To disable SELinux, edit file /etc/sysconfig/selinux ,
vi /etc/sysconfig/selinuxSet SELINUX=disabled.
[...]
SELINUX=disabled
[...]
Reboot your server to take effect the changes.
Client Side ConfigurationNow, go to your client systems. Create a new repository file as shown above under /etc/yum.repos.d/ directory.
vi /etc/yum.repos.d/localrepo.repoand add the following contents:
[localrepo]
name=Unixmen Repository
baseurl=ftp://192.168.1.101/pub/localrepo
gpgcheck=0
enabled=1
Note: Use double slashes in the baseurl and 192.168.1.101 is yum server IP Address.
Now, list out the repositories using the following command:
yum repolistClean the Yum cache and update the repository lists:
yum clean all
yum update
Disable or rename the existing repositories if you only want to install packages from the server local repository itself.
Alternatively, you can install packages from the local repository by mentioning the repository as shown below.
yum install --disablerepo="*" --enablerepo="localrepo" httpdSample Output:
Loaded plugins: fastestmirror
Loading mirror speeds from cached hostfile
Resolving Dependencies
--> Running transaction check
---> Package httpd.x86_64 0:2.4.6-17.el7.centos.1 will be installed
--> Processing Dependency: httpd-tools = 2.4.6-17.el7.centos.1 for package: httpd-2.4.6-17.el7.centos.1.x86_64
--> Processing Dependency: /etc/mime.types for package: httpd-2.4.6-17.el7.centos.1.x86_64
--> Processing Dependency: libaprutil-1.so.0()(64bit) for package: httpd-2.4.6-17.el7.centos.1.x86_64
--> Processing Dependency: libapr-1.so.0()(64bit) for package: httpd-2.4.6-17.el7.centos.1.x86_64
--> Running transaction check
---> Package apr.x86_64 0:1.4.8-3.el7 will be installed
---> Package apr-util.x86_64 0:1.5.2-6.el7 will be installed
---> Package httpd-tools.x86_64 0:2.4.6-17.el7.centos.1 will be installed
---> Package mailcap.noarch 0:2.1.41-2.el7 will be installed
--> Finished Dependency Resolution

Dependencies Resolved

================================================================================
 Package          Arch        Version                      Repository      Size
================================================================================
Installing:
 httpd            x86_64      2.4.6-17.el7.centos.1        localrepo      2.7 M
Installing for dependencies:
 apr              x86_64      1.4.8-3.el7                  localrepo      103 k
 apr-util         x86_64      1.5.2-6.el7                  localrepo       92 k
 httpd-tools      x86_64      2.4.6-17.el7.centos.1        localrepo       77 k
 mailcap          noarch      2.1.41-2.el7                 localrepo       31 k

Transaction Summary
================================================================================
Install  1 Package (+4 Dependent packages)

Total download size: 3.0 M
Installed size: 10 M
Is this ok [y/d/N]: y
Downloading packages:
(1/5): apr-1.4.8-3.el7.x86_64.rpm                          | 103 kB   00:01
(2/5): apr-util-1.5.2-6.el7.x86_64.rpm                     |  92 kB   00:01
(3/5): httpd-tools-2.4.6-17.el7.centos.1.x86_64.rpm        |  77 kB   00:00
(4/5): httpd-2.4.6-17.el7.centos.1.x86_64.rpm              | 2.7 MB   00:00
(5/5): mailcap-2.1.41-2.el7.noarch.rpm                     |  31 kB   00:01
--------------------------------------------------------------------------------
Total                                              1.0 MB/s | 3.0 MB  00:02
Running transaction check
Running transaction test
Transaction test succeeded
Running transaction
  Installing : apr-1.4.8-3.el7.x86_64                                       1/5
  Installing : apr-util-1.5.2-6.el7.x86_64                                  2/5
  Installing : httpd-tools-2.4.6-17.el7.centos.1.x86_64                     3/5
  Installing : mailcap-2.1.41-2.el7.noarch                                  4/5
  Installing : httpd-2.4.6-17.el7.centos.1.x86_64                           5/5
  Verifying  : mailcap-2.1.41-2.el7.noarch                                  1/5
  Verifying  : httpd-2.4.6-17.el7.centos.1.x86_64                           2/5
  Verifying  : apr-util-1.5.2-6.el7.x86_64                                  3/5
  Verifying  : apr-1.4.8-3.el7.x86_64                                       4/5
  Verifying  : httpd-tools-2.4.6-17.el7.centos.1.x86_64                     5/5

Installed:
  httpd.x86_64 0:2.4.6-17.el7.centos.1

Dependency Installed:
  apr.x86_64 0:1.4.8-3.el7                      apr-util.x86_64 0:1.5.2-6.el7
  httpd-tools.x86_64 0:2.4.6-17.el7.centos.1    mailcap.noarch 0:2.1.41-2.el7

Complete!
That's it. Now, you will be able to install softwares from your server local repository.
Cheers!
Sep 01, 2019 | www.2daygeek.com
Three Ways to Exclude Specific Packages from Yum Update
· Published : August 28, 2019 || Last Updated: August 31, 2019
Method 1 : Exclude Packages with yum Command Manually or TemporarilyWe can use
--exclude or -xswitch with yum command to exclude specific packages from getting updated through yum command.This is a temporary method or On-Demand method. If you want to exclude specific package only once then we can use this method.
The below command will update all packages except kernel.
To exclude single package.
# yum update --exclude=kernel

or

# yum update -x 'kernel'
To exclude multiple packages. The below command will update all packages except kernel and php.
# yum update --exclude=kernel* --exclude=php*

or

# yum update --exclude httpd,php
Method-2: Exclude Packages with yum Command PermanentlyIf you are frequently performing the patch update,You can use this permanent method.
To do so, add the required packages in /etc/yum.conf to disable packages updates permanently.
Once you add an entry, you don't need to specify these package each time you run yum update command. Also, this prevents packages from any accidental update.
# vi /etc/yum.conf

[main]
cachedir=/var/cache/yum/$basearch/$releasever
keepcache=0
debuglevel=2
logfile=/var/log/yum.log
exactarch=1
obsoletes=1
gpgcheck=1
plugins=1
installonly_limit=3
exclude=kernel* php*
Method-3: Exclude Packages Using Yum versionlock pluginThis is also permanent method similar to above. Yum versionlock plugin allow users to lock specified packages from being updated through yum command.
To do so, run the following command. The below command will exclude the freetype package from yum update.
You can also add the package entry directly in "/etc/yum/pluginconf.d/versionlock.list" file.
# yum versionlock add freetype

Loaded plugins: changelog, package_upload, product-id, search-disabled-repos, subscription-manager, verify, versionlock
Adding versionlock on: 0:freetype-2.8-12.el7
versionlock added: 1
Use the below command to check the list of packages locked by versionlock plugin.
# yum versionlock list

Loaded plugins: changelog, package_upload, product-id, search-disabled-repos, subscription-manager, verify, versionlock
0:freetype-2.8-12.el7.*
versionlock list done
Run the following command to discards the list.
# yum versionlock clear
Apr 12, 2016 | linuxconfig.org
Introduction
- Details
- admin
- Redhat
If your Redhat server is not connected to the official RHN repositories, you will need to configure your own private repository which you can later use to install packages. The procedure of creating a Redhat repository is quite simple task. In this article we will show you how to create a local file Redhat repository as well as remote HTTP repository.
Using Official Redhat DVD as repositoryAfter default installation and without registering your server to official RHN repositories your are left without any chance to install new packages from redhat repository as your repository list will show 0 entries:
# yum repolist
Loaded plugins: product-id, refresh-packagekit, security, subscription-manager
This system is not registered to Red Hat Subscription Management. You can use subscription-manager to register.
repolist: 0
At this point the easiest thing to do is to attach your Redhat installation DVD as a local repository. To do that, first make sure that your RHEL DVD is mounted:
# mount | grep iso9660
/dev/sr0 on /media/RHEL_6.4 x86_64 Disc 1 type iso9660 (ro,nosuid,nodev,uhelper=udisks,uid=500,gid=500,iocharset=utf8,mode=0400,dmode=0500)
The directory which most interests us at the moment is " /media/RHEL_6.4 x86_64 Disc 1/repodata " as this is the directory which contains information about all packages found on this particular DVD disc.
Next we need to define our new repository pointing to " /media/RHEL_6.4 x86_64 Disc 1/ " by creating a repository entry in /etc/yum.repos.d/. Create a new file called: /etc/yum.repos.d/RHEL_6.4_Disc.repo using vi editor and insert a following text:
[RHEL_6.4_Disc]
name=RHEL_6.4_x86_64_Disc
baseurl="file:///media/RHEL_6.4 x86_64 Disc 1/"
gpgcheck=0
Once file was created your local Redhat DVD repository should be ready to use:
# yum repolist
Loaded plugins: product-id, refresh-packagekit, security, subscription-manager
This system is not registered to Red Hat Subscription Management. You can use subscription-manager to register.
repo id                                                     repo name                                                           status
RHEL_6.4_Disc                                               RHEL_6.4_x86_64_Disc                                                3,648
repolist: 3,648
SUBSCRIBE TO NEWSLETTER
Subscribe to Linux Career NEWSLETTER and receive latest Linux news, jobs, career advice and tutorials.
Creating a local file Redhat repositoryNormally having a Redhat DVD repository will be enough to get you started however, the only disadvantage is that you are not able to alter your repository in any way and thus not able to insert new/updated packages into it. The resolve this issue we can create a local file repository sitting somewhere on the filesystem. To aid us with this plan we will use a createrepo utility.
By default createrepo may not be installed on your system:
# yum list installed | grep createrepo
#
No output indicates that this packages is currently not present in your system. If you have followed a previous section on how to attach RHEL official DVD as your system's repository, then to install createrepo package simply execute:
# yum install createrepoThe above command will install createrepo utility along with all prerequisites. In case that you do not have your repository defined yet, you can install createrepo manually:
Using your mounted RedHat DVD first install prerequisites:
# rpm -hiv /media/RHEL_6.4\ x86_64\ Disc\ 1/Packages/deltarpm-*
# rpm -hiv /media/RHEL_6.4\ x86_64\ Disc\ 1/Packages/python-deltarpm-*
followed by the installation of the actual createrepo package:
# rpm -hiv /media/RHEL_6.4\ x86_64\ Disc\ 1/Packages/createrepo-*If all went well you should be able to see createrepo package installed in your system:
# yum list installed | grep createrepo
createrepo.noarch                        0.9.9-17.el6                          installed
At this stage we are ready to create our own Redhat local file repository. Create a new directory called /rhel_repo:
# mkdir /rhel_repoNext, copy all packages from your mounted RHEL DVD to your new directory:
# cp /media/RHEL_6.4\ x86_64\ Disc\ 1/Packages/* /rhel_repo/When copy is finished execute createrepo command with a single argument which is your new local repository directory name:
# createrepo /rhel_repo/
Spawning worker 0 with 3648 pkgs
Workers Finished
Gathering worker results

Saving Primary metadata
Saving file lists metadata
Saving other metadata
Generating sqlite DBs
Sqlite DBs complete
You are also able to create Redhat repository on any debian-like Linux system such as Debian, Ubuntu or mint. The procedure is the same except that installation of createrepo utility will be: # apt-get install createrepo
As a last step we will create a new yum repository entry:
# vi /etc/yum.repos.d/rhel_repo.repo[rhel_repo] name=RHEL_6.4_x86_64_Local baseurl="file:///rhel_repo/" gpgcheck=0Your new repository should now be accessible:
# yum repolist
Loaded plugins: product-id, refresh-packagekit, security, subscription-manager
This system is not registered to Red Hat Subscription Management. You can use subscription-manager to register.
rhel_repo                                                                                                      | 2.9 kB     00:00 ...
rhel_repo/primary_db                                                                                           | 367 kB     00:00 ...
repo id                                                     repo name                                                           status
RHEL_6.4_Disc                                               RHEL_6.4_x86_64_Disc                                                3,648
rhel_repo                                                   RHEL_6.4_x86_64_Local                                                 3,648
Creating a remote HTTP Redhat repositoryIf you have multiple Redhat servers you may want to create a single Redhat repository accessible by all other servers on the network. For this you will need apache web server. Detailed installation and configuration of Apache web server is beyond the scope of this guide therefore, we assume that your httpd daemon ( Apache webserver ) is already configured. In order to make your new repository accessible via http configure your apache with /rhel_repo/ directory created in previous section as document root directory or simply copy entire directory to: /var/www/html/ ( default document root ).
Then create a new yum repository entry on your client system by creating a new repo configuration file:
vi /etc/yum.repos.d/rhel_http_repo.repowith a following content, where my host is a IP address or hostname of your Redhat repository server:
[rhel_repo_http]
name=RHEL_6.4_x86_64_HTTP
baseurl="http://myhost/rhel_repo/"
gpgcheck=0
Confirm the correctness of your new repository by:
# yum repolist Loaded plugins: product-id, refresh-packagekit, security, subscription-manager This system is not registered to Red Hat Subscription Management. You can use subscription-manager to register. repo id repo name status rhel_repo_http RHEL_6.4_x86_64_HTTP 3,648 repolist: 3,648ConclusionCreating your own package repository gives you more options on how to manage packages on your Redhat system even without paid RHN subscription. When using a remote HTTP Redhat repository you may also want to configure GPGCHECK as part of your repository to make sure that no packages had been tampered to prior their installation.
Mar 20, 2019 | unix.stackexchange.com
Kiran ,Jan 2, 2017 at 23:57
I have three RHEL 6.6 servers. One has a yum repository that I know works. The other two servers I will refer to as "yum clients." These two are configured to use the same yum repository (the first server described). When I doyum install httpdon each of these two yum client servers, I get two different results. One server prepares for the installation as normal and prompts me with a y/n prompt. The second server saysNo package httpd available.
The /etc/yum.conf files on each of the two servers is identical. The /etc/yum.repos.d/ directories have the same .repo files. Why does one yum client not see the httpd package? I use httpd as an example. One yum client cannot install any package. The other yum client can install anything. Neither have access to the Internet or different servers the other one does not have access to.
XXX
If /etc/yum.conf is identical on all servers, and that package is not listed there in exclude line, check if the repo is enabled on all the servers.Do
grep enabled /etc/yum.repos.d/filename.repoand see if it is set to 0 or 1.
value of enabled needs to be set to 1, for yum to use that repo.
If repo is not enabled, you can edit the repo file, and change the enable to 1, or try to run yum with enablerepo switch, to enable it for that operation.
Try to run yum like this.
yum --enablerepo=repo_name install package_name
Nov 09, 2018 | www.linuxnix.com
IntroductionWe've explored the yum package manager for RHEL based systems extensively in previous yum . In this article, we will present the cause and fix for the message "Repodata is over 2 weeks old. Install yum-cron? Or run: yum makecache fast" which you might occassionally come across while running yum commands.
Cause of the messageYUM maintains a cache of repository related information in the /var/cache/yum/$basearch/$releasever/ directory, where $basearch and $releasever are Yum variables referring to base architecture of the system and the release version of Red Hat Enterprise Linux. Along with some metadata yum also stores downloaded packages temporarily in this location while the packages are being installed. Once the packages are installed successfully they are removed from the cache directories. If you are working on a server that has not been able to connect to an active yum repository server for several weeks then you will see this message when you run a yum command indicating the presence of outdated repository entries in the yum cache.This basically means that the yum cache directory is not up to date.
[root@linuxnix ~]# yum install zip
Loaded plugins: fastestmirror, langpacks
Repodata is over 2 weeks old. Install yum-cron? Or run: yum makecache fast
The old repodata warning also gets triggered if you restore from an old server snapshots for those using VPS servers or cloud servers. It is merely a warning that you may not be getting the current version of programs for your webserver.
Fix for the message:You can get rid of this message via one of the following two methods.
Method 1; Yum clean all
To clean the yum cache entirely and recreate it execute the following command:[root@linuxnix ~]# yum clean all Loaded plugins: fastestmirror, langpacks Cleaning repos: base epel extras puppetlabs-pc1 updates Cleaning up everything Cleaning up list of fastest mirrors [root@linuxnix ~]#After running this command, when you run the next yum related command then it will populate the yum cache again, you will no longer see the "Repodata is over 2 weeks old. Install yum-cron? Or run: yum makecache fast" since yum will now have access to the latest repository metadata in the yum cache.
Method 2: Yum makecache fast
The yum cache will be automatically built up over time when you perform various yum queries such as installing or updating packages, however we have the option to manually make the cache so that future actions will be quicker with the 'makecache' argument. By adding the keyword fast to the end of the yum makecache command will make it populate the yum cache even faster but will end up caching fewer repositories.[root@linuxnix ~]# yum makecache fast Loaded plugins: fastestmirror, langpacks base | 3.6 kB 00:00:00 epel/x86_64/metalink | 5.3 kB 00:00:00 epel | 4.7 kB 00:00:00 extras | 3.4 kB 00:00:00 puppetlabs-pc1 | 2.5 kB 00:00:00 updates | 3.4 kB 00:00:00 (1/8): base/7/x86_64/group_gz | 166 kB 00:00:05 (2/8): extras/7/x86_64/primary_db | 186 kB 00:00:03 (3/8): puppetlabs-pc1/x86_64/primary_db | 184 kB 00:00:03 (4/8): epel/x86_64/group_gz | 88 kB 00:00:13 (5/8): epel/x86_64/updateinfo | 938 kB 00:00:22 (6/8): base/7/x86_64/primary_db | 5.9 MB 00:00:48 (7/8): epel/x86_64/primary | 3.6 MB 00:01:40 (8/8): updates/7/x86_64/primary_db | 5.2 MB 00:01:57 Determining fastest mirrors * base: centos.mirror.snu.edu.in * epel: mirror01.idc.hinet.net * extras: mirrors.nhanhoa.com * updates: mirrors.viethosting.com epel 12661/12661 Metadata Cache Created [root@linuxnix ~]#Aside from the two methods described above we could also use yum-cron to regularly refresh the yum cache. The yum-cron package provides a convenient way to check for, download and apply updates automatically.The cron jobs from the yum-cron package are active immediately after installing the package and there's no extra configuration necessary. The job will be run when daily cron jobs are set to run.
Aug 16, 2016 | unix.stackexchange.com
ukll , Aug 16, 2016 at 15:26
I am kinda new to Linux so this may be a dumb question. I searched both in stackoverflow and google but could not find any answer.I am using CentOS 7. I installed okular, which is a PDF viewer, with the command:
sudo yum install okularAs you can see in the picture below, it installed 37 dependent packages to install okular.
But I wasn't satisfied with the features of the application and I decided to remove it. The problem is that if I remove it with the command:
sudo yum autoremove okularIt only removes four dependent packages.
And if I remove it with the command:
sudo yum remove okularIt removes only one package which is okular.x86_64.
Now, my question is that is there a way to remove all 37 installed packages with a command or do I have to remove all of them one by one?
Thank you in advance.
Jason Powell , Aug 16, 2016 at 17:25
Personally, I don't like yum plugins because they don't work a lot of the time, in my experience.You can use the
yum historycommand to view your yum history.[root@testbox ~]# yum history Loaded plugins: product-id, rhnplugin, search-disabled-repos, subscription-manager, verify, versionlock ID | Login user | Date and time | Action(s) | Altered ---------------------------------------------------------------------------------- 19 | Jason <jason> | 2016-06-28 09:16 | Install | 10You can find info about the transaction by doing
yum history info <transaction id>. So:
yum history info 19would tell you all the packages that were installed with transaction 19 and the command line that was used to install the packages. If you want to undo transaction 19, you would runyum history undo 19.Alternatively, if you just wanted to undo the last transaction you did (you installed a software package and didn't like it), you could just do
yum history undo lastHope this helps!
ukll , Aug 16, 2016 at 18:34
Firstly, thank you for your excellent answer. And secondly, when I didsudo yum history, it showed only actions with id 30 through 49. Is there a way to view all actions history (including with id 1-29)? � ukll Aug 16 '16 at 18:34Jason Powell , Aug 16, 2016 at 19:00
You're welcome! Yes, there is a way to show all of your history. Just doyum history list all. � Jason Powell Aug 16 '16 at 19:00,
yum remove package_namewill remove only that package and all their dependencies.
yum autoremovewill remove the unused dependenciesTo remove a package with it's dependencies , you need to install
yumplugin called:remove-with-leavesTo install it type:
yum install yum-plugin-remove-with-leavesTo remove
package_nametype:yum remove package_name --remove-leaves
Nov 01, 2018 | www.2daygeek.com
How Do We Find Out The Installed Packages Came From Which Repository on RHEL/CentOS Systems?This can be done in multiple ways. Here we will be giving you all the possible options and you can choose which one is best for you.
Method-1: Using Yum Command... ... ...
yum info apachetop
Oct 12, 2018 | www.2daygeek.com
RHEL based systems are mainly offering the below three major repositories. These repository will be enabled by default.
base:It's containing all the core packages and base packages.extras:It provides additional functionality to CentOS without breaking upstream compatibility or updating base components. It is an upstream repository, as well as additional CentOS packages.updates:It's offering bug fixed packages, Security packages and Enhancement packages.# yum repolist or # yum repolist enabled Loaded plugins: fastestmirror Determining fastest mirrors * epel: ewr.edge.kernel.org repo id repo name status !base/7/x86_64 CentOS-7 - Base 9,911 !epel/x86_64 Extra Packages for Enterprise Linux 7 - x86_64 12,687 !extras/7/x86_64 CentOS-7 - Extras 403 !updates/7/x86_64 CentOS-7 - Updates 1,348 repolist: 24,349How To List The Enabled Repositories on FedoraDNF stands for Dandified yum. We can tell DNF, the next generation of yum package manager (Fork of Yum) using hawkey/libsolv library for backend. Aleš Kozumplík started working on DNF since Fedora 18 and its implemented/launched in Fedora 22 finally.
Dnf command is used to install, update, search & remove packages on Fedora 22 and later system. It automatically resolve dependencies and make it smooth package installation without any trouble.
Yum replaced by DNF due to several long-term problems in Yum which was not solved. Asked why ? he did not patches the Yum issues. Aleš Kozumplík explains that patching was technically hard and YUM team wont accept the changes immediately and other major critical, YUM is 56K lines but DNF is 29K lies. So, there is no option for further development, except to fork.
Suggested Read : DNF (Fork of YUM) Command To Manage Packages on Fedora System
Fedora system is mainly offering the below two major repositories. These repository will be enabled by default.
fedora:It's containing all the core packages and base packages.updates:It's offering bug fixed packages, Security packages and Enhancement packages from the stable release branch.# dnf repolist or # dnf repolist enabled Last metadata expiration check: 0:02:56 ago on Wed 10 Oct 2018 06:12:22 PM IST. repo id repo name status docker-ce-stable Docker CE Stable - x86_64 6 *fedora Fedora 26 - x86_64 53,912 home_mhogomchungu mhogomchungu's Home Project (Fedora_25) 19 home_moritzmolch_gencfsm Gnome Encfs Manager (Fedora_25) 5 mystro256-gnome-redshift Copr repo for gnome-redshift owned by mystro256 6 nodesource Node.js Packages for Fedora Linux 26 - x86_64 83 rabiny-albert Copr repo for albert owned by rabiny 3 *rpmfusion-free RPM Fusion for Fedora 26 - Free 536 *rpmfusion-free-updates RPM Fusion for Fedora 26 - Free - Updates 278 *rpmfusion-nonfree RPM Fusion for Fedora 26 - Nonfree 202 *rpmfusion-nonfree-updates RPM Fusion for Fedora 26 - Nonfree - Updates 95 *updates Fedora 26 - x86_64 - Updates 14,595
Dec 06, 2017 | stackoverflow.com
JosepB ,Nov 4, 2014 at 12:08
I'm trying to update Orion ContextBroker using the command yum install contextBroker. Unfortunatelly I get the following error:Loaded plugins: fastestmirror, refresh-packagekit, security Loading
mirror speeds from cached hostfile
Error: Cannot retrieve metalink for repository: epel. Please verify its path and try again
What could be going wrong ?
fgalan ,Nov 4, 2014 at 12:51
I solved this issue editing both/etc/yum.repos.d/epel.repoand/etc/yum.repos.d/epel-testing.repofiles, commenting all entries starting withmirrorlist=...and uncommenting all the entries starting withbaseurl=....XoR ,Dec 27, 2014 at 12:12
You just needed to update ca-certificates package. Before that just disable all repos with https that are failing. That's why solution with commenting mirrorlist or using http instead https would work also.For example if you need to disable only epel repo:
yum --disablerepo=epel -y update ca-certificatesThis will also help wget, curl, and anything else that uses SSL certificates.
Horatio Alderaan ,Jan 23, 2015 at 0:22
This should be accepted as the correct answer, as it diagnoses the real source of the problem, rather than just providing a work-around. – Horatio Alderaan Jan 23 '15 at 0:22TrinitronX ,Jan 26, 2015 at 5:31
I've tested this on the CentOS 6.5 bento box and it does make things slightly more reliable when runningyum clean all && yum makecache. However, it still fails sometimes. Adding a retry to my script made it even more reliable. I suspect that some mirrors are unreliable and a retry can give another mirror that works. So if at first it doesn't succeed, try try again! – TrinitronX Jan 26 '15 at 5:31Stéphane ,Mar 10, 2015 at 13:44
Wonder how you found that solution ... the error message was quite criptic for me – Stéphane Mar 10 '15 at 13:44XoR ,Mar 10, 2015 at 15:45
Well this comes from experience, and yes, message is cryptic :) – XoR Mar 10 '15 at 15:45Ekramul Hoque ,Apr 11, 2016 at 18:44
Thanks for nice answer – Ekramul Hoque Apr 11 '16 at 18:44sumit pandit ,Jan 12, 2015 at 12:23
use this command:sudo sed -i "s/mirrorlist=https/mirrorlist=http/" /etc/yum.repos.d/epel.repoor alternatively use command
vi /etc/yum.repos.d/epel.repogo to line number 4 and change the url from
mirrorlist=https://mirrors.fedoraproject.org/metalink?repo=epel-6&arch=$basearchto
mirrorlist=http://mirrors.fedoraproject.org/metalink?repo=epel-6&arch=$basearchJoseph N. ,Nov 23, 2014 at 15:37
For my case commenting outmirrorlistand uncomenting entries withbaseurldin't work. I noticed the problem was with thehttpsiniside the.repofedora files. I solved it by going in/etc/yum.repository.dand replacing allhttpswithhttpin different .repo files. That worked!!Rashad Saif ,May 3, 2016 at 9:54
Check if you access internet throw proxy then you have to add internet proxy address to yum configuration .add
proxy=http://ip:port to /etc/yum.confMarkus ,Aug 11 at 7:06
make sure to have the https proxy also specified. – Markus Aug 11 at 7:06how to i start ,Feb 4, 2015 at 6:28
I solved this problem by this solution.you just change in this file /etc/yum.repos.d/epel.repo
mirrorlist= change this url https to http
baseurl= change this url https to http
bummi ,Feb 4, 2015 at 8:08
Please take a look at stackoverflow.com/help/promotion – bummi Feb 4 '15 at 8:08Nabeel Ahmed ,Dec 2, 2016 at 7:34
You may come across this message/error, after installing epel-release. The quick fix is to update your SSL certificates:yum -y upgrade ca-certificatesChances are the above error may also occur while certificate update, if so, just disable the
epelrepo i.e. use the following command:yum -y upgrade ca-certificates --disablerepo=epelOnce the certificates will be updated, you'll be able to use yum normally, even the epel repo will work fine. In case you're getting this same error for a different repo, just put it's name against the
--disablerepo=<repo-name>flag.
Note : use
sudoif you're not therootuser.qingbo ,Aug 3 at 5:10
That's the best answer for me :) – qingbo Aug 3 at 5:10Howard Lee ,Jun 30, 2016 at 17:39
For boxes that does not have internet access, you can removeepelrepository:
yum remove epel-release --disablerepo=epelThis happened to me as I accidentally installed
epel-releaseusingrpmon a prod box.Laxman S ,Nov 27, 2014 at 14:06
I solved it by going in /etc/yum.repository.d/. For my case i comment out mirrorlist and uncomenting entries with baseurl. as well as added sslverify=false.https://serverfault.com/questions/637549/epel-repo-for-centos-6-causing-error
dagelf ,Mar 24, 2015 at 7:07
Not only that, but also changing the URLs to archives.fedoraproject.org/pub/archive/fedora/linux/releases/ (for fedora.repo and fedora-updates.repo). Note the "archives" in front and the "pub/archive" in the path) – dagelf Mar 24 '15 at 7:07Fabricio ,Apr 13, 2015 at 14:26
I've workaround this issue by changing the https entries in epel.repo file to http.Sam ,Jun 26, 2015 at 6:09
I guess this should work. I solved my problem with this.$ sudo yum clean all
$ sudo yum --disablerepo="epel" update nss
Beavus Slagerty ,Mar 5, 2015 at 20:20
All of the above did not work for me, but a rebuild of the rpm database, with the following command, did:sudo rpm --rebuilddbThanks all for the help.
Anil Reddy ,Apr 19, 2016 at 20:26
Changing the mirrorlist URL from https to http fixed the issue for me.Futur'Fusionneur ,Oct 30 at 22:38
Fixed mine like this:yum install elfutils-default-yama-scope-0.168-8.el7.noarch --disablerepo=epel yum install nss-pem -disablerepo=epel yum reinstall ca-certificates --disablerepo=epel yum clean all rm -rf /var/cache/yum yum update`,
Walkthrough StepsRunning the following command will update the repo to use HTTP rather than HTTPS:
sudo sed -i "s/mirrorlist=https/mirrorlist=http/" /etc/yum.repos.d/epel.repoYou should then be able to update with this command:
yum -y update
July 9, 2008 | www.cyberciti.biz
would like to only download the packages via yum and not install/update them. How do I download a RPM package using yum command under CentOS Enterprise Linux server 5.x or RHEL 5.x systems?
You need to install plugin called yum-downloadonly . This plugin adds a --downloadonly flag to yum so that yum will only download the packages and not install/update them. Following options supported by this plugin:
[a] --downloadonly : don't update, just download a rpm file
[b] --downloaddir=/path/to/dir : specifies an alternate directory to store packages such as /tmpPlease note following instructions are only tested on CentOS server but should work with RHN and RHEL without any problem.
How do I install yum-downloadonly plugin?Type the following command to install plugin, enter:
# yum install yum-downloadonly
Sample output:Loading "fastestmirror" plugin Loading "security" plugin Loading mirror speeds from cached hostfile * base: centos.mirrors.tds.net * updates: mirror.myriadnetwork.com * addons: mirrors.gigenet.com * extras: holmes.umflint.edu Setting up Install Process Parsing package install arguments Resolving Dependencies --> Running transaction check ---> Package yum-downloadonly.noarch 0:1.1.10-9.el5.centos set to be updated --> Finished Dependency Resolution Dependencies Resolved ============================================================================= Package Arch Version Repository Size ============================================================================= Installing: yum-downloadonly noarch 1.1.10-9.el5.centos base 9.0 k Transaction Summary ============================================================================= Install 1 Package(s) Update 0 Package(s) Remove 0 Package(s) Total download size: 9.0 k Is this ok [y/N]: y Downloading Packages: (1/1): yum-downloadonly-1 100% |=========================| 9.0 kB 00:00 Running rpm_check_debug Running Transaction Test Finished Transaction Test Transaction Test Succeeded Running Transaction Installing: yum-downloadonly ######################### [1/1] Installed: yum-downloadonly.noarch 0:1.1.10-9.el5.centos Complete!How do I download a RPM package only from RHN or CentOS mirror, without installing it?Download httpd package but don't install/update, enter:
# yum update httpd -y --downloadonly
By default package will by downloaded and stored in /var/cache/yum/ directory. But, you can specifies an alternate directory to store packages such as /opt, enter:
# yum update httpd -y --downloadonly --downloaddir=/opt
Sample output:yum install httpd -y --downloadonly Loading "downloadonly" plugin Loading "fastestmirror" plugin Loading "security" plugin Loading mirror speeds from cached hostfile * base: centos.mirrors.mypsh.com * updates: mirror.steadfast.net * addons: mirrors.gigenet.com * extras: holmes.umflint.edu Setting up Install Process Parsing package install arguments Resolving Dependencies --> Running transaction check ---> Package httpd.i386 0:2.2.3-11.el5_1.centos.3 set to be updated filelists.xml.gz 100% |=========================| 2.8 MB 00:03 filelists.xml.gz 100% |=========================| 681 kB 00:11 filelists.xml.gz 100% |=========================| 122 kB 00:00 filelists.xml.gz 100% |=========================| 150 B 00:00 --> Finished Dependency Resolution Dependencies Resolved ============================================================================= Package Arch Version Repository Size ============================================================================= Installing: httpd i386 2.2.3-11.el5_1.centos.3 base 1.1 M Transaction Summary ============================================================================= Install 1 Package(s) Update 0 Package(s) Remove 0 Package(s) Total download size: 1.1 M Downloading Packages: (1/1): httpd-2.2.3-11.el5 100% |=========================| 1.1 MB 00:01 exiting because --downloadonly specifiedTo see downloaded file, enter:
# ls -l /opt/*.rpm
Sample output:-rw-r--r-- 1 root root 1116426 Jan 17 03:36 /opt/httpd-2.2.3-11.el5_1.centos.3.i386.rpm -rw-r--r-- 1 root root 83452 Oct 2 2007 /opt/lighttpd-fastcgi-1.4.18-1.el5.rf.i386.rpm -rw-r--r-- 1 root root 635045 Oct 20 2007 /opt/psad-2.1-1.i386.rpmMethod # 2: yum-utils.noarch Packageyum-utils is a collection of utilities and examples for the yum package manager. It includes utilities by different authors that make yum easier and more powerful to use. These tools include: debuginfo-install, package-cleanup, repoclosure, repodiff, repo-graph, repomanage, repoquery, repo-rss, reposync, repotrack, verifytree, yum-builddep, yum-complete-transaction, yumdownloader, yum-debug-dump and yum-groups-manager.
# yum -y install yum-utils.noarch
Now use the yumdownloader command which is a program for downloading RPMs from Yum repositories. Type the following command to download httpd rpm file:
# yumdownloader httpd
Sample outputs:Loaded plugins: rhnplugin httpd-2.2.3-31.el5_4.2.x86_64.rpm | 1.2 MB 00:00How Do I Extract Downloaded RPM File?Type the command as follows:
# rpm2cpio httpd-2.2.3-31.el5_4.2.x86_64.rpm | cpio -idmv
Oct 19, 2017 | www.bashoneliners.com
$ sudo yum upgrade && for pkg in $(package-cleanup --orphans -q); do repoquery $(rpm -q $pkg --queryformat="%{NAME}") | grep -q ".*" && echo $pkg; done | xargs sudo yum -y remove && for pkg in $(package-cleanup --leaves --all -q); do repoquery --groupmember $pkg | grep -q "@" || echo $pkg; done-- by openiduser143 on April 16, 2014, 9:58 p.m.
Explanation"sudo yum upgrade" does clean up outdated packages that the current upgrade replaces, but not other outdated packages or the ones that it willfully skips. Yes, that's what "package-cleanup --orphans" will finish, but "orphaned packages" also include packages that are at their latest version but just aren't updated by the repositories (usually a discrete .rpm installation). This one-liner uses "package-cleanup --orphans" but wraps around it to skip packages that aren't in the repositories anyway and just removes outdated packages that have a newer version in the repositories.
No, it's not at the end yet. It has a final command to display all packages that don't belong to any group. Choose any of the "manual extension" packages which aren't really necessary and only clog the system. Limitations
- Specific to only rpm and yum
- No, not just yum, it requires the yum-utils package (or whatever else provides package-cleanup and repoquery, if anything)
Mar 20, 2017 | www.cyberciti.biz
The basic syntax is:
yum history yum history command #ID yum history [options] history [info|list|packages-list|summary|addon-info|redo|undo|rollback|new] Examples
First, verify that history has been configured for yum command .
# ls -l /var/lib/yum/history/
Sample outputs:total 1036 drwxr-xr-x. 30 root root 4096 Dec 9 11:40 2012-11-08 -rw-------. 1 root root 1050624 Dec 9 11:40 history-2012-11-08.sqliteList your historyType the following command:
# yum history
OR
# yum history list
Sample outputs:
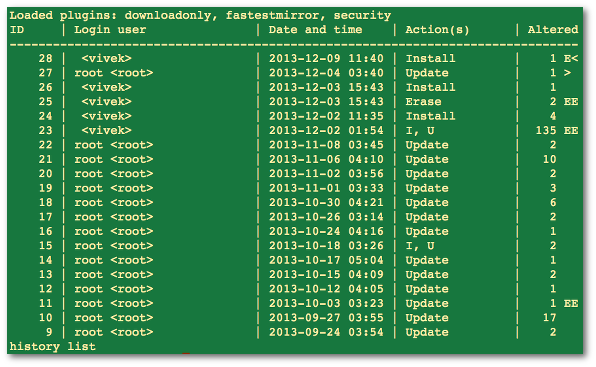
Fig.01: yum history in action
Where,
- ID � Transaction number.
- Login user � The name of the user whose login session was used to initiate a yum.
- Date and time � The date and time when a transaction was issued by yum.
- Action(s) � A list of actions that were performed during a transaction as follows:
- D or Downgrade � Package has been downgraded to an older version.
- E or Erase � Package has been removed.
- I or Install � New package has been installed.
- O or Obsoleting � Package has been marked as obsolete.
- R or Reinstall � Package has been reinstalled.
- U or Update � Package has been updated to a newer version.
- Altered �" The number of packages that were affected by a yum, as follows:
- *lt; � Before the transaction finished, the rpmdb database was changed outside yum.
- > � After the transaction finished, the rpmdb database was changed outside yum.
- * � The transaction failed to finish.
- # � The transaction finished successfully, but yum returned a non-zero exit code.
- E � The transaction finished successfully, but an error or a warning was displayed.
- P � The transaction finished successfully, but problems already existed in the rpmdb database.
- s � The transaction finished successfully, but the �skip-broken command line option was used and certain packages were skipped.
To see all transactions, pass the add option as follows:
# yum history list allYou can list only one transactions or transactions in a given range:
# yum history list 7


                  # yum history list 1..3
Sample outputs:Loaded plugins: downloadonly, fastestmirror, security ID | Login user | Date and time | Action(s) | Altered ------------------------------------------------------------------------------- 3 | 106300 | 2013-08-12 15:14 | Update | 1 2 | 88177 | 2012-11-09 14:24 | Install | 2 1 | SystemList summary of all all past transactions| 2012-11-08 19:19 | Install | 380 history list The syntax is:
# yum history summary


                  # yum history summary 3


                  # yum history summary 1..3
Sample outputs:
Loaded plugins: downloadonly, fastestmirror, security Login user | Time | Action(s) | Altered -------------------------------------------------------------------------------< vivek> | Last day | Install | 1< vivek> | Last week | E, I | 3 root <root> | Last week | Update | 1< vivek> | Last 2 weeks | I, U | 139< vivek> | Last 3 months | Update | 1 root <root> | Last 3 months | I, O, U | 284 106300 | Last 6 months | I, U | 6 88177 | Over a year ago | Install | 2 System <unset> | Over a year ago | Install | 380 history summary Find out history of a package called nginx
The basic syntax is:
# yum history list
                  PackageNameHere


                  # yum history list nginx
Sample outputs:
Loaded plugins: downloadonly, fastestmirror, security
ID     | Login user               | Date and time    | Action(s)      | Altered
-------------------------------------------------------------------------------
    28 |  <vivek>                 | 2013-12-09 11:40 | Install        |    1 EE
history list
Loaded plugins: downloadonly, fastestmirror, security ID | Login user | Date and time | Action(s) | Altered ------------------------------------------------------------------------------- 28 | <vivek> | 2013-12-09 11:40 | Install | 1 EE history list
You can also see complete history as follows for mysql package including version number, run:
# yum history
                  package-list mysql
Sample outputs:
Loaded plugins: downloadonly, fastestmirror, security
ID     | Action(s)      | Package
-------------------------------------------------------------------------------
    26 | Install        | mysql-5.1.71-1.el6.x86_64
    25 | Erase          | mysql-5.1.71-1.el6.x86_64                          EE
    24 | Install        | mysql-5.1.71-1.el6.x86_64
history package-list
Loaded plugins: downloadonly, fastestmirror, security ID | Action(s) | Package ------------------------------------------------------------------------------- 26 | Install | mysql-5.1.71-1.el6.x86_64 25 | Erase | mysql-5.1.71-1.el6.x86_64 EE 24 | Install | mysql-5.1.71-1.el6.x86_64 history package-list
Now, use ID #24 to get detailed information on mysql package:
# yum history info 24
Sample outputs:
Loaded plugins: downloadonly, fastestmirror, security
Transaction ID : 24
Begin time     : Mon Dec  2 11:35:59 2013
Begin rpmdb    : 401:d28899f68a6631be573730605bd4825fe661fcce
End time       :            11:36:03 2013 (4 seconds)
End rpmdb      : 405:47873bf26c150bf0a26279da5c62d4ae4b1c227d
User           :  <vivek>
Return-Code    : Success
Command Line   : install mysql-server mysql
Transaction performed with:
    Installed     rpm-4.8.0-37.el6.x86_64                       @base
    Installed     yum-3.2.29-40.el6.centos.noarch               @base
    Installed     yum-plugin-fastestmirror-1.1.30-14.el6.noarch @base
Packages Altered:
    Install     mysql-5.1.71-1.el6.x86_64         @base
    Install     mysql-server-5.1.71-1.el6.x86_64  @base
    Dep-Install perl-DBD-MySQL-4.013-3.el6.x86_64 @base
    Dep-Install perl-DBI-1.609-4.el6.x86_64       @base
history info
Loaded plugins: downloadonly, fastestmirror, security Transaction ID : 24 Begin time : Mon Dec 2 11:35:59 2013 Begin rpmdb : 401:d28899f68a6631be573730605bd4825fe661fcce End time : 11:36:03 2013 (4 seconds) End rpmdb : 405:47873bf26c150bf0a26279da5c62d4ae4b1c227d User : <vivek> Return-Code : Success Command Line : install mysql-server mysql Transaction performed with: Installed rpm-4.8.0-37.el6.x86_64 @base Installed yum-3.2.29-40.el6.centos.noarch @base Installed yum-plugin-fastestmirror-1.1.30-14.el6.noarch @base Packages Altered: Install mysql-5.1.71-1.el6.x86_64 @base Install mysql-server-5.1.71-1.el6.x86_64 @base Dep-Install perl-DBD-MySQL-4.013-3.el6.x86_64 @base Dep-Install perl-DBI-1.609-4.el6.x86_64 @base history info
To find out what additional information is available for a certain transaction:
# yum history addon-info
                  id


                  # yum history addon-info 24
To just get info on last transaction:
# yum history addon-info
                  last
Mar 19, 2010 | www.if-not-true-then-false.com
Yum (Yellowdog Update Modified) is RPM Packet Management system for Fedora, CentOS, Red Hat, OpenSuse etc. Yum history (list, info, summary, repeat, redo, undo, new) commands is added on 3.2.25 version. So this works every Linux Distros, which uses yum 3.2.25 or newer . Yum history command is a really useful in situations where the need to example rollback latest yum activity or undelete some deletes or just see what is updated lately.Yum history and Yum history list
yum history lists all latest yum operations and yum history list list all operations or just selected package operations
yum history info list installed packages.
yum history info 2...Shows summary of latest operations.
...yum history repeat command repeats old operation by history ID.yum history summaryyum history repeat 2...yum history undo simply undo operations by history ID.
... yum history redo simply redos operation from yum history by ID.
...yum history new command delete/clear old history listing.yum history redo 2yum history new
Feb 17, 2017 | tecmint.com
.... ... ...
To view a full history of YUM transactions, we can run the command below which will show us the: transaction id, login user who executed the particular action, date and time when the operation happened, the actual action and additional information about any thing wrong with the operation:
# yum history...The history sub-commands: info/list/summary can take a transaction ID or package name as an argument. Additionally, the list sub-command can take a special argument, all meaning � all transactions.
The previous history command is equivalent to running:
# yum history list allAnd, you can view details of transactions concerning a given package such as
httpdweb server with theinfocommand as follows:# yum history info httpdTo get a summary of the transactions concerning
httpdpackage, we can issue the following command:# yum history summary httpd...It is also possible to use a transaction ID, the command below will display details of the transaction ID
15.# yum history info 15...There are sub-commands that print out transaction details of a specific package or group of packages. We can use
package-listorpackage_infoto view more info abouthttpdpackage like so:# yum history package-list httpd OR # yum history package-info httpd...To get history about multiple packages, we can run:
# yum history package-list httpd epel-release
OR
# yum history packages-list httpd epel-release
...Furthermore, there are certain history sub-commands that enable us to: undo/redo/rollback transactions.
- Undo � will undo a specified transaction.
- redo � repeat the work of a specified transaction
- rollback � will undo all transactions up to the point of the specified transaction.
They take either a single transaction id or the keyword last and an offset from the last transaction.
For example, assuming we've done 60 transactions, "last" refers to transaction 60, and "last-4" points to transaction 56.
Suggested Read: How to Use 'yum-utils' to Maintain Yum and Boost its Performance
This is how the sub-commands above work: If we have 5 transactions: V, W, X, Y and Z, where packages where installed respectively.
# yum history undo 2    #will remove package W
# yum history redo 2    #will  reinstall package W
# yum history rollback 2    #will remove packages from X, Y, and Z.
In the following example, transaction 2 was a update operation, as seen below, the redo command that follows will repeat transaction 2 upgrading all the packages updated by that time:
# yum history | grep -w "2"Yum � Find Package Transaction ID
# yum history redo 2The redo sub-command can also take some optional arguments before we specify a transaction:
- force-reinstall � reinstalls any packages that were installed in that transaction (via yum install, upgrade or downgrade).
- force-remove � removes any packages that were updated or downgraded.
# yum history redo force-reinstall 16...These sub-commands provide us information about the history DB and additional info sources:
- addon-info � will provide sources of additional information.
- stats � displays statistics about the current history DB.
- sync � enables us to alter the the rpmdb/yumdb data stored for any installed packages.
Consider the commands below to understand how these sub-commands practically work:
# yum history addon-info
# yum history stats
# yum history sync
To set a new history file, use the new sub-command:
# yum history newWe can find a complete information about YUM history command and several other commands in the yum man page:
# man yumSuggested Read: 4 Ways to Disable/Lock Certain Package Updates Using Yum
That's it for now. In this guide, we explained various YUM history commands to view details of YUM transactions. Remember to offer us your thoughts concerning this guide via the comment section below.
Feb 19, 2017 | www.tecmint.com
View Complete YUM HistoryTo view a full history of YUM transactions, we can run the command below which will show us the: transaction id, login user who executed the particular action, date and time when the operation happened, the actual action and additional information about any thing wrong with the operation:
# yum historyView Yum History Use Yum to Find Package Info
The history sub-commands: info/list/summary can take a transaction ID or package name as an argument. Additionally, the list sub-command can take a special argument, all meaning � all transactions.
The previous history command is equivalent to running:
# yum history list allAnd, you can view details of transactions concerning a given package such as
httpdweb server with theinfocommand as follows:# yum history info httpdYum � Find Package Info
To get a summary of the transactions concerning
httpdpackage, we can issue the following command:# yum history summary httpdYum � Find Summary of Package
It is also possible to use a transaction ID , the command below will display details of the transaction ID
15.# yum history info 15Yum � Find Package Info Using ID Use Yum History to Find Package Transaction Info
There are sub-commands that print out transaction details of a specific package or group of packages. We can use
package-listorpackage_infoto view more info abouthttpdpackage like so:# yum history package-list httpd OR # yum history package-info httpdYum � Find Package Transaction Info
To get history about multiple packages, we can run:
# yum history package-list httpd epel-release
OR
# yum history packages-list httpd epel-release
Yum � Find Multiple Packages Info Use Yum to Rollback Packages
Furthermore, there are certain history sub-commands that enable us to: undo/redo/rollback transactions.
- Undo � will undo a specified transaction.
- redo � repeat the work of a specified transaction
- rollback � will undo all transactions up to the point of the specified transaction.
They take either a single transaction id or the keyword last and an offset from the last transaction.
For example, assuming we've done 60 transactions, " last " refers to transaction 60 , and " last-4 " points to transaction 56 .
Suggested Read: How to Use 'yum-utils' to Maintain Yum and Boost its Performance
This is how the sub-commands above work: If we have 5 transactions: V, W, X, Y and Z, where packages where installed respectively.
# yum history undo 2    #will remove package W
# yum history redo 2    #will  reinstall package W
# yum history rollback 2    #will remove packages from X, Y, and Z.
In the following example, transaction 2 was a update operation, as seen below, the redo command that follows will repeat transaction 2 upgrading all the packages updated by that time:
# yum history | grep -w "2"Yum � Find Package Transaction ID
# yum history redo 2Yum Redo Package Update
The redo sub-command can also take some optional arguments before we specify a transaction:
- force-reinstall � reinstalls any packages that were installed in that transaction (via yum install, upgrade or downgrade).
- force-remove � removes any packages that were updated or downgraded.
# yum history redo force-reinstall 16Yum � Force Install Package Find Yum History Database and Sources Info
These sub-commands provide us information about the history DB and additional info sources:
- addon-info � will provide sources of additional information.
- stats � displays statistics about the current history DB.
- sync � enables us to alter the the rpmdb/yumdb data stored for any installed packages.
Consider the commands below to understand how these sub-commands practically work:
# yum history addon-info
# yum history stats
# yum history sync
To set a new history file, use the new sub-command:
# yum history newWe can find a complete information about YUM history command and several other commands in the yum man page:
# man yumSuggested Read: 4 Ways to Disable/Lock Certain Package Updates Using Yum
That's it for now. In this guide, we explained various YUM history commands to view details of YUM transactions. Remember to offer us your thoughts concerning this guide via the comment section below. Share + 0 3
Feb 08, 2017 | www.trinix.be
)Sometimes it can be handy to set up your own repository to prevent from downloading the remote repository over and over again. This tutorial shows how to create a CentOS mirror for your local network. If you have to install multiple systems in your local network then all needed packages can be downloaded over the fast LAN connection, thus saving your internet bandwidth.
Create the Directories:
mkdir -pv /var/www/html/centos/4/{os,updates}/i386
Replacing 4 and i386 with your major version and architecture.
Quote:
Additionally you'll need some deeper directories. This is the correct location to copy the CD/DVD rpms.
mkdir -pv /var/www/html/centos/4/os/i386/CentOS/RPMS/The Base RepositoryCopy the RPMs from the CDs/DVD to /var/www/html/centos/base .
Create the base repository headers:
createrepo /var/www/html/centos/4/os/i386/
The Updates RepositorySelect an rsync mirror for updates: check out this list of aviable mirrors: Centos OS Mirror list and these are identified with rsync .
For example: rsync://ftp.belnet.be/packages/centos/
The mirrors share a common structure for updates. Simply append /updates/<d version>/<base arch> .
Rsync to create the updates-released repository:
/usr/bin/rsync -avrt rsync://ftp.riken.jp/centos/4/updates/i386 --exclude=debug/ /var/www/html/centos/4/updates/
This will create a complete update repository at /var/www/html/centos/4/updates/i386 . The repodata directory will be created with all of the headers.
You can additionally pipe this into mail to receive an email when updates are available.
/usr/bin/rsync -avrt rsync://ftp.riken.jp/centos/4/updates/i386 --exclude=debug /var/www/html/centos/4/updates/ | /bin/mail [email protected] -s "New Repo Updates" Next I would advise to setup a cron job to run the rsync (above). In this manner your repository is kept updated and only new updates and headers will be downloaded to your repository.
Yum ConfigurationEdit yum.conf :
vi /etc/yum.repos.d/CentOS-Base.repo
[base]
name=CentOS-$releasever - Base
baseurl=http://192.168.*.*/centos/$releasever/os/$basearch/
#mirrorlist=http://mirrorlist.centos.org/?release=$releasever&arch=$basearch&repo=os
#baseurl=http://mirror.centos.org/centos/$releasever/os/$basearch/
gpgcheck=1
gpgkey=http://mirror.centos.org/centos/RPM-GPG-KEY-CentOS-5
#released updates
[update]
name=CentOS-$releasever - Updates
baseurl=http://192.168.*.*/centos/$releasever/updates/$basearch/
#mirrorlist=http://mirrorlist.centos.org/?release=$releasever&arch=$basearch&repo=updates
#baseurl=http://mirror.centos.org/centos/$releasever/updates/$basearch/
gpgcheck=1
gpgkey=http://mirror.centos.org/centos/RPM-GPG-KEY-CentOS-5
That's it.
SPECIAL THANKS TO kylehase (for sending me corrections)
GeekSecrets.net
In your favourite editor open the .bash_profile file for editing.(example: vi ~/.bash_profile)
Add the following lines to the end of the file:http_proxy=http://proxy_server_address:port export no_proxy=localhost,127.0.0.1,192.168.0.34 export http_proxyhttp_proxy should be the ip address or hostname, plus the port of your proxy serverno_proxy should be any exclusions you want to make � addresses that you don't want to send via the proxy.
NOTE: This must be done for each individual user, including root.If you don't want to log out of your shell session, you can reload the bash profile with the following:
source .bash_profileConfiguring YUM to use proxyTo configure "yum" to use the HTTP / HTTPS proxy you will need to edit the /etc/yum.conf configuration file. Open /etc/yum.conf in your favorite editor and add the following line.
proxy=http://proxy_server_address:portSave and close the file, then clear the cache used by yum with the following command:yum clean all
Yum Proxy settings
by Emre Tugriceri on Mar.26, 2011, under Linux, Yum
[root@localhost ~]# vi /etc/yum.conf
�proxy=http://10.129.0.23:8080
�http_proxy=http://10.129.0.23:8080[root@localhost ~]# declare -x ftp_proxy="http://10.129.0.23:8080″
[root@localhost ~]# declare -x http_proxy="10.129.0.23:8080″
2013-12-12 | Red Hat
- To skip installing or updating kernel or other packages while using the
yumupdate utility in Red Hat Enterprise Linux 5 and 6, use following options:
- Temporary solution via Command line:
# yum update --exclude=PACKAGENAMEFor example, to exclude all kernel related packages:
# yum update --exclude=kernel*
- To make permanent changes, edit the
/etc/yum.conffile and following entries to it:[main] cachedir=/var/cache/yum/$basearch/$releasever keepcache=0 debuglevel=2 logfile=/var/log/yum.log exclude=kernel* samba*
6.10. yum-plugin-list-data. This extension add the commands:
They all take the same arguments as the command list and info. The difference between list and info variants is that info lists all packages under each addition.
- list-vendors
- info-vendors
- list-rpm-groups
- info-rpm-groups
- list-packagers
- info-packagers
- list-licenses
- info-licenses
- list-arches
- info-arches
- list-committers
- info-committers
- list-buildhosts
- info-buildhosts
- list-baseurls
- info-baseurls
- list-package-sizes
- info-package-sizes
- list-archive-sizes
- info-archive-sizes
- list-installed-sizes
- info-installed-sizes
- list-groups
- info-groups
Yum (Yellowdog Update Modified) is RPM Packet Management system for Fedora, CentOS, Red Hat, OpenSuse etc. Yum history (list, info, summary, repeat, redo, undo, new) commands is added on 3.2.25 version. So this works every Linux Distros, which uses yum 3.2.25 or newer. Yum history command is a really useful in situations where the need to example rollback latest yum activity or undelete some deletes or just see what is updated lately.
Yum history and Yum history list
yum history lists all latest yum operations and yum history list list all operations or just selected package operations
CentOS.org
Searching for Packages with yum
Use the search features of yum to find software that is available from the configured repositories, or already installed on your system. Searches automatically include both installed and available packages.
The format of the results depends upon the option. If the query produces no information, there are no packages matching the criteria.
5.1. Searching by Package Name and AttributesTo search for a specific package by name, use the list function. To search for the package tsclient, use the command:
su -c 'yum list tsclient'Enter the password for the root account when prompted.
To make your queries more precise, specify packages with a name that include other attributes, such as version or hardware architecture. To search for version 0.132 of the application, use the command:
su -c 'yum list tsclient-0.132'5.2. Advanced Searches
If you do not know the name of the package, use the search or provides options. Alternatively, use wild cards or regular expressions with any yum search option to broaden the search critieria.
The search option checks the names, descriptions, summaries and listed package maintainers of all of the available packages to find those that match. For example, to search for all packages that relate to PalmPilots, type:
su -c 'yum search PalmPilot'Enter the password for the root account when prompted.
The provides function checks both the files included in the packages and the functions that the software provides. This option requires yum to download and read much larger index files than with the search option.
To search for all packages that include files called libneon, type:
su -c 'yum provides libneon'To search for all packages that either provide a MTA (Mail Transport Agent) service, or include files with mta in their name:
su -c 'yum provides MTA'For each command, at the prompt enter the password for the root account.
Use the standard wildcard characters to run any search option with a partial word or name: ? to represent any one character, and * to mean zero or more characters. Always add the escape character (\) before wildcards.
To list all packages with names that begin with tsc, type:
su -c 'yum list tsc\*'
Regular Expressions Use Perl or Python regular expressions to carry out more complex queries. 5.3. Understanding Matches
Searches with yum show all of the packages that match your criteria. Packages must meet the terms of the search exactly to be considered matches, unless you use wildcards or a regular expression.
For example, a search query for shadowutils or shadow-util would not produce the package shadow-utils. This package would match and be shown if the query was shadow-util\?, or shadow\*.
FedoraForum.org
IntroductionTo update the system applying the most recent corrective patches of security and to the operating system is not as difficult as many do not suppose, nor either must be a hell of dependencies between packages RPM as some others argue. The reality of the things is that it is much very simple and single requires of good bandwidth or very many patience. Next we presented/displayed the procedures to use yum and to make easily what some denominate "horrible, difficult and complicated ".
Please note there are some changes that apply to Fedora Core 3. You will need to install GPG Key for yum in FC3.
To update system. Update of the system with all the dependencies that are necessary:
Code:
yum updateSearches. To make a search of some package or term in the data base in some of the formed deposits yum in the system:
Code:
yum search any-packageExample:
Code:
yum search httpdI hope this will help you understand how to use yum more effeciently. Any erros in this how please notify me.
Consultation of information. To consult the information contained in a package in individual:
Code:
yum info any-packageExample:
Code:
yum info httpdInstallation of packages. Installation of paqueter�a with automatic resolution of dependencies:
Code:
yum install any-packageExample.
Code:
yum install gkrellmUninstalling packages. Desinstalaci�n of packages along with everything what it depends on these:
Code:
yum remove any-packageExample.
Code:
yum remove gkrellmListing Packages. The following thing will list all the packages available in the data base yum and that can settle:
Code:
available yum list|lessThe following thing will list all the packages installed in the system:
Code:
yum list installed|lessThe following thing will list all the packages installed in the system and that can (they must) be updated:
Code:
yum list updates|lessCleaning of the system.Yum leaves as result of its use heads and packages RPM stored in the interior of the directory located in the route /var/cache/yum/. Particularly the packages RPM that have settled can occupy much space and is by such reason agrees to eliminate them once no longer they have utility. Also it agrees to do the same with the old heads of packages that no longer are in the data base. In order to make the corresponding cleaning, the following thing can be executed:
Code:
yum clean allGroup install
Code:
yum groupinstall "groupname"Dont forget the quotation marks for group install.I hope this will help you understand how to use yum more effeciently. I did this for our newbies that may want to uninstall packages which is not mention in the fedora FAQ. For more info on yum go here: http://www.fedorafaq.org/#installsoftware
November 22, 2010 | A techie's confessions
In RHEL 5.0 onwards Red hat introduced YUM concept by which it is very easy to install some rpm without being getting worry about the dependency problem.YUM takes care of this dependency problem by selecting all dependent RPM to install from a central repository either from RED HAT or from some third party repository like oracle has or you can create your own repository if you want to use YUM offline
Ravi Saive A Technology Blog For Newbies
Lets assume you have a RPM Package installed called firefox-3.6.17-1.el5.centos and you don't want to update it even if a newer version is available. This can by done by using YUM plugin called yum-versionlock. This plugin allows you to lock package update. Just you need to add the list of packages that you want to lock their updates with their version and architecture in the lock file /etc/yum/pluginconf.d/versionlock.list. So, whenever you update your system these packages where excluded by the YUM, because yum reads the file before updating the packages. Now enable this great plugin by following simple easy steps below.
1. Install the plugin by using below command.
[[email protected] ~]# yum install yum-versionlock2. Once plugin installed, check enabled = 1 appears in /etc/yum/pluginconf.d/versionlock.conf.
[[email protected] ~]# cat /etc/yum/pluginconf.d/versionlock.conf
[main]
enabled = 1
locklist = /etc/yum/pluginconf.d/versionlock.list
#  Uncomment this to lock out "upgrade via. obsoletes" etc. (slower)
# follow_obsoletes = 1
3. Now add the packages you want to lock in /etc/yum/pluginconf.d/versionlock.list. For example firefox-3.6.17-1.el5.centos.
[[email protected] ~]# cat /etc/yum/pluginconf.d/versionlock.list
firefox-3.6.17-1.el5.centos
4. Once you added your package in lock list. Try to install the same package with YUM.
[[email protected] ~]# yum install firefox
Loaded plugins: downloadonly, fastestmirror, priorities, versionlock
Loading mirror speeds from cached hostfile
 * base: centos.aol.in
 * epel: ftp.kddilabs.jp
 * extras: centos.aol.in
 * rpmforge: fr2.rpmfind.net
 * updates: ftp.iitm.ac.in
Reducing CentOS-5 Testing to included packages only
Finished
1380 packages excluded due to repository priority protections
Reading version lock configuration
Setting up Install Process
Nothing to do
5. Check above output in red line, Yum reads lock file before installating them.
I have a RHEL5 DVD but it is difficult to install a package using rpm because I need to manually add all dependent packages. Here is now I create a Yum reposiroty so that I can use yum to install these packages. Note that the DVD is automatically mounted as /media/RHEL_5.1 x86_64 DVD.> cd /media/RHEL5_5.1\ x86_64\ DVD/Client
> rpm -ihv createrepo-0.4.4-2.fc6.noarch.rpm
> cd /home/blah/some_dir
> createrepo -vpo /home/blah/some_dir /media/RHEL5_5.1\ x86_64\ DVD
> cd /home/blah/some_dir
> ln -s /media/RHEL5_5.1\ x86_64\ DVD/Client Client
> ln -s /media/RHEL5_5.1\ x86_64\ DVD/Workstation WorkstationThen create a file /etc/yum.repos.d/DVD.repo with the following content
[dvd]
name=RHEL4 DVD
baseurl=file:///home/blah/some_dir
enabled=1
gpgcheck=0Run
> yum updateand you are done.
Package locations
In the previous section, you learned how to install an RPM package. But where do the packages come from? How does yum know where to download packages from? The starting point is the /etc/yum.repos.d/ directory, which usually contains several repo files. This is the default location for repos, but other locations may be specified in the YUM configuration file, normally /etc/yum.conf. Listing 4 shows the fedora-updates.repo corresponding to the location from which we installed gcl on our Fedora 12 system.
A typical repo file is divided into three sections, one for normal packages, one for debug packages, and the last for source packages. Usually there will be several copies of a distribution's packages available from different locations, or mirrors. So the repo file tells yum where to find the latest list of mirrors for each section. Note that the distribution release level and machine architecture are parameterized, so yum would download the list for my x86_64 Fedora 12 system from https://mirrors.fedoraproject.org/metalink?repo=updates-released-f12&arch=x86_64.
In addition to the repository location, the repo file tells whether a particular repository is enabled and whether GPG signatures should be used to check the downloaded packages.
[ian@echidna ~]$ cat /etc/yum.repos.d/fedora-updates.repo
[updates]
name=Fedora $releasever - $basearch - Updates
failovermethod=priority
#baseurl=http://download.fedoraproject.org/pub/fedora/linux/updates/$releasever
/$basearch/
mirrorlist=https://mirrors.fedoraproject.org/metalink?repo=updates-released-f$r
eleasever&arch=$basearch
enabled=1
gpgcheck=1
gpgkey=file:///etc/pki/rpm-gpg/RPM-GPG-KEY-fedora-$basearch

[updates-  does not have this feature as far
	as I know.
Yum & Repositories
I noticed this issue with both CentOS 4 and 5 - Yum will often choose bad mirrors from the mirrorlist file - for example, choosing overseas servers, when an official NZ server exists. And in some cases, the servers it has chosen are horribly slow.
You will probably find that you get better download speeds by editing /etc/yum.repos.d/CentOS-Base.repo and commenting out the mirrorlist lines and setting the baseurl line to point to your preferred local mirror.
Yum-updatesd
CentOS 5 has a new daemon called yum-updatesd, which replaces the old cron job yum update scripts. This script will check frequently for updates, and can be configured to download and/or install them.
However, this daemon is bad for a server, since it doesn't run at a fixed time - I really don't want my server downloading and updating software during the busiest time of day thank-you-very-much!
So, it's bad for a server. Let's disable it with:
service yum-updatesd stop
chkconfig --level 2345 yum-updatesd off
Plus I don't like the idea of having a full blown daemon where a simple cronjob will do the trick perfectly fine - seems like overkill. (although it appears yum-updatesd has some useful features like dbus integration for desktop users)So, I replace it with my favorite cronjob script approach, by running the following (as root of course):
cat << "EOF" > /etc/cron.daily/yumupdate
 #!/bin/sh
 # install any yum updates
/usr/bin/yum -R 10 -e 0 -d 1 -y update yum > /var/log/yum.cron.log 2>&1
/usr/bin/yum -R 120 -e 0 -d 1 -y update  >> /var/log/yum.cron.log 2>&1
if [ -s /var/log/yum.cron.log ]; then
        /bin/cat /var/log/yum.cron.log | mail root -s "Yum update information" 2>&1
fi
EOF
and if you want to clear up the package cache every week:cat << "EOF" > /etc/cron.weekly/yumclean #!/bin/sh # remove downloaded packages /usr/bin/yum -e 0 -d 0 clean packages EOF(please excuse the leading space infront of the comments ( #) - it is to work around a limitation in my site, which I will fix shortly. Just copy the lines into a text editor and remove the space, before pasting into the terminal)This will install 2 scripts that get run around 4:00am (as set in /etc/crontab) which will check for updates and download and install any automatically. If there were any updates, it will send out an email, if there were none, it doesn't send anything.
(of course, you need sendmail/whatever_fucking_email_server_you_like configured correctly to get the alerts!)
You can change yum to just download and not install the updates (just RTFM), but I've never had a update break anything - update compatibility and quality is always very high - so I use automatic updates.
CentOS 4 had something very similar to this, with the addition of a bootscript to turn the cronjobs on and off.
* Please check out the update at the bottom of this page for futher information on this. UPDATE - 1st May 2007
A reader has informed me that the old RHEL 4 style cronjobs can be found in a package called 'yum-cron'. Just like in RHEL 4, it installs a service called "yum" which you can enable with:
chkconfig --level 2345 yum on
service yum start
However, I will point out a small difference with the Redhat cron script vs. my cron script - the Redhat one will send the list of updates as an email from cron (as cron simply emails the output the script produces). My version allows you to change the subject, and the destination email address. This may/may not be useful to you.The same reader also points out that there is another package in the CentOS extras repository called 'yum-updateonboot', which installs bootscripts which update your system when you boot it, and will then reboot if there are any kernel updates needed.
You should be able to (I haven't tried myself) enable it with:
chkconfig --level 2345 yum-updateonboot on
Before performing an upgrade with yum, please read the YumUpgradeFaq Wiki.
The basic steps for upgrading a system to the latest Fedora Core release using yum:
1. Install the fedora-release package from the new release
2. Run yum upgrade
3. RebootUpgrading to Fedora Core 4
The following steps were used to update a Fedora Core 3 system to Fedora Core 4 using yum.1. Update yum to the latest Fedora Core 3 version.
# yum -y update yum2. Download and install the Fedora Core 4 version of fedora-release from one of the Fedora Core mirrors.
Example:
# rpm -Uvh http://download.fedora.redhat.com/pub/fedora/linux/core/4/i386/os/Fedora/RPMS/fedora-release-4-2.noarch.rpm3. Disable third-party yum repositories, if applicable.
In my configuration, I had the Dag, FreshRPMs, and Dries third-party yum repositories enabled. As of 2005/06/15, only the Dries repository caused an error message (i.e. it had not been updated with Fedora Core 4 packages or it did not have a Fedora Core 4 directory structure) so I will only disable that repository.
# echo "enabled=0" >> /etc/yum.repos.d/dries.repo
4. When upgrading to Fedora Core 4, the kernel must be upgraded before the rest of the packages.
# yum -y update kernelOtherwise, you may receive the following error message:
--> Running transaction check
--> Processing Dependency: kernel-utils for package: kernel
--> Finished Dependency Resolution
Error: Missing Dependency: kernel-utils is needed by package kernel5. Disable SELinux, if applicable, and reboot the system to begin using the Fedora Core 4 kernel. I ran into significant problems after this reboot when SELinux was enabled.
To disable SELinux:
# vi /etc/sysconfig/selinux
Change:
SELINUX=enforcing
-- or --
SELINUX=permissiveTo:
SELINUX=disabled# reboot
7. Remove the Fedora Core 3 kernel(s) to prevent the aforementioned kernel-utils package dependency error.
# yum remove kernel-2.6.\*FC3\*
# yum remove kernel-smp\*FC3\* (if you have one or more FC3 SMP kernels installed)8. Continue the upgrade to Fedora Core 4.
# yum -y upgradeNote: if you receive the following error, import the RPM-GPG-KEY.
warning: rpmts_HdrFromFdno: V3 DSA signature: NOKEY, key ID db42a60e
public key not available for caching-nameserver-7.3-3.noarch.rpm# rpm --import /etc/pki/rpm-gpg/RPM-GPG-KEY
9. Reboot the system to begin using Fedora Core 4.
10. If applicable, re-enable SELinux by undoing the changes above, and reboot the system to use SELinux.
User-contributed notes on Upgrading to Fedora Core 4
On 2005/07/16, Jay Thorne wrote:Before you upgrade the kernel, you need to upgrade mkinitrd, otherwise
the initrd that the kernel install process makes is in the old format
and the new kernel will not boot; it dies with a oops.# yum -y upgrade mkinitrd
Otherwise, this procedure works well. Good work.
Also, in the x86_64 case, you need to specifically upgrade
libselinux.i386 and libselinux.x86_64 before the kernel upgrade, or the
upgrade will fail with a conflict.# yum -y upgrade libselinux.i386 libselinux.x86_64
Thanks for Wim Cos for writing on 2005/06/16 and providing the steps to update yum to the latest FC3 version and for the steps to remove FC3 SMP kernels, if applicable.
For SUSE Linux 9.3, 10.0, 10.1 and Factory, you can also use smart', zypper, yum, or apt to install and update packages from the Build Service. The latest smart and yum packages can be found at http://download.opensuse.org/repositories/smart/
Zypper
With openSUSE 10.2, you can also use the command line tool named zypper to add repositories:
zypper sa -r <URL_to_your_repo_file>For example:
zypper sa -r http://download.opensuse.org/repositories/openSUSE:/Tools/SUSE_Linux_Factory/openSUSE:Tools.repoFor more information, use
zypper helpsmart channel --add http://download.opensuse.org/repositories/<projectname>/<directory>/<project>.repoTo install a package you need to call
smart update smart install <package> smart upgrade # Performs an upgrade of all installed packages using the new repositories.YUM can use the repositories after the generated .repo file got copied into the /etc/yum.repos.d/ directory. Afterwards you can use yum commandline tools or GUI tools like kyum.
APT
APT isn't very well supported on openSUSE, so we recommend that you use one of the other above methods instead. This paragraph is a translation of an updated article for SuSE Linux 10.1 Apt v SUSE LINUX 10.1 from the czech SuSE portal which deals with the installation and usage of APT (Advanced Package Tool) in SUSE.
First we need apt and apt-libs. Both packages can be found on the DVD. The graphical front-end for Apt - Synaptic - is missing for an unknown reason, so we must be content with the command line version.
To install the above mentioned packages successfully we need to download and install the package install-apt4suse.rpm. The easiest installation is to launch mc as root, find and open the downloaded package by Enter and start the script INSTALL.
In a further step we launch:
install-apt4suse --update-srclistwhich updates the current list of mirrors. The result can be checked in /etc/apt/sources.list. The following table shows the commands which can be used with APT:
apt-get update Creates a list of available packets apt-get upgrade Updates pre-installed packets by newer versions apt-get -s upgrade Shows more details about what is to be updated apt-get -s install "packet name" Shows more details about what is to be installed apt-get install "packet name" Installs a packet apt-get reinstall "packet name" Re-installs a packet apt-get remove "packet name" Removes a packet apt-get clean Cleanup of the buffered setups In case of errors with GPG during the installation process open the file /etc/apt/apt.conf.d/gpg-checker.conf and change the entry
GPG::Check true;to
GPG::Check false;The usage of APT is faster and more transparent to end users compared to YaST and the new ZEN installer.
See also The Advanced Package Tool for SUSE for more information.
Some options associated with the yum command:
- yum - display brief help (is the package installed?)
- yum check-update - displays any updates the current system needs
- yum update - check for updates and apply them interactively
- yum update <package> - check for updates and upgrade a specified package
- yum info - similar output to a rpm -qai
- yum info <package> - information about a specific package
- yum list - lists all available packages
- yum list <package> - list individual package(s)
- yum list installed - list all installed packages
- yum list available - list all packages not installed
- yum list update - list all packages that need to be upgraded
- yum clean - delete any rpms in the yum cache and remove any unneeded headers
- yum install <package> - install the package (or yum �y install <package>)
- yum remove <package> - delete the package
- yum search <string> - searches for packages containing the string in their name or header info
- RUN this command at TERMINAL --> yum check-update [ENTER]
Go here:
http://linux01.gwdg.de/~pbleser/rpm-...=/System/smartInstall smart. It is better then Yum and it can handle multiple repostory types. Yast, Yum, Apt-get, Red Carpet, CD/DVD, plain directory are all handled well by Smart.
There is more to Red Hat Enterprise Linux 5 (RHEL5) than Xen. I, for one, think people will develop a real taste for YUM (Yellow dog Updater Modified), an automatic update and package installer/remover for RPM systems.YUM has already been used in the last few Fedora Core releases, but RHEL4 uses the up2date package manager. RHEL5 will use YUM 3.0. Up2date is used as a wrapper around YUM in RHEL5. Third-party code repositories, prepared directories or websites that contain software packages and index files, will also make use of the Anaconda-YUM combination.
... ... ...
Using YUM makes it much easier to maintain groups of machines without having to manually update each one using RPM. Some of its features include:
- Multiple repositories
- Simple config file
- Correct dependency calculation
- Fast operation
- RPM-consistent behavior
- comps.xml group support, including multiple repository groups
- Simple interface
RHEL5 moves the entire stack of tools which install and update software to YUM. This includes everything from the initial install (through Anaconda) to host-based software management tools, like system-config-packages, to even the updating of your system via Red Hat Network (RHN). New functionality will include the ability to use a YUM repository to supplement the packages provided with your in-house software, as well as plugins to provide additional behavior tweaks.
YUM automatically locates and obtains the correct RPM packages from repositories. It frees you from having to manually find and install new applications or updates. You can use one single command to update all system software, or search for new software by specifying criteria.
Google matched content |
Learn Linux, 101 RPM and YUM package management
Yellowdog Updater, Modified - Wikipedia, the free encyclopedia
yum command Update - Install Packages Under Redhat Enterprise - CentOS Linux Version 5.x
Yum: Yellow dog Updater, Modified Homepage
Charles Curley's Yum Repository Notes
Yum (Yellow dog
Updater, Modified) HOWTO
YUM: Yellowdog
Updater, Modified
yum [options] [command] [package ...]From the syntax we know that there are yum options and commands, followed by a list of package names. Different yum commands and options will be mixed throughout the development of this manual, but it is very important to emphasize their difference and that not all options apply to all commands. The main reference is the yum manual page yum ( man yum ). One quick option is simply typing the yum command and see the usage help it displays, for example, below is the output of yum according to the extensions installed on a given Fedora 13 system, listing the commands and options:
$ yum
Loaded plugins: aliases, filter-data, list-data, local, merge-conf, presto,
              : refresh-packagekit, tmprepo
You need to give some command
Usage: yum [options] COMMAND

List of Commands:

alias          Adds or lists aliases
check          Check for problems in the rpmdb
check-update   Check for available package updates
clean          Remove cached data
deplist        List a package's dependencies
distribution-synchronization Synchronize installed packages to the latest available versions
downgrade      downgrade a package
erase          Remove a package or packages from your system
groupinfo      Display details about a package group
groupinstall   Install the packages in a group on your system
grouplist      List available package groups
groupremove    Remove the packages in a group from your system
help           Display a helpful usage message
history        Display, or use, the transaction history
info           Display details about a package or group of packages
info-arches    Display aggregate data on the arch attribute of a group of packages
And list all the packages under each
info-archive-sizes Display aggregate data on the archivesize attribute of a group of packages
And list all the packages under each
info-baseurls  Display aggregate data on the url attribute of a group of packages
And list all the packages under each
info-buildhosts Display aggregate data on the buildhost attribute of a group of packages
And list all the packages under each
info-committers Display aggregate data on the committer attribute of a group of packages
And list all the packages under each
info-groups    Display aggregate group data, for matching members
And list all the packages under each
info-installed-sizes Display aggregate data on the installedsize attribute of a group of packages
And list all the packages under each
info-licenses  Display aggregate data on the license attribute of a group of packages
And list all the packages under each
info-package-sizes Display aggregate data on the packagesize attribute of a group of packages
And list all the packages under each
info-packagers Display aggregate data on the packager attribute of a group of packages
And list all the packages under each
info-rpm-groups Display aggregate data on the group attribute of a group of packages
And list all the packages under each
info-vendors   Display aggregate data on the vendor attribute of a group of packages
And list all the packages under each
install        Install a package or packages on your system
list           List a package or groups of packages
list-arches    Display aggregate data on the arch attribute of a group of packages
list-archive-sizes Display aggregate data on the archivesize attribute of a group of packages
list-baseurls  Display aggregate data on the url attribute of a group of packages
list-buildhosts Display aggregate data on the buildhost attribute of a group of packages
list-committers Display aggregate data on the committer attribute of a group of packages
list-groups    Display aggregate group data, for matching members
list-installed-sizes Display aggregate data on the installedsize attribute of a group of packages
list-licenses  Display aggregate data on the license attribute of a group of packages
list-package-sizes Display aggregate data on the packagesize attribute of a group of packages
list-packagers Display aggregate data on the packager attribute of a group of packages
list-rpm-groups Display aggregate data on the group attribute of a group of packages
list-vendors   Display aggregate data on the vendor attribute of a group of packages
localinstall   Install a local RPM
makecache      Generate the metadata cache
provides       Find what package provides the given value
reinstall      reinstall a package
repolist       Display the configured software repositories
resolvedep     Determine which package provides the given dependency
search         Search package details for the given string
shell          Run an interactive yum shell
update         Update a package or packages on your system
upgrade        Update packages taking obsoletes into account
version        Display a version for the machine and/or available repos.


Options:
  -h, --help            show this help message and exit
  -t, --tolerant        be tolerant of errors
  -C, --cacheonly       run entirely from system cache, don't update cache
  -c [config file], --config=[config file]
                        config file location
  -R [minutes], --randomwait=[minutes]
                        maximum command wait time
  -d [debug level], --debuglevel=[debug level]
                        debugging output level
  --showduplicates      show duplicates, in repos, in list/search commands
  -e [error level], --errorlevel=[error level]
                        error output level
  --rpmverbosity=[debug level name]
                        debugging output level for rpm
  -q, --quiet           quiet operation
  -v, --verbose         verbose operation
  -y, --assumeyes       answer yes for all questions
  --version             show Yum version and exit
  --installroot=[path]  set install root
  --enablerepo=[repo]   enable one or more repositories (wildcards allowed)
  --disablerepo=[repo]  disable one or more repositories (wildcards allowed)
  -x [package], --exclude=[package]
                        exclude package(s) by name or glob
  --disableexcludes=[repo]
                        disable exclude from main, for a repo or for
                        everything
  --obsoletes           enable obsoletes processing during updates
  --noplugins           disable Yum plugins
  --nogpgcheck          disable gpg signature checking
  --disableplugin=[plugin]
                        disable plugins by name
  --enableplugin=[plugin]
                        enable plugins by name
  --skip-broken         skip packages with depsolving problems
  --color=COLOR         control whether color is used
  --releasever=RELEASEVER
                        set value of $releasever in yum config and repo files
  --setopt=SETOPTS      set arbitrary config and repo options
  --filter-vendors=FILTER_VENDORS
                        Filter to packages with a matching vendor
  --filter-rpm-groups=FILTER_RPM_GROUPS
                        Filter to packages with a matching group
  --filter-packagers=FILTER_PACKAGERS
                        Filter to packages with a matching packager
  --filter-licenses=FILTER_LICENSES
                        Filter to packages with a matching license
  --filter-committers=FILTER_COMMITTERS
                        Filter to packages with a matching committer
  --filter-arches=FILTER_ARCHES
                        Filter to packages with a matching arch
  --filter-buildhosts=FILTER_BUILDHOSTS
                        Filter to packages with a matching buildhost
  --filter-urls=FILTER_URLS
                        Filter to packages with a matching url
  --filter-package-sizes=FILTER_PACKAGE_SIZES
                        Filter to packages with a packagesize in the given
                        range
  --filter-archive-sizes=FILTER_ARCHIVE_SIZES
                        Filter to packages with a archivesize in the given
                        range
  --filter-installed-sizes=FILTER_INSTALLED_SIZES
                        Filter to packages with a installedsize in the given
                        range
  --filter-groups=FILTER_GROUPS
                        Filter to packages within a matching yum group
  --merge-conf          Merge configuration changes after installation
  --disablepresto       disable Presto plugin and don't download any deltarpms

  Plugin Options:
    --tmprepo=[url]     enable one or more repositories from URLs
    --tmprepo-keep-created
                        keep created direcotry based tmp. repos.
Society
Groupthink : Two Party System as Polyarchy : Corruption of Regulators : Bureaucracies : Understanding Micromanagers and Control Freaks : Toxic Managers : Harvard Mafia : Diplomatic Communication : Surviving a Bad Performance Review : Insufficient Retirement Funds as Immanent Problem of Neoliberal Regime : PseudoScience : Who Rules America : Neoliberalism : The Iron Law of Oligarchy : Libertarian Philosophy
Quotes
War and Peace : Skeptical Finance : John Kenneth Galbraith :Talleyrand : Oscar Wilde : Otto Von Bismarck : Keynes : George Carlin : Skeptics : Propaganda : SE quotes : Language Design and Programming Quotes : Random IT-related quotes : Somerset Maugham : Marcus Aurelius : Kurt Vonnegut : Eric Hoffer : Winston Churchill : Napoleon Bonaparte : Ambrose Bierce : Bernard Shaw : Mark Twain Quotes
Bulletin:
Vol 25, No.12 (December, 2013) Rational Fools vs. Efficient Crooks The efficient markets hypothesis : Political Skeptic Bulletin, 2013 : Unemployment Bulletin, 2010 : Vol 23, No.10 (October, 2011) An observation about corporate security departments : Slightly Skeptical Euromaydan Chronicles, June 2014 : Greenspan legacy bulletin, 2008 : Vol 25, No.10 (October, 2013) Cryptolocker Trojan (Win32/Crilock.A) : Vol 25, No.08 (August, 2013) Cloud providers as intelligence collection hubs : Financial Humor Bulletin, 2010 : Inequality Bulletin, 2009 : Financial Humor Bulletin, 2008 : Copyleft Problems Bulletin, 2004 : Financial Humor Bulletin, 2011 : Energy Bulletin, 2010 : Malware Protection Bulletin, 2010 : Vol 26, No.1 (January, 2013) Object-Oriented Cult : Political Skeptic Bulletin, 2011 : Vol 23, No.11 (November, 2011) Softpanorama classification of sysadmin horror stories : Vol 25, No.05 (May, 2013) Corporate bullshit as a communication method : Vol 25, No.06 (June, 2013) A Note on the Relationship of Brooks Law and Conway Law
History:
Fifty glorious years (1950-2000): the triumph of the US computer engineering : Donald Knuth : TAoCP and its Influence of Computer Science : Richard Stallman : Linus Torvalds : Larry Wall : John K. Ousterhout : CTSS : Multix OS Unix History : Unix shell history : VI editor : History of pipes concept : Solaris : MS DOS : Programming Languages History : PL/1 : Simula 67 : C : History of GCC development : Scripting Languages : Perl history : OS History : Mail : DNS : SSH : CPU Instruction Sets : SPARC systems 1987-2006 : Norton Commander : Norton Utilities : Norton Ghost : Frontpage history : Malware Defense History : GNU Screen : OSS early history
Classic books:
The Peter Principle : Parkinson Law : 1984 : The Mythical Man-Month : How to Solve It by George Polya : The Art of Computer Programming : The Elements of Programming Style : The Unix Hater�s Handbook : The Jargon file : The True Believer : Programming Pearls : The Good Soldier Svejk : The Power Elite
Most popular humor pages:
Manifest of the Softpanorama IT Slacker Society : Ten Commandments of the IT Slackers Society : Computer Humor Collection : BSD Logo Story : The Cuckoo's Egg : IT Slang : C++ Humor : ARE YOU A BBS ADDICT? : The Perl Purity Test : Object oriented programmers of all nations : Financial Humor : Financial Humor Bulletin, 2008 : Financial Humor Bulletin, 2010 : The Most Comprehensive Collection of Editor-related Humor : Programming Language Humor : Goldman Sachs related humor : Greenspan humor : C Humor : Scripting Humor : Real Programmers Humor : Web Humor : GPL-related Humor : OFM Humor : Politically Incorrect Humor : IDS Humor : "Linux Sucks" Humor : Russian Musical Humor : Best Russian Programmer Humor : Microsoft plans to buy Catholic Church : Richard Stallman Related Humor : Admin Humor : Perl-related Humor : Linus Torvalds Related humor : PseudoScience Related Humor : Networking Humor : Shell Humor : Financial Humor Bulletin, 2011 : Financial Humor Bulletin, 2012 : Financial Humor Bulletin, 2013 : Java Humor : Software Engineering Humor : Sun Solaris Related Humor : Education Humor : IBM Humor : Assembler-related Humor : VIM Humor : Computer Viruses Humor : Bright tomorrow is rescheduled to a day after tomorrow : Classic Computer Humor
The Last but not Least Technology is dominated by two types of people: those who understand what they do not manage and those who manage what they do not understand ~Archibald Putt. Ph.D
Copyright � 1996-2021 by Softpanorama Society. www.softpanorama.org was initially created as a service to the (now defunct) UN Sustainable Development Networking Programme (SDNP) without any remuneration. This document is an industrial compilation designed and created exclusively for educational use and is distributed under the Softpanorama Content License. Original materials copyright belong to respective owners. Quotes are made for educational purposes only in compliance with the fair use doctrine.
FAIR USE NOTICE This site contains copyrighted material the use of which has not always been specifically authorized by the copyright owner. We are making such material available to advance understanding of computer science, IT technology, economic, scientific, and social issues. We believe this constitutes a 'fair use' of any such copyrighted material as provided by section 107 of the US Copyright Law according to which such material can be distributed without profit exclusively for research and educational purposes.
This is a Spartan WHYFF (We Help You For Free) site written by people for whom English is not a native language. Grammar and spelling errors should be expected. The site contain some broken links as it develops like a living tree...
|
|
You can use PayPal to to buy a cup of coffee for authors of this site |
Disclaimer:
The statements, views and opinions presented on this web page are those of the author (or referenced source) and are not endorsed by, nor do they necessarily reflect, the opinions of the Softpanorama society. We do not warrant the correctness of the information provided or its fitness for any purpose. The site uses AdSense so you need to be aware of Google privacy policy. You you do not want to be tracked by Google please disable Javascript for this site. This site is perfectly usable without Javascript.
Last modified: December 26, 2020
