Firewalld is a firewall management solution available In RHEL and its clones, which acts as a frontend for the iptables
packet filtering system provided by the Linux kernel. The firewalld service allows you to configure maintainable rules and rule-sets
that take into consideration your network environment. It allows you to seamlessly transition between different firewall policies
nased on IIP/service combinations gives administrators the ability to abstract the port management into more higher level concept of
zones.
It is not easy how to set up a firewall for your server, especially in complex environment like Azure
Command like utility firewall-cmd is used as the administrative tool for firewalld daemon (if you'd rather use iptables
with CentOS6, follow
this
guide ).
Firewalld operates using the concept of zones, which in principle are similar to security zones what were used in IE 11. IPs
and subnets can be assigned to particular zones. Some zones have IP range they cover predefined. Some have some additional
capabilities predefined.
NOTE:
filewalldhas XML config file which can be edited directly. This is often simpler then trying to understand arcane
commands of firewall-cmd
Looks like systemd people in Red Hat are closet sadists and like to torture sysadmins with excessive complexity.
The trick is to remove default services like sshd from public zone and define them in internal zone (zone used
for remote administration), for which
you need to provide the list of IP and subnets using
IP
sets.
On Azure to preserve compatibility you also need to define your 10 network as trusted zone.
It is not necessary to use rich rules in most cases. If you want to restrict a access for set of specific set of IPs,
or subnets, it is simpler define those IPs as sources for a zone other then public
(and remove any
interface definition that may be present, as they override source IPs).
Do not use the "public" zone for restricting acess to particular services based on IPs. Semantically public zone means
the set of services open to the world (it can none)
Instead, try using a different zone such as "internal" for "mostly trusted" IP addresses (addresses used to administer
the serveror VM) and add to it sshd and other sensitive services
Warning:
Don't mistake the special "trusted" zone with the normal "internal" zone. Any sources added to the "trusted" zone
will
be allowed through on all ports; adding services to "trusted" zone is allowed but it doesn't make any sense to do so.
In Azure 10 network can be made trusted as this is an internal network.
For example:
firewall-cmd --zone=internal --add-service=ssh
firewall-cmd --zone=internal --add-source=168.199.0.0/16 # subnet for administration -- possibly from your home PC
firewall-cmd --zone=trusted --add-source=10.0.3.0/24 # Azure internal network
firewall-cmd --zone=public --remove-service=ssh
The result of this will be a "internal" zone which permits access to ssh, but only from the specified subnet. To make it
persistent, re-run each command with --permanent appended, or better, by using firewall-cmd --runtime-to-permanent.
NOTE: you could create an IP set for a non-contiguous list of allowed IPs.
Runtime and Permanent Settings
Any changes committed in runtime mode only apply while firewalld is running. When firewalld is restarted,
the settings revert to their permanent values.
To make the changes persistent across reboots, apply them again using the
--permanent option. Alternatively, to make changes persistent while firewalld is running, use the --runtime-to-permanentfirewall-cmd option.
If you set the rules while firewalld is running using only the --permanent option, they do not become effective
before firewalld is restarted. However, restarting firewalld closes all open ports and stops the networking
traffic.
To change settings in both modes, you can use two methods:
Change runtime settings and then make them permanent as follows. In this case you can use --timeout
# firewall-cmd <other options>
# firewall-cmd --runtime-to-permanent # NOTE: firewall-cmd --reload command issued after after would be redundant unless you used --timeout option
Set permanent settings and reload the settings into runtime mode. I so not recommend that because using the --permanent
option prevents using the --timeout option which is very useful if you connects tot he server remotely as it
prevent locking yourself out.
Never use --runtime-to-permanent if you are configuring remote firewall. Use --timeout option. Using this option excludes the --permanent option. This way yout prevent locking
yourself selves out of a machine. After a specified amount of time, changes made reverts to its previous state.
It is not necessary to reloadfirewalldif you issued regular firewall-cmd
command and then firewall-cmd --runtime-to-permanent command unless you used
timeout option
The firewalld daemon operated using the concept of the groups of rules called "zones". The predefined zones are stored in the
/etc/firewalld/zones/ and can be edited directly as they represents XML files in the /etc/filewalld directory.
Zones are basically sets of rules dictating what traffic should be allowed depending on the level of trust you have for the particular
part of your IP space.
Zones are basically sets of predefined rules dictating what traffic should be allowed depending. They differ by the level
of trust you have in the networks your computer is connected to.
Network interfaces are assigned a zone to dictate the behavior that the firewall should allow.
In a way this concept is similar to security zones that were used in IE 11. Each zone is defined iether by subnet (which by
default is 0.0.0.0/0 for public; more restricted for internal and other zones that are
used) or interface if no subnet is specified.
Set of IP addresses and subnets (if large can be done via IP
sets, )This is the traditional way the firewall works. It can be implicit or explicit. The default is all IP space.
List of interfaces. This makes sense when you computer have multiple interfaces which serve different subnets. It
is also useful when you computer changes network to which it was connected before for example in airport when you need to use WiFi.
NetworkManager notifies firewalld about what connection is used and what are its properties.
Each network interface can be assigned to particular zone. For example WiFi adapter can be assigned to public zone.
It would be a mistake to assign it to trusted zone.
One of these zones is set as the default zone. When interface connections are added to, they are assigned
to the default zone, which encompasses the whole IP space. On installation, the default zone in firewalld is set to be
the public zone. The default zone can be changed using special command Default zone typically encompass all IP space. Additional zones select from this IP space subnets and establish different ruleset
for them
You can create new zones at will. This is a very convenient option.
Network interfaces can be assigned to zones to dictate the behavior that the firewall should allow. But it makes sense mostly when
you have multiple interfaces.
Selection of the zone involve both but it is unclear how. In any case if connection comes from the interface assigned to the
public zone (for example Wifi) all protocol which are not defined in this zone are dropped. But logically interface pays a role
if and only if zone encompass all IP space. It IP space is restricted (as it is typically for internal zone) it became the defining
factor as for which protocols are allowed (for internal zone sshd is typically allowed, but for public it is not)
Of interface is not defines then IP rules are to select zone to which particular connection belongs.
For computers that might move between networks frequently (like laptops), this kind of flexibility provides a good method of changing
your rules depending on your environment. You may have strict rules in place prohibiting most traffic when operating on a public WiFi
network, while allowing more relaxed restrictions when connected to your home network. For a server, these zones are not as immediately
important because the network environment rarely, if ever, changes.
Regardless of how dynamic your network environment may be, it is still useful to be familiar with the general idea behind each of
the predefined zones for firewalld . In order from least trusted to most trusted , the predefined zones within firewalld
are:
drop : The lowest level of trust. All incoming connections are dropped without reply and only outgoing connections are possible.
block : Similar to the above, but instead of simply dropping connections, incoming requests are rejected with an icmp-host-prohibited
or icmp6-adm-prohibited message.
public : Represents connections from public, untrusted networks (correspond to Internet zone in IE 11).
Bu default it encompasses all IP space. You don't trust other computers but may allow selected
incoming connections on for certain "more secure from tampering" services.
NOTE:
Generally sshd should not be allowed for this zone to prevent ssh scans (which are a real nuisance
now), but httpd can be.
external : External networks in the event that you are using the firewall as your gateway. It is configured for NAT masquerading
so that your internal network remains private but reachable.
internal : This is the external connections to the servers or subnets that you trust. For example from Azure to you
company and to your home PC. They can be on a separate interface or on the single
(main) network interface. For example the connection from your desktop to the server should belong to internal network and corresponding
subnet defined as allowed for internal zone. The computers in this zone are assumed to be fairly trustworthy and sensitive
services like sshd are enabled for them.
NOTE:
This is the zone which I recommend to used for the administrative
access to the VM in Azure and similar situation --NNB
Restricting ssh to this zone blocks ssh scans which lately became a real nuisance and pollute logs
dmz : Used for computers located in a DMZ (isolated computers that will not have access to the rest of your network). Only certain
incoming connections are allowed.
work : Used for work machines. A few more services might be allowed in
comparison with internal zone. Can be used for example for Fireeya agent (you need to open ports 80 and 443 for FireEye servers)
home : A home environment (intranet). It generally implies that you trust most of the other computers and that a few
more services will be accepted in comparison with internal and work zone. This is the zone which is similar to IE 11 zone called
"Local intranet"
trusted : Trust all of the machines in the network. The most open of the available options and should be used sparingly.
Internal Azure network or corporate 10 networks can be used this way.
To use the firewall, we can create rules and alter the properties of our zones and then assign our network interfaces to whichever
zones are most appropriate.
Rule Permanence
In firewalld, rules can be designated as either permanent or immediate. If a rule is added or modified, by default, the behavior
of the currently running firewall is modified. At the next reboot, the changes will be discards and old rules will be loaded.
Most firewall-cmd operations can take the --permanent flag to indicate that the non-ephemeral firewall
should be targeted. This will affect the rule set that is reloaded upon boot. This separation means that you can test rules in your
active firewall instance and then reload if there are problems.
NOTE: do not use --permanent flag is you are configuring firewall from a remote location.
Install and Enable Your Firewall to Start at Boot
firewalld is installed by default on some Linux distributions, including many images of CentOS 7. However, it may be
necessary for you to install firewalld yourself:
sudo yum install firewalld
After you install firewalld , you can enable the service and reboot your server. Keep in mind that enabling firewalld
will cause the service to start up at boot. It is best practice to create your firewall rules and take the opportunity to test them
before configuring this behavior in order to avoid potential issues.
sudo systemctl enable firewalld
sudo reboot
When the server restarts, your firewall should be brought up, your network interfaces should be put into the zones you configured
(or fall back to the configured default zone), and any rules associated with the zone(s) will be applied to the associated interfaces.
We can verify that the service is running and reachable by typing:
sudo firewall-cmd --state
output running
This indicates that our firewall is up and running with the default configuration.
Exploring the Defaults
Before we begin to make modifications, we should familiarize ourselves with the default environment and rules provided by the daemon.
We can see which zone is currently selected as the default by typing:
firewall-cmd --get-default-zone
This should
output public
Since we haven't given firewalld any commands to deviate from the default zone, and none of our interfaces are configured
to bind to another zone, that zone will also be the only "active" zone (the zone that is controlling the traffic for our interfaces).
We can verify that by typing:
firewall-cmd --get-active-zones
output public interfaces: eth0 eth1
Here, we can see that our example server has two network interfaces being controlled by the firewall ( eth0 and
eth1 ). They are both currently being managed according to the rules defined for the public zone.
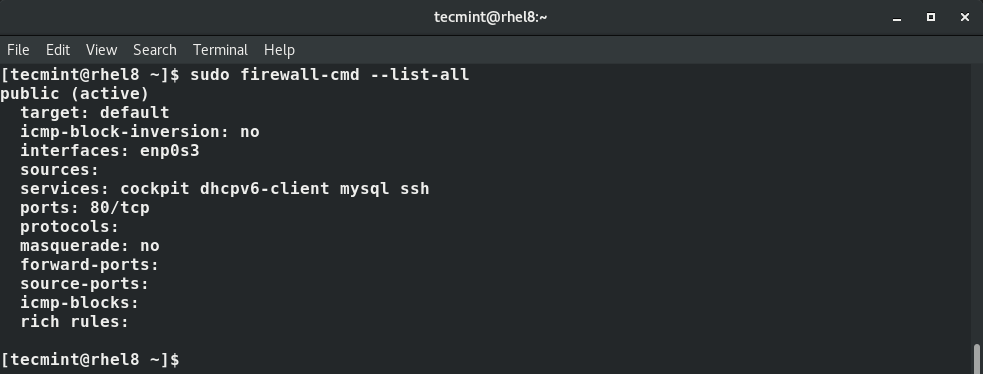
How do we know what rules are associated with the public zone though? We can print out the default zone's configuration by typing:
sudo firewall-cmd --list-all
We can tell from the output that this zone is both the default and active and that the eth0 and eth1 interfaces
are associated with this zone (we already knew all of this from our previous inquiries). However, we can also see that this zone allows
for the normal operations associated with a DHCP client (for IP address assignment) and SSH (for remote administration).
Exploring Alternative Zones
Now we have a good idea about the configuration for the default and active zone. We can find out information about other zones as
well.
To get a list of the available zones, type:
firewall-cmd --get-zones
output
block dmz drop external home internal public trusted work
We can see the specific configuration associated with a zone by including the --zone= parameter in our --list-all
command:
sudo firewall-cmd --zone= home --list-all
output home interfaces: sources: services: dhcpv6-client ipp-client mdns samba-client ssh ports: masquerade: no forward-ports: icmp-blocks:
rich rules:
You can output all of the zone definitions by using the --list-all-zones option. You will probably want to pipe the
output into a pager for easier viewing:
sudo firewall-cmd --list-all-zones | less
Selecting Zones for your Interfaces
Unless you have configured your network interfaces otherwise, each interface will be put in the default zone when the firewall is
booted.
You can transition an interface between zones during a session by using the --zone= parameter in combination with the
--change-interface= parameter. As with all commands that modify the firewall, you will need to use sudo .
For instance, we can transition our eth0 interface to the "home" zone by typing this:
output success Note Whenever you are transitioning an interface to a new zone, be aware that you are probably modifying the services
that will be operational. For instance, here we are moving to the "home" zone, which has SSH available. This means that our connection
shouldn't drop. Some other zones do not have SSH enabled by default and if your connection is dropped while using one of these zones,
you could find yourself unable to log back in.
We can verify that this was successful by asking for the active zones again:
firewall-cmd --get-active-zones
output home interfaces: eth0 public interfaces: eth1
Adjusting the Default Zone
If all of your interfaces can best be handled by a single zone, it's probably easier to just select the best default zone and then
use that for your configuration. You can change the default zone with the --set-default-zone= parameter. This will immediately
change any interface that had fallen back on the default to the new zone:
sudo firewall-cmd --set-default-zone= home
output success Setting Rules for your Applications
The basic way of defining firewall exceptions for the services you wish to make available is easy. We'll run through the basic idea
here.
Adding a Service to your Zones
The easiest method is to add the services or ports you need to the zones you are using. Again, you can get a list of the available
services with the --get-services option:
firewall-cmd --get-services
You can get more details about each of these services by looking at their associated .xml file within the /usr/lib/firewalld/services
directory. For instance, the SSH service is defined like this:
/usr/lib/firewalld/services/ssh.xml
<?xml version="1.0" encoding="utf-8"?>
<service>
  <short>SSH</short>
  <description>Secure Shell (SSH) is a protocol for logging into and executing commands on remote machines. It provides secure encrypted communications. If you plan on accessing your machine remotely via SSH over a firewalled interface, enable this option. You need the openssh-server package installed for this option to be useful.</description>
  <port protocol="tcp" port="22"/>
</service>
You can enable a service for a zone using the --add-service= parameter. The operation will target the default zone or whatever
zone is specified by the --zone= parameter. By default, this will only adjust the current firewall session. You can adjust
the permanent firewall configuration by including the --permanent flag.
For instance, if we are running a web server serving conventional HTTP traffic, we can allow this traffic for interfaces in our "public"
zone for this session by typing:
You can leave out the --zone= if you wish to modify the default zone. We can verify the operation was successful by
using the --list-all or --list-services operations:
sudo firewall-cmd --zone=public --list-services
output dhcpv6-client http ssh
Once you have tested that everything is working as it should, you will probably want to modify the permanent firewall rules so that
your service will still be available after a reboot. We can make our "public" zone change permanent by typing:
You can verify that this was successful by adding the --permanent flag to the --list-services operation.
You need to use sudo for any --permanent operations:
Your "public" zone will now allow HTTP web traffic on port 80. If your web server is configured to use SSL/TLS, you'll also want
to add the https service. We can add that to the current session and the permanent rule-set by typing:
The firewall services that are included with the firewalld installation represent many of the most common requirements for applications
that you may wish to allow access to. However, there will likely be scenarios where these services do not fit your requirements.
In this situation, you have two options.
Opening a Port for your Zones
The easiest way to add support for your specific application is to open up the ports that it uses in the appropriate zone(s). This
is as easy as specifying the port or port range, and the associated protocol for the ports you need to open.
For instance, if our application runs on port 5000 and uses TCP, we could add this to the "public" zone for this session using the
--add-port= parameter. Protocols can be either tcp or udp :
We can verify that this was successful using the --list-ports operation:
sudo firewall-cmd --zone=public --list-ports
output 5000/tcp
It is also possible to specify a sequential range of ports by separating the beginning and ending port in the range with a dash.
For instance, if our application uses UDP ports 4990 to 4999, we could open these up on "public" by typing:
Opening ports for your zones is easy, but it can be difficult to keep track of what each one is for. If you ever decommission a service
on your server, you may have a hard time remembering which ports that have been opened are still required. To avoid this situation,
it is possible to define a service.
Services are simply collections of ports with an associated name and description. Using services is easier to administer than ports,
but requires a bit of upfront work. The easiest way to start is to copy an existing script (found in /usr/lib/firewalld/services
) to the /etc/firewalld/services directory where the firewall looks for non-standard definitions.
For instance, we could copy the SSH service definition to use for our "example" service definition like this. The filename minus
the .xml suffix will dictate the name of the service within the firewall services list:
sudo cp /usr/lib/firewalld/services/ssh.xml /etc/firewalld/services/ example .xml
Now, you can adjust the definition found in the file you copied:
sudo vi /etc/firewalld/services/example.xml
To start, the file will contain the SSH definition that you copied:
/etc/firewalld/services/example.xml
<?xml version="1.0" encoding="utf-8"?>
<service>
  <short>SSH</short>
  <description>Secure Shell (SSH) is a protocol for logging into and executing commands on remote machines. It provides secure encrypted communications. If you plan on accessing your machine remotely via SSH over a firewalled interface, enable this option. You need the openssh-server package installed for this option to be useful.</description>
  <port protocol="tcp" port="22"/>
</service>
The majority of this definition is actually metadata. You will want to change the short name for the service within the <short>
tags. This is a human-readable name for your service. You should also add a description so that you have more information if you ever
need to audit the service. The only configuration you need to make that actually affects the functionality of the service will likely
be the port definition where you identify the port number and protocol you wish to open. This can be specified multiple times.
For our "example" service, imagine that we need to open up port 7777 for TCP and 8888 for UDP. By entering INSERT mode by pressing
i , we can modify the existing definition with something like this:
/etc/firewalld/services/example.xml
<?xml version="1.0" encoding="utf-8"?>
<service>
  <short>Example Service</short>
  <description>This is just an example service.  It probably shouldn't be used on a real system.</description>
  <port protocol="tcp" port="7777"/>
  <port protocol="udp" port="8888"/>
</service>
Press ESC , then enter :x to save and close the file.
Reload your firewall to get access to your new service:
sudo firewall-cmd --reload
You can see that it is now among the list of available services:
firewall-cmd --get-services
You can now use this service in your zones as you normally would.
Creating Your Own Zones
While the predefined zones will probably be more than enough for most users, it can be helpful to define your own zones that are
more descriptive of their function. For example
Another example is the zone for HTTP and HTTPS services. We can call it "publicweb". However, you might want to have another zone
configured so that only selected IPs can access it. Let's call it "privatweb". Similarly you can have zone "privatedns" for
your DNS servers.
When adding a zone, you must add it to the permanent firewall configuration. You can then reload to bring the configuration into
your running session. For instance, we could create the two zones we discussed above by typing:
You can verify that these are present in your permanent configuration by typing:
sudo firewall-cmd --permanent --get-zones
output block dmz drop external home internal privatedns public publicweb trusted work
As stated before, these won't be available in the current instance of the firewall yet:
firewall-cmd --get-zones
output block dmz drop external home internal public trusted work
Reload the firewall to bring these new zones into the active configuration:
sudo firewall-cmd --reload
firewall-cmd --get-zones
output block dmz drop external home internal privatedns public publicweb trusted work
Now, you can begin assigning the appropriate services and ports to your zones. It's usually a good idea to adjust the active instance
and then transfer those changes to the permanent configuration after testing. For instance, for the "publicweb" zone, you might want
to add the SSH, HTTP, and HTTPS services:
At this point, you have the opportunity to test your configuration. If these values work for you, you will want to add the same rules
to the permanent configuration. You can do that by re-applying the rules with the --permanent flag:
You have successfully set up your own zones! If you want to make one of these zones the default for other interfaces, remember to
configure that behavior with the --set-default-zone= parameter:
Here the guy did a typical mistake trying to restrict public zone instead of defining necessary services and IPs in internal zone
I would appreciate some assistance with configuring firewalld please. Here's a bit of background. All I want to do is prevent
all access- except whitelisted IP addresses to a web application running on https.
I have done much googling. learnt a number of things but none has worked yet. Here's what I have done:
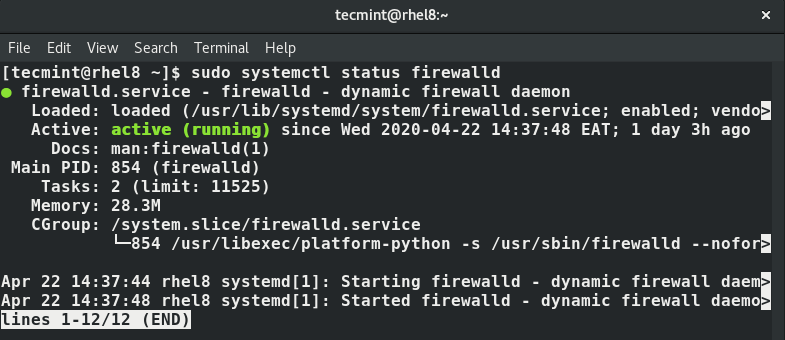
I can tell firewalld is running
# systemctl status firewalld

firewalld.service - firewalld - dynamic     firewall daemon    Loaded: loaded
(/usr/lib/systemd/system/firewalld.service; enabled)    Active: active
(running)
also with
    # firewall-cmd --state
    running
I have the default zones
# firewall-cmd --get-zones
block dmz drop external home internal public trusted work
My active zones include:
# firewall-cmd --get-active-zones
public
sources: 192.72.0.193 192.72.0.0/22 94.27.256.190
My default zone is public:
# firewall-cmd --get-default-zone
public
The details of public are:
public (default)
interfaces:
sources: 192.72.0.193 192.72.0.0/22 94.27.256.190
services: http https ssh
ports:
masquerade: no
forward-ports:
icmp-blocks:
rich rules:
How can
I allow traffic from a specific IP address in my private network or allow traffic from a specific private network through
firewalld
,
to a specific port or service on a
Red Hat
Enterprise Linux
(
RHEL
) or
CentOS
server?
In this
short article, you will learn how to open a port for a specific IP address or network range in your RHEL or CentOS server
running a
firewalld
firewall.
The most
appropriate way to solve this is by using a
firewalld
zone.
So, you need to create a new zone that will hold the new configurations (or you can use any of the secure default zones
available).
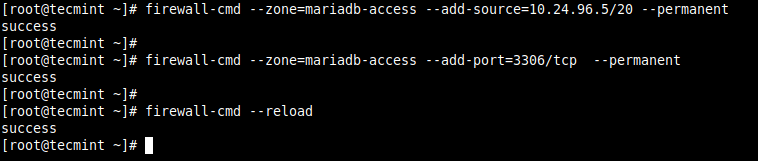
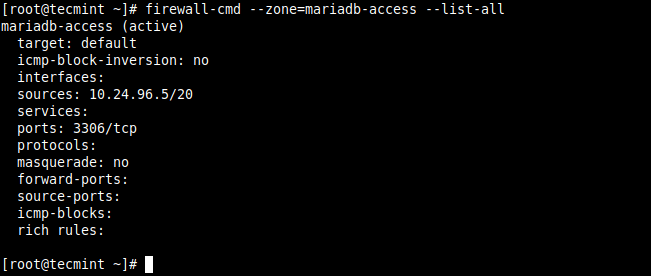
Open Port for Specific IP Address in Firewalld
First
create an appropriate zone name (in our case, we have used
mariadb-access
to
allow access to the MySQL database server).
Next,
reload the
firewalld
settings to apply
the new change. If you skip this step, you may get an error when you try to use the new zone name. This time around, the new
zone should appear in the list of zones as highlighted in the following screenshot.
Next,
add the source IP address (
10.24.96.5/20
)
and the port (
3306
) you wish to open on
the local server as shown. Then reload the firewalld settings to apply the new changes.
NetworkManager 1.26 has been released as the latest stable series of this powerful and
widely used network connection manager designed for the
GNOME desktop environment .
Numerous GNU/Linux distributions ship with NetworkManager by default to allow users to
manage network connections, whether they're Wi-Fi or wired connections or VPN connections.
In NetworkManager 1.26, there's now automatic connection for Wi-Fi profiles when all
previous activation attempts fail. Previously, if a Wi-Fi profile failed to autoconnect to the
network, the automatism was blocked.
Another cool new feature is a build option called firewalld-zone, which is enabled by
default and lets NetworkManager install a firewalld zone for connection sharing. This also puts
network interfaces that use IPv4 or IPv6 shared mode in this firewalld zone during
activation.
The new firewalld-zone option is more useful on Linux systems that use the firewalld
firewall management tool with the nftables backend. However, it looks like NetworkManager
continues to use iptables for enabling masquerading and open the required ports for DHCP and
DNS.
NetworkManager 1.26 also adds a MUD URL property for connection profiles (RFC 8520) and sets
it for DHCP and DHCPv6 requests, support for the ethtool coalesce and ring options, support for
"local" type routes beside "unicast," support for several bridge options, and adds match for
device path, driver and kernel command-line for connection profiles.
Support for OVS patch interfaces has been improved in this release, which introduces a new
provider in the nm-cloud-setup component for Google Cloud Platform. This is useful to
automatically detect and configure the host to receive network traffic from internal load
balancers.
Among other noteworthy changes, the syntax was extended to 'match' setting properties with
'|', '&', '!' and '\', raw LLDP message is now exposed on D-Bus and the MUD usage
description URL, and team connections are now allowed to work without D-Bus.
New manual pages for the nm-settings-dbus and nm-settings-nmcli components have been
introduced as well, along with support more tc qdiscs: tbf and sfq, as well as the ability for
ifcfg-rh to handle 802-1x.pin properties and "802-1x.{,phase2-}ca-path" (fixes CVE-2020-10754 ).
Last but not least, NetworkManager now marks externally managed devices and profiles on
D-Bus and highlight externally managed devices in nmcli. For Ethernet connections,
NetworkManager now automatically resets the original autonegotiation, duplex and speed settings
when deactivating the device.
NetworkManager 1.26 is available for download here
, but it's only the sources which needs to be compiled. Therefore, I strongly recommend that
you update to this new stable version from the stable software repositories of your favorite
GNU/Linux distribution as it's an important component.
https://tpc.googlesyndication.com/safeframe/1-0-37/html/container.html Report this ad 21
6
On a linux networked machine, i would like to restrict the set of addresses on the "public"
zone (firewalld concept), that are allowed to reach it. So the end result would be no other
machine can access any port or protocol, except those explicitly allowed, sort of a mix of
  --add-rich-rule='rule family="ipv4" source not  address="192.168.56.120" drop'

  --add-rich-rule='rule family="ipv4" source not  address="192.168.56.105" drop'
The problem above is that this is not a real list, it will block everything since if its one
address its blocked by not being the same as the other, generating an accidental "drop all"
effect, how would i "unblock" a specific non contiguous set? does source accept a list of
addresses? i have not see anything in my look at the docs or google result so far.
If you want to restrict a zone to a specific set of IPs, simply define those IPs as sources
for the zone itself (and remove any interface definition that may be present, as they override
source IPs).
You probably don't want to do this to the "public" zone, though, since that's semantically
meant for public facing services to be open to the world.
Instead, try using a different zone such as "internal" for mostly trusted IP addresses to
access potentially sensitive services such as sshd. (You can also create your own zones.)
Warning: don't mistake the special "trusted" zone with the normal "internal" zone. Any
sources added to the "trusted" zone will be allowed through on all ports; adding services to
"trusted" zone is allowed but it doesn't make any sense to do so.
The result of this will be a "internal" zone which permits access to ssh, but only from the
two given IP addresses. To make it persistent, re-run each command with
--permanent appended, or better, by using firewall-cmd
--runtime-to-permanent . share improve this answer follow edited Jun 25 at 17:15 answered Apr 6
'15 at 20:47 Michael
Hampton 202k 31 31 gold badges 395 395 silver badges 757 757 bronze badges
please clarify what you mean by "interface definition that may be present", iv tried your
suggestion, please see my edit. – mike Apr 6 '15 at 21:20
@mike Like I said, you need to remove eth1 from the zone. firewall-cmd
--zone=encrypt --remove-interface=eth1 – Michael Hampton Apr 6 '15 at
21:24
well, the encrypt zone is the new zone, before eth1 was in public, i moved it from public
to encrypt, so encrypt has the source .120, i thought only 120 should be able to reach the
port, what im i missing? – mike Apr 6 '15 at 21:30
1 If you put the interface in the zone, then anything arriving via the interface
can access whatever ports and services are added to the zone, regardless of IP address. So it
probably belongs in public, where it was originally. – Michael Hampton Apr 6 '15 at
21:37
ahh, so the accepted sources will still be allowed in even if the interface is placed in
public, and the accept sources are placed in a different trusted source? – mike Apr 6 '15 at 21:43
https://tpc.googlesyndication.com/safeframe/1-0-37/html/container.html Report this ad 1
As per firewalld.richlanguage :
Source source [not] address="address[/mask]"
   With the source address the origin of a connection attempt can be limited to the source address. An address is either a single IP address, or a network IP address. The address has to match the rule family (IPv4/IPv6). Subnet mask is expressed in either
   dot-decimal (/x.x.x.x) or prefix (/x) notations for IPv4, and in prefix notation (/x) for IPv6 network addresses. It is possible to invert the sense of an address by adding not before address. All but the specified address will match then.
Specify a netmask for the address to allow contiguous blocks.
Other than that, you could try creating an ipset for a non-contiguous list of
allowed IPs.
5.12.1. Configuring IP Set Options with the Command-Line Client IP sets can be used in
firewalld zones as sources and also as sources in rich rules. In Red Hat Enterprise
Linux 7, the preferred method is to use the IP sets created with firewalld in a direct
rule. To list the IP sets known to firewalld in the permanent environment, use the
following command as root :
~]# firewall-cmd --permanent --get-ipsets
To add a new IP set, use the following command using the permanent environment as
root :
The previous command creates a new IP set with the name test and the
hash:net type for IPv4 . To create an IP set for use with
IPv6 , add the --option=family=inet6 option. To make the new setting
effective in the runtime environment, reload firewalld . List the new IP set with the
following command as root :
~]# firewall-cmd --permanent --get-ipsets
test
To get more information about the IP set, use the following command as root :
~]# firewall-cmd --permanent --info-ipset=test
test
type: hash:net
options:
entries:
Note that the IP set does not have any entries at the moment. To add an entry to the
test IP set, use the following command as root :
The previous command adds the IP address 192.168.0.1 to the IP set. To get the list of
current entries in the IP set, use the following command as root :
The file with the list of IP addresses for an IP set should contain an entry per line. Lines
starting with a hash, a semi-colon, or empty lines are ignored. To add the addresses from the
iplist.txt file, use the following command as root :
You can add the IP set as a source to a zone to handle all traffic coming in from any of the
addresses listed in the IP set with a zone. For example, to add the test IP set as a source
to the drop zone to drop all packets coming from all entries listed in the test IP
set, use the following command as root :
The ipset: prefix in the source shows firewalld that the source is
an IP set and not an IP address or an address range. Only the creation and removal of IP sets is
limited to the permanent environment, all other IP set options can be used also in the runtime
environment without the --permanent option. 5.12.2. Configuring a Custom Service
for an IP Set To configure a custom service to create and load the IP set structure before
firewalld starts:
Using an editor running as root , create a file as follows:
~]# vi /etc/firewalld/direct.xml
<?xml version="1.0" encoding="utf-8"?>
<direct>
        <rule ipv="ipv4" table="filter" chain="INPUT" priority="0">-m set --match-set <replaceable>ipset_name</replaceable> src -j DROP</rule>
</direct>
A firewalld reload is required to activate the changes:
~]# firewall-cmd --reload
This reloads the firewall without losing state information (TCP sessions will not be
terminated), but service disruption is possible during the reload.
Warning Red Hat does not recommend using IP sets that are not managed through
firewalld . To use such IP sets, a permanent direct rule is required to reference
the set, and a custom service must be added to create these IP sets. This service needs to be
started before firewalld starts, otherwise firewalld is not able to add the direct
rules using these sets. You can add permanent direct rules with the
/etc/firewalld/direct.xml file.
As a
Linux user, you can opt either to allow or restrict network access to some services or IP addresses using the
firewalld
firewall
which is native to
CentOS/RHEL 8
and
most
RHEL
based distributions such as
Fedora
.
The
output below confirms that the
firewalld
service
is up and running.
Check
Firewalld Status
Configuring Rules using Firewalld
Now that
we have
firewalld
running, we can go
straight to making some configurations. Firewalld allows you to add and block ports, blacklist, as well as whitelist IP,
addresses to provide access to the server. Once done with the configurations, always ensure that you reload the firewall for
the new rules to take effect.
Adding a TCP/UDP Port
To add a
port, say port
443
for
HTTPS
,
use the syntax below. Note that you have to specify whether the port is a TCP or UDP port after the port number:
$ sudo firewall-cmd --add-port=22/tcp --permanent
Similarly, to add a
UDP
port, specify
the
UDP
option as shown:
$ sudo firewall-cmd --add-port=53/tcp --permanent
The
--permanent
flag
ensures that the rules persist even after a reboot.
Blocking a TCP/UDP Port
To block
a TCP port, like port
22
, run the
command.
You can
also allow a range of IPs or an entire subnet using a CIDR (Classless Inter-Domain Routing) notation. For example to allow an
entire subnet in the
255.255.255.0
subnet,
execute.
So far,
we have seen how you can add and remove ports and services as well as whitelisting and removing whitelisted IPs. To block an
IP address, '
rich rules
' are used for
this purpose.
For
example to block the IP
192.168.2.50
run
the command:
One particular concept found in firewalld is that of zones. Zones are predefined sets of rules that specify what traffic should be
allowed, based on trust levels for network connections. For example, you can have zones for home, public, trusted, etc. Zones work
on a one-to-many relation, so a connection can only be part of a single zone, but a zone can be used for many network connections.
Different network interfaces and sources can be assigned to specific zones.
There are a number of zones provided by firewalld:
drop: All incoming connections are dropped without notification, whereas all outgoing
connections are allowed.
block: All incoming connections are rejected with an icmp-host-prohibited message, whereas
all outgoing connections are allowed.
public: This zone is intended to be used in untrusted public areas. Other computers on this
network are not to be trusted.
external: This zone is intended to be used on external networks with NAT masquerading
enabled.
internal: This zone is intended to be used on internal networks when your system acts as a
gateway or router. Other systems on this network are generally trusted.
dmz: This zones is intended to be used for computers located in your demilitarized zone
that will have limited access to the rest of your network.
work: This zone is intended to be used for work machines. Other systems on this network are
generally trusted.
home: This zone is intended to be used for home machines. Other systems on this network are
generally trusted.
trusted: All network connections are accepted and other systems are trusted.
By 2024, AI will have dramatically transformed how we live our lives, conduct business, or run a datacenter.
Read this whitepaper and find out the five most common use cases in hardware, software and services.
White Papers
provided by
IBM
You can easily assign an interface to one of the above zones, but there is one thing to be taken care of first .
Installing firewalld
You might be surprised to find out that firewalld isn't installed by default. To fix that issue, open a terminal window and issue
the following command:
sudo yum install firewalld
Once that installation completes, you'll need to start and enable firewalld with the commands:
The first thing you should do is view the default zone. Issue the command:
sudo firewall-cmd --get-default-zone
You will probably see that the default zone is set to public. If you want more information about that zone, issue the command:
sudo firewall-cmd --zone=public --list-all
You should see all the pertinent details about the public zone (
Figure A
).
Figure A
Information about our default zone.
Let's change the default zone. Say, for instance, you want to change the zone to work. Let's first find out what zones are being
used by our network interface(s). For that, issue the command:
sudo firewall-cmd --get-active-zones
You should see something like that found in
Figure B
.
Firewalld is a firewall management solution available for many Linux distributions which
acts as a frontend for the iptables packet filtering system provided by the Linux kernel. In
this guide, we will cover how to set up a firewall for your server and show you the basics of
managing the firewall with the firewall-cmd administrative tool (if you'd rather
use iptables with CentOS, follow
this guide ).
Note: There is a chance that you may be working with a newer version of firewalld than was
available at the time of this writing, or that your server was set up slightly differently
than the example server used throughout this guide. Thus, the behavior of some of the
commands explained in this guide may vary depending on your specific
configuration.
Basic Concepts in Firewalld
Before we begin talking about how to actually use the firewall-cmd utility to
manage your firewall configuration, we should get familiar with a few basic concepts that the
tool introduces.
Zones
The firewalld daemon manages groups of rules using entities called "zones".
Zones are basically sets of rules dictating what traffic should be allowed depending on the
level of trust you have in the networks your computer is connected to. Network interfaces are
assigned a zone to dictate the behavior that the firewall should allow.
For computers that might move between networks frequently (like laptops), this kind of
flexibility provides a good method of changing your rules depending on your environment. You
may have strict rules in place prohibiting most traffic when operating on a public WiFi
network, while allowing more relaxed restrictions when connected to your home network. For a
server, these zones are not as immediately important because the network environment rarely,
if ever, changes.
Regardless of how dynamic your network environment may be, it is still useful to be
familiar with the general idea behind each of the predefined zones for firewalld
. In order from least trusted to most trusted , the predefined zones within
firewalld are:
drop : The lowest level of trust. All incoming connections are dropped without reply
and only outgoing connections are possible.
block : Similar to the above, but instead of simply dropping connections, incoming
requests are rejected with an icmp-host-prohibited or
icmp6-adm-prohibited message.
public : Represents public, untrusted networks. You don't trust other computers but may
allow selected incoming connections on a case-by-case basis. Generally sshd should not be allowed for this zone, but httpd
can be.
external : External networks in the event that you are using the firewall as your
gateway. It is configured for NAT masquerading so that your internal network remains
private but reachable.
internal : The other side of the external zone, used for the internal portion of a
gateway. The computers are fairly trustworthy and services like sshd are
available. NOTE: This is the zone for which set of allowed IP should be defined --NNB
dmz : Used for computers located in a DMZ (isolated computers that will not have access
to the rest of your network). Only certain incoming connections are allowed.
work : Used for work machines. Trust most of the computers in the network. A few more
services might be allowed.
home : A home environment. It generally implies that you trust most of the other
computers and that a few more services will be accepted.
trusted : Trust all of the machines in the network. The most open of the available
options and should be used sparingly.
To use the firewall, we can create rules and alter the properties of our zones and then
assign our network interfaces to whichever zones are most appropriate.
Rule
Permanence
In firewalld, rules can be designated as either permanent or immediate. If a rule is added
or modified, by default, the behavior of the currently running firewall is modified. At the
next boot, the old rules will be reverted.
Most firewall-cmd operations can take the --permanent flag to
indicate that the non-ephemeral firewall should be targeted. This will affect the rule set
that is reloaded upon boot. This separation means that you can test rules in your active
firewall instance and then reload if there are problems. You can also use the
--permanent flag to build out an entire set of rules over time that will all be
applied at once when the reload command is issued.
Install and Enable Your Firewall to
Start at Boot
firewalld is installed by default on some Linux distributions, including many
images of CentOS 7. However, it may be necessary for you to install firewalld yourself:
sudo yum install firewalld
After you install firewalld , you can enable the service and reboot your
server. Keep in mind that enabling firewalld will cause the service to start up at boot. It
is best practice to create your firewall rules and take the opportunity to test them before
configuring this behavior in order to avoid potential issues.
sudo systemctl enable firewalld
sudo reboot
When the server restarts, your firewall should be brought up, your network interfaces
should be put into the zones you configured (or fall back to the configured default zone),
and any rules associated with the zone(s) will be applied to the associated interfaces.
We can verify that the service is running and reachable by typing:
sudo firewall-cmd --state
output running
This indicates that our firewall is up and running with the default
configuration.
Getting Familiar with the Current Firewall Rules
Before we begin to make modifications, we should familiarize ourselves with the default
environment and rules provided by the daemon.
Exploring the Defaults
We can see which zone is currently selected as the default by typing:
firewall-cmd --get-default-zone
output public
Since we haven't given firewalld any commands to deviate from the default
zone, and none of our interfaces are configured to bind to another zone, that zone will also
be the only "active" zone (the zone that is controlling the traffic for our interfaces). We
can verify that by typing:
firewall-cmd --get-active-zones
output public interfaces: eth0 eth1
Here, we can see that our example server has two network interfaces being controlled by
the firewall ( eth0 and eth1 ). They are both currently being
managed according to the rules defined for the public zone.
How do we know what rules are associated with the public zone though? We can print out the
default zone's configuration by typing:
sudo firewall-cmd --list-all
output public (default, active) target: default icmp-block-inversion: no interfaces:
eth0 eth1 sources: services: ssh dhcpv6-client ports: protocols: masquerade: no
forward-ports: source-ports: icmp-blocks: rich rules:
We can tell from the output that this zone is both the default and active and that the
eth0 and eth1 interfaces are associated with this zone (we already
knew all of this from our previous inquiries). However, we can also see that this zone allows
for the normal operations associated with a DHCP client (for IP address assignment) and SSH
(for remote administration).
Exploring Alternative Zones
Now we have a good idea about the configuration for the default and active zone. We can
find out information about other zones as well.
To get a list of the available zones, type:
firewall-cmd --get-zones
output block dmz drop external home internal public trusted work
We can see the specific configuration associated with a zone by including the
--zone= parameter in our --list-all command:
sudo firewall-cmd --zone= home --list-all
output home interfaces: sources: services: dhcpv6-client ipp-client mdns samba-client
ssh ports: masquerade: no forward-ports: icmp-blocks: rich rules:
You can output all of the zone definitions by using the --list-all-zones
option. You will probably want to pipe the output into a pager for easier viewing:
sudo firewall-cmd --list-all-zones | less
Selecting Zones for your Interfaces
Unless you have configured your network interfaces otherwise, each interface will be put
in the default zone when the firewall is booted.
Changing the Zone of an Interface
You can transition an interface between zones during a session by using the
--zone= parameter in combination with the --change-interface=
parameter. As with all commands that modify the firewall, you will need to use
sudo .
For instance, we can transition our eth0 interface to the "home" zone by
typing this:
output success Note Whenever you are transitioning an interface to a new zone, be aware
that you are probably modifying the services that will be operational. For instance, here we
are moving to the "home" zone, which has SSH available. This means that our connection
shouldn't drop. Some other zones do not have SSH enabled by default and if your connection is
dropped while using one of these zones, you could find yourself unable to log back in.
We can verify that this was successful by asking for the active zones again:
firewall-cmd --get-active-zones
output home interfaces: eth0 public interfaces: eth1 Adjusting the Default Zone
If all of your interfaces can best be handled by a single zone, it's probably easier to
just select the best default zone and then use that for your configuration.
You can change the default zone with the --set-default-zone= parameter. This
will immediately change any interface that had fallen back on the default to the new
zone:
sudo firewall-cmd --set-default-zone= home
output success Setting Rules for your Applications
The basic way of defining firewall exceptions for the services you wish to make available
is easy. We'll run through the basic idea here.
Adding a Service to your Zones
The easiest method is to add the services or ports you need to the zones you are using.
Again, you can get a list of the available services with the --get-services
option:
You can get more details about each of these services by looking at their associated
.xml file within the /usr/lib/firewalld/services directory. For
instance, the SSH service is defined like this:
/usr/lib/firewalld/services/ssh.xml
<?xml version="1.0" encoding="utf-8"?>
<service>
  <short>SSH</short>
  <description>Secure Shell (SSH) is a protocol for logging into and executing commands on remote machines. It provides secure encrypted communications. If you plan on accessing your machine remotely via SSH over a firewalled interface, enable this option. You need the openssh-server package installed for this option to be useful.</description>
  <port protocol="tcp" port="22"/>
</service>
You can enable a service for a zone using the --add-service= parameter. The
operation will target the default zone or whatever zone is specified by the
--zone= parameter. By default, this will only adjust the current firewall
session. You can adjust the permanent firewall configuration by including the
--permanent flag.
For instance, if we are running a web server serving conventional HTTP traffic, we can
allow this traffic for interfaces in our "public" zone for this session by typing:
You can leave out the --zone= if you wish to modify the default zone. We can
verify the operation was successful by using the --list-all or
--list-services operations:
sudo firewall-cmd --zone=public --list-services
output dhcpv6-client http ssh
Once you have tested that everything is working as it should, you will probably want to
modify the permanent firewall rules so that your service will still be available after a
reboot. We can make our "public" zone change permanent by typing:
You can verify that this was successful by adding the --permanent flag to the
--list-services operation. You need to use sudo for any
--permanent operations:
Your "public" zone will now allow HTTP web traffic on port 80. If your web server is
configured to use SSL/TLS, you'll also want to add the https service. We can add
that to the current session and the permanent rule-set by typing:
The firewall services that are included with the firewalld installation represent many of
the most common requirements for applications that you may wish to allow access to. However,
there will likely be scenarios where these services do not fit your requirements.
In this situation, you have two options.
Opening a Port for your Zones
The easiest way to add support for your specific application is to open up the ports that
it uses in the appropriate zone(s). This is as easy as specifying the port or port range, and
the associated protocol for the ports you need to open.
For instance, if our application runs on port 5000 and uses TCP, we could add this to the
"public" zone for this session using the --add-port= parameter. Protocols can be
either tcp or udp :
We can verify that this was successful using the --list-ports operation:
sudo firewall-cmd --zone=public --list-ports
output 5000/tcp
It is also possible to specify a sequential range of ports by separating the beginning and
ending port in the range with a dash. For instance, if our application uses UDP ports 4990 to
4999, we could open these up on "public" by typing:
Opening ports for your zones is easy, but it can be difficult to keep track of what each
one is for. If you ever decommission a service on your server, you may have a hard time
remembering which ports that have been opened are still required. To avoid this situation, it
is possible to define a service.
Services are simply collections of ports with an associated name and description. Using
services is easier to administer than ports, but requires a bit of upfront work. The easiest
way to start is to copy an existing script (found in /usr/lib/firewalld/services
) to the /etc/firewalld/services directory where the firewall looks for
non-standard definitions.
For instance, we could copy the SSH service definition to use for our "example" service
definition like this. The filename minus the .xml suffix will dictate the name
of the service within the firewall services list:
sudo cp /usr/lib/firewalld/services/ssh.xml /etc/firewalld/services/ example .xml
Now, you can adjust the definition found in the file you copied:
sudo vi /etc/firewalld/services/example.xml
To start, the file will contain the SSH definition that you
copied:
/etc/firewalld/services/example.xml
<?xml version="1.0" encoding="utf-8"?>
<service>
  <short>SSH</short>
  <description>Secure Shell (SSH) is a protocol for logging into and executing commands on remote machines. It provides secure encrypted communications. If you plan on accessing your machine remotely via SSH over a firewalled interface, enable this option. You need the openssh-server package installed for this option to be useful.</description>
  <port protocol="tcp" port="22"/>
</service>
The majority of this definition is actually metadata. You will want to change the short
name for the service within the <short> tags. This is a human-readable
name for your service. You should also add a description so that you have more information if
you ever need to audit the service. The only configuration you need to make that actually
affects the functionality of the service will likely be the port definition where you
identify the port number and protocol you wish to open. This can be specified multiple
times.
For our "example" service, imagine that we need to open up port 7777 for TCP and 8888 for
UDP. By entering INSERT mode by pressing i , we can modify the existing
definition with something like this:
/etc/firewalld/services/example.xml
<?xml version="1.0" encoding="utf-8"?>
<service>
  <short>Example Service</short>
  <description>This is just an example service.  It probably shouldn't be used on a real system.</description>
  <port protocol="tcp" port="7777"/>
  <port protocol="udp" port="8888"/>
</service>
Press ESC , then enter :x to save and close the file.
Reload your firewall to get access to your new service:
sudo firewall-cmd --reload
You can see that it is now among the list of available services:
You can now use this service in your zones as you normally would.
Creating Your Own
Zones
While the predefined zones will probably be more than enough for most users, it can be
helpful to define your own zones that are more descriptive of their function.
For instance, you might want to create a zone for your web server, called "publicweb".
However, you might want to have another zone configured for the DNS service you provide on
your private network. You might want a zone called "privateDNS" for that.
When adding a zone, you must add it to the permanent firewall configuration. You can then
reload to bring the configuration into your running session. For instance, we could create
the two zones we discussed above by typing:
You can verify that these are present in your permanent configuration by typing:
sudo firewall-cmd --permanent --get-zones
output block dmz drop external home internal privateDNS public publicweb trusted work
As stated before, these won't be available in the current instance of the firewall
yet:
firewall-cmd --get-zones
output block dmz drop external home internal public trusted work
Reload the firewall to bring these new zones into the active configuration:
sudo firewall-cmd --reload
firewall-cmd --get-zones
output block dmz drop external home internal privateDNS public publicweb trusted work
Now, you can begin assigning the appropriate services and ports to your zones. It's
usually a good idea to adjust the active instance and then transfer those changes to the
permanent configuration after testing. For instance, for the "publicweb" zone, you might want
to add the SSH, HTTP, and HTTPS services:
At this point, you have the opportunity to test your configuration. If these values work
for you, you will want to add the same rules to the permanent configuration. You can do that
by re-applying the rules with the --permanent flag:
You have successfully set up your own zones! If you want to make one of these zones the
default for other interfaces, remember to configure that behavior with the
--set-default-zone= parameter:
sudo firewall-cmd --set-default-zone=publicweb
Conclusion
You should now have a fairly good understanding of how to administer the firewalld service
on your CentOS system for day-to-day use.
The firewalld service allows you to configure maintainable rules and rule-sets that take
into consideration your network environment. It allows you to seamlessly transition between
different firewall policies through the use of zones and gives administrators the ability to
abstract the port management into more friendly service definitions. Acquiring a working
knowledge of this system will allow you to take advantage of the flexibility and power that
this tool provides.
I would appreciate some assistance with configuring firewalld please. Here's a bit of
background. All I want to do is prevent all access- except whitelisted IP addresses to a web
application running on https.
I have done much googling. learnt a number of things but none has worked yet. Here's what
I have done:
I can tell firewalld is running
# systemctl status firewalld

firewalld.service - firewalld - dynamic     firewall daemon    Loaded: loaded
(/usr/lib/systemd/system/firewalld.service; enabled)    Active: active
(running)
also with
    # firewall-cmd --state
    running
I have the default zones
# firewall-cmd --get-zones
block dmz drop external home internal public trusted work
My active zones include:
# firewall-cmd --get-active-zones
public
sources: 192.72.0.193 192.72.0.0/22 94.27.256.190
My default zone is public:
# firewall-cmd --get-default-zone
public
The details of public are:
public (default)
interfaces:
sources: 192.72.0.193 192.72.0.0/22 94.27.256.190
services: http https ssh
ports:
masquerade: no
forward-ports:
icmp-blocks:
rich rules:
The Last but not LeastTechnology is dominated by
two types of people: those who understand what they do not manage and those who manage what they do not understand ~Archibald Putt.
Ph.D
FAIR USE NOTICEThis site contains
copyrighted material the use of which has not always been specifically
authorized by the copyright owner. We are making such material available
to advance understanding of computer science, IT technology, economic, scientific, and social
issues. We believe this constitutes a 'fair use' of any such
copyrighted material as provided by section 107 of the US Copyright Law according to which
such material can be distributed without profit exclusively for research and educational purposes.
This is a Spartan WHYFF (We Help You For Free)
site written by people for whom English is not a native language. Grammar and spelling errors should
be expected. The site contain some broken links as it develops like a living tree...
You can use PayPal to to buy a cup of coffee for authors
of this site
Disclaimer:
The statements, views and opinions presented on this web page are those of the author (or
referenced source) and are
not endorsed by, nor do they necessarily reflect, the opinions of the Softpanorama society.We do not warrant the correctness
of the information provided or its fitness for any purpose. The site uses AdSense so you need to be aware of Google privacy policy. You you do not want to be
tracked by Google please disable Javascript for this site. This site is perfectly usable without
Javascript.

mike 358 1 1 gold badge 2 2 silver badges 10 10 bronze badges add a comment 3 Answers Active Oldest Votes 26
Michael Hampton 202k 31 31 gold badges 395 395 silver badges 757 757 bronze badges
dawud 14.2k 3 3 gold badges 38 38 silver badges 59 59 bronze badges
Ranjeet Ranjan 129 1 1 bronze badge add a comment