NetworkManager is a dynamic network control and configuration system that attempts
to keep network devices and connections up and active when they are available. Useful manily for
laptops and other devices that hop from one netwrok to another.
NetworkManager
consists of a core daemon, a GNOME Notification Area applet that provides network status information,
and graphical configuration tools that can create, edit and remove connections and interfaces.
NetworkManager can be used to configure the following types of connections: Ethernet,
wireless, mobile broadband (such as cellular 3G), and DSL and PPPoE (Point-to-Point
over Ethernet).
In addition, NetworkManager allows for the configuration of network
aliases, static routes, DNS information and VPN connections, as well as many connection-specific parameters.
Finally, NetworkManager provides a rich API via D-Bus which allows applications to
query and control network configuration and state.
Previous versions of Red Hat Enterprise Linux included the Network Administration Tool,
which was commonly known as system-config-network after its command-line invocation.
In
Red Hat Enterprise Linux 6, NetworkManager replaces the former Network Administration
Tool while providing enhanced functionality, such as user-specific and mobile broadband configuration.
It is also possible to configure the network in Red Hat Enterprise Linux 6 by editing interface configuration
files;
NetworkManager may be installed by default on your version of Red Hat Enterprise Linux
if you select certain option during the installation such as workstation.
20210312 : How to Set a Static IP Address in CentOS Linux by an IP Address. Usually, IP addresses are dynamically assigned to a computer by a dedicated server called DHCP Server ( Dynamic Host Control Protocol ), and hence change from time to time as and when the connection is lost and reestablished. However, there are scenarios where a static IP address is more preferable; Eg. In large corporations, where it removes the load of using DHCP for each computer in the organization. Today, we will learn how to set a static IP address on a local network in CentOS . An IP ( Internet Protocol ) Address is a unique numerical representation of a computer on a network. Every computer connected to the Internet is identified by an IP Address. Usually, IP addresses are dynamically assigned to a computer by a dedicated server called DHCP Server ( Dynamic Host Control Protocol ), and hence change from time to time as and when the connection is lost and reestablished. However, there are scenarios where a static IP address is more preferable; Eg. In large corporations, where it removes the load of using DHCP for each computer in the organization. Today, we will learn how to set a static IP address on a local network in CentOS . Usually, IP addresses are dynamically assigned to a computer by a dedicated server called DHCP Server ( Dynamic Host Control Protocol ), and hence change from time to time as and when the connection is lost and reestablished. However, there are scenarios where a static IP address is more preferable; Eg. In large corporations, where it removes the load of using DHCP for each computer in the organization. Today, we will learn how to set a static IP address on a local network in CentOS . Usually, IP addresses are dynamically assigned to a computer by a dedicated server called DHCP Server ( Dynamic Host Control Protocol ), and hence change from time to time as and when the connection is lost and reestablished. However, there are scenarios where a static IP address is more preferable; Eg. In large corporations, where it removes the load of using DHCP for each computer in the organization. Today, we will learn how to set a static IP address on a local network in CentOS . However, there are scenarios where a static IP address is more preferable; Eg. In large corporations, where it removes the load of using DHCP for each computer in the organization. Today, we will learn how to set a static IP address on a local network in CentOS . However, there are scenarios where a static IP address is more preferable; Eg. In large corporations, where it removes the load of using DHCP for each computer in the organization. Today, we will learn how to set a static IP address on a local network in CentOS . Today, we will learn how to set a static IP address on a local network in CentOS . Today, we will learn how to set a static IP address on a local network in CentOS . List Network Interface Name A computer can be connected to one or more network interfaces, for example to a WiFi device and a LAN device, which has different IP addresses for each interface. Run the following command to show the interface names. A computer can be connected to one or more network interfaces, for example to a WiFi device and a LAN device, which has different IP addresses for each interface. Run the following command to show the interface names. Run the following command to show the interface names. Run the following command to show the interface names.
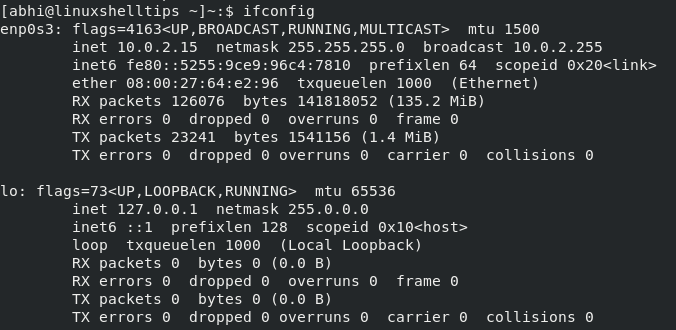
# ifconfig OR # ip addr
List Network Interface Names The interface ' enp0s3 ' is the LAN device connected to my computer and the IP Address is ' 10.0.2.15 '. The other interface ' lo ' ( Loopback ) which is nothing but the local network of the computer within itself. Thus my computer is only connected to one interface, ' enp0s3 '. The interface ' enp0s3 ' is the LAN device connected to my computer and the IP Address is ' 10.0.2.15 '. The other interface ' lo ' ( Loopback ) which is nothing but the local network of the computer within itself. Thus my computer is only connected to one interface, ' enp0s3 '. Configuring Static IP Address in CentOS Go to directory ' /etc/sysconfig/network-scripts ' and list the files; you should see a file corresponding to your network interface. Go to directory ' /etc/sysconfig/network-scripts ' and list the files; you should see a file corresponding to your network interface.
$ cd /etc/sysconfig/network-scripts $ ls
List Network Interface Files Open the file 'ifcfg-enp0s3' using ' Open the file 'ifcfg-enp0s3' using ' Vim ' or any editor of your choice. Set the following values for the variables. Change the values according to the IP address and subnet that you need to set. Set the following values for the variables. Change the values according to the IP address and subnet that you need to set. Set the following values for the variables. Change the values according to the IP address and subnet that you need to set. Set IP Address in CentOS Save and exit the file. Restart the networking service with the following commands: Save and exit the file. Restart the networking service with the following commands:
# nmcli networking off # nmcli networking on
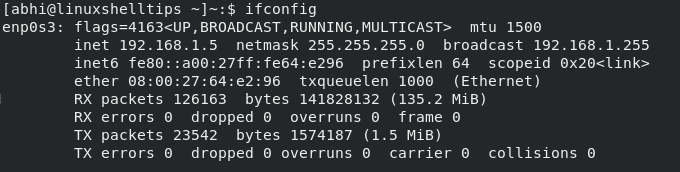
Finally, run ' ifconfig ' again to verify if static IP has been set. Finally, run ' ifconfig ' again to verify if static IP has been set.
I had a client who was losing network connectivity intermittently recently and it turns out they needed to increase the high limit
for network connections. Centos7 has some variable name changes from previous versions so here are some helpful tips on how to increase
the limits.
In older Centos you might have seen these error messages:
ip_conntrack version 2.4 (8192 buckets, 65536 max) – 304 bytes per conntrack
To make it permanent after reboot, please add these values to the /etc/sysctl.conf
net.ipv4.netfilter.ip_conntrack_max=196608
Hope this helps!
Tags
[Mar 12, 2021] How to Set a Static IP Address in CentOS Linux by an IP Address. Usually, IP addresses are dynamically assigned to a computer by a dedicated server called DHCP Server ( Dynamic Host Control Protocol ), and hence change from time to time as and when the connection is lost and reestablished. However, there are scenarios where a static IP address is more preferable; Eg. In large corporations, where it removes the load of using DHCP for each computer in the organization. Today, we will learn how to set a static IP address on a local network in CentOS . An IP ( Internet Protocol ) Address is a unique numerical representation of a computer on a network. Every computer connected to the Internet is identified by an IP Address. Usually, IP addresses are dynamically assigned to a computer by a dedicated server called DHCP Server ( Dynamic Host Control Protocol ), and hence change from time to time as and when the connection is lost and reestablished. However, there are scenarios where a static IP address is more preferable; Eg. In large corporations, where it removes the load of using DHCP for each computer in the organization. Today, we will learn how to set a static IP address on a local network in CentOS . Usually, IP addresses are dynamically assigned to a computer by a dedicated server called DHCP Server ( Dynamic Host Control Protocol ), and hence change from time to time as and when the connection is lost and reestablished. However, there are scenarios where a static IP address is more preferable; Eg. In large corporations, where it removes the load of using DHCP for each computer in the organization. Today, we will learn how to set a static IP address on a local network in CentOS . Usually, IP addresses are dynamically assigned to a computer by a dedicated server called DHCP Server ( Dynamic Host Control Protocol ), and hence change from time to time as and when the connection is lost and reestablished. However, there are scenarios where a static IP address is more preferable; Eg. In large corporations, where it removes the load of using DHCP for each computer in the organization. Today, we will learn how to set a static IP address on a local network in CentOS . However, there are scenarios where a static IP address is more preferable; Eg. In large corporations, where it removes the load of using DHCP for each computer in the organization. Today, we will learn how to set a static IP address on a local network in CentOS . However, there are scenarios where a static IP address is more preferable; Eg. In large corporations, where it removes the load of using DHCP for each computer in the organization. Today, we will learn how to set a static IP address on a local network in CentOS . Today, we will learn how to set a static IP address on a local network in CentOS . Today, we will learn how to set a static IP address on a local network in CentOS . List Network Interface Name A computer can be connected to one or more network interfaces, for example to a WiFi device and a LAN device, which has different IP addresses for each interface. Run the following command to show the interface names. A computer can be connected to one or more network interfaces, for example to a WiFi device and a LAN device, which has different IP addresses for each interface. Run the following command to show the interface names. Run the following command to show the interface names. Run the following command to show the interface names.
# ifconfig OR # ip addr
List Network Interface Names The interface ' enp0s3 ' is the LAN device connected to my computer and the IP Address is ' 10.0.2.15 '. The other interface ' lo ' ( Loopback ) which is nothing but the local network of the computer within itself. Thus my computer is only connected to one interface, ' enp0s3 '. The interface ' enp0s3 ' is the LAN device connected to my computer and the IP Address is ' 10.0.2.15 '. The other interface ' lo ' ( Loopback ) which is nothing but the local network of the computer within itself. Thus my computer is only connected to one interface, ' enp0s3 '. Configuring Static IP Address in CentOS Go to directory ' /etc/sysconfig/network-scripts ' and list the files; you should see a file corresponding to your network interface. Go to directory ' /etc/sysconfig/network-scripts ' and list the files; you should see a file corresponding to your network interface.
$ cd /etc/sysconfig/network-scripts $ ls
List Network Interface Files Open the file 'ifcfg-enp0s3' using ' Open the file 'ifcfg-enp0s3' using ' Vim ' or any editor of your choice. Set the following values for the variables. Change the values according to the IP address and subnet that you need to set. Set the following values for the variables. Change the values according to the IP address and subnet that you need to set. Set the following values for the variables. Change the values according to the IP address and subnet that you need to set. Set IP Address in CentOS Save and exit the file. Restart the networking service with the following commands: Save and exit the file. Restart the networking service with the following commands:
# nmcli networking off # nmcli networking on
Finally, run ' ifconfig ' again to verify if static IP has been set. Finally, run ' ifconfig ' again to verify if static IP has been set.
In this
article, we saw an easy way to set an IP address in CentOS. The example, in this case, is a static IP on the local network,
i.e., it is not a static public IP over the Internet.
To set a
static public IP address over the Internet, you need to purchase the IP Address and configure it in the file as shown above,
along with other details like DNS server, network prefix, which will be provided by your Internet Service Provider.
Thanks a lot for reading and let us know your thoughts in the comments
below!
IP Aliasing : Assigning multiple IP addresses to single NIC
by Shusain ·
Published April 3, 2019 · Updated April 4, 2019
In this tutorial, we are going to
learn to assign multiple IP addresses to a single NIC (Network Interface Card). This process of
assigning multiple addresses to a single network interface is called IP aliasing.
Main advantage of using IP aliasing is that we don't need multiple NICs to configure
multiple IPs, hence saving us cost & configuration time. IP aliasing is most useful when
using Apache IP based virtual hosting.
For this tutorial, we are going to use RHEL/CentOS 7 but the same process can also be used
older versions of RHEL/CentOS, the only change being the name of the network interfaces other
than that process is same.
Network interfaces files in RHEL/CentOS 7(on older versions as well) are located at '
/etc/sysconfig/network-scripts ' & name of the interfaces are usually ' ifcfg-en0sX ',
where ' X ' is the number of the interface. In my case, its ' ifcfg-en0s0' . So we will be
using the same for the purpose of this tutorial.
Using Network Manager
We will be using a tool called 'nmtui' for this method. NMTUI is command line based user
interface for Network Manager & even works for the system that does not have GUI installed.
Open terminal & enter the command,
Click on 'Edit a connection', & then select the network interface from the list of
interfaces & press ENTER key,
<img
src="https://i1.wp.com/linuxtechlab.com/wp-content/uploads/2019/04/IP-Alias-2.png?resize=795%2C618&ssl=1"
alt="IP aliasing" width="795" height="618"
srcset="https://i1.wp.com/linuxtechlab.com/wp-content/uploads/2019/04/IP-Alias-2.png?w=795&ssl=1
795w,
https://i1.wp.com/linuxtechlab.com/wp-content/uploads/2019/04/IP-Alias-2.png?resize=768%2C597&ssl=1
768w" sizes="(max-width: 795px) 100vw, 795px" data-recalc-dims="1" />
Now we add the required number of IP address here & once done, we can click on 'OK' &
then exit from the nmtui menu. Restart the NetworkManager service & we will have our IP
aliasing ready.
Manual Method
For this method, we will manually create the necessary files needed. We will assign two
different IPs in addition to the one we have already assigned to our interface '
ifcfg-en0s0' . To create IP alias, we are going to use our default network interface
file & then will create two copies of the file with names 'ifcfg-en0s0:1 ' &
'ifcfg-en0s0:2'
Move your dotfiles to version controlBack up or sync your custom configurations
across your systems by sharing dotfiles on GitLab or GitHub. 20 Mar 2019 Matthew Broberg (Red Hat)Feed 11
up4
comments x Get the newsletter
Join the 85,000 open source advocates who receive our giveaway alerts and article
roundups.
What a Shell Dotfile Can Do For
You , H. "Waldo" Grunenwald goes into excellent detail about the why and how of setting
up your dotfiles. Let's dig into the why and how of sharing them. What's a dotfile?
"Dotfiles" is a common term for all the configuration files we have floating around our
machines. These files usually start with a . at the beginning of the filename, like .gitconfig
, and operating systems often hide them by default. For example, when I use ls -a on MacOS, it
shows all the lovely dotfiles that would otherwise not be in the output.
dotfiles on
master
➜ ls
README.md Rakefile bin misc profiles zsh-custom
dotfiles on master
➜ ls -a
. .gitignore .oh-my-zsh README.md zsh-custom
.. .gitmodules .tmux Rakefile
.gemrc .global_ignore .vimrc bin
.git .gvimrc .zlogin misc
.gitconfig .maid .zshrc profiles
If I take a look at one, .gitconfig , which I use for Git configuration, I see a ton of
customization. I have account information, terminal color preferences, and tons of aliases that
make my command-line interface feel like mine. Here's a snippet from the [alias] block:
87 #
Show the diff between the latest commit and the current state
88 d = !"git diff-index --quiet HEAD -- || clear; git --no-pager diff --patch-with-stat"
89
90 # `git di $number` shows the diff between the state `$number` revisions ago and the current
state
91 di = !"d() { git diff --patch-with-stat HEAD~$1; }; git diff-index --quiet HEAD -- || clear;
d"
92
93 # Pull in remote changes for the current repository and all its submodules
94 p = !"git pull; git submodule foreach git pull origin master"
95
96 # Checkout a pull request from origin (of a github repository)
97 pr = !"pr() { git fetch origin pull/$1/head:pr-$1; git checkout pr-$1; }; pr"
Since my .gitconfig has over 200 lines of customization, I have no interest in rewriting it
on every new computer or system I use, and either does anyone else. This is one reason sharing
dotfiles has become more and more popular, especially with the rise of the social coding site
GitHub. The canonical article advocating for sharing dotfiles is Zach Holman's Dotfiles Are
Meant to Be Forked from 2008. The premise is true to this day: I want to share them, with
myself, with those new to dotfiles, and with those who have taught me so much by sharing their
customizations.
Sharing dotfiles
Many of us have multiple systems or know hard drives are fickle enough that we want to back
up our carefully curated customizations. How do we keep these wonderful files in sync across
environments?
My favorite answer is distributed version control, preferably a service that will handle the
heavy lifting for me. I regularly use GitHub and continue to enjoy GitLab as I get more
experienced with it. Either one is a perfect place to share your information. To set yourself
up:
Sign into your preferred Git-based service.
Create a repository called "dotfiles." (Make it public! Sharing is caring.)
Step 4 above is the crux of this effort and can be a bit tricky. Whether you use a script or
do it by hand, the workflow is to symlink from your dotfiles folder to the dotfiles destination
so that any updates to your dotfiles are easily pushed to the remote repository. To do this for
my .gitconfig file, I would enter:
The flags added to the symlinking command offer a few additional benefits:
-s creates a symbolic link instead of a hard link
-f continues with other symlinking when an error occurs (not needed here, but useful in
loops)
-n avoids symlinking a symlink (same as -h for other versions of ln )
You can review the IEEE and Open Group specification of ln and
the version on MacOS
10.14.3 if you want to dig deeper into the available parameters. I had to look up these
flags since I pulled them from someone else's dotfiles.
You can also make updating simpler with a little additional code, like the Rakefile I
forked from Brad Parbs .
Alternatively, you can keep it incredibly simple, as Jeff Geerling does in his dotfiles . He symlinks files using
this Ansible
playbook . Keeping everything in sync at this point is easy: you can cron job or
occasionally git push from your dotfiles folder.
Quick aside: What not to share
Before we move on, it is worth noting what you should not add to a shared dotfile
repository -- even if it starts with a dot. Anything that is a security risk, like files in
your .ssh/ folder, is not a good choice to share using this method. Be sure to double-check
your configuration files before publishing them online and triple-check that no API tokens are
in your files.
There are other incredible resources to help you get started with dotfiles. Years ago, I
came across dotfiles.github.io and
continue to go back to it for a broader look at what people are doing. There is a lot of tribal
knowledge hidden in other people's dotfiles. Take the time to scroll through some and don't be
shy about adding them to your own.
I hope this will get you started on the joy of having consistent dotfiles across your
computers.
What's your favorite dotfile trick? Add a comment or tweet me @mbbroberg . TopicsGitGitHubGitLabAbout the author
Matthew Broberg - Matt loves working with technology communities to develop products and
content that invite delightful engagement. He's a serial podcaster, best known for the
Geek Whisperers podcast , is on the
board of the Influence
Marketing Council , co-maintains the DevRel Collective , and often shares his thoughts on
Twitter and GitHub ... More
about me
See also the rcm suite for managing dotfiles from a central location. This provides the
subdirectory from which you can put your dotfiles into revision control.
An interesting article, Matt, thanks! I was glad to see "what not to share".
While most of my dot files hold no secrets, as you note some do - .ssh, .gnupg,
.local/share among others... could be some others. Thinking about this, my dot files are kind
of like my sock drawer - plenty of serviceable socks there, not sure I would want to share
them! Anyway a neat idea.
If you own a Raspberry Pi, chances are you may already have experimented with physical
computing -- writing code to interact with the real, physical world, like blinking some LEDs or
controlling a servo motor .
You may also have used GPIO Zero , a Python library that provides a
simple interface to GPIO devices from Raspberry Pi with a friendly Python API. GPIO Zero is
developed by Opensource.com community
moderator Ben Nuttall
.
I am working on rust_gpiozero , a port of the awesome GPIO Zero
library that uses the Rust programming language. It is still a work in progress, but it already
includes some useful components.
Rust is a systems programming
language developed at Mozilla. It is focused on performance, reliability, and productivity. The
Rust website has great resources
if you'd like to learn more about it.
Getting started
Before starting with rust_gpiozero, it's smart to have a basic grasp of the Rust programming
language. I recommend working through at least the first three chapters in The Rust Programming Language book.
I recommend installing
Rust on your Raspberry Pi using rustup .
Alternatively, you can set up a cross-compilation environment using cross (which works only on an x86_64 Linux host)
or
this how-to .
After you've installed Rust, create a new Rust project by entering:
Virtual filesystems in Linux: Why we need them and how they work
Virtual filesystems are the magic abstraction that makes the "everything is a file" philosophy of
Linux possible.
08 Mar 2019
Alison Chaiken
Feed
18
up
6 comments
x
Get the newsletter
Join the 85,000 open source advocates who receive our
giveaway alerts and article roundups.
Robert Love
, "A filesystem is a hierarchical storage of data adhering to a specific structure."
However, this description applies equally well to VFAT (Virtual File Allocation Table), Git, and
Cassandra
(a
NoSQL database
). So what
distinguishes a filesystem?
Filesystem basics
The Linux kernel requires that for an entity to be a filesystem, it must also implement the
open()
,
read()
, and
write()
methods on persistent objects
that have names associated with them. From the point of view of
object-oriented programming
, the kernel
treats the generic filesystem as an abstract interface, and these big-three functions are "virtual,"
with no default definition. Accordingly, the kernel's default filesystem implementation is called a
virtual filesystem (VFS).
If
we can open(), read(), and write(), it is a file as this console session shows.
VFS underlies the famous observation that in Unix-like systems "everything is a file." Consider how
weird it is that the tiny demo above featuring the character device
/dev/console
actually
works. The image shows an interactive Bash session on a virtual teletype (tty). Sending a string into
the virtual console device makes it appear on the virtual screen. VFS has other, even odder
properties. For example, it's
possible to
seek in them
.
The familiar filesystems like ext4, NFS, and /proc all provide definitions of the big-three functions
in a C-language data structure called
file_operations
. In addition, particular filesystems extend and override the VFS functions in the
familiar object-oriented way. As Robert Love points out, the abstraction of VFS enables Linux users to
blithely copy files to and from foreign operating systems or abstract entities like pipes without
worrying about their internal data format. On behalf of userspace, via a system call, a process can
copy from a file into the kernel's data structures with the read() method of one filesystem, then use
the write() method of another kind of filesystem to output the data.
The function definitions that belong to the VFS base type itself are found in the
fs/*.c files
in kernel source, while the subdirectories of fs/ contain the specific filesystems.
The kernel also contains filesystem-like entities such as cgroups, /dev, and tmpfs, which are needed
early in the boot process and are therefore defined in the kernel's init/ subdirectory. Note that
cgroups, /dev, and tmpfs do not call the file_operations big-three functions, but directly read from
and write to memory instead.
The diagram below roughly illustrates how userspace accesses various types of filesystems commonly
mounted on Linux systems. Not shown are constructs like pipes, dmesg, and POSIX clocks that also
implement struct file_operations and whose accesses therefore pass through the VFS layer.
VFS
are a "shim layer" between system calls and implementors of specific file_operations like ext4 and
procfs
. The file_operations functions can then communicate either with device-specific drivers or
with memory accessors.
tmpfs
,
devtmpfs
and
cgroups
don't make use of file_operations but access memory directly.
VFS's existence promotes code reuse, as the basic methods associated with filesystems need not be
re-implemented by every filesystem type. Code reuse is a widely accepted software engineering best
practice! Alas, if the reused code
introduces serious bugs
, then all the implementations that inherit the common methods suffer from
them.
/tmp: A simple tip
An easy way to find out what VFSes are present on a system is to type
mount | grep -v sd |
grep -v :/
, which will list all mounted filesystems that are not resident on a disk and not
NFS on most computers. One of the listed VFS mounts will assuredly be /tmp, right?
Why is keeping /tmp on storage
inadvisable? Because the files in /tmp are temporary(!), and storage devices are slower than memory,
where tmpfs are created. Further, physical devices are more subject to wear from frequent writing than
memory is. Last, files in /tmp may contain sensitive information, so having them disappear at every
reboot is a feature.
Unfortunately, installation scripts for some Linux distros still create /tmp on a storage device by
default. Do not despair should this be the case with your system. Follow simple instructions on the
always excellent
Arch Wiki
to
fix the problem, keeping in mind that memory allocated to tmpfs is not available for other purposes.
In other words, a system with a gigantic tmpfs with large files in it can run out of memory and crash.
Another tip: when editing the /etc/fstab file, be sure to end it with a newline, as your system will
not boot otherwise. (Guess how I know.)
/proc and /sys
Besides /tmp, the VFSes with which most Linux users are most familiar are /proc and /sys. (/dev
relies on shared memory and has no file_operations). Why two flavors? Let's have a look in more
detail.
The procfs offers a snapshot into the instantaneous state of the kernel and the processes that it
controls for userspace. In /proc, the kernel publishes information about the facilities it provides,
like interrupts, virtual memory, and the scheduler. In addition, /proc/sys is where the settings that
are configurable via the
sysctl command
are accessible to userspace. Status and statistics on individual processes are
reported in /proc/<PID> directories.
/proc/
meminfo
is an empty file that nonetheless contains valuable information.
The
behavior of /proc files illustrates how unlike on-disk filesystems VFS can be. On the one hand,
/proc/meminfo contains the information presented by the command
free
. On the other
hand, it's also empty! How can this be? The situation is reminiscent of a famous article written by
Cornell University physicist N. David Mermin in 1985 called "
Is
the moon there when nobody looks?
Reality and the quantum theory." The truth is that the kernel
gathers statistics about memory when a process requests them from /proc, and there actually
is
nothing in the files in /proc when no one is looking. As
Mermin said
, "It is a
fundamental quantum doctrine that a measurement does not, in general, reveal a preexisting value of
the measured property." (The answer to the question about the moon is left as an exercise.)
The
files in /proc are empty when no process accesses them. (
Source
)
The apparent emptiness of procfs makes sense, as the information available there is dynamic. The
situation with sysfs is different. Let's compare how many files of at least one byte in size there are
in /proc versus /sys.
Procfs has precisely one, namely the exported kernel configuration, which is an exception since it
needs to be generated only once per boot. On the other hand, /sys has lots of larger files, most of
which comprise one page of memory. Typically, sysfs files contain exactly one number or string, in
contrast to the tables of information produced by reading files like /proc/meminfo.
The purpose of sysfs is to expose the readable and writable properties of what the kernel calls
"kobjects" to userspace. The only purpose of kobjects is reference-counting: when the last reference
to a kobject is deleted, the system will reclaim the resources associated with it. Yet, /sys
constitutes most of the kernel's famous "
stable
ABI to userspace
" which
no one may
ever, under any circumstances, "break."
That doesn't mean the files in sysfs are static, which
would be contrary to reference-counting of volatile objects.
The kernel's stable ABI instead constrains what
can
appear in /sys, not what is actually
present at any given instant. Listing the permissions on files in sysfs gives an idea of how the
configurable, tunable parameters of devices, modules, filesystems, etc. can be set or read. Logic
compels the conclusion that procfs is also part of the kernel's stable ABI, although the kernel's
documentation
doesn't state so explicitly.
Files
in
sysfs
describe exactly one property each for an entity and may be readable, writable or both. The
"0" in the file reveals that the SSD is not removable.
Snooping on VFS with eBPF and bcc tools
The easiest way to learn how the kernel manages sysfs files is to watch it in action, and the
simplest way to watch on ARM64 or x86_64 is to use eBPF. eBPF (extended Berkeley Packet Filter)
consists of a
virtual machine running inside the kernel
that privileged users can query from the command line.
Kernel source tells the reader what the kernel
can
do; running eBPF tools on a booted system
shows instead what the kernel actually
does
.
Happily, getting started with eBPF is pretty easy via the
bcc
tools, which are available as
packages from major
Linux distros
and have been
amply
documented
by Brendan Gregg. The bcc tools are Python scripts with small embedded snippets of C,
meaning anyone who is comfortable with either language can readily modify them. At this count,
there are 80 Python scripts
in bcc/tools
, making it highly likely that a system administrator or developer will find an
existing one relevant to her/his needs.
To get a very crude idea about what work VFSes are performing on a running system, try the simple
vfscount
or
vfsstat
, which show that dozens of calls to vfs_open() and its friends occur every second.
vfsstat.py
is a Python script with an embedded C snippet that simply counts VFS function calls.
For a less trivial example, let's watch what happens in sysfs when a USB stick is inserted on a
running system.
Watch
with eBPF what happens in /sys when a USB stick is inserted, with simple and complex examples.
In the first simple example above, the
trace.py
bcc tools script prints out a message whenever the sysfs_create_files() command runs. We see that
sysfs_create_files() was started by a kworker thread in response to the USB stick insertion, but what
file was created? The second example illustrates the full power of eBPF. Here, trace.py is printing
the kernel backtrace (-K option) plus the name of the file created by sysfs_create_files(). The
snippet inside the single quotes is some C source code, including an easily recognizable format
string, that the provided Python script
induces a LLVM just-in-time compiler
to compile and execute inside an in-kernel virtual machine.
The full sysfs_create_files() function signature must be reproduced in the second command so that the
format string can refer to one of the parameters. Making mistakes in this C snippet results in
recognizable C-compiler errors. For example, if the
-I
parameter is omitted, the
result is "Failed to compile BPF text." Developers who are conversant with either C or Python will
find the bcc tools easy to extend and modify.
When the USB stick is inserted, the kernel backtrace appears showing that PID 7711 is a kworker
thread that created a file called "events" in sysfs. A corresponding invocation with
sysfs_remove_files() shows that removal of the USB stick results in removal of the events file, in
keeping with the idea of reference counting. Watching sysfs_create_link() with eBPF during USB stick
insertion (not shown) reveals that no fewer than 48 symbolic links are created.
What is the purpose of the events file anyway? Using
cscope
to find the function
__device_add_disk()
reveals that it calls disk_add_events(), and either "media_change" or
"eject_request" may be written to the events file. Here, the kernel's block layer is informing
userspace about the appearance and disappearance of the "disk." Consider how quickly informative this
method of investigating how USB stick insertion works is compared to trying to figure out the process
solely from the source.
Read-only root filesystems make
embedded devices possible
Assuredly, no one shuts down a server or desktop system by pulling out the power plug. Why? Because
mounted filesystems on the physical storage devices may have pending writes, and the data structures
that record their state may become out of sync with what is written on the storage. When that happens,
system owners will have to wait at next boot for the
fsck
filesystem-recovery tool
to run and, in the worst case, will actually lose data.
Yet, aficionados will have heard that many IoT and embedded devices like routers, thermostats, and
automobiles now run Linux. Many of these devices almost entirely lack a user interface, and there's no
way to "unboot" them cleanly. Consider jump-starting a car with a dead battery where the power to the
Linux-running head unit
goes up and down repeatedly. How is it that the system boots without a
long fsck when the engine finally starts running? The answer is that embedded devices rely on
a read-only root
fileystem
(ro-rootfs for short).
ro-rootfs
are why embedded systems don't frequently need to fsck. Credit (with permission):
https://tinyurl.com/yxoauoub
A
ro-rootfs offers many advantages that are less obvious than incorruptibility. One is that malware
cannot write to /usr or /lib if no Linux process can write there. Another is that a largely immutable
filesystem is critical for field support of remote devices, as support personnel possess local systems
that are nominally identical to those in the field. Perhaps the most important (but also most subtle)
advantage is that ro-rootfs forces developers to decide during a project's design phase which system
objects will be immutable. Dealing with ro-rootfs may often be inconvenient or even painful, as
const variables in
programming languages
often are, but the benefits easily repay the extra overhead.
Creating a read-only rootfs does require some additional amount of effort for embedded developers,
and that's where VFS comes in. Linux needs files in /var to be writable, and in addition, many popular
applications that embedded systems run will try to create configuration dot-files in $HOME. One
solution for configuration files in the home directory is typically to pregenerate them and build them
into the rootfs. For /var, one approach is to mount it on a separate writable partition while / itself
is mounted as read-only. Using bind or overlay mounts is another popular alternative.
Bind and overlay mounts and their use by
containers
Running
man
mount
is the best place to learn about bind and overlay mounts, which give embedded
developers and system administrators the power to create a filesystem in one path location and then
provide it to applications at a second one. For embedded systems, the implication is that it's
possible to store the files in /var on an unwritable flash device but overlay- or bind-mount a path in
a tmpfs onto the /var path at boot so that applications can scrawl there to their heart's delight. At
next power-on, the changes in /var will be gone. Overlay mounts provide a union between the tmpfs and
the underlying filesystem and allow apparent modification to an existing file in a ro-rootfs, while
bind mounts can make new empty tmpfs directories show up as writable at ro-rootfs paths. While
overlayfs is a proper filesystem type, bind mounts are implemented by the
VFS namespace facility
.
Based on the description of overlay and bind mounts, no one will be surprised that
Linux containers
make heavy use of them. Let's spy on what happens when we employ
systemd-nspawn
to start up a container by running bcc's mountsnoop tool:
The
system-
nspawn
invocation fires up the container while mountsnoop.py runs.
And let's see
what happened:
Running
mountsnoop
during the container "boot" reveals that the container runtime relies heavily on bind
mounts. (Only the beginning of the lengthy output is displayed)
Here,
systemd-nspawn is providing selected files in the host's procfs and sysfs to the container at paths in
its rootfs. Besides the MS_BIND flag that sets bind-mounting, some of the other flags that the "mount"
system call invokes determine the relationship between changes in the host namespace and in the
container. For example, the bind-mount can either propagate changes in /proc and /sys to the
container, or hide them, depending on the invocation.
Summary
Understanding Linux internals can seem an impossible task, as the kernel itself contains a gigantic
amount of code, leaving aside Linux userspace applications and the system-call interface in C
libraries like glibc. One way to make progress is to read the source code of one kernel subsystem with
an emphasis on understanding the userspace-facing system calls and headers plus major kernel internal
interfaces, exemplified here by the file_operations table. The file operations are what makes
"everything is a file" actually work, so getting a handle on them is particularly satisfying. The
kernel C source files in the top-level fs/ directory constitute its implementation of virtual
filesystems, which are the shim layer that enables broad and relatively straightforward
interoperability of popular filesystems and storage devices. Bind and overlay mounts via Linux
namespaces are the VFS magic that makes containers and read-only root filesystems possible. In
combination with a study of source code, the eBPF kernel facility and its bcc interface makes probing
the kernel simpler than ever before.
Many years ago while I was still a Wind*ws user, I tried the same thing. It was a total failure,
so I ditched that idea. Now reading your article, my first thought was "this is not going to..."
and then I realized that indeed it would work! I'm such a chump. Thank you for your article!
The idea of virtual filesystems appears to originate in a 1986 USENIX paper called "Vnodes:
An Architecture for Multiple File System Types in Sun UNIX." You can find it at
Figure 1 looks remarkably like one of the diagrams I made. I thank my co-worker Sam Cramer
for pointing this out. You can find the figure in the slides that accompany the talk at
http://she-devel.com/ChaikenSCALE2019.pdf
Alison, this presentation at SCaLE 17x was my favorite over all 4 days and 15 sessions! Awesome
lecture and live demos. I learned an incredible amount, even as a Linux kernel noob. Really
appreciate the bcc/eBPF demo as well - it was really encouraging to see how easy it is to get
started.
So grateful that you also created this blog post... the recording from SCaLE was totally
botched! Ugh.
Cat can also number a file's lines during output. There are two commands to do this, as shown in the help documentation: -b, --number-nonblank
number nonempty output lines, overrides -n
-n, --number number all output lines
If I use the -b command with the hello.world file, the output will be numbered like this:
   $ cat -b hello.world
   1 Hello World !
In the example above, there is an empty line. We can determine why this empty line appears by using the -n argument:
$ cat -n hello.world
   1 Hello World !
   2
   $
Now we see that there is an extra empty line. These two arguments are operating on the final output rather than the file contents,
so if we were to use the -n option with both files, numbering will count lines as follows:
   $ cat -n hello.world goodbye.world
   1 Hello World !
   2
   3 Good Bye World !
   4
   $
One other option that can be useful is -s for squeeze-blank . This argument tells cat to reduce repeated empty line output
down to one line. This is helpful when reviewing files that have a lot of empty lines, because it effectively fits more text on the
screen. Suppose I have a file with three lines that are spaced apart by several empty lines, such as in this example, greetings.world
:
   $ cat greetings.world
   Greetings World !

   Take me to your Leader !

   We Come in Peace !
   $
Using the -s option saves screen space:
$ cat -s greetings.world
Cat is often used to copy contents of one file to another file. You may be asking, "Why not just use cp ?" Here is how I could
create a new file, called both.files , that contains the contents of the hello and goodbye files:
$ cat hello.world goodbye.world > both.files
$ cat both.files
Hello World !
Good Bye World !
$
zcat
There is another variation on the cat command known as zcat . This command is capable of displaying files that have been compressed
with Gzip without needing to uncompress the files with the gunzip
command. As an aside, this also preserves disk space, which is the entire reason files are compressed!
The zcat command is a bit more exciting because it can be a huge time saver for system administrators who spend a lot of time
reviewing system log files. Where can we find compressed log files? Take a look at /var/log on most Linux systems. On my system,
/var/log contains several files, such as syslog.2.gz and syslog.3.gz . These files are the result of the log
management system, which rotates and compresses log files to save disk space and prevent logs from growing to unmanageable file sizes.
Without zcat , I would have to uncompress these files with the gunzip command before viewing them. Thankfully, I can use zcat :
$ cd / var / log
$ ls * .gz
syslog.2.gz syslog.3.gz
$
$ zcat syslog.2.gz | more
Jan 30 00:02: 26 workstation systemd [ 1850 ] : Starting GNOME Terminal Server...
Jan 30 00:02: 26 workstation dbus-daemon [ 1920 ] : [ session uid = 2112 pid = 1920 ] Successful
ly activated service 'org.gnome.Terminal'
Jan 30 00:02: 26 workstation systemd [ 1850 ] : Started GNOME Terminal Server.
Jan 30 00:02: 26 workstation org.gnome.Terminal.desktop [ 2059 ] : # watch_fast: "/org/gno
me / terminal / legacy / " (establishing: 0, active: 0)
Jan 30 00:02:26 workstation org.gnome.Terminal.desktop[2059]: # unwatch_fast: " / org / g
nome / terminal / legacy / " (active: 0, establishing: 1)
Jan 30 00:02:26 workstation org.gnome.Terminal.desktop[2059]: # watch_established: " /
org / gnome / terminal / legacy / " (establishing: 0)
--More--
We can also pass both files to zcat if we want to review both of them uninterrupted. Due to how log rotation works, you need to
pass the filenames in reverse order to preserve the chronological order of the log contents:
$ ls -l * .gz
-rw-r----- 1 syslog adm 196383 Jan 31 00:00 syslog.2.gz
-rw-r----- 1 syslog adm 1137176 Jan 30 00:00 syslog.3.gz
$ zcat syslog.3.gz syslog.2.gz | more
The cat command seems simple but is very useful. I use it regularly. You also don't need to feed or pet it like a real cat. As
always, I suggest you review the man pages ( man cat ) for the cat and zcat commands to learn more about how it can be used. You
can also use the --help argument for a quick synopsis of command line arguments.
Interesting article but please don't misuse cat to pipe to more......
I am trying to teach people to use less pipes and here you go abusing cat to pipe to other commands. IMHO, 99.9% of the time
this is not necessary!
In stead of "cat file | command" most of the time, you can use "command file" (yes, I am an old dinosaur
from a time where memory was very expensive and forking multiple commands could fill it all up)
The following steps will disable NetworkManager service and allows the interface to be
managed only by network service.
1. To check which are the interfaces managed by NetworkManager
# nmcli device status
This displays a table that lists all network interfaces along with their STATE. If Network
Manager is not controlling an interface, its STATE will be listed as unmanaged . Any other
value indicates the interface is under Network Manager control.
2. Stop the NetworkManager service:
# systemctl stop NetworkManager
3. Disable the service permanently:
# systemctl disable NetworkManager
4. To confirm the NetworkManager service has been disabled
# systemctl list-unit-files | grep NetworkManager
5. Add the below parameter in /etc/sysconfig/network-scripts/ifcfg-ethX of interfaces that
are managed by NetworkManager to make it unmanaged.
NM_CONTROLLED="no"
Note: Be sure to change the NM_CONTROLLED="yes" to " no " or the network service may complain
about "Connection activation failed" when it cannot find an interface to start Switching to
"network" service
When the NetworkManager is disabled, the interface can be configured for use with the
network service. Follow the steps below to configure and interface using network services.
1. Set the IP address in the configuration file: /etc/sysconfig/network-scripts/ifcfg-eth0.
Set the NM_CONTROLLED value to no and assign a static IP address in the file.
NetworkManager is by far the most common auto-configuration tool for the entire networking stack including DNS resolution. It's
responsible for /etc/resolv.conf on many popular distribution including Debian and Fedora. After you've disable other programs that
manages resolv.conf, you may also discover that NetworkManager will jump in to fill the job -- as happens on Ubuntu 16.10 and later.
Set the dns option in the main configuration section to none to disable DNS handling in NetworkManager. The below commands sets
this option in a new conf.d/no-dns.conf configuration file, restarts the NetworkManager service, and deletes the NetworkManager-generated
resolv.conf file.
If you discover that NetworkManager is still managing your resolv.conf, then you may have a configuration conflict (usually caused
by dnsmasq). Recursively search through your NetworkManager configuration to discover any conflicts.
grep -ir /etc/NetworkManager/
Refer to the last section of this article for instructions on recreating a /etc/resolv.conf file with manual configuration
My personal favorite is to use line supersede domain-name-servers in
/etc/dhcp/dhclient.conf . No matter what dns access point provides , your ubuntu
will always use those dns specified in dhclient.conf
I had this problem as well.
My /etc/resolv.conf file kept being overwritten on reboot with a message in it that said:
# generated by NetworkManager, do not edit
I had already turned off NetworkManager as a service entirely, so I removed it too:
rpm -e NetworkManager NetworkManager-...
but the /etc/resolv.conf kept being overwritten on reboot with that "generated by
NetworkManager" message in it! WTH?
It turns out that if you have a file called /etc/resolv.conf.save, it overwrites
/etc/resolv.conf on reboot. There are a number of scripts that will generate a
/etc/resolv.conf.save. I blew away my /etc/resolv.conf.save and now everything works. It
really was not a NetworkManager problem.
normyzo Guest
NetworkManager will get DNS information where you
tell it to get DNS from; you can either enter the DNS servers manually into your
/etc/sysconfig/network-scripts/ifcfg-* files with the keys DNS1, DNS2, DNS3 (which NM will
pick up and use automatically if the device is managed by NM), or you can use
nm-connection-editor to add your preferred DNS servers to the connection.
I was setting up a RHEL7 server in vmware vSphere and I'm having trouble getting it on the network without NetworkManager.
I configured the server to have a static IP during the install process and it set everything up using NetworkManager. While this
does work we do not use NetworkManager in my office, so I went and entered what we usually put the config file to get RHEL6 servers
online without NetworkManager.
/etc/sysconfig/network-scripts/ifcfg-ens192 is the following:
I recently debugged an issue with network.service and the best way to track the ip commands was strace
. You shouldn't generally get this type of error. It might be worth reporting (ideally via support). –
Check your MAC Address for the VM. It should be 08:00:27:98:8e:df since that is what is shown you ran ip addr. If it's anything
else, you will need to set it in your ifcfg-ens192 file with the following, but replace the address with the actual.
If you are not sure of the hardware address you can find it in.
cat /sys/class/net/ens192/address
you should put that information (GATEWAY=10.0.2.2) in /etc/sysconfig/network once it's done, restarting the service should succeed
Try to go to the virtual machine network settings and make sure the network cable is connected and check if you have blocked this
with a firewall
NetworkManager dictates the default route ( ip route ) even though your interface has nm disabled, it is just that interface not
the whole system.
ps aux | grep -I net   # will probably find NetworkManager still running.
chkconfig NetworkManager off
systemctl disable NetworkManager.service
systemctl disable doesn't stop a service, nor does chkconfig ... off which basically translates to the
same command anyway. – Pavel Šimerda
I too came across "Failed to start LSB: Bring up/down networking" error, since disabling NetworkManager. It took two minutes to be
brought up interfaces after boot. The cause of confusion was "... LSB". It turned out the message comes out from just the traditional
/etc/rc.d/init.d/network script. In my case, following solved the problem;
To network-scripts/ifcfg-eth0 added
NMCONTROLLED=no
Removed unnecessary ifcfg-* files which NetworkManager has left behind
Now edit /etc/sysconfig/network-scripts/ifcfg-eth0,
Add new HWADDR generated or remove it
Remove UUID line
-Restart the networking service
#systemctl restart network.service
NOW! Working.
I was having the same issue. So I just delete the backup files I made in /etc/sysconfig/network-scripts , such as
ifcfg-Bridge_connection_1.home and ifcfg-Bridge_connection_1.office which I created for backup usage. They
should not be created there. The /etc/init.d/network restart could work well after delete those useless ifcfg-*.
OpenStack networking currently does not work on systems that have the Network Manager ( NetworkManager ) service enabled.
The Network Manager service is currently enabled by default on Red Hat Enterprise Linux installations where one of these package
groups was selected during installation:
Desktop
Software Development Workstation
The Network Manager service is not currently enabled by default on Red Hat Enterprise Linux installations where one of these package
groups was selected during installation:
Basic Server
Database Server
Web Server
Identity Management Server
Virtualization Host
Minimal Install
Follow the steps listed in this procedure while logged in as the root user on each system in the environment that will
handle network traffic. This includes the system that will host the OpenStack Networking service, all network nodes, and all compute
nodes. These steps ensure that the NetworkManager service is disabled and replaced by the standard network service for
all interfaces that will be used by OpenStack Networking.
Verify Network Manager is currently enabled using the chkconfig command.
# chkconfig --list NetworkManager
The output displayed by the chkconfig command inicates whether or not the Network Manager service is enabled.
The system displays an error if the Network Manager service is not currently installed:
error reading information on service NetworkManager: No such file or directory
If this error is displayed then no further action is required to disable the Network Manager service.
The system displays a list of numerical run levels along with a value of on or off indicating
whether the Network Manager service is enabled when the system is operating in the given run level.
If the value displayed for all run levels is off then the Network Manager service is disabled and no further action
is required. If the value displayed for any of the run levels is on then the Network Manager service is enabled
and further action is required.
Ensure that the Network Manager service is stopped using the service command.
# service NetworkManager stop
Ensure that the Network Manager service is disabled using the chkconfig command.
# chkconfig NetworkManager off
Open each interface configuration file on the system in a text editor. Interface configuration files are found in the
/etc/sysconfig/network-scripts/ directory and have names of the form ifcfg- X
where X is replaced by the name of the interface. Valid interface names include eth0 ,
p1p5 , and em1 . In each file ensure that the NM_CONTROLLED configuration key is set to
no and the ON_BOOT configuration key is set to yes .
NM_CONTROLLED=no
ONBOOT=yes
This action ensures that the standard network service will take control of the interfaces and automatically activate them on boot.
Ensure that the network service is started using the service command.
# service network start
Ensure that the network service is enabled using the chkconfig command.
# chkconfig network on
The Network Manager service has been disabled. The standard network service has been enabled and configured to control the required
network interfaces.
Okay community, let's see if we can figure this one out, cause I'm out of answers.
Where I work I am setting up a bunch of RedHat Enterprise Linux servers. There is a collection of RHEL6 and RHEL7 servers.
On the RHEL6 servers, I am using the standard network configuration tool by configuring it in /etc/sysconfig/network-scripts/ifcfg-eth0
and a dhclient configuration file in /etc/dhclient-eth0.conf . Everything works properly, I am assigned the custom
FQDN by our DNS servers (e.g. hostname.ad.company.tld ) and when the DHCP lease is up, it is renewed automatically.
Here is the issue:
In RHEL7, NetworkManager is enabled by default. On our Kickstart, I have removed NetworkManager and went back to configuring
network and dhcp the way it is done in RHEL6. All of the configuration is the same (sans using /etc/sysconfig/network-scripts/ifcfg-ens192
instead of eth0) and works fine for the first DHCP lease.
Once the lease is up, it seemingly doesn't renew it until I issue a systemctl restart network command.
I have looked and looked and I am coming up short. There must be something different in RHEL7 or something not configured when
you disable NetworkManager , but I cannot for the life of me figure it out.
Anyone have any thoughts?
As I know these usually help, I'll post my RHEL7 configuration files, and the snippet from the logs where it loses the DHCP
lease.
Jun 27 23:06:09 sa-kbwiki01 avahi-daemon[591]: Withdrawing address record for 129.89.78.221 on ens192.
Jun 27 23:06:09 sa-kbwiki01 avahi-daemon[591]: Leaving mDNS multicast group on interface ens192.IPv4 with address xxx.xx.xx.xxx.
Jun 27 23:06:09 sa-kbwiki01 avahi-daemon[591]: Interface ens192.IPv4 no longer relevant for mDNS.
That log snippet doesn't show your DHCP lease being lost. Keep looking, there should be other more relevant entries. –
Michael Hampton ♦
Jul 2 '14 at 15:24
From what I recall hearing pre-launch is that networkManager is not the same PoS it was years ago and Red Hat more or less forces
you to learn to live with it. Having said that, the
documentation mentions that NetworkManager has been made responsible for starting dhclient, so it could be that without NM, dhclient
is run with the -1 option and doesn't become a daemon. –
HBruijn ♦
Jul 2 '14 at 15:36
@MichaelHampton I do not see anything else in /var/log/messages. Other things that use the network are operating fine until that
line, at which point everything starts saying no network available. –
cjmaio
Jul 2 '14 at 15:59
@HBruijn That gives me somewhere to start... though when doing a ps aux | grep dhclient I do see that the -1
flag is being set... is there anywhere else that dhclient would log to other than /var/log/messages ? –
cjmaio
Jul 2 '14 at 16:00
Yeah, NM is fairly safe to use these days unless you have a very complicated setup. I do wonder why you're running Avahi
though. – Michael Hampton ♦
Jul 2 '14 at 16:01
The Last but not LeastTechnology is dominated by
two types of people: those who understand what they do not manage and those who manage what they do not understand ~Archibald Putt.
Ph.D
FAIR USE NOTICEThis site contains
copyrighted material the use of which has not always been specifically
authorized by the copyright owner. We are making such material available
to advance understanding of computer science, IT technology, economic, scientific, and social
issues. We believe this constitutes a 'fair use' of any such
copyrighted material as provided by section 107 of the US Copyright Law according to which
such material can be distributed without profit exclusively for research and educational purposes.
This is a Spartan WHYFF (We Help You For Free)
site written by people for whom English is not a native language. Grammar and spelling errors should
be expected. The site contain some broken links as it develops like a living tree...
You can use PayPal to to buy a cup of coffee for authors
of this site
Disclaimer:
The statements, views and opinions presented on this web page are those of the author (or
referenced source) and are
not endorsed by, nor do they necessarily reflect, the opinions of the Softpanorama society.We do not warrant the correctness
of the information provided or its fitness for any purpose. The site uses AdSense so you need to be aware of Google privacy policy. You you do not want to be
tracked by Google please disable Javascript for this site. This site is perfectly usable without
Javascript.


<img src="https://i0.wp.com/linuxtechlab.com/wp-content/uploads/2019/04/IP-Alias-1.png?resize=425%2C366&ssl=1" alt="IP aliasing" width="425" height="366" data-recalc-dims="1" />
<img src="https://i1.wp.com/linuxtechlab.com/wp-content/uploads/2019/04/IP-Alias-2.png?resize=795%2C618&ssl=1" alt="IP aliasing" width="795" height="618" srcset="https://i1.wp.com/linuxtechlab.com/wp-content/uploads/2019/04/IP-Alias-2.png?w=795&ssl=1 795w, https://i1.wp.com/linuxtechlab.com/wp-content/uploads/2019/04/IP-Alias-2.png?resize=768%2C597&ssl=1 768w" sizes="(max-width: 795px) 100vw, 795px" data-recalc-dims="1" />
<img src="https://i0.wp.com/linuxtechlab.com/wp-content/uploads/2017/03/ifconfig.jpg?resize=545%2C301&ssl=1" alt="ip aliasing" width="545" height="301" srcset="https://i0.wp.com/linuxtechlab.com/wp-content/uploads/2017/03/ifconfig.jpg?w=545&ssl=1 545w, https://i0.wp.com/linuxtechlab.com/wp-content/uploads/2017/03/ifconfig.jpg?resize=300%2C166&ssl=1 300w" sizes="(max-width: 545px) 100vw, 545px" data-recalc-dims="1" />
Registered User
I had this problem as well. My /etc/resolv.conf file kept being overwritten on reboot with a message in it that said:normyzo Guest