|
|
Home | Switchboard | Unix Administration | Red Hat | TCP/IP Networks | Neoliberalism | Toxic Managers |
| (slightly skeptical) Educational society promoting "Back to basics" movement against IT overcomplexity and bastardization of classic Unix | |||||||
|
|
This topic includes the following subtopics:
|
|
Three rules for successful repartitioning
A good description of repartitioning of raw partitions using Gparted is provided in Roderick W. Smith article Resizing Linux partitions, Part 1 Basics published Aug 11, 2010 on IBM developerWorks
Obtaining current partition use dataThe first step in planning your partition resizing operation is to obtain information about how your disk is currently laid out and what partitions are running out of space. One convenient way to obtain such information is to use GParted, which presents a friendly GUI display, as shown in Figure 1. The display shows where partitions are located relative to one another and how much space each consumes. Unfortunately, GParted doesn't always present complete information, so you may want to supplement its displays with the output of the text-mode df, fdisk, or other utilities.
Figure 1. GParted presents disk use summary information
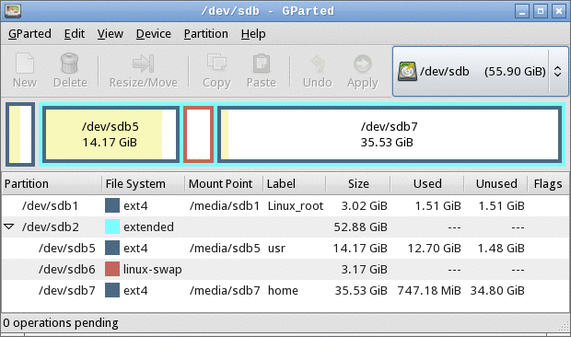
Figure 1 shows a system that has a cramped /usr partition (/dev/sdb5) and plenty of free space in /home (/dev/sdb7), which can cause problems if you want to add more software to the computer. Given this partition layout, you might want to reduce the size of /home and increase the size of /usr. (Note that Figure 1 was obtained from an emergency boot disc, so the Mount Point column doesn't reflect the running system's mount points.)
File system-specific capabilities
Linux supports several native file systems, and dual-boot systems often share the disk with others too. As a general rule, ext2fs, ext3fs, ex4fs, ReiserFS, and Btrfs are the most flexible in terms of what you can do with them. These file systems can all be grown, shrunk, and moved by most implementations of GParted. XFS and JFS, unfortunately, cannot be shrunk, although they can be grown or moved.
Among common non-Linux file systems, FAT and NTFS can be grown, shrunk, and moved. HFS and HFS+, used on Macintoshes, can usually be shrunk and moved, but not grown. OS X's Disk Utility can sometimes grow HFS+ partitions.
In GParted, you can select View > File System Support to obtain a table of file systems and the operations that GParted supports. If you try this in your regular Linux system, however, you should be aware that what is supported varies from one distribution to another. If you use an emergency disc, as described shortly, it may support different options than your regular installation does.
Planning a new partition layout
With the existing partition data and information about what you can do with your current file systems in hand, you can begin planning your new layout. You should consider several important factors:
- Speed and safety—Changing the start point of a partition is usually slower and riskier than changing the end point because moving the start point entails rewriting much of the data in the partition. This effect is greater for partitions with more data than for those with less data.
- Non-Linux file systems—Although GParted and its text-mode cousin GNU Parted can resize NTFS, FAT, HFS, and HFS+ file systems, you may want to consider using the native operating system's tools instead of Linux tools when dealing with them. This is especially true of Microsoft® Windows® boot partitions on dual-boot systems because changing the start point of a Windows boot partition is likely to render Windows unbootable.
- Primary vs. logical partitions—The Master Boot Record (MBR) partitioning system, used on most Linux computers, supports only four primary partitions. One of these partitions may be an extended partition, which can hold any number of logical partitions. Some operating systems, such as Windows, must boot from a primary partition. All your logical partitions must reside within a single extended partition, and so must be contiguous. If your system uses a globally unique identifier (GUID) Partition Table (GPT) rather than the older MBR system, these distinctions become moot because GPT supports only one partition type.
- Device IDs—Take note of the device IDs, such as /dev/sda3, used by your Linux partitions. If these IDs change, you may need to make changes to your /etc/fstab file or your boot loader configuration (typically /boot/grub/menu.lst, /boot/grub/grub.conf, or /boot/grub/grub.cfg). Many modern distributions use Universally Unique Identifier (UUID) numbers rather than device identifiers in these files, so such changes may not be necessary. They also won't be required if your new partition layout doesn't change any critical device IDs. Note that primary partitions are numbered from 1 to 4, and the numbering system may contain gaps, whereas logical partitions are numbered from 5 up and may not contain gaps. Thus, if you add a primary partition, it's possible that no partition numbers will change; but if you add a logical partition, all your other logical partitions' numbers may change.
Preparing a backup
Once your changes are planned, you may be tempted to rush to implement them; however, because of the risks involved in repartitioning, you should back up your most critical data, if at all practical. If a backup is not practical, you're well advised to make it so by purchasing the necessary hardware. Even aside from the risks involved in partition resizing, hard disks sometimes fail, and software problems can render file systems useless. Thus, having a backup is a good idea.
You can back up to whatever medium is most convenient. You may be able to use tar to create a system backup that will fit on a recordable DVD, once compressed; however, most modern systems have enough user data that a single DVD won't hold it all. Thus, you may need to resort to some other medium, such as an external hard disk, to back up your user data.
Even if a full backup is impossible, you should back up the contents of /etc. This directory holds critical system configuration files, so keeping a copy of it can speed up recovery if you need to reinstall your operating system.
Using GParted to resize partitions
The easiest way to resize partitions in Linux is to use the GUI GParted program. Although you can run GParted from your regular Linux installation, it refuses to operate on any currently mounted partition. Thus, you can't resize root (/) or any other partition that's critical for the system's functioning. Therefore, I describe how to implement your changes using a Linux emergency disc. After this disc is booted, you can run GParted much as you would from a regular system, using point-and-click operations to tell the software what you want it to do.
Running an emergency disc
Many Linux emergency disc systems exist, such as PartedMagic and SystemRescueCd (see Resources). You may also be able to use your Linux installation media. Many distributions include a rescue mode that provides access to GParted or a similar utility. For illustrative purposes, I describe the use of PartedMagic 4.11; however, other utilities are similar in broad strokes. You may need to launch GParted in a different way, though.
Most emergency discs come only in x86 (32-bit) form, but these discs work fine on x86-64 (64-bit) computers, even if the system runs a 64-bit version of Linux. The file system data structures are not affected by the central processing unit (CPU) architecture. If you run on something other than standard personal computer (PC) hardware, however, such as a Macintosh, you may need to check that your emergency disc works with your hardware.
Typically, you must boot an emergency disc much as you boot a Linux installation disc. On some systems, inserting the disc and then rebooting the computer does the job. On some systems, you must press a function key to select the boot device or adjust a basic input/output system (BIOS) option to boot from the optical drive rather than from your hard disk. The details of how to do this are system-specific, so you may need to consult your manual for details.
When you boot PartedMagic, a boot menu appears. Select Default settings (Runs from RAM) to boot into the standard system. When the system boots, you see a desktop appear with icons for some common tools, including one called Partition Editor, which launches GParted. Double-click this icon to begin resizing your partitions.
Telling GParted about your changes
To resize a partition, right-click it and select Resize/Move from the pop-up menu. The result is a dialog box such as that shown in Figure 2. You can adjust the size and position of the partition using the graphical slider or the text-entry fields.
Figure 2. GParted provides a point-and-click interface for resizing partitions

Figure 2 shows a resizing of /dev/sdb7 from Figure 1, moving its start point to the right to make room for an expansion of /dev/sdb5. To complete a resizing of Figure 1's partitions, you have to also move the swap partition (/dev/sdb6) to the right prior to resizing /dev/sdb5. Alternatively, you can delete and recreate the swap partition; however, this might require altering UUID references to swap space in /etc/fstab. When the swap space is moved, you can expand /dev/sdb5.
Note the Align to field in Figure 2. This is a new feature with recent versions of GParted, and it enables you to align partitions to cylinders, to mebibyte (MiB) boundaries, or neither. Older disks are typically partitioned to align on cylinder boundaries, but MiB alignment is common on disks partitioned with Windows Vista or later. Linux is happy with either type of alignment. If your system dual-boots with Windows XP, cylinder alignment may be required. If the system dual-boots with Windows Vista or later, or if it uses a new disk with 4096-byte sectors, MiB alignment may be required.
If you want to take space from a logical partition to give it to a primary partition or vice versa, you must explicitly resize the extended partition that surrounds the logical partitions. You do so just like you resize any other partition; however, you'll find it easier to click on its list entry than its entry in the diagram above the partition list.
GParted doesn't allow you to resize partitions that are in use. Such partitions have a padlock icon next to their entries. You can right-click the partition and select Unmount to unmount it. Note that the extended partition is locked in this way if any of its contained logical partitions are in use, including swap space.
Implementing your changes in GParted
After you tell GParted about your changes, you must implement them by selecting the Edit > Apply All Operations menu item or by clicking the Apply icon. The result is a progress dialog box that summarizes what the program is doing. If you decide against an operation, you can use GParted's undo feature or exit from the program without applying your changes. Your disk is then unchanged.
Partition resizing operations can take anywhere from a fraction of a second to several hours to complete, depending on the nature of the change and how much data must be moved. Under no circumstances should you interrupt an ongoing operation! Doing so can damage the file system, rendering your data irretrievable.
Altering disk references
If you add or delete partitions, you may need to alter your /etc/fstab file or your boot loader configuration, as noted earlier. To do so, you must mount the root (/) partition and edit the file. In Figure 1, the root partition is /dev/sdb1, and GParted can mount it at /media/sdb1, so you would then edit /media/sdb1/etc/fstab. If your system uses a separate /boot partition, you may need to mount it separately to edit the boot loader configuration in the boot partition's grub/menu.lst, grub/boot.conf, or grub/boot.cfg file.
Examine these files and replace any references to the old partition ID numbers to the new ones. If you make any changes, back up the original configuration file before saving the new one.
Moving forward
At this point, you can reboot your system. In PartedMagic, you can click the icon in the lower left of the screen and select Logout, which then gives you the option of, among other things, rebooting. Be sure to remove the emergency disc, if you haven't already done so. With any luck, your computer should reboot into your regular Linux operating system, but you'll find that your disk space allocation has changed.
This article describes a basic partition resizing operation. Part 2 of this series describes more advanced and alternative options, including resizing Logical Volume Management (LVM), troubleshooting, and alternatives you may want to consider if resizing operations are inadequate.
|
|
Switchboard | ||||
| Latest | |||||
| Past week | |||||
| Past month | |||||
May 24, 2021 | blog.dougco.com
Recovery LVM Data from RAID – Doug's Blog
- Post author By doug
- Post date March 1, 2018
- No Comments on Recovery LVM Data from RAID
We had a client that had an OLD fileserver box, a Thecus N4100PRO. It was completely dust-ridden and the power supply had burned out.
Since these drives were in a RAID configuration, you could not hook any one of them up to a windows box, or a linux box to see the data. You have to hook them all up to a box and reassemble the RAID.
We took out the drives (3 of them) and then used an external SATA to USB box to connect them to a Linux server running CentOS. You can use parted to see what drives are now being seen by your linux system:
parted -l | grep 'raid\|sd'
Then using that output, we assembled the drives into a software array:
mdadm -A /dev/md0 /dev/sdb2 /dev/sdc2 /dev/sdd2
If we tried to only use two of those drives, it would give an error, since these were all in a linear RAID in the Thecus box.
If the last command went well, you can see the built array like so:
root% cat /proc/mdstat
Personalities : [linear]
md0 : active linear sdd2[0] sdb2[2] sdc2[1]
1459012480 blocks super 1.0 128k roundingNote the personality shows the RAID type, in our case it was linear, which is probably the worst RAID since if any one drive fails, your data is lost. So good thing these drives outlasted the power supply! Now we find the physical volume:
pvdisplay /dev/md0
Gives us:
-- Physical volume --
PV Name /dev/md0
VG Name vg0
PV Size 1.36 TB / not usable 704.00 KB
Allocatable yes
PE Size (KByte) 2048
Total PE 712408
Free PE 236760
Allocated PE 475648
PV UUID iqwRGX-zJ23-LX7q-hIZR-hO2y-oyZE-tD38A3Then we find the logical volume:
lvdisplay /dev/vg0
Gives us:
-- Logical volume --
LV Name /dev/vg0/syslv
VG Name vg0
LV UUID UtrwkM-z0lw-6fb3-TlW4-IpkT-YcdN-NY1orZ
LV Write Access read/write
LV Status NOT available
LV Size 1.00 GB
Current LE 512
Segments 1
Allocation inherit
Read ahead sectors 16384-- Logical volume --
LV Name /dev/vg0/lv0
VG Name vg0
LV UUID 0qsIdY-i2cA-SAHs-O1qt-FFSr-VuWO-xuh41q
LV Write Access read/write
LV Status NOT available
LV Size 928.00 GB
Current LE 475136
Segments 1
Allocation inherit
Read ahead sectors 16384We want to focus on the lv0 volume. You cannot mount yet, until you are able to lvscan them.
lvscan
Show us things are inactive currently:
inactive '/dev/vg0/syslv' [1.00 GB] inherit
inactive '/dev/vg0/lv0' [928.00 GB] inheritSo we set them active with:
vgchange vg0 -a y
And doing lvscan again shows:
ACTIVE '/dev/vg0/syslv' [1.00 GB] inherit
ACTIVE '/dev/vg0/lv0' [928.00 GB] inheritNow we can mount with:
mount /dev/vg0/lv0 /mnt
And viola! We have our data up and accessable in /mnt to recover! Of course your setup is most likely going to look different from what I have shown you above, but hopefully this gives some helpful information for you to recover your own data.
Nov 09, 2019 | blogs.oracle.com
Mirroring a running system into a ramdisk Greg Marsden
- October 29, 2019
![]()
In this blog post, Oracle Linux kernel developer William Roche presents a method to mirror a running system into a ramdisk.
A RAM mirrored System ?There are cases where a system can boot correctly but after some time, can lose its system disk access - for example an iSCSI system disk configuration that has network issues, or any other disk driver problem. Once the system disk is no longer accessible, we rapidly face a hang situation followed by I/O failures, without the possibility of local investigation on this machine. I/O errors can be reported on the console:
XFS (dm-0): Log I/O Error Detected....Or losing access to basic commands like:
# ls
-bash: /bin/ls: Input/output error
The approach presented here allows a small system disk space to be mirrored in memory to avoid the above I/O failures situation, which provides the ability to investigate the reasons for the disk loss. The system disk loss will be noticed as an I/O hang, at which point there will be a transition to use only the ram-disk.
To enable this, the Oracle Linux developer Philip "Bryce" Copeland created the following method (more details will follow):
Disk and memory sizes:
- Create a "small enough" system disk image using LVM (a minimized Oracle Linux installation does that)
- After the system is started, create a ramdisk and use it as a mirror for the system volume
- when/if the (primary) system disk access is lost, the ramdisk continues to provide all necessary system functions.
As we are going to mirror the entire system installation to the memory, this system installation image has to fit in a fraction of the memory - giving enough memory room to hold the mirror image and necessary running space.
Of course this is a trade-off between the memory available to the server and the minimal disk size needed to run the system. For example a 12GB disk space can be used for a minimal system installation on a 16GB memory machine.
A standard Oracle Linux installation uses XFS as root fs, which (currently) can't be shrunk. In order to generate a usable "small enough" system, it is recommended to proceed to the OS installation on a correctly sized disk space. Of course, a correctly sized installation location can be created using partitions of large physical disk. Then, the needed application filesystems can be mounted from their current installation disk(s). Some system adjustments may also be required (services added, configuration changes, etc...).
This configuration phase should not be underestimated as it can be difficult to separate the system from the needed applications, and keeping both on the same space could be too large for a RAM disk mirroring.
The idea is not to keep an entire system load active when losing disks access, but to be able to have enough system to avoid system commands access failure and analyze the situation.
We are also going to avoid the use of swap. When the system disk access is lost, we don't want to require it for swap data. Also, we don't want to use more memory space to hold a swap space mirror. The memory is better used directly by the system itself.
The system installation can have a swap space (for example a 1.2GB space on our 12GB disk example) but we are neither going to mirror it nor use it.
Our 12GB disk example could be used with: 1GB /boot space, 11GB LVM Space (1.2GB swap volume, 9.8 GB root volume).
Ramdisk memory footprint:
The ramdisk size has to be a little larger (8M) than the root volume size that we are going to mirror, making room for metadata. But we can deal with 2 types of ramdisk:
- A classical Block Ram Disk (brd) device
- A memory compressed Ram Block Device (zram)
We can expect roughly 30% to 50% memory space gain from zram compared to brd, but zram must use 4k I/O blocks only. This means that the filesystem used for root has to only deal with a multiple of 4k I/Os.
Basic commands:Here is a simple list of commands to manually create and use a ramdisk and mirror the root filesystem space. We create a temporary configuration that needs to be undone or the subsequent reboot will not work. But we also provide below a way of automating at startup and shutdown.
Note the root volume size (considered to be ol/root in this example):
?
1 2 3 # lvs --units k -o lv_size ol/rootLSize10268672.00kCreate a ramdisk a little larger than that (at least 8M larger):
?
1 # modprobe brd rd_nr=1 rd_size=$((10268672 + 8*1024))Verify the created disk:
?
1 2 3 # lsblk /dev/ram0NAME MAJ:MIN RM SIZE RO TYPE MOUNTPOINTram0 1:0 0 9.8G 0 diskPut the disk under lvm control
?
1 2 3 4 5 6 7 8 9 # pvcreate /dev/ram0Physical volume"/dev/ram0"successfully created.# vgextend ol /dev/ram0Volume group"ol"successfully extended# vgscan --cacheReading volumegroupsfrom cache.Found volume group"ol"using metadatatypelvm2# lvconvert -y -m 1 ol/root /dev/ram0Logical volume ol/rootsuccessfully converted.We now have ol/root mirror to our /dev/ram0 disk.
?
1 2 3 4 5 6 7 8 # lvs -a -o +devicesLV VG Attr LSize Pool Origin Data% Meta% Move Log Cpy%Sync Convert Devicesroot ol rwi-aor--- 9.79g 40.70 root_rimage_0(0),root_rimage_1(0)[root_rimage_0] ol iwi-aor--- 9.79g /dev/sda2(307)[root_rimage_1] ol Iwi-aor--- 9.79g /dev/ram0(1)[root_rmeta_0] ol ewi-aor--- 4.00m /dev/sda2(2814)[root_rmeta_1] ol ewi-aor--- 4.00m /dev/ram0(0)swap ol -wi-ao---- <1.20g /dev/sda2(0)A few minutes (or seconds) later, the synchronization is completed:
?
1 2 3 4 5 6 7 8 # lvs -a -o +devicesLV VG Attr LSize Pool Origin Data% Meta% Move Log Cpy%Sync Convert Devicesroot ol rwi-aor--- 9.79g 100.00 root_rimage_0(0),root_rimage_1(0)[root_rimage_0] ol iwi-aor--- 9.79g /dev/sda2(307)[root_rimage_1] ol iwi-aor--- 9.79g /dev/ram0(1)[root_rmeta_0] ol ewi-aor--- 4.00m /dev/sda2(2814)[root_rmeta_1] ol ewi-aor--- 4.00m /dev/ram0(0)swap ol -wi-ao---- <1.20g /dev/sda2(0)We have our mirrored configuration running !
For security, we can also remove the swap and /boot, /boot/efi(if it exists) mount points:
?
1 2 3 # swapoff -a# umount /boot/efi# umount /boot
Stopping the system also requires some actions as you need to cleanup the configuration so that it will not be looking for a gone ramdisk on reboot.
?What about in-memory compression ?
1 2 3 4 5 6 7 # lvconvert -y -m 0 ol/root /dev/ram0Logical volume ol/rootsuccessfully converted.# vgreduce ol /dev/ram0Removed"/dev/ram0"from volume group"ol"# mount /boot# mount /boot/efi# swapon -aAs indicated above, zRAM devices can compress data in-memory, but 2 main problems need to be fixed:
Make lvm work with zram:
- LVM does take into account zRAM devices by default
- zRAM only works with 4K I/Os
The lvm configuration file has to be changed to take into account the "zram" type of devices. Including the following "types" entry to the /etc/lvm/lvm.conf file in its "devices" section:
?Root file system I/Os:
1 2 3 devices {types = ["zram", 16 ]}A standard Oracle Linux installation uses XFS, and we can check the sector size used (depending on the disk type used) with
?
1 2 3 4 5 6 7 8 9 10 # xfs_info /meta-data=/dev/mapper/ol-rootisize=256 agcount=4, agsize=641792 blks= sectsz=512 attr=2, projid32bit=1= crc=0 finobt=0 spinodes=0data = bsize=4096 blocks=2567168, imaxpct=25= sunit=0 swidth=0 blksnaming =version 2 bsize=4096 ascii-ci=0 ftype=1log =internal bsize=4096 blocks=2560, version=2= sectsz=512 sunit=0 blks, lazy-count=1realtime =none extsz=4096 blocks=0, rtextents=0We can notice here that the sector size (sectsz) used on this root fs is a standard 512 bytes. This fs type cannot be mirrored with a zRAM device, and needs to be recreated with 4k sector sizes.
Transforming the root file system to 4k sector size:This is simply a backup (to a zram disk) and restore procedure after recreating the root FS. To do so, the system has to be booted from another system image. Booting from an installation DVD image can be a good possibility.
?
- Boot from an OL installation DVD [Choose "Troubleshooting", "Rescue a Oracle Linux system", "3) Skip to shell"]
- Activate and mount the root volume
1 2 3 sh-4.2# vgchange -a y ol2 logical volume(s)involume group"ol"now activesh-4.2# mount /dev/mapper/ol-root /mnt?
- create a zram to store our disk backup
1 2 3 4 5 6 7 8 9 10 11 12 13 14 15 16 17 18 19 20 21 22 23 24 25 26 sh-4.2# modprobe zramsh-4.2# echo 10G > /sys/block/zram0/disksizesh-4.2# mkfs.xfs /dev/zram0meta-data=/dev/zram0isize=256 agcount=4, agsize=655360 blks= sectsz=4096 attr=2, projid32bit=1= crc=0 finobt=0, sparse=0data = bsize=4096 blocks=2621440, imaxpct=25= sunit=0 swidth=0 blksnaming =version 2 bsize=4096 ascii-ci=0 ftype=1log =internal log bsize=4096 blocks=2560, version=2= sectsz=4096 sunit=1 blks, lazy-count=1realtime =none extsz=4096 blocks=0, rtextents=0sh-4.2# mkdir /mnt2sh-4.2# mount /dev/zram0 /mnt2sh-4.2# xfsdump -L BckUp -M dump -f /mnt2/ROOT /mntxfsdump: usingfiledump (drive_simple) strategyxfsdump: version 3.1.7 (dumpformat3.0) -type^Cforstatus and controlxfsdump: level 0 dump of localhost:/mnt...xfsdump: dump complete: 130 seconds elapsedxfsdump: Dump Summary:xfsdump: stream 0 /mnt2/ROOTOK (success)xfsdump: Dump Status: SUCCESSsh-4.2# umount /mnt?
- recreate the xfs on the disk with a 4k sector size
1 2 3 4 5 6 7 8 9 10 11 12 sh-4.2# mkfs.xfs -f -s size=4096 /dev/mapper/ol-rootmeta-data=/dev/mapper/ol-rootisize=256 agcount=4, agsize=641792 blks= sectsz=4096 attr=2, projid32bit=1= crc=0 finobt=0, sparse=0data = bsize=4096 blocks=2567168, imaxpct=25= sunit=0 swidth=0 blksnaming =version 2 bsize=4096 ascii-ci=0 ftype=1log =internal log bsize=4096 blocks=2560, version=2= sectsz=4096 sunit=1 blks, lazy-count=1realtime =none extsz=4096 blocks=0, rtextents=0sh-4.2# mount /dev/mapper/ol-root /mnt?
- restore the backup
1 2 3 4 5 6 7 8 9 10 11 sh-4.2# xfsrestore -f /mnt2/ROOT /mntxfsrestore: usingfiledump (drive_simple) strategyxfsrestore: version 3.1.7 (dumpformat3.0) -type^Cforstatus and controlxfsrestore: searching mediafordump...xfsrestore: restore complete: 337 seconds elapsedxfsrestore: Restore Summary:xfsrestore: stream 0 /mnt2/ROOTOK (success)xfsrestore: Restore Status: SUCCESSsh-4.2# umount /mntsh-4.2# umount /mnt2?
- reboot the machine on its disk (may need to remove the DVD)
1 sh-4.2# reboot?
- login and verify the root filesystem
1 2 3 4 5 6 7 8 9 10 $ xfs_info /meta-data=/dev/mapper/ol-rootisize=256 agcount=4, agsize=641792 blks= sectsz=4096 attr=2, projid32bit=1= crc=0 finobt=0 spinodes=0data = bsize=4096 blocks=2567168, imaxpct=25= sunit=0 swidth=0 blksnaming =version 2 bsize=4096 ascii-ci=0 ftype=1log =internal bsize=4096 blocks=2560, version=2= sectsz=4096 sunit=1 blks, lazy-count=1realtime =none extsz=4096 blocks=0, rtextents=0With sectsz=4096, our system is now ready for zRAM mirroring.
Basic commands with a zRAM device: ?
1 2 3 4 5 6 7 8 9 10 11 12 13 14 15 16 17 18 19 20 21 22 23 24 25 26 27 28 29 30 31 # modprobe zram# zramctl --find --size 10G/dev/zram0# pvcreate /dev/zram0Physical volume"/dev/zram0"successfully created.# vgextend ol /dev/zram0Volume group"ol"successfully extended# vgscan --cacheReading volumegroupsfrom cache.Found volume group"ol"using metadatatypelvm2# lvconvert -y -m 1 ol/root /dev/zram0Logical volume ol/rootsuccessfully converted.# lvs -a -o +devicesLV VG Attr LSize Pool Origin Data% Meta% Move Log Cpy%Sync Convert Devicesroot ol rwi-aor--- 9.79g 12.38 root_rimage_0(0),root_rimage_1(0)[root_rimage_0] ol iwi-aor--- 9.79g /dev/sda2(307)[root_rimage_1] ol Iwi-aor--- 9.79g /dev/zram0(1)[root_rmeta_0] ol ewi-aor--- 4.00m /dev/sda2(2814)[root_rmeta_1] ol ewi-aor--- 4.00m /dev/zram0(0)swap ol -wi-ao---- <1.20g /dev/sda2(0)# lvs -a -o +devicesLV VG Attr LSize Pool Origin Data% Meta% Move Log Cpy%Sync Convert Devicesroot ol rwi-aor--- 9.79g 100.00 root_rimage_0(0),root_rimage_1(0)[root_rimage_0] ol iwi-aor--- 9.79g /dev/sda2(307)[root_rimage_1] ol iwi-aor--- 9.79g /dev/zram0(1)[root_rmeta_0] ol ewi-aor--- 4.00m /dev/sda2(2814)[root_rmeta_1] ol ewi-aor--- 4.00m /dev/zram0(0)swap ol -wi-ao---- <1.20g /dev/sda2(0)# zramctlNAME ALGORITHM DISKSIZE DATA COMPR TOTAL STREAMS MOUNTPOINT/dev/zram0lzo 10G 9.8G 5.3G 5.5G 1The compressed disk uses a total of 5.5GB of memory to mirror a 9.8G volume size (using in this case 8.5G).
Removal is performed the same way as brd, except that the device is /dev/zram0 instead of /dev/ram0.
Automating the process:Fortunately, the procedure can be automated on system boot and shutdown with the following scripts (given as examples).
The start method: /usr/sbin/start-raid1-ramdisk: [ https://github.com/oracle/linux-blog-sample-code/blob/ramdisk-system-image/start-raid1-ramdisk ]
After a chmod 555 /usr/sbin/start-raid1-ramdisk, running this script on a 4k xfs root file system should show something like:
?
1 2 3 4 5 6 7 8 9 10 11 # /usr/sbin/start-raid1-ramdiskVolume group"ol"is already consistent.RAID1 ramdisk: intending to use 10276864 K of memoryforfacilitation of [ / ]Physical volume"/dev/zram0"successfully created.Volume group"ol"successfully extendedLogical volume ol/rootsuccessfully converted.Waitingformirror to synchronize...LVM RAID1syncof [ / ] took 00:01:53 secLogical volume ol/rootchanged.NAME ALGORITHM DISKSIZE DATA COMPR TOTAL STREAMS MOUNTPOINT/dev/zram0lz4 9.8G 9.8G 5.5G 5.8G 1The stop method: /usr/sbin/stop-raid1-ramdisk: [ https://github.com/oracle/linux-blog-sample-code/blob/ramdisk-system-image/stop-raid1-ramdisk ]
After a chmod 555 /usr/sbin/stop-raid1-ramdisk, running this script should show something like:
?
1 2 3 4 5 6 # /usr/sbin/stop-raid1-ramdiskVolume group"ol"is already consistent.Logical volume ol/rootchanged.Logical volume ol/rootsuccessfully converted.Removed"/dev/zram0"from volume group"ol"Labels on physical volume"/dev/zram0"successfully wiped.A service Unit file can also be created: /etc/systemd/system/raid1-ramdisk.service [https://github.com/oracle/linux-blog-sample-code/blob/ramdisk-system-image/raid1-ramdisk.service]
?Conclusion:
1 2 3 4 5 6 7 8 9 10 11 12 13 14 [Unit]Description=Enable RAMdisk RAID 1 on LVMAfter=local-fs.targetBefore=shutdown.target reboot.target halt.target[Service]ExecStart=/usr/sbin/start-raid1-ramdiskExecStop=/usr/sbin/stop-raid1-ramdiskType=oneshotRemainAfterExit=yesTimeoutSec=0[Install]WantedBy=multi-user.targetWhen the system disk access problem manifests itself, the ramdisk mirror branch will provide the possibility to investigate the situation. This procedure goal is not to keep the system running on this memory mirror configuration, but help investigate a bad situation.
When the problem is identified and fixed, I really recommend to come back to a standard configuration -- enjoying the entire memory of the system, a standard system disk, a possible swap space etc.
Hoping the method described here can help. I also want to thank for their reviews Philip "Bryce" Copeland who also created the first prototype of the above scripts, and Mark Kanda who also helped testing many aspects of this work.
Nov 08, 2019 | opensource.com
In Figure 1, two complete physical hard drives and one partition from a third hard drive have been combined into a single volume group. Two logical volumes have been created from the space in the volume group, and a filesystem, such as an EXT3 or EXT4 filesystem has been created on each of the two logical volumes.
Figure 1: LVM allows combining partitions and entire hard drives into Volume Groups.
Adding disk space to a host is fairly straightforward but, in my experience, is done relatively infrequently. The basic steps needed are listed below. You can either create an entirely new volume group or you can add the new space to an existing volume group and either expand an existing logical volume or create a new one.
Adding a new logical volumeThere are times when it is necessary to add a new logical volume to a host. For example, after noticing that the directory containing virtual disks for my VirtualBox virtual machines was filling up the /home filesystem, I decided to create a new logical volume in which to store the virtual machine data, including the virtual disks. This would free up a great deal of space in my /home filesystem and also allow me to manage the disk space for the VMs independently.
The basic steps for adding a new logical volume are as follows.
- If necessary, install a new hard drive.
- Optional: Create a partition on the hard drive.
- Create a physical volume (PV) of the complete hard drive or a partition on the hard drive.
- Assign the new physical volume to an existing volume group (VG) or create a new volume group.
- Create a new logical volumes (LV) from the space in the volume group.
- Create a filesystem on the new logical volume.
- Add appropriate entries to /etc/fstab for mounting the filesystem.
- Mount the filesystem.
Now for the details. The following sequence is taken from an example I used as a lab project when teaching about Linux filesystems.
ExampleThis example shows how to use the CLI to extend an existing volume group to add more space to it, create a new logical volume in that space, and create a filesystem on the logical volume. This procedure can be performed on a running, mounted filesystem.
WARNING: Only the EXT3 and EXT4 filesystems can be resized on the fly on a running, mounted filesystem. Many other filesystems including BTRFS and ZFS cannot be resized.
Install hard driveIf there is not enough space in the volume group on the existing hard drive(s) in the system to add the desired amount of space it may be necessary to add a new hard drive and create the space to add to the Logical Volume. First, install the physical hard drive, and then perform the following steps.
Create Physical Volume from hard driveIt is first necessary to create a new Physical Volume (PV). Use the command below, which assumes that the new hard drive is assigned as /dev/hdd.
pvcreate /dev/hddIt is not necessary to create a partition of any kind on the new hard drive. This creation of the Physical Volume which will be recognized by the Logical Volume Manager can be performed on a newly installed raw disk or on a Linux partition of type 83. If you are going to use the entire hard drive, creating a partition first does not offer any particular advantages and uses disk space for metadata that could otherwise be used as part of the PV.
Extend the existing Volume GroupIn this example we will extend an existing volume group rather than creating a new one; you can choose to do it either way. After the Physical Volume has been created, extend the existing Volume Group (VG) to include the space on the new PV. In this example the existing Volume Group is named MyVG01.
vgextend /dev/MyVG01 /dev/hddCreate the Logical VolumeFirst create the Logical Volume (LV) from existing free space within the Volume Group. The command below creates a LV with a size of 50GB. The Volume Group name is MyVG01 and the Logical Volume Name is Stuff.
lvcreate -L +50G --name Stuff MyVG01Create the filesystemCreating the Logical Volume does not create the filesystem. That task must be performed separately. The command below creates an EXT4 filesystem that fits the newly created Logical Volume.
mkfs -t ext4 /dev/MyVG01/StuffAdd a filesystem labelAdding a filesystem label makes it easy to identify the filesystem later in case of a crash or other disk related problems.
e2label /dev/MyVG01/Stuff StuffMount the filesystemAt this point you can create a mount point, add an appropriate entry to the /etc/fstab file, and mount the filesystem.
You should also check to verify the volume has been created correctly. You can use the df , lvs, and vgs commands to do this.
Resizing a logical volume in an LVM filesystemThe need to resize a filesystem has been around since the beginning of the first versions of Unix and has not gone away with Linux. It has gotten easier, however, with Logical Volume Management.
Example
- If necessary, install a new hard drive.
- Optional: Create a partition on the hard drive.
- Create a physical volume (PV) of the complete hard drive or a partition on the hard drive.
- Assign the new physical volume to an existing volume group (VG) or create a new volume group.
- Create one or more logical volumes (LV) from the space in the volume group, or expand an existing logical volume with some or all of the new space in the volume group.
- If you created a new logical volume, create a filesystem on it. If adding space to an existing logical volume, use the resize2fs command to enlarge the filesystem to fill the space in the logical volume.
- Add appropriate entries to /etc/fstab for mounting the filesystem.
- Mount the filesystem.
This example describes how to resize an existing Logical Volume in an LVM environment using the CLI. It adds about 50GB of space to the /Stuff filesystem. This procedure can be used on a mounted, live filesystem only with the Linux 2.6 Kernel (and higher) and EXT3 and EXT4 filesystems. I do not recommend that you do so on any critical system, but it can be done and I have done so many times; even on the root (/) filesystem. Use your judgment.
WARNING: Only the EXT3 and EXT4 filesystems can be resized on the fly on a running, mounted filesystem. Many other filesystems including BTRFS and ZFS cannot be resized.
Install the hard driveIf there is not enough space on the existing hard drive(s) in the system to add the desired amount of space it may be necessary to add a new hard drive and create the space to add to the Logical Volume. First, install the physical hard drive and then perform the following steps.
Create a Physical Volume from the hard driveIt is first necessary to create a new Physical Volume (PV). Use the command below, which assumes that the new hard drive is assigned as /dev/hdd.
pvcreate /dev/hddIt is not necessary to create a partition of any kind on the new hard drive. This creation of the Physical Volume which will be recognized by the Logical Volume Manager can be performed on a newly installed raw disk or on a Linux partition of type 83. If you are going to use the entire hard drive, creating a partition first does not offer any particular advantages and uses disk space for metadata that could otherwise be used as part of the PV.
Add PV to existing Volume GroupFor this example, we will use the new PV to extend an existing Volume Group. After the Physical Volume has been created, extend the existing Volume Group (VG) to include the space on the new PV. In this example, the existing Volume Group is named MyVG01.
vgextend /dev/MyVG01 /dev/hddExtend the Logical VolumeExtend the Logical Volume (LV) from existing free space within the Volume Group. The command below expands the LV by 50GB. The Volume Group name is MyVG01 and the Logical Volume Name is Stuff.
lvextend -L +50G /dev/MyVG01/StuffExpand the filesystemExtending the Logical Volume will also expand the filesystem if you use the -r option. If you do not use the -r option, that task must be performed separately. The command below resizes the filesystem to fit the newly resized Logical Volume.
resize2fs /dev/MyVG01/StuffYou should check to verify the resizing has been performed correctly. You can use the df , lvs, and vgs commands to do this.
TipsOver the years I have learned a few things that can make logical volume management even easier than it already is. Hopefully these tips can prove of some value to you.
- Use the Extended file systems unless you have a clear reason to use another filesystem. Not all filesystems support resizing but EXT2, 3, and 4 do. The EXT filesystems are also very fast and efficient. In any event, they can be tuned by a knowledgeable sysadmin to meet the needs of most environments if the defaults tuning parameters do not.
- Use meaningful volume and volume group names.
- Use EXT filesystem labels.
I know that, like me, many sysadmins have resisted the change to Logical Volume Management. I hope that this article will encourage you to at least try LVM. I am really glad that I did; my disk management tasks are much easier since I made the switch. Topics Business Linux How-tos and tutorials Sysadmin About the author David Both - David Both is an Open Source Software and GNU/Linux advocate, trainer, writer, and speaker who lives in Raleigh North Carolina. He is a strong proponent of and evangelist for the "Linux Philosophy." David has been in the IT industry for nearly 50 years. He has taught RHCE classes for Red Hat and has worked at MCI Worldcom, Cisco, and the State of North Carolina. He has been working with Linux and Open Source Software for over 20 years. David prefers to purchase the components and build his...
Mar 16, 2015 | serverfault.com
LVM spanning over multiple disks: What disk is a file on? Can I lose a drive without total loss? Ask Question Asked 8 years, 10 months ago Active 4 years, 6 months ago Viewed 9k times 7 2 I have three 990GB partitions over three drives in my server. Using LVM, I can create one ~3TB partition for file storage.
1) How does the system determine what partition to use first?
2) Can I find what disk a file or folder is physically on?
3) If I lose a drive in the LVM, do I lose all data, or just data physically on that disk? storage lvm shareHopelessN00b 49k 25 25 gold badges 121 121 silver badges 194 194 bronze badges asked Dec 2 '10 at 2:28
add a comment | 3 Answers 3 active oldest votes 12Luke has no name Luke has no name 989 10 10 silver badges 13 13 bronze badges
Peter Grace Peter Grace 2,676 2 2 gold badges 22 22 silver badges 38 38 bronze badges
- The system fills from the first disk in the volume group to the last, unless you configure striping with extents.
- I don't think this is possible, but where I'd start to look is in the lvs/vgs commands man pages.
- If you lose a drive in a volume group, you can force the volume group online with the missing physical volume, but you will be unable to open the LV's that were contained on the dead PV, whether they be in whole or in part.
- So, if you had for instance 10 LV's, 3 total on the first drive, #4 partially on first drive and second drive, then 5-7 on drive #2 wholly, then 8-10 on drive 3, you would be potentially able to force the VG online and recover LV's 1,2,3,8,9,10.. #4,5,6,7 would be completely lost.
add a comment | 3
- To #3, that's what I was afraid of. Thank you. – Luke has no name Dec 2 '10 at 5:14
1) How does the system determine what partition to use first?
LVM doesn't really have the concept of a partition it uses PVs (Physical Volumes), which can be a partition. These PVs are broken up into extents and then these are mapped to the LVs (Logical Volumes). When you create the LVs you can specify if the data is striped or mirrored but the default is linear allocation. So it would use the extents in the first PV then the 2nd then the 3rd.
2) Can I find what disk a file or folder is physically on?
You can determine what PVs a LV has allocation extents on. But I don't know of a way to get that information for an individual file.
3) If I lose a drive in the LVM, do I lose all data, or just data physically on that disk?
As Peter has said the blocks appear as 0's if a PV goes missing. So you can potentially do data recovery on files that are on the other PVs. But I wouldn't rely on it. You normally see LVM used in conjunction with RAIDs for this reason.
3dinfluence 3dinfluence 12k 1 1 gold badge 23 23 silver badges 38 38 bronze badges
add a comment | 2 I don't know the answer to #2, so I'll leave that to someone else. I suspect "no", but I'm willing to be happily surprised.
- So here's a derivative of my question: I have 3x1 TB drives and I want to use 3TB of that space. What's the best way to configure the drives so I am not splitting my data over folders/mountpoints? or is there a way at all, other than what I've implied above? – Luke has no name Dec 2 '10 at 5:12
- If you want to use 3TB and aren't willing to split data over folders/mount points I don't see any other way. There may be some virtual filesystem solution to this problem like unionfs although I'm not sure if it would solve your particular problem. But LVM is certainly the most straight forward and simple solution as such it's the one I'd go with. – 3dinfluence Dec 2 '10 at 14:51
1 is: you tell it, when you combine the physical volumes into a volume group.
3 is: it's effectively as if a huge chunk of your disk suddenly turned to badblocks. You can patch things back together with a new, empty drive to which you give the same UUID, and then run an fsck on any filesystems on logical volumes that went across the bad drive to hope you can salvage something.
And to the overall, unasked question: yeah, you probably don't really want to do that.
Oct 02, 2019 | serverfault.com
Can I recover a RAID 5 array if two drives have failed? Ask Question Asked 9 years ago Active 2 years, 3 months ago Viewed 58k times I have a Dell 2600 with 6 drives configured in a RAID 5 on a PERC 4 controller. 2 drives failed at the same time, and according to what I know a RAID 5 is recoverable if 1 drive fails. I'm not sure if the fact I had six drives in the array might save my skin.
I bought 2 new drives and plugged them in but no rebuild happened as I expected. Can anyone shed some light? raid raid5 dell-poweredge share Share a link to this question
add a comment | 4 Answers 4 active oldest votes11 Regardless of how many drives are in use, a RAID 5 array only allows for recovery in the event that just one disk at a time fails.
What 3molo says is a fair point but even so, not quite correct I think - if two disks in a RAID5 array fail at the exact same time then a hot spare won't help, because a hot spare replaces one of the failed disks and rebuilds the array without any intervention, and a rebuild isn't possible if more than one disk fails.
For now, I am sorry to say that your options for recovering this data are going to involve restoring a backup.
For the future you may want to consider one of the more robust forms of RAID (not sure what options a PERC4 supports) such as RAID 6 or a nested RAID array . Once you get above a certain amount of disks in an array you reach the point where the chance that more than one of them can fail before a replacement is installed and rebuilt becomes unacceptably high. share Share a link to this answer Copy link | improve this answer edited Jun 8 '12 at 13:37
longneck 21.1k 3 3 gold badges 43 43 silver badges 76 76 bronze badges answered Sep 21 '10 at 14:43
Rob Moir Rob Moir 30k 4 4 gold badges 53 53 silver badges 84 84 bronze badges
add a comment | 2 You can try to force one or both of the failed disks to be online from the BIOS interface of the controller. Then check that the data and the file system are consistent. share Share a link to this answer Copy link | improve this answer answered Sep 21 '10 at 15:35
- 1 thanks robert I will take this advise into consideration when I rebuild the server, lucky for me I full have backups that are less than 6 hours old. regards – bonga86 Sep 21 '10 at 15:00
- If this is (somehow) likely to occur again in the future, you may consider RAID6. Same idea as RAID5 but with two Parity disks, so the array can survive any two disks failing. – gWaldo Sep 21 '10 at 15:04
- g man(mmm...), i have recreated the entire system from scratch with a RAID 10. So hopefully if 2 drives go out at the same time again the system will still function? Otherwise everything has been restored and working thanks for ideas and input – bonga86 Sep 23 '10 at 11:34
- Depends which two drives go... RAID 10 means, for example, 4 drives in two mirrored pairs (2 RAID 1 mirrors) striped together (RAID 0) yes? If you lose both disks in 1 of the mirrors then you've still got an outage. – Rob Moir Sep 23 '10 at 11:43
- 1 Remember, that RAID is not a backup. No more robust forms of RAID will save you from data corruption. – Kazimieras Aliulis May 31 '13 at 10:57
Mircea Vutcovici Mircea Vutcovici 13.6k 3 3 gold badges 42 42 silver badges 69 69 bronze badges
add a comment | 2 Direct answer is "No". In-direct -- "It depends". Mainly it depends on whether disks are partially out of order, or completely. In case there're partially broken, you can give it a try -- I would copy (using tool like ddrescue) both failed disks. Then I'd try to run the bunch of disks using Linux SoftRAID -- re-trying with proper order of disks and stripe-size in read-only mode and counting CRC mismatches. It's quite doable, I should say -- this text in Russian mentions 12 disk RAID50's recovery using LSR , for example. share Share a link to this answer Copy link | improve this answer edited Jun 8 '12 at 15:12
- 2 Dell systems, especially, in my experience, built on PERC3 or PERC4 cards had a nasty tendency to simply have a hiccup on the SCSI bus which would know two or more drives off-line. A drive being offline does NOT mean it failed. I've never had a two drives fail at the same time, but probably a half dozen times, I've had two or more drives go off-line. I suggest you try Mircea's suggestion first... could save you a LOT of time. – Multiverse IT Sep 21 '10 at 16:32
- Hey guys, i tried the force option many times. Both "failed" drives would than come back online, but when I do a restart it says logical drive :degraded and obviously because of that they system still could not boot. – bonga86 Sep 23 '10 at 11:27
Skyhawk 13.5k 3 3 gold badges 45 45 silver badges 91 91 bronze badges answered Jun 8 '12 at 14:11
poige poige 7,370 2 2 gold badges 16 16 silver badges 38 38 bronze badges add a comment | 0 It is possible if raid was with one spare drive , and one of your failed disks died before the second one. So, you just need need to try reconstruct array virtually with 3d party software . Found small article about this process on this page: http://www.angeldatarecovery.com/raid5-data-recovery/
And, if you realy need one of died drives you can send it to recovery shops. With of this images you can reconstruct raid properly with good channces.
Sep 23, 2019 | linuxconfig.org
Contents
- Details
- Egidio Docile
- System Administration
- 15 September 2019
In this article we will talk about
foremost, a very useful open source forensic utility which is able to recover deleted files using the technique calleddata carving. The utility was originally developed by the United States Air Force Office of Special Investigations, and is able to recover several file types (support for specific file types can be added by the user, via the configuration file). The program can also work on partition images produced by dd or similar tools.In this tutorial you will learn:
- How to install foremost
- How to use foremost to recover deleted files
- How to add support for a specific file type
<img src=https://linuxconfig.org/images/foremost_manual.png alt=foremost-manual width=1200 height=675 /> Foremost is a forensic data recovery program for Linux used to recover files using their headers, footers, and data structures through a process known as file carving. Software Requirements and Conventions Used
Installation
Software Requirements and Linux Command Line Conventions Category Requirements, Conventions or Software Version Used System Distribution-independent Software The "foremost" program Other Familiarity with the command line interface Conventions # - requires given linux commands to be executed with root privileges either directly as a root user or by use of sudocommand
$ - requires given linux commands to be executed as a regular non-privileged userSince
foremostis already present in all the major Linux distributions repositories, installing it is a very easy task. All we have to do is to use our favorite distribution package manager. On Debian and Ubuntu, we can useapt:$ sudo apt install foremostIn recent versions of Fedora, we use the
dnfpackage manager to install packages , thednfis a successor ofyum. The name of the package is the same:$ sudo dnf install foremostIf we are using ArchLinux, we can use
pacmanto installforemost. The program can be found in the distribution "community" repository:$ sudo pacman -S foremost
SUBSCRIBE TO NEWSLETTER
Subscribe to Linux Career NEWSLETTER and receive latest Linux news, jobs, career advice and tutorials.
Basic usageWARNING
No matter which file recovery tool or process your are going to use to recover your files, before you begin it is recommended to perform a low level hard drive or partition backup, hence avoiding an accidental data overwrite !!! In this case you may re-try to recover your files even after unsuccessful recovery attempt. Check the following dd command guide on how to perform hard drive or partition low level backup.The
foremostutility tries to recover and reconstruct files on the base of their headers, footers and data structures, without relying onfilesystem metadata. This forensic technique is known asfile carving. The program supports various types of files, as for example:
- jpg
- gif
- png
- bmp
- avi
- exe
- mpg
- wav
- riff
- wmv
- mov
- ole
- doc
- zip
- rar
- htm
- cpp
The most basic way to use
foremostis by providing a source to scan for deleted files (it can be either a partition or an image file, as those generated withdd). Let's see an example. Imagine we want to scan the/dev/sdb1partition: before we begin, a very important thing to remember is to never store retrieved data on the same partition we are retrieving the data from, to avoid overwriting delete files still present on the block device. The command we would run is:$ sudo foremost -i /dev/sdb1By default, the program creates a directory called
outputinside the directory we launched it from and uses it as destination. Inside this directory, a subdirectory for each supported file type we are attempting to retrieve is created. Each directory will hold the corresponding file type obtained from the data carving process:output ├── audit.txt ├── avi ├── bmp ├── dll ├── doc ├── docx ├── exe ├── gif ├── htm ├── jar ├── jpg ├── mbd ├── mov ├── mp4 ├── mpg ├── ole ├── pdf ├── png ├── ppt ├── pptx ├── rar ├── rif ├── sdw ├── sx ├── sxc ├── sxi ├── sxw ├── vis ├── wav ├── wmv ├── xls ├── xlsx └── zipWhen
foremostcompletes its job, empty directories are removed. Only the ones containing files are left on the filesystem: this let us immediately know what type of files were successfully retrieved. By default the program tries to retrieve all the supported file types; to restrict our search, we can, however, use the-toption and provide a list of the file types we want to retrieve, separated by a comma. In the example below, we restrict the search only togifand$ sudo foremost -t gif,pdf -i /dev/sdb1In this video we will test the forensic data recovery program Foremost to recover a single https://www.youtube.com/embed/58S2wlsJNvo
pngfile from/dev/sdb1partition formatted with theEXT4filesystem.
Specifying an alternative destinationAs we already said, if a destination is not explicitly declared, foremost creates an
outputdirectory inside ourcwd. What if we want to specify an alternative path? All we have to do is to use the-ooption and provide said path as argument. If the specified directory doesn't exist, it is created; if it exists but it's not empty, the program throws a complain:ERROR: /home/egdoc/data is not empty Please specify another directory or run with -T.To solve the problem, as suggested by the program itself, we can either use another directory or re-launch the command with the
-Toption. If we use the-Toption, the output directory specified with the-ooption is timestamped. This makes possible to run the program multiple times with the same destination. In our case the directory that would be used to store the retrieved files would be:/home/egdoc/data_Thu_Sep_12_16_32_38_2019The configuration fileThe
foremostconfiguration file can be used to specify file formats not natively supported by the program. Inside the file we can find several commented examples showing the syntax that should be used to accomplish the task. Here is an example involving thepngtype (the lines are commented since the file type is supported by default):# PNG (used in web pages) # (NOTE THIS FORMAT HAS A BUILTIN EXTRACTION FUNCTION) # png y 200000 \x50\x4e\x47? \xff\xfc\xfd\xfeThe information to provide in order to add support for a file type, are, from left to right, separated by a tab character: the file extension (
pngin this case), whether the header and footer are case sensitive (y), the maximum file size in Bytes (200000), the header (\x50\x4e\x47?) and and the footer (\xff\xfc\xfd\xfe). Only the latter is optional and can be omitted.If the path of the configuration file it's not explicitly provided with the
-coption, a file namedforemost.confis searched and used, if present, in the current working directory. If it is not found the default configuration file,/etc/foremost.confis used instead.Adding the support for a file type
By reading the examples provided in the configuration file, we can easily add support for a new file type. In this example we will add support for
flacaudio files.Flac(Free Lossless Audio Coded) is a non-proprietary lossless audio format which is able to provide compressed audio without quality loss. First of all, we know that the header of this file type in hexadecimal form is66 4C 61 43 00 00 00 22(fLaCin ASCII), and we can verify it by using a program likehexdumpon a flac file:$ hexdump -C blind_guardian_war_of_wrath.flac|head 00000000 66 4c 61 43 00 00 00 22 12 00 12 00 00 00 0e 00 |fLaC..."........| 00000010 36 f2 0a c4 42 f0 00 4d 04 60 6d 0b 64 36 d7 bd |6...B..M.`m.d6..| 00000020 3e 4c 0d 8b c1 46 b6 fe cd 42 04 00 03 db 20 00 |>L...F...B.... .| 00000030 00 00 72 65 66 65 72 65 6e 63 65 20 6c 69 62 46 |..reference libF| 00000040 4c 41 43 20 31 2e 33 2e 31 20 32 30 31 34 31 31 |LAC 1.3.1 201411| 00000050 32 35 21 00 00 00 12 00 00 00 54 49 54 4c 45 3d |25!.......TITLE=| 00000060 57 61 72 20 6f 66 20 57 72 61 74 68 11 00 00 00 |War of Wrath....| 00000070 52 45 4c 45 41 53 45 43 4f 55 4e 54 52 59 3d 44 |RELEASECOUNTRY=D| 00000080 45 0c 00 00 00 54 4f 54 41 4c 44 49 53 43 53 3d |E....TOTALDISCS=| 00000090 32 0c 00 00 00 4c 41 42 45 4c 3d 56 69 72 67 69 |2....LABEL=Virgi|As you can see the file signature is indeed what we expected. Here we will assume a maximum file size of 30 MB, or 30000000 Bytes. Let's add the entry to the file:
flac y 30000000 \x66\x4c\x61\x43\x00\x00\x00\x22The
footersignature is optional so here we didn't provide it. The program should now be able to recover deletedflacfiles. Let's verify it. To test that everything works as expected I previously placed, and then removed, a flac file from the/dev/sdb1partition, and then proceeded to run the command:$ sudo foremost -i /dev/sdb1 -o $HOME/Documents/outputAs expected, the program was able to retrieve the deleted flac file (it was the only file on the device, on purpose), although it renamed it with a random string. The original filename cannot be retrieved because, as we know, files metadata is contained in the filesystem, and not in the file itself:
/home/egdoc/Documents └── output ├── audit.txt └── flac └── 00020482.flac
The audit.txt file contains information about the actions performed by the program, in this case:
Foremost version 1.5.7 by Jesse Kornblum, Kris Kendall, and Nick Mikus Audit File Foremost started at Thu Sep 12 23:47:04 2019 Invocation: foremost -i /dev/sdb1 -o /home/egdoc/Documents/output Output directory: /home/egdoc/Documents/output Configuration file: /etc/foremost.conf ------------------------------------------------------------------ File: /dev/sdb1 Start: Thu Sep 12 23:47:04 2019 Length: 200 MB (209715200 bytes) Num Name (bs=512) Size File Offset Comment 0: 00020482.flac 28 MB 10486784 Finish: Thu Sep 12 23:47:04 2019 1 FILES EXTRACTED flac:= 1 ------------------------------------------------------------------ Foremost finished at Thu Sep 12 23:47:04 2019ConclusionIn this article we learned how to use foremost, a forensic program able to retrieve deleted files of various types. We learned that the program works by using a technique called
data carving, and relies on files signatures to achieve its goal. We saw an example of the program usage and we also learned how to add the support for a specific file type using the syntax illustrated in the configuration file. For more information about the program usage, please consult its manual page.
Linux® systems are often installed on multiple partitions, each of which has a fixed size. As your needs change, though, it is often necessary to resize partitions to suit your changing needs. Several tools exist to do this in Linux, but there are a number of potential pitfalls and restrictions that can make the task more difficult than it might at first seem. This article guides you through the task of resizing Linux partitions, beginning with basic preparations and moving on to common resizing scenarios using graphical user interface (GUI) tools.
Darik's Boot and Nuke ("DBAN") is a self-contained boot disk that securely wipes the hard disks of most computers. DBAN will automatically and completely delete the contents of any hard disk that it can detect, which makes it an appropriate utility for bulk or emergency data destruction.
Disk /dev/dm-0 doesn't contain a valid partition table
This has been very helpful to me. I found this thread by Goggle on
dm-0 because I also got the no partition table error message.Here is what I think:
When the programs fdisk and sfdisk are run with the option -l and no argument, e.g.
# /sbin/fdisk -lthey look for all devices that can have cylinders, heads, sectors, etc.
If they find such a device, they output that information to standard
output and they output the partition table to standard output. If there is
no partition table, they have an error message (also standard output).
One can see this by piping to 'less', e.g.
# /sbin/fdisk -l | less/dev/dm-0 ... /dev/dm3 on my fedora C5 system seem to be device mappers
associated with LVM.RAID might also require device mappers.
LinuxQuestions.org
If you run suse 10.3 yast > system > partitioner show you with part is used by suse ,and with part is still unused.
I know if you startup the partitioner it gives you a warning but as long as do not change any think every is oke
If according to the partitioner sdb is unused then you can do every think with it for instance to create a second primary partition for a second OS If you put GRUB of the second OS in the second primary partition Suse is still there
and must it be possible to change suse boot loader in that way that she also load the second OSBUt there are more ways to do what you like to do
all the best
For creating ext3 and xfs file systems, mkfs.ext3 and mkfs.xfs have
the -L option to specify the disk label that should be used. For
existing file systems, use e2label to label an ext2/ext3 file
system. And for xfs file systems, use xfs_admin. Both of these
commands can be used with the device to display the existing disk
label.Examples of initializing new file systems with a label:
mkfs.ext3 -L ROOT /dev/sda1
mkfs.xfs -L BIGRAID /dev/sde
Examples of e2label and xfs_admin for existing files systems:
e2label /dev/sda1 PRIMARY_ROOT
e2label /dev/sda1

xfs_admin -L DATA1 /dev/sdf
xfs_admin /dev/sdf
labeling swap devices
You can label a swap device by using the mkswap -L label option.
mkswap -L SWAP0 /dev/sdb5Alternative / by-id
Alternatively, you can use the udev by-id specification (look
in /dev/disk/by-id). The ID paths are usually pretty long
and less meaningful, but they are device specific and won't
change as a result of hardware changes. It's probably best to
use a disk label as above. However, for vfat/fat file systems
disk labels are not available so the by-id specification
should be used./dev/disk/by-id/scsi-3500000e01632b7d0-part2 swap swap defaults 0 0Examples of Use
Finally, the following are examples of using disk labels in
two key system files, fstab and grub.conf.Example of /etc/fstab with disk labels:
LABEL=ROOT          /         ext3    defaults        1 1
LABEL=BOOT          /boot     ext3    defaults        1 2
LABEL=SWAP          swap      swap    defaults        0 0
LABEL=HOME          /home     ext3    nosuid,auto     1 2
Example of /boot/grub/grub.conf with disk labels:
title astrid CentOS primary system
  root (hd0,0)
  kernel (hd0,0)/vmlinuz ro root=LABEL=ASTRID_ROOT0 rhgb quiet
  initrd (hd0,0)/initrd-astrid.img
Summary
Linux systems support disk labels via the udev device manager. Using disk
labels avoids hard coding device names which can change if there's a
change in the hardware configuration (disk added/removed). This will result
in a more robust system.
LinuxPlanet
The Linux kernel is a restless beast, and must continally evolve and change. Especially in ways that mystify us poor end lusers. A recent wrinkle, as of kernel version 2.6.20, is changing the /dev names for ATA devices, so that all ATA and SCSI devices are named /dev/sd*. This is a result of using the shiny new libata subsystem. In the olden days PATA (also called IDE) hard drives and ATAPI devices (CD/DVD, tape drives) were /dev/hd*, and SCSI and SATA devices were /dev/sd*.
However, not all Linux distributions default to using libata. *buntu Feisty and Gutsy are all over the map; some versions of them use the new naming convention, some don't, and I haven't figured out which ones, or why. You can see how your own system handles these names with a couple of simple commands. This example from Kubuntu Gutsy shows the old style:
$ ls /dev|grep '[s|h]d[a-z]'
hda
hda1
hda2
hdc
hdd
sda
sda1
sda2

$ mount|grep ^'/dev'
/dev/hda1 on / type ext3 (rw,errors=remount-ro)
/dev/sda1 on /home type ext3 (rw)
/dev/sda2 on /media/sda2 type ext3 (rw)
/dev/hda2 on /var type ext3 (rw)
The first command shows all the ATA and SCSI devices detected by your kernel. The second command shows which ones are mounted. On this system there is one PATA hard disk with two partitions (hda), two CD/DVD drives (hdc, hdd), and one SATA disk with two partitions (sda). When I boot into Fedora 8, which defaults to libata, it looks like this:
$ ls /dev|grep '[s|h]d[a-z]'
sda
sda1
sda2
sdb
sdb1
sdb2
Where are the two CD/DVD drives? These get /dev/sr* names under libata:$ ls /dev|grep sr sr0 sr1
Linux® systems are often installed on multiple partitions, each of which has a fixed size. As your needs change, though, it is often necessary to resize partitions to suit your changing needs. Several tools exist to do this in Linux, but there are a number of potential pitfalls and restrictions that can make the task more difficult than it might at first seem. This article guides you through the task of resizing Linux partitions, beginning with basic preparations and moving on to common resizing scenarios using graphical user interface (GUI) tools.
InformIT Understanding Memory Technology Devices in Embedded Linux What's Flash Memory
Linux Device Drivers, 2nd Edition Chapter 1 An Introduction to Device Drivers
Using Disk Labels on Linux File Systems - BigAdmin - wikis.sun.com
Darik's Boot and Nuke ("DBAN") is a self-contained boot disk that securely wipes the hard disks of most computers. DBAN will automatically and completely delete the contents of any hard disk that it can detect, which makes it an appropriate utility for bulk or emergency data destruction.
Partitioning with fdisk redhat.com
fdisk - Wikipedia, the free encyclopedia
Fdisk Tutorial Removing and Creating Partitions Windows installation Tech-R
Society
Groupthink : Two Party System as Polyarchy : Corruption of Regulators : Bureaucracies : Understanding Micromanagers and Control Freaks : Toxic Managers : Harvard Mafia : Diplomatic Communication : Surviving a Bad Performance Review : Insufficient Retirement Funds as Immanent Problem of Neoliberal Regime : PseudoScience : Who Rules America : Neoliberalism : The Iron Law of Oligarchy : Libertarian Philosophy
Quotes
War and Peace : Skeptical Finance : John Kenneth Galbraith :Talleyrand : Oscar Wilde : Otto Von Bismarck : Keynes : George Carlin : Skeptics : Propaganda : SE quotes : Language Design and Programming Quotes : Random IT-related quotes : Somerset Maugham : Marcus Aurelius : Kurt Vonnegut : Eric Hoffer : Winston Churchill : Napoleon Bonaparte : Ambrose Bierce : Bernard Shaw : Mark Twain Quotes
Bulletin:
Vol 25, No.12 (December, 2013) Rational Fools vs. Efficient Crooks The efficient markets hypothesis : Political Skeptic Bulletin, 2013 : Unemployment Bulletin, 2010 : Vol 23, No.10 (October, 2011) An observation about corporate security departments : Slightly Skeptical Euromaydan Chronicles, June 2014 : Greenspan legacy bulletin, 2008 : Vol 25, No.10 (October, 2013) Cryptolocker Trojan (Win32/Crilock.A) : Vol 25, No.08 (August, 2013) Cloud providers as intelligence collection hubs : Financial Humor Bulletin, 2010 : Inequality Bulletin, 2009 : Financial Humor Bulletin, 2008 : Copyleft Problems Bulletin, 2004 : Financial Humor Bulletin, 2011 : Energy Bulletin, 2010 : Malware Protection Bulletin, 2010 : Vol 26, No.1 (January, 2013) Object-Oriented Cult : Political Skeptic Bulletin, 2011 : Vol 23, No.11 (November, 2011) Softpanorama classification of sysadmin horror stories : Vol 25, No.05 (May, 2013) Corporate bullshit as a communication method : Vol 25, No.06 (June, 2013) A Note on the Relationship of Brooks Law and Conway Law
History:
Fifty glorious years (1950-2000): the triumph of the US computer engineering : Donald Knuth : TAoCP and its Influence of Computer Science : Richard Stallman : Linus Torvalds : Larry Wall : John K. Ousterhout : CTSS : Multix OS Unix History : Unix shell history : VI editor : History of pipes concept : Solaris : MS DOS : Programming Languages History : PL/1 : Simula 67 : C : History of GCC development : Scripting Languages : Perl history : OS History : Mail : DNS : SSH : CPU Instruction Sets : SPARC systems 1987-2006 : Norton Commander : Norton Utilities : Norton Ghost : Frontpage history : Malware Defense History : GNU Screen : OSS early history
Classic books:
The Peter Principle : Parkinson Law : 1984 : The Mythical Man-Month : How to Solve It by George Polya : The Art of Computer Programming : The Elements of Programming Style : The Unix Hater’s Handbook : The Jargon file : The True Believer : Programming Pearls : The Good Soldier Svejk : The Power Elite
Most popular humor pages:
Manifest of the Softpanorama IT Slacker Society : Ten Commandments of the IT Slackers Society : Computer Humor Collection : BSD Logo Story : The Cuckoo's Egg : IT Slang : C++ Humor : ARE YOU A BBS ADDICT? : The Perl Purity Test : Object oriented programmers of all nations : Financial Humor : Financial Humor Bulletin, 2008 : Financial Humor Bulletin, 2010 : The Most Comprehensive Collection of Editor-related Humor : Programming Language Humor : Goldman Sachs related humor : Greenspan humor : C Humor : Scripting Humor : Real Programmers Humor : Web Humor : GPL-related Humor : OFM Humor : Politically Incorrect Humor : IDS Humor : "Linux Sucks" Humor : Russian Musical Humor : Best Russian Programmer Humor : Microsoft plans to buy Catholic Church : Richard Stallman Related Humor : Admin Humor : Perl-related Humor : Linus Torvalds Related humor : PseudoScience Related Humor : Networking Humor : Shell Humor : Financial Humor Bulletin, 2011 : Financial Humor Bulletin, 2012 : Financial Humor Bulletin, 2013 : Java Humor : Software Engineering Humor : Sun Solaris Related Humor : Education Humor : IBM Humor : Assembler-related Humor : VIM Humor : Computer Viruses Humor : Bright tomorrow is rescheduled to a day after tomorrow : Classic Computer Humor
The Last but not Least Technology is dominated by two types of people: those who understand what they do not manage and those who manage what they do not understand ~Archibald Putt. Ph.D
Copyright © 1996-2021 by Softpanorama Society. www.softpanorama.org was initially created as a service to the (now defunct) UN Sustainable Development Networking Programme (SDNP) without any remuneration. This document is an industrial compilation designed and created exclusively for educational use and is distributed under the Softpanorama Content License. Original materials copyright belong to respective owners. Quotes are made for educational purposes only in compliance with the fair use doctrine.
FAIR USE NOTICE This site contains copyrighted material the use of which has not always been specifically authorized by the copyright owner. We are making such material available to advance understanding of computer science, IT technology, economic, scientific, and social issues. We believe this constitutes a 'fair use' of any such copyrighted material as provided by section 107 of the US Copyright Law according to which such material can be distributed without profit exclusively for research and educational purposes.
This is a Spartan WHYFF (We Help You For Free) site written by people for whom English is not a native language. Grammar and spelling errors should be expected. The site contain some broken links as it develops like a living tree...
|
|
You can use PayPal to to buy a cup of coffee for authors of this site |
Disclaimer:
The statements, views and opinions presented on this web page are those of the author (or referenced source) and are not endorsed by, nor do they necessarily reflect, the opinions of the Softpanorama society. We do not warrant the correctness of the information provided or its fitness for any purpose. The site uses AdSense so you need to be aware of Google privacy policy. You you do not want to be tracked by Google please disable Javascript for this site. This site is perfectly usable without Javascript.
Last modified: June 11, 2021


